Adobe Acrobat For Dummies

by Greg Harvey
Adobe
®
Acrobat
®
6 PDF
FOR
DUMmIES
‰

Adobe
Acrobat
6 PDF For Dummies
Published by
Wiley Publishing, Inc.
909 Third Avenue
New York, NY 10022
www.wiley.com
Copyright 2003 by Wiley Publishing, Inc., Indianapolis, Indiana
Published by Wiley Publishing, Inc., Indianapolis, Indiana
Published simultaneously in Canada
No part of this publication may be reproduced, stored in a retrieval system or transmitted in any form
or by any means, electronic, mechanical, photocopying, recording, scanning or otherwise, except as
permitted under Sections 107 or 108 of the 1976 United States Copyright Act, without either the prior
written permission of the Publisher, or authorization through payment of the appropriate per-copy fee to
the Copyright Clearance Center, 222 Rosewood Drive, Danvers, MA 01923, (978) 750-8400, fax (978) 646-
8700. Requests to the Publisher for permission should be addressed to the Legal Department, Wiley
Publishing, Inc., 10475 Crosspoint Blvd., Indianapolis, IN 46256, (317) 572-3447, fax (317) 572-4447, e-mail:
permcoordinator@wiley.com.
Trademarks: Wiley, the Wiley Publishing logo, For Dummies, the Dummies Man logo, A Reference for the
Rest of Us!, The Dummies Way, Dummies Daily, The Fun and Easy Way, Dummies.com and related trade
dress are trademarks or registered trademarks of Wiley Publishing, Inc., in the United States and other
countries, and may not be used without written permission. Adobe and Acrobat are trademarks or regis-
tered trademarks of Adobe Systems Incorporated. All other trademarks are the property of their respective
owners. Wiley Publishing, Inc., is not associated with any product or vendor mentioned in this book.
LIMIT OF LIABILITY/DISCLAIMER OF WARRANTY: WHILE THE PUBLISHER AND AUTHOR HAVE USED
THEIR BEST EFFORTS IN PREPARING THIS BOOK, THEY MAKE NO REPRESENTATIONS OR WARRANTIES
WITH RESPECT TO THE ACCURACY OR COMPLETENESS OF THE CONTENTS OF THIS BOOK AND SPECIF-
ICALLY DISCLAIM ANY IMPLIED WARRANTIES OF MERCHANTABILITY OR FITNESS FOR A PARTICULAR
PURPOSE. NO WARRANTY MAY BE CREATED OR EXTENDED BY SALES REPRESENTATIVES OR WRITTEN
SALES MATERIALS. THE ADVICE AND STRATEGIES CONTAINED HEREIN MAY NOT BE SUITABLE FOR
YOUR SITUATION. YOU SHOULD CONSULT WITH A PROFESSIONAL WHERE APPROPRIATE. NEITHER
THE PUBLISHER NOR AUTHOR SHALL BE LIABLE FOR ANY LOSS OF PROFIT OR ANY OTHER COM-
MERCIAL DAMAGES, INCLUDING BUT NOT LIMITED TO SPECIAL, INCIDENTAL, CONSEQUENTIAL, OR
OTHER DAMAGES.
For general information on our other products and services or to obtain technical support, please contact
our Customer Care Department within the U.S. at 800-762-2974, outside the U.S. at 317-572-3993, or fax
317-572-4002.
Wiley also publishes its books in a variety of electronic formats. Some content that appears in print may
not be available in electronic books.
Library of Congress Control Number: 2003105653
ISBN: 0-7645-3760-1
Manufactured in the United States of America
10 9 8 7 6 5 4 3 2 1
1O/SR/QX/QT/IN
is a trademark of Wiley Publishing, Inc.
About the Author
Greg Harvey, the author of more than 50 computer books, has had a long
career of teaching business people in the use of IBM PC, Windows, and
Macintosh software application programs. From 1983 to 1988, he conducted
hands-on computer software training for corporate business users with a
variety of training companies (including his own, PC Teach). From 1988 to
1992, he taught university classes in Lotus 1-2-3 and Introduction to Database
Management Technology (using dBASE) in the Department of Information
Systems at Golden State University in San Francisco.
In mid-1993, Greg started a new multimedia publishing venture called mind
over media. As a multimedia developer, he hopes to enliven his future com-
puter books by making them into true interactive learning experiences that
will vastly enrich and improve the training of users of all skill levels. You can
send him e-mail at
gharvey@mindovermedia.com and visit his Web site at
www.mindovermedia.com.
In 1999, Greg began graduate school at the California Institute of Integral
Studies (CIIS) in San Francisco. In the summer of 2000, he received his master’s
degree in philosophy and religion in the area of Asian and Comparative Studies.
Currently, he has finished all his coursework in the Ph.D. program at CIIS and is
getting ready to begin work on his dissertation in the area of Chinese and
Tibetan end-of-life religious beliefs.
Dedication
To Chris for his unflagging support and encouragement
Author’s Acknowledgments
Let me take this opportunity to thank all the people, both at Wiley Publishing,
Inc., and at Mind over Media, Inc., whose dedication and talent combined to
get this book out and into your hands in such great shape.
At Wiley Publishing, Inc., I want to thank Steve Hayes and Tiffany Franklin for
their considerable help in getting this project underway, Christine Berman
for her tremendous expertise as project editor, and Jean Rogers for her great
skill as the copy editor, for making sure that the project stayed on course and
made it into production so that all the talented folks on the Production team
could create this great final product.
At Mind over Media, I want to give a special thanks to Michael Bryant, the
person primarily responsible for the updating and reorganizing all the mater-
ial for this 6.0 version of the software covered in this new edition of the book
(fantastic job, Michael!).

Publisher’s Acknowledgments
We’re proud of this book; please send us your comments through our online registration form
located at
www.dummies.com/register/.
Some of the people who helped bring this book to market include the following:
Acquisitions, Editorial, and Media
Development
Project Editor: Christine Berman
Acquisitions Editor: Tiffany Franklin
Copy Editor: Jean Rogers
Technical Editor: Gordon Kent
Editorial Manager: Leah Cameron
Media Development Manager: Laura VanWinkle
Media Development Supervisor: Richard Graves
Editorial Assistant: Amanda Foxworth
Cartoons: Rich Tennant,
www.the5thwave.com
Production
Project Coordinators: Nancee Reeves,
Regina Snyder
Layout and Graphics: Seth Conley,
Carrie Foster, LeAndra Hosier,
Michael Kruzil, Janet Seib
Proofreaders: Laura Albert, Angel Perez,
Carl Pierce, Kathy Simpson,
Techbooks Production Services
Indexer: Techbooks Production Services
Publishing and Editorial for Technology Dummies
Richard Swadley, Vice President and Executive Group Publisher
Andy Cummings, Vice President and Publisher
Mary C. Corder, Editorial Director
Publishing for Consumer Dummies
Diane Graves Steele, Vice President and Publisher
Joyce Pepple, Acquisitions Director
Composition Services
Gerry Fahey, Vice President of Production Services
Debbie Stailey, Director of Composition Services

Contents at a Glance
Introduction .................................................................1
Part I: Presenting Acrobat and PDF Files .......................7
Chapter 1: The Ins and Outs of PDF Files .......................................................................9
Chapter 2: Accessing PDF Files ......................................................................................21
Chapter 3: Getting Acquainted with Acrobat 6 ............................................................53
Part II: The Wealth of Ways for Creating PDF Files ......79
Chapter 4: Distilling PDF Files ........................................................................................81
Chapter 5: Converting Microsoft Office Documents .................................................107
Chapter 6: Capturing Paper Documents .....................................................................121
Chapter 7: Capturing Web Pages .................................................................................133
Chapter 8: Printing PDF Files .......................................................................................147
Part III: Reviewing, Editing, and Securing PDFs ........159
Chapter 9: Annotating PDF Files for Review ..............................................................161
Chapter 10: Editing PDF Files .......................................................................................203
Chapter 11: Securing PDF Files ....................................................................................239
Chapter 12: Extracting Text and Graphics from PDF Files .......................................263
Chapter 13: Cataloging and Distributing PDF Files ...................................................275
Part IV: PDFs as Electronic Documents ......................291
Chapter 14: Creating Interactive Forms ......................................................................293
Chapter 15: Building and Publishing eBooks .............................................................327
Chapter 16: Making PDFs into Multimedia Presentations ........................................355
Part V: The Part of Tens ...........................................377
Chapter 17: Top Ten Third-Party Acrobat Plug-Ins ...................................................379
Chapter 18: Top Ten Online Resources ......................................................................383
Index .......................................................................387


Table of Contents
Introduction..................................................................1
About This Book ..............................................................................................1
How to Use This Book ....................................................................................2
What You Can Safely Ignore ...........................................................................2
Foolish Assumptions ......................................................................................3
How This Book Is Organized ..........................................................................3
Part I: Presenting Acrobat and PDF Files ............................................3
Part II: The Wealth of Ways for Creating PDF Files ............................4
Part III: Reviewing, Editing, and Securing PDFs .................................4
Part IV: PDFs as Electronic Documents ..............................................4
Part V: The Part of Tens ........................................................................5
Conventions Used in This Book ....................................................................5
Keyboard and mouse ............................................................................5
Special icons ..........................................................................................6
Where to Go from Here ...................................................................................6
Part I: Presenting Acrobat and PDF Files .......................7
Chapter 1: The Ins and Outs of PDF Files . . . . . . . . . . . . . . . . . . . . . . . . .9
The Purpose of PDF Files ...............................................................................9
Benefits of Using PDF Files ...........................................................................11
What you designed is what they see ................................................12
PDF files in the review cycle ..............................................................12
Providing forms, both paper and electronic ....................................12
Document archiving ............................................................................15
PDF in the prepress workflow ............................................................16
Quick and easy Web site retrieval .....................................................16
PDF files as slide shows and multimedia presentations ................17
The Different Types of PDF Files .................................................................18
Chapter 2: Accessing PDF Files . . . . . . . . . . . . . . . . . . . . . . . . . . . . . . . .21
Perusing PDF Files in Adobe Reader ...........................................................21
Downloading and launching Adobe Reader 6 ..................................23
The Adobe Reader window ................................................................26
Navigating PDF documents ................................................................37
Perusing PDF Files in Acrobat 6 ..................................................................42
Reading eBooks with Adobe Reader and Acrobat 6 .................................43
I want my DRM .....................................................................................43
Using the Adobe DRM Activator ........................................................44
Dusting Off My Bookshelf ...................................................................45
Browsing PDF Files in a Web Browser ........................................................50

Chapter 3: Getting Acquainted with Acrobat 6 . . . . . . . . . . . . . . . . . . .53
Launching Acrobat 6 .....................................................................................53
Opening PDF files for viewing or editing ..........................................54
Arranging open PDF files in the Acrobat window ...........................55
Closing open PDF files ........................................................................56
Getting Comfy with the Acrobat 6 Interface ..............................................57
What’s good on the Acrobat 6 menus today? ..................................57
Tons o’ toolbars! ..................................................................................68
Getting all the help you need .............................................................73
Viewing the How To window ..............................................................74
Making quick use of keyboard shortcuts .........................................75
Part II: The Wealth of Ways for Creating PDF Files .......79
Chapter 4: Distilling PDF Files . . . . . . . . . . . . . . . . . . . . . . . . . . . . . . . . .81
Common Ways to Create PDF Files .............................................................81
Put away that PDFWriter! ...................................................................82
Using Create PDF in Acrobat 6 ...........................................................82
Using the Acrobat 6 Distiller ........................................................................84
To every PDF there is a purpose . . . .................................................86
Automatically displaying your distilled file in Acrobat ..................88
Making Adobe PDF settings of your very own .................................89
Selecting security settings for the new PDF file ............................101
Automated PDF files — would you watch this folder for me? .....102
Making Acrobat Distiller your printer ............................................104
PDF Files Courtesy of Adobe PDF Online .................................................105
Chapter 5: Converting Microsoft Office Documents . . . . . . . . . . . . .107
Using PDFMaker in Microsoft Office for Windows ..................................108
Automatically viewing the converted PDF in Acrobat ..................109
Converting and e-mailing PDF files .................................................110
Customizing the PDF conversion settings ......................................111
Converting Office documents to PDF and sending
them for review ..............................................................................117
Converting Office X files on the Mac ..............................................118
Chapter 6: Capturing Paper Documents . . . . . . . . . . . . . . . . . . . . . . . .121
Scanning Paper Documents in Acrobat 6 .................................................121
Making scanned documents searchable and editable ..................125
Correcting Paper Capture boo-boos ...............................................127
Importing Previously Scanned Documents into Acrobat .......................129
Using the Paper Capture Online Service ..................................................130
Adobe Acrobat 6 PDF For Dummies
viii

Chapter 7: Capturing Web Pages . . . . . . . . . . . . . . . . . . . . . . . . . . . . . .133
Opening Web Pages as PDF Files ...............................................................134
Browsing captured Web pages in Acrobat or Adobe Reader ......136
Modifying the Web capture preferences ........................................140
Modifying the Web capture conversion settings ...........................141
Adding Web Pages to a PDF File ................................................................143
Adding linked pages to a PDF file ....................................................143
Refreshing updated content .............................................................144
Chapter 8: Printing PDF Files . . . . . . . . . . . . . . . . . . . . . . . . . . . . . . . . .147
Printing PDF Files ........................................................................................147
Printing document layers .................................................................150
Printing selected pages ....................................................................152
Printing oversized documents .........................................................154
Using the prepress printing settings ...............................................155
Troubleshooting Printing Problems .........................................................155
Using PrintMe Internet Printing ................................................................156
Part III: Reviewing, Editing, and Securing PDFs .........159
Chapter 9: Annotating PDF Files for Review . . . . . . . . . . . . . . . . . . . .161
Sending Out PDF Files for Review in Windows ........................................161
Initiating an e-mail-based review .....................................................162
Participating in an e-mail-based review ..........................................164
Setting up a browser-based review .................................................164
Managing reviews with the Review Tracker ..................................169
The Ins and Outs of Bookmarks ................................................................171
Generating automated bookmarks ..................................................171
Creating manual bookmarks ............................................................173
Editing bookmarks ............................................................................174
Inserting Document Comments with the Commenting Toolbar ...........176
Using the Note tool ...........................................................................177
Using the Stamp tool .........................................................................180
Hitting the highlights ........................................................................184
Inserting Document Comments with the Advanced
Commenting Toolbar ..............................................................................186
Using the Text Box tool .....................................................................186
Using the Attach Sound tool ............................................................188
Using the File Attachment tool ........................................................190
Mark it well .........................................................................................191
Spelling it out .....................................................................................193
ix
Table of Contents

Viewing Comments in a PDF Document ...................................................195
Summing up .......................................................................................195
Showing and hiding comments ........................................................196
Finding comments .............................................................................198
Removing all comments ...................................................................201
Chapter 10: Editing PDF Files . . . . . . . . . . . . . . . . . . . . . . . . . . . . . . . . .203
Touching Up the Text and Graphics .........................................................204
Using the TouchUp Text tool to edit text .......................................204
Editing text from the context menu ................................................206
Modifying text attributes ..................................................................207
Touching up your graphic images ...................................................208
Page-Editing Practices ................................................................................212
Rotating pages ...................................................................................212
Cropping pages ..................................................................................213
Replacing pages from other PDF files .............................................215
Inserting and deleting pages ............................................................217
Reordering the pages ........................................................................219
Renumbering the thumbnail pages .................................................219
Adding Headers and Footers to a PDF Document ...................................221
Adding Watermarks and Backgrounds to PDF Documents ....................223
Adding Articles to a PDF Document .........................................................225
Defining articles .................................................................................226
Checking the flow of a new article ..................................................228
Editing Document Layers in a PDF File .....................................................229
Flattening PDF layers ........................................................................230
Merging PDF layers ............................................................................231
Batch Processing to the Rescue ................................................................232
Editing batch sequences ..................................................................233
Creating new batch sequences ........................................................233
Chapter 11: Securing PDF Files . . . . . . . . . . . . . . . . . . . . . . . . . . . . . . .239
Protecting PDF Files ....................................................................................239
Checking a document’s security settings .......................................240
Securing files with low or high encryption ....................................241
Signing Off Digital Style ..............................................................................244
Setting up your profile ......................................................................245
Modifying the user settings in a profile ..........................................246
Signing a PDF document ...................................................................250
Validating digital signatures .............................................................255
Comparing signed documents .........................................................259
Encrypting PDF Files ...................................................................................261
Adobe Acrobat 6 PDF For Dummies
x

Chapter 12: Extracting Text and Graphics from PDF Files . . . . . . . .263
Extracting Blocks of Text ...........................................................................264
Using drag-and-drop to copy text ....................................................265
Selecting columns of text .................................................................266
Selecting tables and formatted text ................................................268
Selecting and Copying Graphic Images ....................................................270
Exporting Images in Various Graphics Formats ......................................271
Saving Entire PDF Files in a New File Format ...........................................272
Saving PDF files as text files .............................................................272
Saving PDF files as HTML files .........................................................273
Chapter 13: Cataloging and Distributing PDF Files . . . . . . . . . . . . . .275
Cataloging 101 .............................................................................................275
Creating the PDF document collection ...........................................276
Building an index for your collection .............................................278
Rebuilding an index ...........................................................................281
Searching a Collection ................................................................................283
Viewing the search results ...............................................................286
Refining your search .........................................................................287
Adding document information (metadata) and date
filtering to your searches ..............................................................288
Distributing PDF Document Collections ...................................................289
Part IV: PDFs as Electronic Documents ......................291
Chapter 14: Creating Interactive Forms . . . . . . . . . . . . . . . . . . . . . . . .293
Introducing Form Fields .............................................................................293
Adding Fields to Forms ...............................................................................294
Move those fields! .............................................................................297
Duplicating form fields .....................................................................298
Getting Acquainted with Form Field Tools ..............................................299
Selecting Form Field Options .....................................................................300
Jawing about General tab options ...................................................300
Applying Appearance tab options ...................................................301
Understanding the Options tab .......................................................303
Interacting with the Actions tab ......................................................306
Getting familiar with the Format tab ...............................................314
Viewing the Validate tab ...................................................................315
Cruising the Calculate tab ................................................................316
Sizing up the Selection Change tab .................................................317
Singling out the Signed tab ...............................................................318
Looking at the Layout Grid ..............................................................319
What to do with all these fields? .....................................................323
xi
Table of Contents

Chapter 15: Building and Publishing eBooks . . . . . . . . . . . . . . . . . . .327
But First, a Little eBook History . . . ..........................................................327
Designing eBooks for Different Devices ...................................................329
Turning Out Tagged PDF Files ...................................................................331
Perfecting your eBook in PageMaker ..............................................331
What about other layout programs? ...............................................340
Designing Library and Cover Graphics ....................................................343
Adding a cover graphic to your PDF eBook ...................................344
Adding a library thumbnail graphic to your PDF eBook ..............346
Links ..............................................................................................................348
Adding an internal link .....................................................................348
Using Link Properties options .........................................................350
Adding an external link .....................................................................350
Controlling the Way Text Flows .................................................................351
Distributing Your eBooks ...........................................................................353
Chapter 16: Making PDFs into Multimedia Presentations . . . . . . . .355
Converting a Presentation to PDF .............................................................356
Building Your Own PDF Presentation .......................................................357
Having Fun with Photoshop .......................................................................358
Using Multimedia Objects in a Presentation ...........................................361
Inserting a movie in a presentation ................................................362
Inserting a sound in a presentation ................................................366
Making Your Presentation Interactive ......................................................366
Viewing a Presentation Full Screen ...........................................................368
Selecting Full Screen Mode Preferences ...................................................368
Using the Image Viewer and Picture Tasks Plug-ins ...............................371
Viewing slideshows with the Image Viewer plug-in ......................371
Exporting images with the Picture Tasks plug-in ..........................372
Part V: The Part of Tens ............................................377
Chapter 17: Top Ten Third-Party Acrobat Plug-Ins . . . . . . . . . . . . . . .379
Chapter 18: Top Ten Online Resources . . . . . . . . . . . . . . . . . . . . . . . . .383
Index........................................................................387
Adobe Acrobat 6 PDF For Dummies
xii

Introduction
A
dobe PDF (Portable Document Format) is just now starting to fulfill its
promise as a truly transportable file format that enables people to share
sophisticated electronic documents across a wide array of otherwise incom-
patible computer platforms without requiring access to either the software
that generated the documents or the fonts used in the documents. Part of
the proof of this statement is evidenced in the ever-growing presence of PDF
documents, especially on the World Wide Web.
Nowadays, you can hardly browse the Web without encountering sites that
present some of their online information as PDF files. In fact, so many sites
offer their standard reports, registration and feedback forms, and industry
white papers as downloadable PDF files that few seasoned business users
remain unfamiliar with the PDF format (even if they’re not exactly sure what
it is) or the free Adobe Reader software used to open, read, and print docu-
ments saved in it.
Beyond the popularity of PDF for information-sharing on the Internet, PDF is
also becoming increasingly popular as the format to use for prepress docu-
ments, eBook publishing, document review, and document archiving. To ready
PDF files for these additional roles, you naturally graduate from the world of
the free Adobe Reader and Acrobat eBook Reader to that of Acrobat 6.
Acrobat 6 (which, unlike the free Adobe Reader, you must purchase) is Adobe’s
latest version of its all-in-one utility for editing, annotating, and managing docu-
ments saved in PDF.
As the name Acrobat implies, this utility enables you to juggle the many roles
it can assign PDF files with relative ease. All that’s required of you is a keen
sense of the role or roles you want your PDF document to fulfill along with a
careful reading of the pertinent sections of this book.
About This Book
This book is your complete introductory reference to the reading, writing,
and managing of PDF files for any and all of their many purposes, from
preparing prepress documents for printing on sophisticated imagesetters to
publishing your life story as an eBook for sale on the bevy of online book-
stores. Because the way you make, prepare, and sometimes even read a PDF
file varies according to the purpose you have in mind for it, you will find that

this book’s information emphasizes more the purpose you ultimately have in
mind for the PDF file than the features used to accomplish this purpose in the
various programs such as Acrobat, Adobe Reader, and the Acrobat eBook
Reader.
As a result, this book is not meant to be read from cover to cover. Each discus-
sion of a topic briefly addresses the question of how a particular feature enables
you to accomplish your purpose before launching into how to use it. In Acrobat,
as with most other sophisticated programs, there is usually more than one way
to do a task. For the sake of your sanity, I have purposely limited the choices,
usually by giving you only the most efficient ways to do a particular task. Later
on, if you’re so tempted, you can experiment with alternative ways of doing a
task. For now, just concentrate on performing the task as described.
As much as possible, I’ve tried to make it unnecessary for you to remember
anything covered in another section of the book. From time to time, however,
you come across a cross-reference to another section or chapter in the book.
For the most part, such cross-references are meant to help you get more com-
plete information on a subject, should you have the time and interest. If you
have neither, no problem; just ignore the cross-references as if they never
existed.
How to Use This Book
As a reference to all things PDF, you should start out by looking up the topic
you need information on (either in the Table of Contents or the Index) and
then refer directly to the section of interest. Most topics are explained con-
versationally. Many times, however, my regiment-commander mentality takes
over, and I list the steps you need to take to accomplish a particular task in a
particular section.
What You Can Safely Ignore
When you come across a section that contains the steps you take to get some-
thing done, you can safely ignore all text accompanying the steps (the text that
isn’t in bold) if you have neither the time nor the inclination to wade through
more material.
Whenever possible, I have also tried to separate background or footnote-type
information from the essential facts by exiling this kind of junk to a sidebar.
These sections are often flagged with icons that let you know what type of
information you will encounter there. You can easily disregard text marked
this way. (I discuss the icons used in this book a little later.)
2
Adobe Acrobat 6 PDF For Dummies

Foolish Assumptions
I’m going to make only two assumptions about you (let’s see how close I get):
You have a need to create and use PDF files in your work, and you have access
to Acrobat 6. Some of you are working on PCs running some version of Windows
or Windows NT. Others of you are working on Macintosh computers running
one of the later versions of the Mac operating system. Note that there are rather
specific system requirements for Acrobat 6 whether you use a Windows or
Macintosh computer. These requirements are covered in Chapter 1.
Beyond that, it’s anyone’s guess what brings you to Acrobat and PDF. Some of
you need to know how to convert all your paper documents into PDF files.
Some of you need to know how to save your graphics files as PDFs. Others of
you need to know how to create PDF form files in which users can submit
important data. Still others of you need to know how to create and publish
PDF files as eBooks for sale and distribution on the World Wide Web.
Regardless of your needs, you will be able to find the information you require
somewhere in the pages of this book.
How This Book Is Organized
This book is organized into five parts, the first four of which cover all the
basics of reading, making, and managing PDF files. The fifth part, the indispens-
able Part of Tens, recaps important Acrobat and PDF enhancements and
resources. You should not, however, get too hung up about following along
with the structure of the book; ultimately, it doesn’t matter at all if you find out
how to use Paper Capture to convert printed documents to PDF before you find
out how to use PDFMaker 6.0 to convert your Word documents, or if you figure
out how to archive your PDF documents in a searchable collection before you
discover how to create interactive forms for collecting data online. The impor-
tant thing is that you find the information — and understand it when you find
it — when you need to do what needs getting done.
In case you’re interested, here’s a synopsis of what you find in each part of
this book.
Part I: Presenting Acrobat and PDF Files
Part I looks at what makes PDF files tick and the most common ways of
accessing their information. Chapter 1 covers the many purposes of PDF
documents in today’s business world. Chapter 2 lays out essential informa-
tion about using the different Adobe programs that enable you to read and
3
Introduction

print PDF documents. Chapter 3 acquaints you with the interface of Acrobat 6,
Adobe’s utility for preparing and editing PDF documents.
Part II: The Wealth of Ways
for Creating PDF Files
Part II looks at the many ways of making PDF files. Chapter 4 gives you vital
information on how to use and customize the Acrobat Distiller to create the
PDF document suited to just the purpose you have in mind. Chapter 5 covers
the ins and outs of converting Microsoft Office documents (specifically those
created with Word, Excel, and PowerPoint) to PDF. Chapter 6 covers captur-
ing paper documents as PDF files primarily by scanning them directly into
Acrobat 6. Chapter 7 tells you how to capture Web pages as PDF files.
Chapter 8 covers the printing of all or part of your PDF files on printers
you have in-house.
Part III: Reviewing, Editing,
and Securing PDFs
Part III covers a mixture of techniques for reviewing, editing, and protecting
your PDF files. Chapter 9 introduces you to the many ways for annotating the
PDF documents that you send out for online review and introduces the new
e-mail-based and browser-based review features in Acrobat 6. Chapter 10
covers editing PDF files in Acrobat 6. Chapter 11 tells you how to secure your
PDF documents and protect them from further changes. Chapter 12 acquaints
you with the different ways you can extract contents in your PDF files for
repurposing with the other software programs you use. Chapter 13 gives you
the ins and outs of cataloging your PDF files by creating searchable collec-
tions that you can distribute across networks or on CD-ROM.
Part IV: PDFs as Electronic Documents
Part IV covers the different roles of electronic PDF files. Chapter 14 covers the
creation and usage of PDF documents as interactive forms that you can fill out
and whose data you can extract. Chapter 15 acquaints you with creating and
preparing PDF files as eBooks for sale and distribution on the World Wide Web.
Chapter 16 gives you information on how you can turn PDF documents into
online presentations by adding multimedia elements, including audio and
video clips.
4
Adobe Acrobat 6 PDF For Dummies

Part V: The Part of Tens
As is the tradition in these For Dummies books, the last part contains lists
of the top ten most useful facts, tips, and suggestions. Chapter 17 gives you a
list of my top ten third-party (that is, not developed by Adobe Systems) add-in
programs for augmenting and enhancing the program’s already considerable
features. Chapter 18 gives you a list of my top ten online resources for discov-
ering even more about Acrobat and PDF files!
Conventions Used in This Book
The following information gives you the lowdown on how things look in this
book — publishers call these the book’s conventions (no campaigning, flag-
waving, name-calling, or finger-pointing is involved, however).
Keyboard and mouse
Although most of the keyboard and mouse instructions given in the text are
self-explanatory, there are a few important differences between the typical
Windows and Macintosh keyboards and mice that are worth noting here. For
example, keystroke shortcuts in Acrobat 6 and Adobe Reader 6 in Windows
often use the Ctrl key in combination with one or more letter keys. The
Macintosh, however, substitutes its Ô key (called the Command key, the one
with the apple and the cloverleaf icon) for the Windows Ctrl key (rather than
using its Control key). Also, because the Macintosh keyboard has no Alt key,
its Option key is routinely substituted in all shortcuts using the Alt key.
Regarding the mouse, Windows favors a two-button (left- and right-button)
mouse, whereas Macintosh favors a single-button mouse. As a result, while you
access shortcut (or context) menus in Acrobat in Windows by clicking the right
mouse button (a technique commonly known as right-clicking), you hold down
the Control (not the Ô) key as you click the mouse on the Macintosh (a tech-
nique commonly known as Control+clicking). Note that if you do have a two
button mouse on the Macintosh, the right-clicking technique applies.
Other than these common keyboard and mice anomalies, it’s pretty much the
same whether you are working with PDFs in Acrobat and Adobe Reader on a
Windows or Macintosh machine. In the few cases where there are differences
in Acrobat’s capabilities across the platforms, I have duly noted them in the
text, usually in the form of a tip or warning (described in the next section).
5
Introduction

Special icons
The following icons are strategically placed in the margins to point out stuff
you may or may not want to read.
This icon alerts you to nerdy discussions that you may well want to skip (or
read when no one else is around).
This icon alerts you to shortcuts or other valuable hints related to the topic
at hand.
This icon alerts you to information to keep in mind if you want to meet with a
modicum of success.
This icon alerts you to information to keep in mind if you want to avert com-
plete disaster.
Where to Go from Here
If you’ve never had any prior experience with PDF files, I suggest that, right
after getting your chuckles with the cartoons, you go first to Chapter 1 and find
out what you’re dealing with. If you’re already familiar with the ins and outs of
PDF files, but don’t know anything about how you go about creating them,
jump to Chapter 4, where you find out how to get started using Acrobat’s
Create PDF features and using the Acrobat Distiller. Then, as specific needs
arise (like “How do I annotate PDF documents in Acrobat 6?” or “How do I
protect PDF files from further changes?”), you can go to the Table of Contents
or the Index to find the appropriate section and go right to that section for
answers.
6
Adobe Acrobat 6 PDF For Dummies
Part I
Presenting
Acrobat and PDF
Files

In this part . . .
A
dobe’s PDF (Portable Document Format) is charac-
terized as a truly universal file format that preserves
all the original document’s formatting — including its
fonts, graphics, and layout — across a wide array of
different computer platforms. This part of the book is
where you find out how PDF came to warrant this lofty
characterization.
In Chapter 1, you discover the many platforms that support
documents saved as PDFs, the many uses for PDF docu-
ments in your work, the different classes of PDF files that
you will be dealing with, along with a general overview of
the process you follow in saving documents as PDF files. In
Chapter 2, you get the lowdown on how to use the various
PDF reader software programs offered by Adobe Systems,
including Acrobat 6, Adobe Reader, and Acrobat eBook
Reader. Chapter 3 rounds out Part I by introducing you to
the interface of Acrobat 6, the Adobe program that not
only enables you to view and print PDF files but edit them
as well.

Chapter 1
The Ins and Outs of PDF Files
In This Chapter
What is a PDF file?
The benefits of using PDF files
Where PDF files come from
The different flavors of PDF files
I
’m so enthusiastic about Adobe PDF files that I think the abbreviation PDF
should stand for Pretty Darn Fantastic instead of the more mundane
Portable Document Format. In PDF files, you not only see the first inklings of
a truly paperless office (or as close as we’re likely to get), but also the deliv-
ery of a truly universal file format; that is, one truly capable of being opened
and used on any of the many computer operating systems currently in use.
In this chapter, you get introduced to what makes PDF files so special and
how they can be used to your advantage, especially in office environments
that mix and match different computer platforms. As part of this process, you
also get acquainted with the different versions of PDF files and how they can
be tailored to fit the particular needs of those who use the documents.
The Purpose of PDF Files
PDF, as the name Portable Document Format implies, was developed by
Adobe Systems as a means for digital file exchange. The main idea behind the
file format is to enable all computer users to be able to open, review, and print
the documents saved in it. This means that users who work on computers
that don’t have the software with which the files were originally created can
still see the document as it was originally designed and laid out, including all
its fonts and graphics.

The key to this digital file interchange is the nifty little software program
known as Acrobat (although Adobe originally named it Carousel when it first
appeared in 1993). A free form of this software, known as the Adobe Reader, is
available from Adobe Systems for all the major personal computing devices
and most versions of all the operating systems known to humankind. As of
this writing, these forms include:
Microsoft Windows machines with the following versions: Windows 3.1,
Windows 95 (OSR 2.0), Windows 98 SE, Windows Millennium Edition,
Windows NT 4.0 (with Service Pack 5), Windows 2000, or Windows XP
Macintosh computers with version 7.5.3, 8.1–8.6, 9.1–9.2, or OS X of the
Macintosh operating system
Palm handhelds with OS 3.0 or later
Pocket PC computers with Windows CE or Windows 2002
IBM AIX workstations with IBM AIX 4.2.1
HP 9000 Series workstations (model 700 or higher) with HP-UX 9.0.3
SGI workstations with Silicon Graphics IRIX 5.3
DEC workstations with DEC OSF/1, version 4
Sun Solaris SPARCStations with Sun OpenWindows 3.0 or later, Motif
1.2.3 or later, OpenLook 3.0, or CDE 1.0 or later
Computers running versions of Linux including Red Hat Linux 5.1 or
Slackware Linux 2.0
Acrobat 6 and Adobe Reader are both major upgrades to the Acrobat software
family. Consequently, backward-compatibility with older operating systems is
limited. In order to run Acrobat 6 on Windows you must use one of the follow-
ing operating systems: Microsoft Windows 98 Second Edition, Windows NT
Workstation 4.0 with Service Pack 6, Windows 2000 Professional with Service
Pack 2, Windows XP Professional or Home Edition, or Windows XP Tablet PC
Edition. Macintosh users must use OS X versions 10.2.2–10.2.6.
All you have to do to get the appropriate version of Adobe Reader for your
current operating system is point your Web browser to the following page on
the Adobe Systems Web site at
www.adobe.com/products/acrobat/readstep2.html
and in the Step 1 of 2 area of the Adobe Reader download page choose your
language, your connection speed (dial-up or broadband), and your computer
platform. After you choose your computer platform, the Step 2 of 2 area
appears. Note that the selections you make in Step 1 determine the version of
10
Part I: Presenting Acrobat and PDF Files

Adobe Reader best suited for your computer system. If your current system
is compatible with Adobe Reader, you are offered two choices: either the
Basic or Full versions if you chose dial-up as your connection speed, or Full if
you chose broadband. The Basic version is 8.7MB and can typically take up
to 30 minutes or more to download with a 56K modem. The Full version of
Adobe Reader has enhanced features that are described in the Step 2 of 2
dialog box and weighs in at a hefty 15.3MB — not a big deal if you have
broadband Internet access but worth the consideration if you use a modem
to connect to the Web. After choosing your desired version of Adobe Reader,
click the Download button. After downloading the Adobe Reader to the desk-
top of your computer platform, double-click the icon representing the com-
pressed version of the program to unpack and install it on your computer.
After you install the Adobe Reader on your computer, you can then open,
review, and print any PDF file that you get, regardless of what application pro-
grams were used in generating its text and graphics, and regardless of the
computer platform on which these programs ran. (See Chapter 2 for details
on how to access and review PDF files with the Adobe Reader.)
Adobe Reader comes in two versions with very different feature sets that you
can compare during the process of downloading the program. Adobe also cre-
ated not two, but three different versions of Acrobat 6: Professional, Standard,
and Elements. In order to compare the different features of these products,
Adobe provides an Acrobat family features matrix page on their Web site. Go
to the following page on Adobe’s Web site to view this important information:
www.adobe.com/products/acrobat/matrix.html
Benefits of Using PDF Files
The most important benefit derived from the use of PDF files is that anyone
whose computer is equipped with Adobe Reader can open, read, and print
them. This essentially enables you to concentrate on the software tools that
you have at hand and feel are best suited for producing the document with-
out having to worry about whether or not your client or coworker has the
same software available to them. As you’ll soon see, this is only one of the
many important uses to which you can put your PDF files with Acrobat 6.
Keep in mind that the availability of many features described in the following
sections depend on which version of Adobe Reader or Acrobat 6 you are
using. For that reason, it’s a good idea to go to the Acrobat family features
page described in the previous section to familiarize yourself with all of
Adobe’s new Acrobat products.
11
Chapter 1: The Ins and Outs of PDF Files

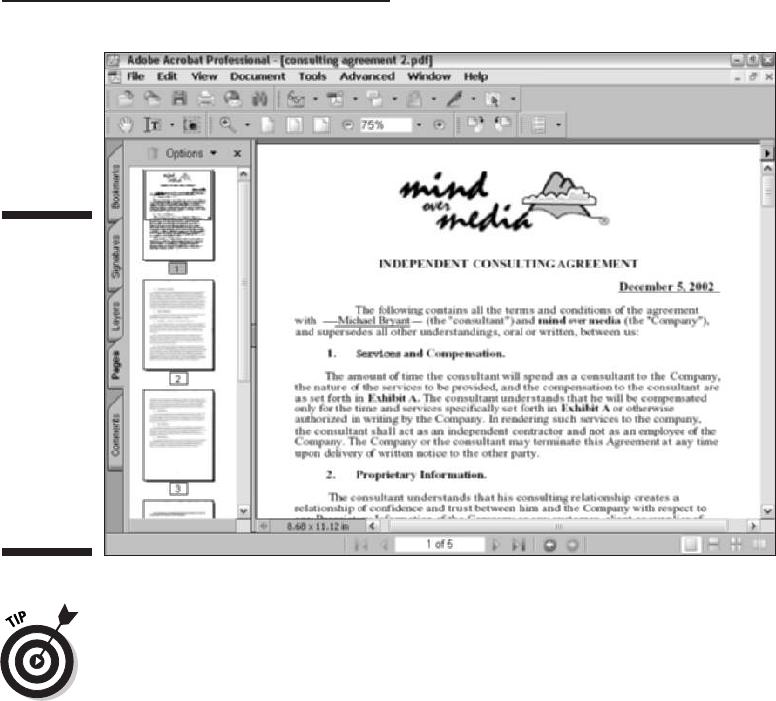
What you designed is what they see
Because you are assured that your PDF files will essentially appear on-screen
and print as you originally designed them, no matter the computer on which
they’re opened or the printing device to which they’re output, you don’t have
to hold back on your design, avoiding the use of certain more decorative
fonts and/or complex layouts. Figures 1-1 and 1-2 illustrate this situation. In
Figure 1-1, you see a PDF file as it appears when opened with Adobe Reader
on a computer running Windows. Figure 1-2 shows the same PDF file as it
appears when opened on a Macintosh computer. As you can see, they are
both comparable in terms of the appearance of their fonts and their layout.
PDF files in the review cycle
While PDF debuted as a universal file format for viewing and printing docu-
ments on various types of computers and printers, thanks to advances to the
Acrobat software (and here I’m referring to the full-fledged Acrobat program
that you must pay for rather than the freebie Adobe Reader available for
download), you can now make PDF files an integral part of your design review
process. After converting a document to PDF, you can disseminate copies of
it to each of the people from whom you need feedback or approval before
you put it into use. Each of these people can then add their feedback by
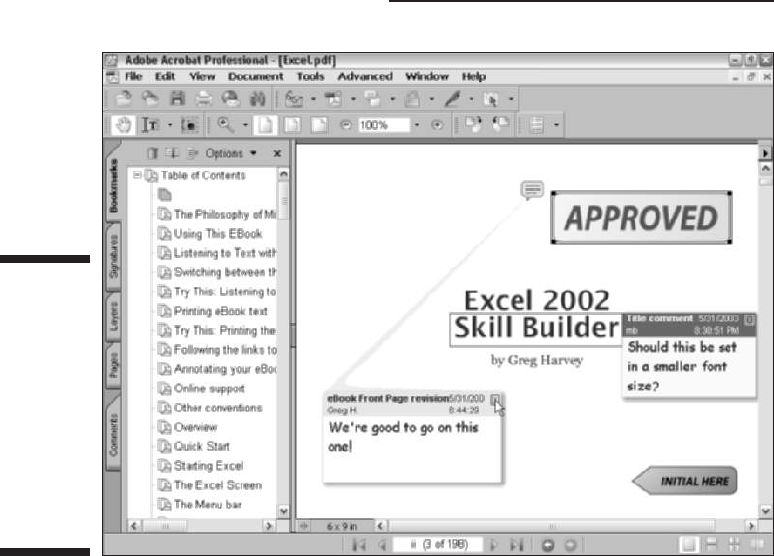
adding comments or actually marking up the PDF document in Acrobat 6.
You can then collect their feedback and make the necessary changes either
to the PDF version of the file in Acrobat 6 or to the original document (prior
to PDF conversion) in the program used in its creation. If managers, cowork-
ers, or clients are required to sign off on the document (either in its original
or revised form), they can indicate their approval by stamping the document
with their approval or by digitally signing off on it, as shown in Figure 1-3.
(See Chapter 9 for details on how to use PDF files in a review cycle and
Chapter 11 for details on how to use digital signatures.)
Providing forms, both paper and electronic
With the widespread reliance on the World Wide Web for getting and submit-
ting crucial information, PDF files have taken on another important use, that
of providing forms to fill in both online and after printing. Acrobat 6 makes
form creation about as easy as it can be.
12
Part I: Presenting Acrobat and PDF Files
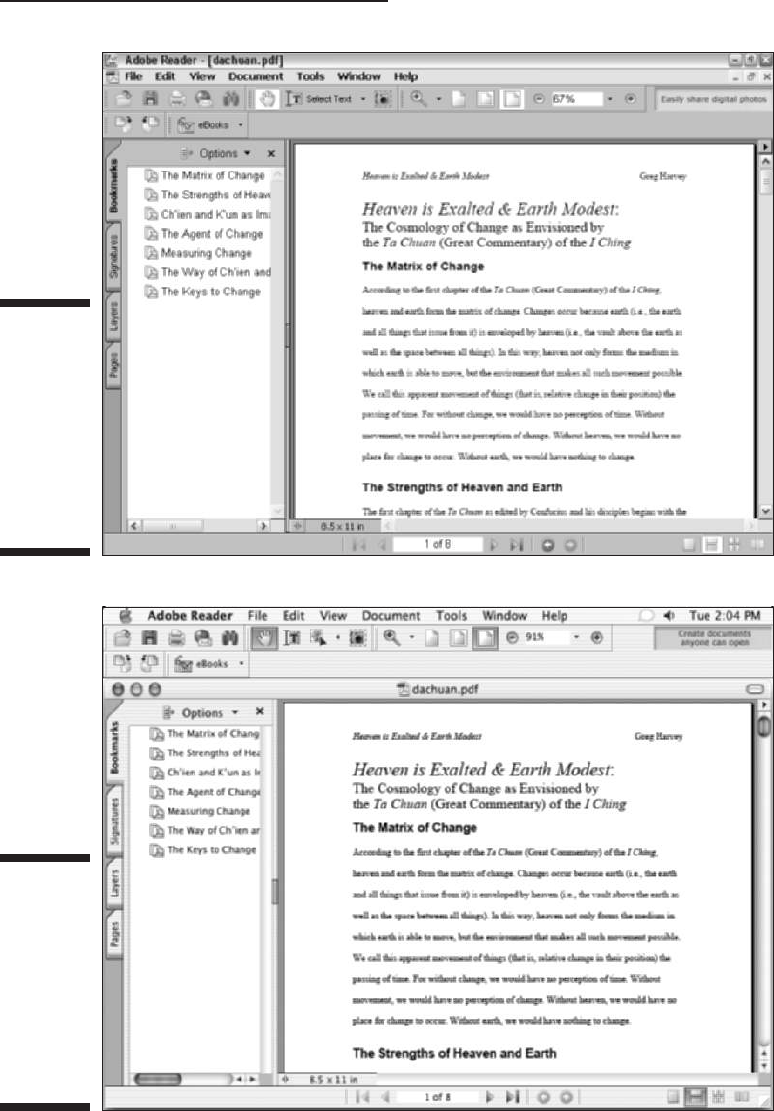
Figure 1-2:
The same
PDF
document
as it
appears in
the Adobe
Reader 6
on a Mac
computer.
Figure 1-1:
A PDF
document
as it
appears in
the Adobe
Reader 6 on
a computer
running
Windows.
13
Chapter 1: The Ins and Outs of PDF Files
If you need to make certain paper forms available on your company’s intranet
or your public Web site so that users can download, print, and then fill them
in by hand, you can use Acrobat 6 to scan the paper forms and immediately
convert their digital images into PDF files (see Figure 1-4). If you need to be
able to search and edit the text in the electronic versions of these forms, you
can use the Paper Capture feature — Acrobat’s version of OCR (Optical
Character Recognition) software — to convert the text image into searchable
and editable fonts. (See Chapter 6 for details on scanning paper forms and
converting them into PDF files with Acrobat 6.)
If you need to get feedback or process informational or order forms directly
from your company’s intranet or its public Web site, you can use Acrobat 6 to
design the electronic forms. Acrobat 6 makes it possible to add all types of
interactive fields, including text boxes, combo boxes (also known as drop-
down list boxes), check boxes, radio buttons, and command buttons (that
users can select to do things such as submit their information or clear the
form). With the addition of a simple CGI (Common Gateway Interface) script
(courtesy of your friendly IT personnel or Internet service provider), you can
store the data submitted by way of your PDF forms in text files that your
favorite database or spreadsheet program can read and store. (See Chapter 14
for details on creating interactive PDF forms for use online.)
Figure 1-3:
With
Acrobat 6,
you can add
comments
and mark up
text that
needs
revising, as
well as give
your stamp
of approval.
14
Part I: Presenting Acrobat and PDF Files
You don’t have to use the World Wide Web or a company intranet to be able
to fill in electronic PDF forms that you create with Acrobat 6. Users who have
Acrobat 4 or later installed on their computers can open and fill in these elec-
tronic forms using this version or later of Acrobat.
Document archiving
Let’s face it: Paper archives are not just bulky and heavy, but they also
degrade quickly and are a veritable nightmare to search. For this reason
alone, out of all the possible uses for Adobe’s Portable Document Format,
archiving your documents as PDF files may prove to be the most important
to you. Imagine all your paper contracts, correspondence, company reports,
and the like stored as collections on CD-ROMs, from which you can retrieve
individual files through searches for keywords or for vital statistics such as
author name, client name, or job number.
You can use the Paper Capture feature in Acrobat 6 on the Windows or
Macintosh platform to scan and convert such paper documents into search-
able PDF files. After you do that, Acrobat makes it easy for you to organize
Figure 1-4:
Acrobat 6
makes it
easy to scan
and convert
paper forms
to PDFs,
which can
then be
distributed
for
download
from your
Web site.
15
Chapter 1: The Ins and Outs of PDF Files

these files into collections (known officially as catalogs), which you can index
for truly speedy retrieval using the Acrobat 6 search feature. (See Chapter 6
for details on converting paper documents to PDF and Chapter 13 for details
on cataloging and indexing your files prior to storing them on various media.)
The Paper Capture feature in Acrobat 6 for Windows restricts you to scanning
and converting paper documents of no more than 50 pages in length. If you
know that you must scan and convert documents longer than 50 pages on
the Windows platform, you need to purchase the standalone module,
Acrobat Capture 3 for Windows NT, 2000, or XP or Acrobat Capture 2.0 for
Windows 95/98.
PDF in the prepress workflow
One of the most obvious uses for PDF files is in the prepress workflow, during
which documents that require professional printing are checked for potential
printing errors and readied for conversion from electronic images to the film
or plates used in the final printing of the document using high-end imageset-
ters (a process known in the industry as preflight). Acrobat 6 (Professional
version only) contains a number of prepress-related printing options, along
with an overprinting preview and an on-screen color correction feature.
These specialized print options and error-checking features in Acrobat 6 are
designed to help professional graphic artists and service bureau personnel in
finding and eliminating potentially costly printing problems. Most users not
directly involved in this end of the business will have no reason to fool with
these printing options or use these specialized preview features. (If, for some
unknown reason, you are interested in knowing more about these prepress
features, refer to Chapter 8.)
Always check with your service bureau personnel to find out what, if any,
prepress options they want you to use prior to sending them your PDF files
for preflight. Some houses definitely prefer that you not use any of these pre-
press options, so it’s always good to check it out ahead of time.
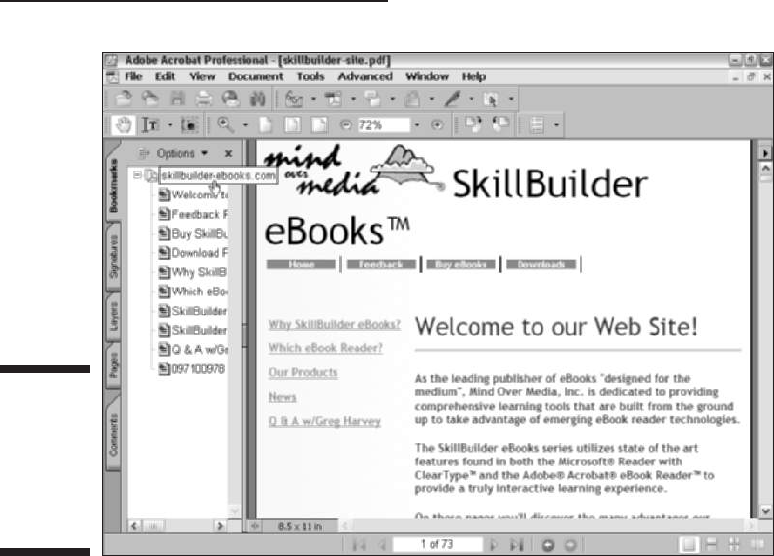
Quick and easy Web site retrieval
If you are involved with your company’s Web design or you are a Web freak
who travels frequently and is therefore bereft of a way to stay connected to
the Net, you can use the Acrobat 6 Web Capture feature to copy and convert
to PDF specific Web pages or even entire Web sites that are of interest to you
(see Figure 1-5). After you’ve converted a set of Web pages or an entire Web
site into PDF files, you can then browse them from your hard drive with
Acrobat or Adobe Reader without being connected to the Internet.
16
Part I: Presenting Acrobat and PDF Files
As both a road warrior and Web enthusiast, you can use this feature to keep
up on the latest online information right from the comfort of your portable
computer at those times when you’re traveling or just waiting to travel.
If you work as a Web designer, the Web Capture feature provides a perfect
means for distributing your Web pages for approval to your client or cowork-
ers. If they have Adobe Reader or Acrobat 6 on their computers, they can even
annotate the pages with their suggestions in the form of notes and markups or
even give you that final nod of approval using the stamp feature. (See Chapter 7
for details on retrieving and converting Web pages to PDF.)
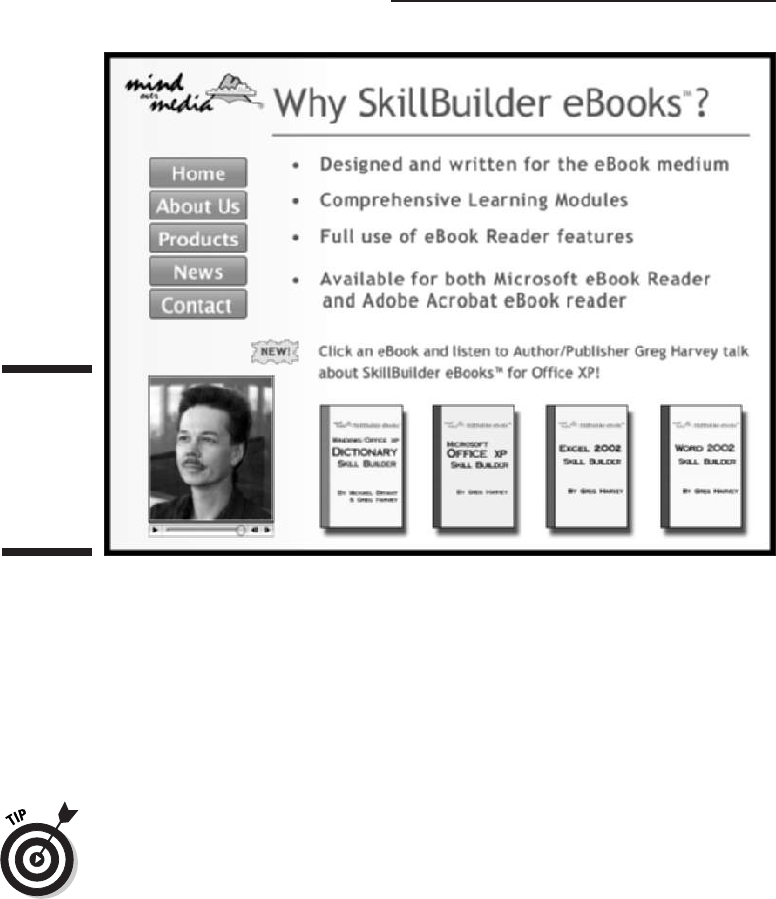
PDF files as slide shows and
multimedia presentations
Another application for PDF files is to use them to create and distribute slide
shows and multimedia presentations (see Figure 1-6). Acrobat 6 enables you
to add interactivity to your slides in the form of hyperlinks, buttons, and
slide transitions. You can also use the program to add sound and/or digital
movie files to the slides that your users can play back for a true multimedia
experience. Note that Acrobat 6 now supports slide shows and greeting
eCards created in Adobe Photoshop Elements 2.0 and Photoshop Album 1.0.
Figure 1-5:
Acrobat 6
makes it a
snap to
capture
Web pages
as PDF files.
17
Chapter 1: The Ins and Outs of PDF Files
To enhance the online slide show or multimedia presentation, Acrobat 6 sup-
ports a full-screen mode that the user can invoke with none of the screen
clutter normally associated with using Acrobat and Adobe Reader (full-screen
mode hides the menus, toolbars, scroll bars, status bar, and in Windows,
even the omnipresent Task bar). When a user views your slide show or pre-
sentation in full-screen mode, you can set it up so that Acrobat automatically
advances through each page after a set time interval, using a slide transition
of your choice.
If you normally use Microsoft PowerPoint to create your slide shows, you can
convert them into PDF files at the touch of a button. You can then use
Acrobat 6 to add any extra interactivity and then distribute them for play-
back on any computer on which the free Adobe Reader 6 is installed.
The Different Types of PDF Files
In addition to the many different uses for the Adobe Portable Document
Format described in this chapter, PDF files also give you a great deal of flexi-
bility when you want to reuse their content for other purposes. For example,
Figure 1-6:
You can play
slide shows
saved as
PDF files in
full-screen
mode.
18
Part I: Presenting Acrobat and PDF Files

you can use various PDF formats to distribute a graphically rich report with
lots of tables and pictures for printing or viewing on a computer monitor, and
then “repurpose” that same content for viewing in a Web page or on a hand-
held device where such graphics are prohibitive. This fabulous chameleon
act is possible because Adobe PDF files support three basic document struc-
ture types: unstructured, structured, and tagged. PDF documents that are cre-
ated from these types of documents create the following PDF files:
Unstructured PDF: These PDFs have no logical structure tree to define or
further describe the author’s content. All document information is treated
as a single unit with just the author’s text and paragraph structure recog-
nized. Basic text formatting, tables, and lists are not recognized.
Structured PDF: These PDFs recognize the author’s text and paragraph
structure but also have a logical structure tree that defines basic text
formatting, such as font attributes. Tables and lists are not recognized.
Tagged PDF: These PDFs have a logical structure tree that includes all the
attributes of structured PDFs and also includes definitions such as docu-
ment styles and stories (this allows tables and lists to be recognized) and
dependencies among various document elements that allow the text to be
reflowed. (For more information on reflowing text, see Chapter 15.)
To understand document structure types, you need to look under the hood
of your favorite word processor or page layout program. As you create your
document, these programs can provide a logical structure tree and tags that
define how your document appears when printed or viewed on-screen. I say
can provide because programs such as Notepad in Windows and Macintosh,
which are simple text editing programs with no formatting ability, don’t pro-
vide for a logical structure tree and so create unstructured documents. You can
get an idea of how a document structure tree works using the Document Map
feature in Microsoft Word. Open a document and choose View➪Document Map.
The program displays the document’s structure tree as hierarchies of head-
ings, paragraphs, and so on. Word then adds tags to this tree that define para-
graph styles, font types, font attributes, and allow you to use this structure
tree to navigate the document by clicking different structure elements.
The support of document structure types enables you to create unstruc-
tured, structured, and tagged PDF files with Acrobat 6. The subsequent result
is that the more structured your original document, the more you can reli-
ably reuse your content for other purposes using Adobe PDF. To find out
more about PDF file types, see “Understanding how structure types affect
flexibility” in the online Acrobat help module. To access the online help
guide, choose Help➪Complete Acrobat 6.0 Help or choose Complete Acrobat
6.0 Help on the How To Window.
19
Chapter 1: The Ins and Outs of PDF Files

20
Part I: Presenting Acrobat and PDF Files

Chapter 2
Accessing PDF Files
In This Chapter
Viewing PDF files with Adobe Reader 6
Viewing PDF files with Acrobat 6
Reading PDF files with Acrobat eBook Reader
Browsing PDF files in your Web browser
A
s this chapter proves, there’s more than one way to open and read a
PDF file. You have a choice between using Adobe Reader, which comes
in two flavors; Basic and Standard (both of which are free), or if you’ve pur-
chased the full-blown Acrobat 6 (which also comes in two versions; Standard
or Professional) for creating and editing PDF files, you can, of course, use it
as well. In addition, Adobe also introduced a new product this year for the
enterprise sector called Acrobat Elements. The program allows you to view
and create, but not edit, PDF documents and must be bulk purchased in lots
of 1000. See Chapter 5 for more information on creating PDF documents with
Acrobat Elements. As if these weren’t enough browsing choices, you can also
open and view your PDF files in common Web browsers, such as Internet
Explorer and Netscape Navigator on all Windows operating systems and
Macintosh OS 9.2.2 and earlier. Note that as of this writing, in order to use the
Windows version of Acrobat 6 or Adobe Reader for in-browser viewing of PDF
documents, you must have Internet Explorer 5 or later. In-browser viewing of
PDF files is also not supported in Mac OS X. As of this writing, Adobe plans to
add that functionality in the near future for Mac OS X users. In the meantime,
you can configure Acrobat 6 or Adobe Reader as Helper applications in OS X
versions of Internet Explorer and Netscape Navigator.
Perusing PDF Files in Adobe Reader
The most common way to view PDF files is by using Adobe Reader (formerly
called Acrobat Reader). Adobe Systems offers this program as a free down-
load for a wide number of different computer platforms. As of this writing, the
most current version of Adobe Reader is version 6.0. Adobe Reader coincides
with the release of Acrobat 6 and utilizes many of the same feature enhance-
ments and improvements to the User Interface (UI) that characterize the latest
version of the full-blown product. If you’re using Windows XP or Mac OS X,
Adobe Reader is automatically selected when you specify your operating
system on the Adobe download page. Note that the Macintosh version of
Adobe Reader (and also Acrobat 6 Standard and Professional versions) only
runs on the Jaguar version of Mac OS X, because the minimum system require-
ment for the Macintosh version is 10.2.2.
Adobe Reader can open and read all PDF files created with earlier versions of
Acrobat. Be aware, however, that earlier versions of Acrobat Reader cannot
open and read PDF files created with the later versions of Adobe Acrobat
unless you specify compatibility with earlier versions when you create a PDF.
Consequently, you also lose newer Acrobat functionalities when you create
backward compatible PDF files. See Chapter 4 for more information on creat-
ing PDF documents. As Table 2-1 indicates, each version of Adobe Acrobat
creates its own version of PDF files. Later versions of Acrobat can read files
created in earlier versions, but not vice versa.
Table 2-1 Versions of Acrobat and Their PDF Files
Acrobat Version PDF File Version Created Year Released
Acrobat 1.0 PDF 1.0 1993
Acrobat 2.0 PDF 1.1 1994
Acrobat 3.0 PDF 1.2 1996
Acrobat 4.0 PDF 1.3 1999
Acrobat 5.0 PDF 1.4 2001
Acrobat 6.0 PDF 1.5 2003
As you can see in Table 2-1, you can tell which version of Acrobat produced a
particular PDF file version because the sum of the digits in the PDF file version
equals the number of the Adobe Acrobat version that created it. For example,
you know that a PDF file in version 1.3 was likely created with Acrobat 4
because the sum of its file version numbers, 1 and 3, is 4.
When you’re viewing PDF files in Acrobat on a Windows computer, you can
tell what version of PDF file you’re dealing with by choosing File➪Document
Properties to open the Document Properties dialog box. Select Description in
22
Part I: Presenting Acrobat and PDF Files

the list box in the PDF Information area of the Description palette and you
find the PDF version. Note that the file version listed will not always tally with
the version of Acrobat that created the file because engineering a PDF for
backward compatibility is possible.
When creating a PDF file with the Acrobat Distiller in Acrobat 6, you can make
it possible for viewers using earlier versions of Acrobat Reader to open your
files by selecting a Compatibility setting in the Adobe PDF Settings dialog box
for an earlier version of Acrobat. This setting provides compatibility with
Acrobat versions 3.0 through 6.0 and their corresponding PDF versions,
which ensures that your files will reach a wider audience.
Downloading and launching
Adobe Reader 6
Adobe Reader 6 (formerly Acrobat Reader) is available in two flavors: Basic
and Full. The Full version gives you the added functionality of local, network,
or Internet PDF searches, Accessibility features, eBook support, and
Multimedia enhancements.
All you have to do to get the appropriate version of Adobe Reader for your
current operating system is point your Web browser to the following page on
the Adobe Systems Web site:
www.adobe.com/products/acrobat/readstep2.html
This URL takes you to the Download Adobe Reader page, where all you have
to do is make a selection from each of three drop-down lists provided in the
Step 1 of 2 dialog box:
1. Select the Language of the Adobe Reader (English in most cases).
2. Select the Platform (or operating system) that your computer uses
(that is, Windows Me, Windows NT, Windows 2000/XP, Mac 8.6,
Mac 9.x, OS X, and so on).
3. Choose a Connection speed that you use to access the Internet (dial-up
or broadband).
Note that the selections you make in Steps 2 and 3 above determine the
version of Adobe Reader best suited for your computer system. After you
choose your Connection speed, the Step 2 of 2 dialog box appears and dis-
plays the result of your Platform and Connection speed choices. If your
23
Chapter 2: Accessing PDF Files

current operating system is compatible with Adobe Reader 6 and you chose
dial-up as your connection speed, you are offered two choices: either the
Basic or Full version. If you chose broadband as your connection speed, only
the Full version is offered. Earlier platform/operating system choices that are
not compatible with Adobe Reader provide the appropriate version of the
older Acrobat Reader program for download.
The Basic version of Adobe Reader is 8.7MB in size and can typically take up
to 30 minutes or more to download with a 56K modem. The Full version of
Adobe Reader has enhanced features described in the Step 2 of 2 dialog box
and weighs in at a hefty 15.3MB (20.9MB for the Mac version). Downloading
the Full version is not a big deal if you have broadband Internet access, but it
may be worth considering the Basic version if you use a modem to download
from the Web.
After choosing your desired version of Adobe Reader, click the Download
button, select a download location in the Browse for Folder dialog box, and
wait until the Adobe Reader file is downloaded on your computer. Then
double-click its installer icon to decompress the Reader files and install them
on your hard drive (on the Mac, the Adobe Reader Installer actually down-
loads the Reader files and installs them when you double-click the Adobe
Reader Installer icon).
After installing Adobe Reader on your hard drive, you can launch the Reader
with or without also opening a PDF file. To launch the program without also
opening a PDF on the Windows platform, choose Start➪Programs➪Adobe
Reader (Start➪All Programs➪Adobe Reader in Windows XP).
To launch Adobe Reader on the Macintosh in OS X, follow these steps:
1. Click the Finder icon on the Dock to open the Finder and click the
Applications button on the Finder toolbar.
2. Double-click the Adobe Reader file icon in the Applications folder.
After you launch Adobe Reader , you can then open PDF files for viewing and
printing by choosing File➪Open and selecting the PDF file to open in its Open
dialog box.
In addition to simply double-clicking a PDF file icon you can also launch
Adobe Reader and open a PDF file for viewing by dragging a PDF file icon
onto an Adobe Reader shortcut on the Windows or Macintosh desktop. Note
that when you install Adobe Reader on a Windows machine, the installer
automatically creates a desktop shortcut called Adobe Reader 6.0.
24
Part I: Presenting Acrobat and PDF Files
To create such a desktop shortcut on the Macintosh (where it’s called an
alias), click to select the Adobe Reader icon (located in the Applications
folder on your hard drive), press Ô+M to create an Adobe Reader 6.0 alias,
and then drag this alias icon onto the Macintosh desktop.
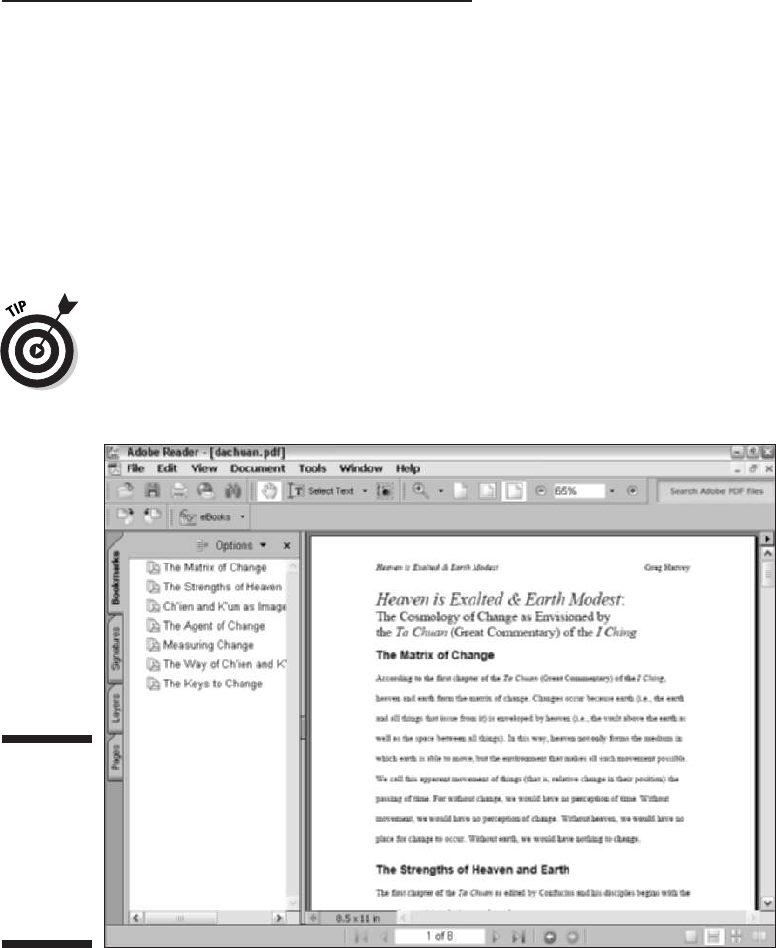
Figure 2-1 shows you how the Adobe Reader window appears on a Windows
computer when you launch the Reader and simultaneously open a PDF file
within it. Note that in this particular case, the PDF file that opens takes up the
full width of the program window up to the Navigation pane, which displays
the bookmarks in this document.
You can have more than one PDF file open at a time in Adobe Reader 6. To
open multiple files when launching Adobe Reader 6, Ctrl+click individual PDF
file icons or lasso a group of them and then drag the entire selection onto the
Adobe Reader desktop shortcut (alias). To do this from the Open dialog box,
Ctrl+click or lasso the group before you click the Open button.
Figure 2-1:
The Adobe
Reader
window
with the
open PDF
file used to
launch it.
25
Chapter 2: Accessing PDF Files
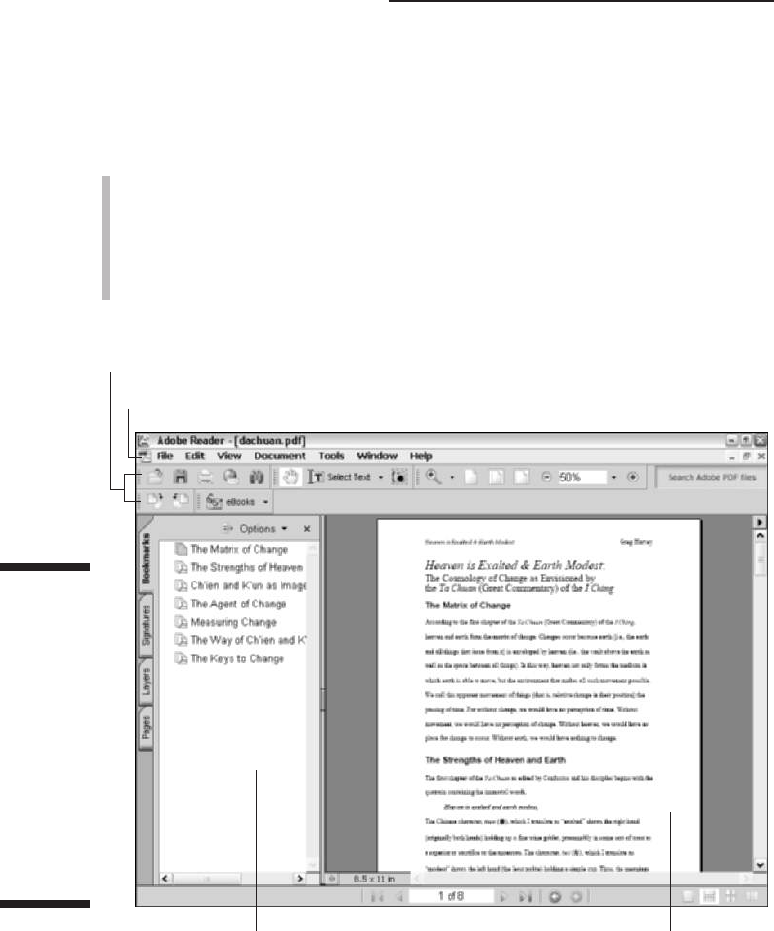
The Adobe Reader window
As you can see in Figure 2-2, the Adobe Reader window is divided into three
areas:
Menu and toolbars at the top of the screen
Document pane with scroll bars to the right and bottom and a status bar
to immediate left at the bottom
Navigation pane with tabs for its four palettes: Bookmarks, Signatures,
Layers, and Pages.
Menu bar
Navigation pane
Toolbars
Document pane
Figure 2-2:
The Adobe
Reader
window is
divided into
three areas:
menu and
toolbars
above;
Document
and
Navigation
panes
below.
26
Part I: Presenting Acrobat and PDF Files
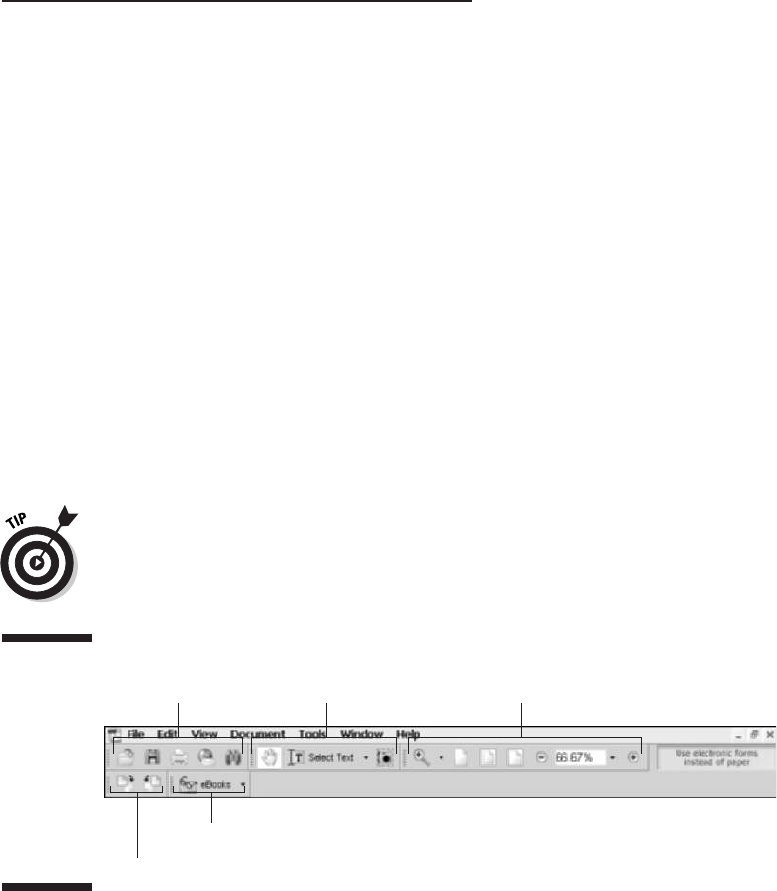
The menu bar contains standard application menus: File through Help. To
select a menu and display its items, you click the menu name (or you can
press the Alt key plus the underlined letter in the menu name, the so-called
hot key, in the Windows version). To select a menu item, you drag down to
highlight it and then press Enter, or you click it (in the Windows version, you
can also select an item by typing its hot key). Menus on the Macintosh ver-
sion display hot keys with the cloverleaf symbol that represents the
Command key. You can select these commands simply by holding down the
Command key plus the appropriate hot key without opening the menu.
The Adobe Reader toolbars
Directly beneath the menu bar, you see a long toolbar with an almost solid
row of buttons. The toolbar may appear on two rows, depending on your
screen resolution, when you install and open Adobe Reader for the first time.
As Figure 2-3 indicates, this toolbar is actually five separate toolbars, File
through Tasks. Note the Tasks toolbar is a single button with a pop-up menu
for acquiring, opening, or accessing help on eBooks. This is one example (and
the only one you see in Adobe Reader 6) of several new single-button Tasks
toolbars. The rest are covered in the section about toolbars in Chapter 3.
The File toolbar, shown in Figure 2-3, displays buttons and labels. You can
gain more space on the upper toolbar area by hiding the File Toolbar labels.
To do so, right-click the toolbar area and choose Tool Button Labels to
remove the checkmark from the context menu.
Four of the buttons shown in the toolbars in this figure sport downward-
pointing shaded triangles. These downward-pointing triangles (formerly
titled More Tools in previous versions of Acrobat) are buttons that, when
clicked, display a pop-up menu with additional related tools or commands. In
Adobe Reader, these buttons, from left to right, are as follows:
File toolbar
Rotate View toolbar
Basic toolbar Zoom toolbar
Tasks toolbar
Figure 2-3:
The space
below the
menu bar of
the Adobe
Reader
window
contains
five toolbars
side by side.
27
Chapter 2: Accessing PDF Files

The Select Text tool: Right next to the Hand tool in the Basic toolbar, its
pop-up menu button enables you to choose either Text or Image and
also the Expand This Button option to add both menu items as buttons
on the toolbar.
The Zoom In tool: The first button in the Zoom toolbar. Its pop-up menu
button enables you to select the Zoom In tool if you’re using one of the
other Zoom tools, the Zoom Out tool (Shift+Z) for zooming out on an
area, or a new Dynamic Zoom tool that enables you to dynamically
(without incremental changes) zoom in and out by clicking on a viewing
area and dragging the mouse up or down.
The Viewing button: Shows the current page magnification setting as a
percentage in the Zoom toolbar.
The Read an eBook tool: The only button on the Tasks toolbar. Its pop-
up menu lets you open an eBook in your library (called My Bookshelf)
and display an online guide to reading eBooks in the How To window.
Another similar option you may encounter on these pop-up menus is the
Show (insert name) Toolbar command that displays, by default, all the menu
commands in a floating toolbar window that can be docked anywhere in the
toolbar area. To hide this floating toolbar, click its Close button. If the toolbar
has been docked, uncheck the Show Toolbar command on the original tool-
bar button pop-up menu to hide it. The next time you select this command,
the toolbar will appear in its last displayed state, either floating or docked.
Users of Acrobat Reader 5 or earlier may notice that Adobe has consolidated
the Find and Search tools into a single Search tool button on the File Toolbar.
I find this most gratifying, because I can never remember the difference
between a Find and a Search. The Acrobat 6 Search feature is very clear. It
enables you to do fast text searches in either the current PDF document, a
PDF file on your computer or local network, and even on the Internet when
you’re using the Full version of Adobe Reader. Clicking the button opens the
Search PDF pane in the How To window, where you specify search criteria
and then click the Search button. Search results are then displayed in the
Search PDF pane. See the “Adobe Reader Document pane” section, later in
this chapter, to find out more on the new How To window.
Table 2-2 lists the buttons on each of these toolbars and describes their
functions.
Table 2-2 The Toolbars of Adobe Reader 6
Toolbar Icon Name Use It To . . .
File Open Display the Open dialog box.
28
Part I: Presenting Acrobat and PDF Files
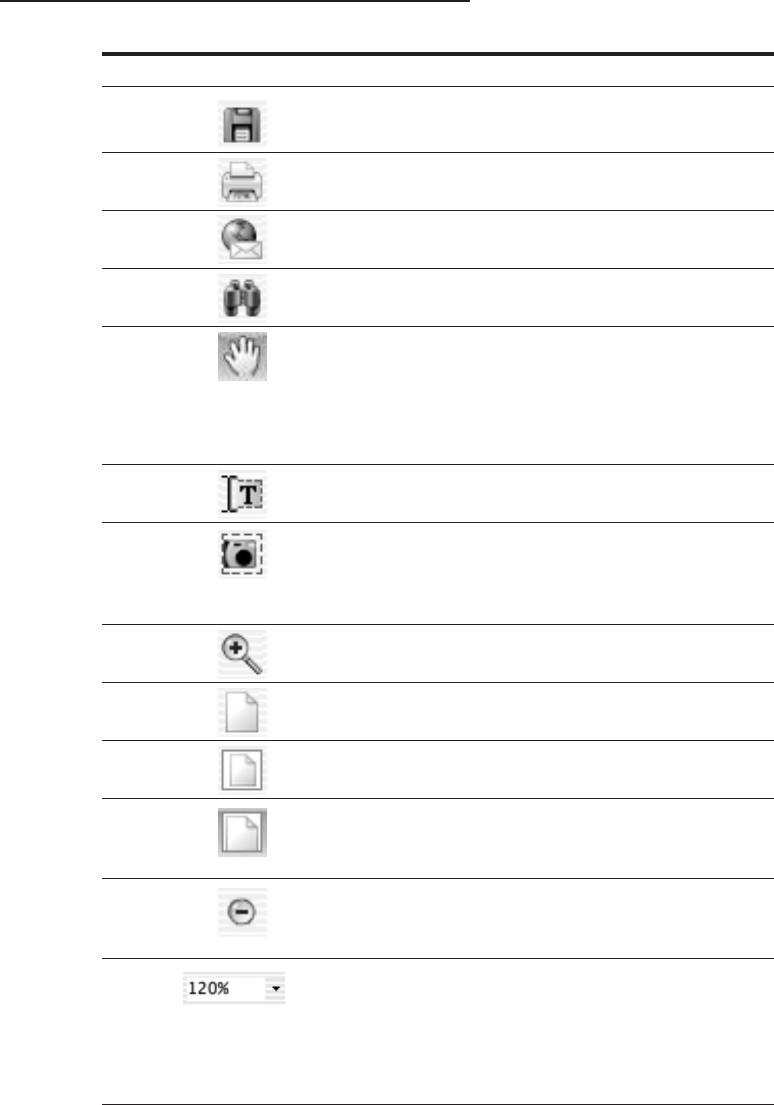
Toolbar Icon Name Use It To . . .
Save a Copy Display the Save a Copy dialog box.
Print Open the Print dialog box.
E-mail Open your e-mail client and attach the
current PDF to a new e-mail.
Search Open the Search PDF pane in the How
To window.
Basic Hand tool (H) Move the PDF document to different
areas of the viewing window or of the
document itself, depending on your
zoom setting; the Hand tool changes to
an arrow over menus and buttons, and
to a pointing finger over hyperlinks.
Select Text tool (V) Select text or images in the document
for copying to the Clipboard.
Snapshot tool Select text or graphics in the docu-
ment for copying to the Clipboard
by drawing a marquee around your
selection.
Zoom Zoom In tool (Z) Zoom in on the area that you point to
with the magnifying glass icon.
Actual Size Resize the zoom magnification setting
to 100%.
Fit in Window Resize the zoom magnification setting
so that you see the entire document.
Fit Width Resize the zoom magnification setting
so that the width of the document fills
the entire Document pane.
Zoom Out Decrease the magnification (to see
more of the entire document) by set
intervals of 25% or less.
Magnification Level Display the current magnification level
as a percentage of the actual size
(100%). To change the magnification,
type a number in the Magnification
Level text box or select a preset zoom
value from the pop-up menu.
(continued)
29
Chapter 2: Accessing PDF Files
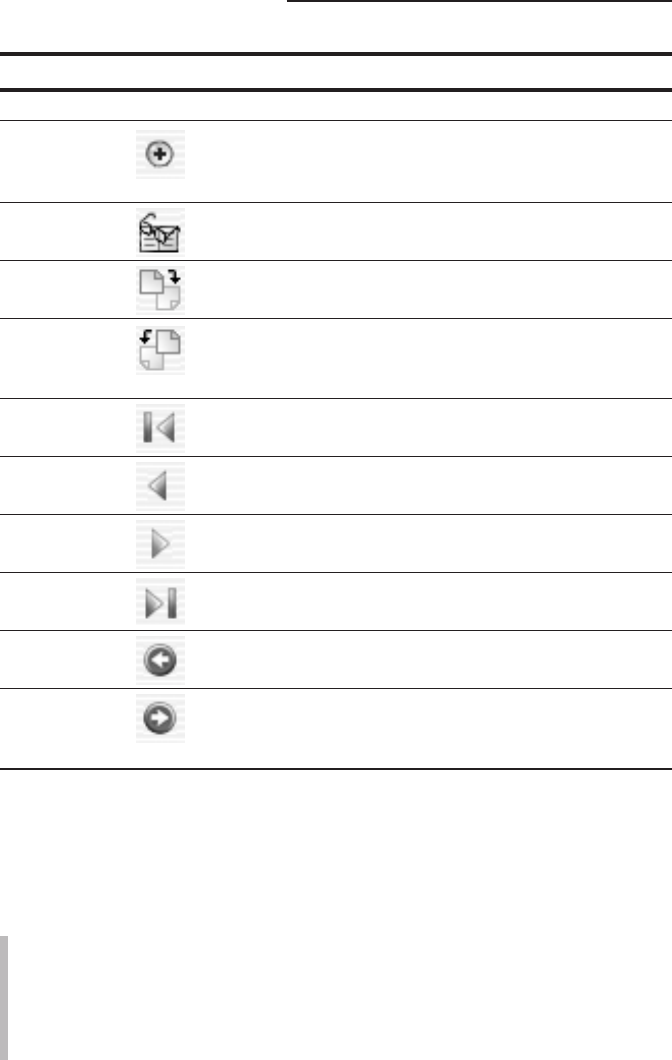
Table 2-2 (continued)
Toolbar Icon Name Use It To . . .
Zoom In Increase the magnification (to see
more detail and less of the entire docu-
ment) by set intervals of 25% or less.
Tasks Read an eBook Go online to acquire eBooks.
Rotate View Rotate Clockwise Reorient the current page by rotating it
90 degrees to the right (clockwise).
Rotate Counter- Reorient the current page by
clockwise rotating it 90 degrees to the left
(counterclockwise).
Navigation First Page Jump to the beginning of a multipage
document.
Previous Page Jump to the previous page in a multi-
page document.
Next Page Jump to the subsequent page in a
multipage document.
Last Page Jump to the end of a multipage
document.
View History Previous View Go to the last page you visited.
Next View Go back to the page that was current
when you clicked the Previous View
button.
The Adobe Reader Document pane
The Adobe Reader Document pane is where your PDF files load for viewing.
How much document text and graphics appear in this pane depends upon a
number of factors:
The size of the pages in the document (displayed in the Page Size indica-
tor in the status bar at the bottom of the Document pane — see Figure 2-4)
The size of your computer monitor
The current zoom (magnification) setting in Adobe Reader (shown in the
Magnification Level button in the Viewing toolbar)
30
Part I: Presenting Acrobat and PDF Files
Of these factors, you can change only the current zoom setting either with
the buttons in the Viewing toolbar (see Table 2-2) or the options on the View
menu. Zoom out to get an overview of the document’s layout. Zoom in to
make the text large enough to read.
The How To window is a new feature in both Adobe Reader and Acrobat 6 that
provides help and dialog boxes for common tasks, displays the online help
guide for both programs, and takes up a significant portion of the Document
window. To quickly display or hide the How To window in both the Windows
and Macintosh versions of Adobe Reader and Acrobat 6, press F4. See Chapter
3 to discover more about the How To window.
The best way to zoom in on some document detail (be it lines of text or a
graphic) is to click the Zoom In tool (or press Z, its hot key) and then use the
magnifying-glass pointer to draw a bounding box around the desired text or
graphic. When you release the mouse button, Adobe Reader zooms in on the
selected area so that it takes up the entire width of the Document pane.
At the bottom left of the Document pane, you find the status bar, which gives
you valuable information about the current PDF file you’re viewing. The
status bar also enables you to advance back and forth through the pages and
to change how the pages are viewed in the Document pane (the default set-
ting is a single page at a time). Figure 2-4 helps you identify the status bar
buttons.
31
Chapter 2: Accessing PDF Files
Musical toolbars
You don’t have to leave the five Adobe Reader
toolbars in the original arrangement. You can
move them to new rows or even move them out
of the top area of the screen so that they float
on top of the Navigation or Document pane. To
move a toolbar, you drag it by its separator bar
(the slightly raised vertical bar that appears
before the first button in each toolbar). As you
drag, a dark outline appears at the mouse
pointer until you release the mouse button and
plunk the toolbar down in its new position. Note
that when you release the toolbar in the
Navigation or Document pane area, the Adobe
Reader reshapes the toolbar so that its buttons
are no longer in a single row and gives the tool-
bar its own title bar. You can move the floating
toolbar by clicking the title bar and dragging the
window to a new location, but you can’t change
the shape of the toolbar. To close a floating tool-
bar, click its close button. To dock a floating
toolbar, drag it by its title bar until its outline
assumes a single-row shape, and then drop it in
place. These features also apply to the
Navigation toolbar, which is not displayed by
default in Adobe Reader or Acrobat 6.
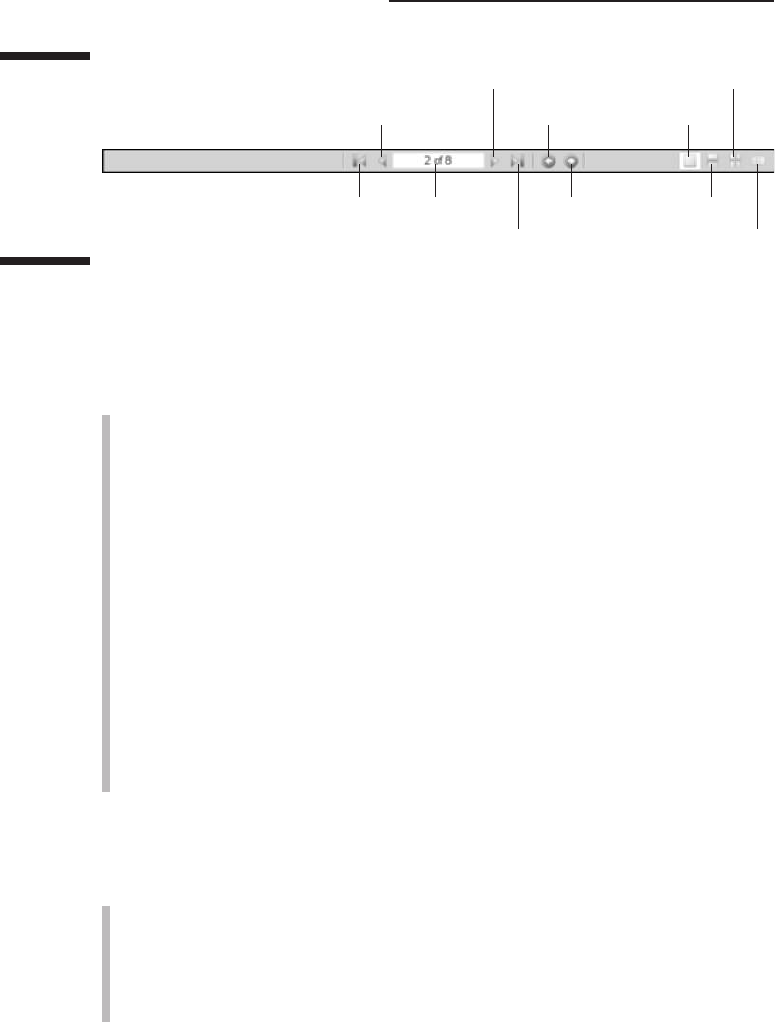
The Adobe Reader Navigation pane
The Navigation pane to the left of the Document pane contains four Tab
palettes in Adobe Reader 6:
The Bookmarks palette: Shows the overall structure of the document in
an outline form. Note, however, that not all PDF files that you open in
Adobe Reader have bookmarks because this is a feature that the author
of the document must decide to include prior to or when actually
making the PDF file. (See Chapter 4 for more on this topic.)
The Signatures palette: Displays your digital signature or any others
that exist in a PDF document signature form field. (See Chapter 11 for
more info on signing and securing PDF documents.)
The Layers palette: Enables you to view any content layers that the
author has inserted, such as headers and footers or watermarks, in the
current PDF document. (For more on this new feature, see Chapter 10.)
The Pages palette (formerly the Thumbnails palette): Shows little rep-
resentations of each page in the PDF document you’re viewing. Note that
Adobe Reader generates thumbnails for each page in a PDF document,
whether or not the author embedded them at the time when the PDF
was made.
Adobe Reader offers you several ways to open and close the Navigation pane
(which may or may not be displayed automatically when you first open the
PDF file for viewing):
If the Navigation Pane is closed, click any of the Navigation Tabs on the
left side of the document pane to open the Navigation Pane and display
that palette.
If the Navigation Pane is open, you can close it by clicking the Close
button (X) on the Options bar at the top of the pane.
Previous page
First page Current page
Next page
Last page
Previous view
Next view
Single page
Continuous
Facing
Continuous facing
Figure 2-4:
The status
bar shows
the current
page and
lets you
control the
page’s view.
32
Part I: Presenting Acrobat and PDF Files

Click the Navigation Pane button (the double-headed arrow) at the
beginning of the status bar in the Document pane to open or close the
Navigation Pane.
Press F6 (Windows or Mac).
Note that you can manually resize the Navigation pane to make it wider or nar-
rower. Position the Hand tool mouse pointer on its border or on the Navigation
Pane button at the beginning of the Status bar. When the tool changes to a
double-headed arrow, drag right (to make the pane wider) or left (to narrow it).
Adobe Reader remembers any width changes that you make to the Navigation
pane, so that the pane resumes the last modified size each time you use the
Reader.
You might be tempted to increase the width of the Navigation pane because it
isn’t wide enough to display all the text in the headings in the Bookmarks
palette. Rather than reduce the precious real estate allotted to the Document
pane in order to make all the headings visible, you can read a long heading by
hovering the Hand tool mouse pointer over its text. After a second or two,
Acrobat displays the entire bookmark heading in a highlighted box that
appears on top of the Navigation pane and extends as far as necessary into
the Document pane. As soon as you click the bookmark link or move the Hand
tool off the bookmark, this highlighted box disappears. You can also choose
Wrap Long Bookmarks on the Options menu at the top of the Bookmarks pane
which automatically adjusts the width of bookmark text to the current width
of the Navigation pane.
Using the Bookmarks palette
The Bookmarks palette gives you an overview of the various sections in many
PDF documents (see Figure 2-5). Adobe Reader indicates the section of the
document that is currently being displayed in the Document pane by highlight-
ing the page icon of the corresponding bookmark in the Bookmarks palette.
In some documents you open, the Bookmarks palette will have multiple
nested levels (indicating subordinate levels in the document’s structure or
table of contents). When a Bookmarks palette contains multiple levels, you
can expand a part of the outline to display a heading’s nested levels by click-
ing the Expand button that appears in front of its name. In Windows, Expand
buttons appear as boxes containing a plus sign. On the Macintosh, Expand
buttons appear as shaded triangles pointing to the right. Note that you can
also expand the current bookmark by clicking the Expand Current Bookmark
button at the top of the Bookmark palette.
33
Chapter 2: Accessing PDF Files
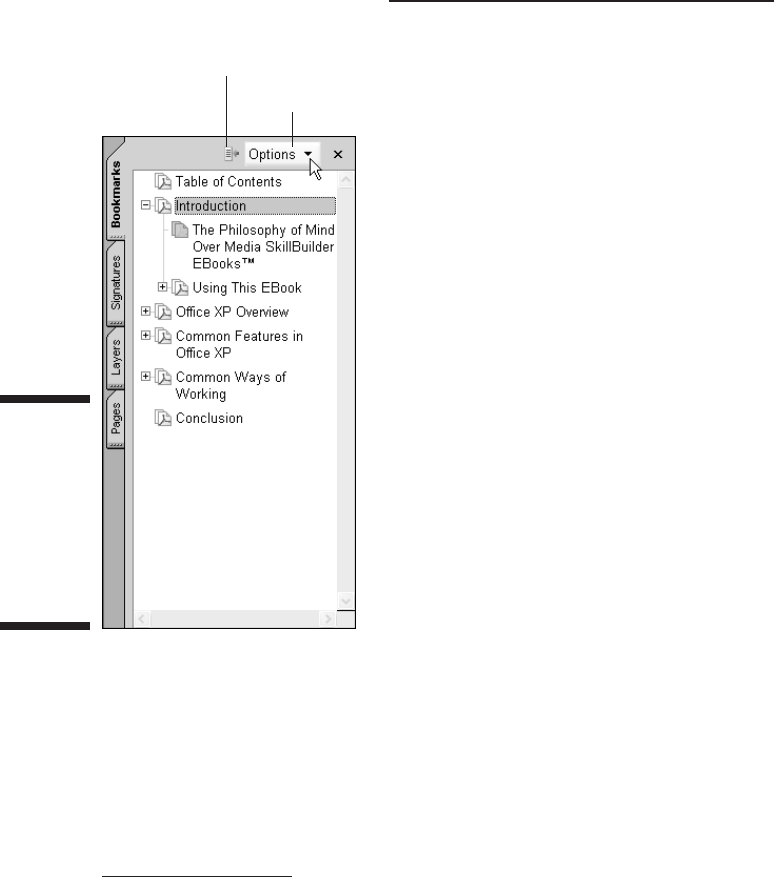
When you expand a particular bookmark heading, all its subordinate topics
appear in an indented list in the Bookmarks palette, and the Expand button
becomes a Collapse button (indicated by a box with a minus sign in it in
Windows and by a downward-pointing shaded triangle on the Mac). To hide
the subordinate topics and tighten up the bookmark list, click the topic’s
Collapse button. You can also collapse all open subordinate topics by select-
ing Collapse Top-Level Bookmarks on the Options menu.
Using the Pages palette
The Pages palette shows you tiny versions of each page in the PDF document
you’re viewing in Adobe Reader (see Figure 2-6). You can use the Navigation
pane’s vertical scroll bar to scroll through these thumbnails to get an overview
of the pages in the current document, and sometimes you can even use them
to locate the particular page to which you want to go (especially if that page
contains a large, distinguishing graphic).
Expand Current Bookmark
Options menu
Figure 2-5:
The
Navigation
pane
opened
with the
Bookmarks
palette
selected.
34
Part I: Presenting Acrobat and PDF Files
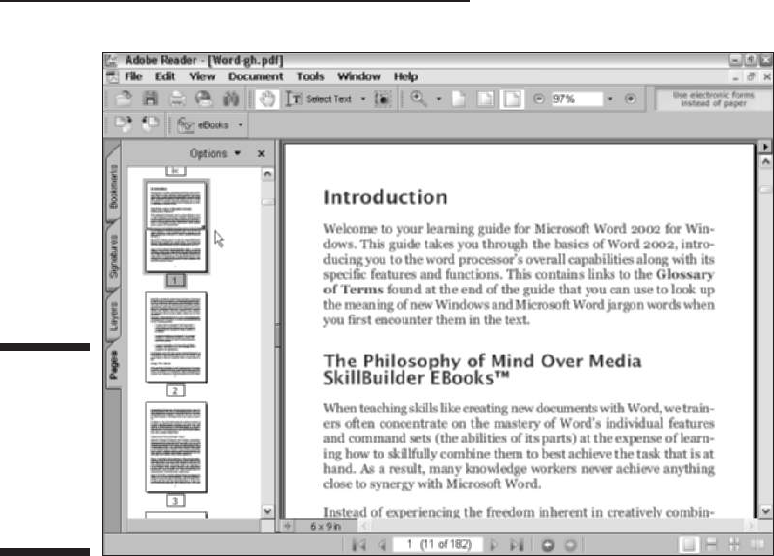
Note that Adobe Reader displays the number of each page immediately
beneath its thumbnail image in the Pages palette. The program indicates the
current page that you’re viewing by highlighting its page number underneath
the thumbnail. The program also indicates how much of the current page is
being displayed in the Document pane on the right with the use of a red out-
lining box in the current thumbnail (this box appears as just two red lines
when the box is stretched as wide as the thumbnail).
You can zoom in and out and scroll up and down through the text of the cur-
rent page by manipulating the size and position of this red box. To scroll the
current page’s text up, position the Hand tool on the bottom edge of the box
and then drag it downward (and, of course, to scroll the current page’s text
down, you drag this outline up). To zoom in on the text of the page in the
Document pane, position the Hand tool on the sizing handle located in the
lower-right corner of the red box (causing it to change to a double-headed
diagonal arrow) and then drag the corners of the box to make the box smaller
so that less is selected. To zoom out on the page, drag the corner to make the
box wider and taller. Of course, if you stretch the outline of the red box so
that it’s as tall and wide as the thumbnail of the current page, Adobe Reader
responds by displaying the entire page in the Document pane, the same as if
you selected the Fit in Window view.
Figure 2-6:
The
Navigation
pane
opened with
the Pages
palette
selected.
35
Chapter 2: Accessing PDF Files

By default, Adobe Reader displays what it considers to be large thumbnails
(large enough that they must be shown in a single column within the Pages
palette). To display more thumbnails in the Pages palette, choose Reduce
Page Thumbnails on the Options menu at the top of the Pages palette. When
you select this command, the displayed thumbnails are reduced in 33% incre-
ments. This means that if you want to reduce the thumbnail display substan-
tially, you have to repeatedly select the Reduce Page Thumbnails command.
To increase the size of the thumbnails, choose Enlarge Page Thumbnails on
the Options menu.
Using the Article palette
Acrobat 6 supports a feature called articles that enables the author or editor
to control the reading order when the PDF document is read online. This fea-
ture is useful when reading text that has been set in columns, as are many
magazine and newspaper articles, because it enables you to read the text as
it goes across columns and pages as though it were set as one continuous
column. Otherwise, you end up having to do a lot of zooming in and out and
scrolling, and you can easily lose your place.
To see if the PDF file you’re reading has any articles defined for it, choose
View➪Navigation Tabs➪Articles. Doing this opens a floating Articles palette
in its own dialog box that lists the names of all the articles defined for the
document. If this dialog box is empty, then you know that the PDF document
doesn’t use articles. Note that you can dock this palette on the Navigation
pane and add its tab beneath the one for the Pages palette by dragging the
Articles tab displayed in the dialog box and dropping it on the Navigation
pane.
To read an article listed on the Articles tab, double-click the article name in
the list or click its name in the list and then click the Read Article item on its
pop-up menu. The first part of the text defined in the article appears in fit-
width viewing mode at the Adobe Reader ‘s default maximum-fit setting, and
the mouse pointer changes to a Hand tool with a down arrow on it. After read-
ing the first section of the article, you continue to the next section either by
pressing the Enter key (Return on Mac) or by clicking the Hand tool pointer.
Adobe Reader indicates when you reach the end of the article by placing a
horizontal bar under the arrowhead of the down arrow on the Hand tool. If
you then click the Hand tool again or press Enter (or Return), Adobe Reader
returns you to the start of the article (indicated by a horizontal bar appearing
at the top of the shaft of the down arrow). To return to normal viewing mode
after reading an article, click one of the regular viewing buttons on the Zoom
toolbar — Actual Size, Fit in Window, or Fit Width — or its corresponding
menu option on the View menu (you can even use the View➪Fit Visible com-
mand, which resizes the text and graphics in the document — without page
borders — and has no comparable button).
36
Part I: Presenting Acrobat and PDF Files

To change the magnification used in reading an article in a PDF file, before
you start reading the article, choose Edit➪Preferences or press Ctrl+K (Ô+K
on the Mac). In the Preferences dialog box that appears, click Page Display in
the left window, and then select a new magnification setting from the Max Fit
Visible Zoom drop-down list. Click OK to close the Preferences dialog box
and change the magnification.
Navigating PDF documents
Between the buttons on the Navigation toolbar at the top, the navigation but-
tons on the status bar, the Bookmarks and Pages palettes in the Navigation
pane to the left, and the scroll bars on the Document pane to the right, you
have quite a few choices in how you navigate a PDF document in Adobe
Reader. The following list describes the most popular ways to move through
the pages of a PDF document:
To move a page at a time: Press the → or ← key, click the Next Page
button in the Navigation toolbar or the status bar to move forward, or
click the Previous Page button to move back.
To move to the last page: Press the End key or click the Last Page
button in the Navigation toolbar or the status bar.
To move to the first page: Press the Home key or click the First Page
button in the Navigation toolbar or the status bar.
To move to a specific page: Drag the scroll button in the Document
pane’s vertical scroll bar until the page number appears in the
ScreenTip; click the Current Page indicator in the status bar, type the
page number, and press Enter; or scroll to the page’s thumbnail in the
Pages palette and click it.
To scroll through sections of text (about half a page at a time): Press
the Page Down key (to move forward) or the Page Up key (to move back).
To scroll continuously through the text: Click and hold down the down
(to move forward) and up (to move back) scroll arrows on the vertical
scroll bar in the Document pane.
Changing the page viewing mode
Normally, Adobe Reader displays a single page of the PDF document at a time
so that when you scroll from the end of one page to the next page, the next
page seems to replace the previous one. You can, if you want, change the
page viewing mode from single to continuous paging, wherein you see a
steady stream of pages as you scroll through the document. To change from
37
Chapter 2: Accessing PDF Files

single-page to continuous-page viewing, click the Continuous button on the
right side of the status bar or choose View➪Continuous.
As part of continuous paging, you can also display facing pages (with verso
or left-hand pages on the left, and recto or right-hand pages on the right). To
display a PDF document with continuous facing pages, click the Continuous -
Facing button on the status bar or choose View➪Page Layout➪Continuous -
Facing. A new addition to the status bar is the Facing button that displays
two full pages side by side in the document window.
Reading text in full-screen mode
If you’re like me and your computer isn’t equipped with a mega-size monitor,
you may want to make the most of your screen real estate by viewing the PDF
document in full-screen mode. When you switch to full-screen viewing, the
program removes all the screen controls, including the menu bar, toolbars,
Navigation pane, status bar, and yes, even the ubiquitous Windows taskbar.
To view a PDF document in full-screen mode, press Ctrl+L (Ô+L on the
Macintosh), or choose View➪Full Screen. To get out of full-screen mode
and return to your regular viewing settings (replete with menus, toolbars,
and so on), press the Escape key (usually marked Esc on your keyboard) or
press Ctrl+L again.
Note that when viewing a PDF document in full-screen mode, Adobe Reader
always displays a single page at a time (no matter what page viewing mode
you were using prior to selecting full-screen mode). Because full-screen mode
hides all menus and toolbars, you normally need to rely on keystroke short-
cuts to alter the magnification and move through the document text. Here are
some of the more useful keystroke shortcuts for doing just that:
Ctrl++ (Ctrl plus the plus key) and Ctrl+– (Ctrl plus the minus key):
Increase magnification by 25% by pressing Ctrl++; decrease magnification
by 25% by pressing Ctrl+–.
Ctrl+0: Select the Fit in Window view.
Ctrl+1: Select the Actual Size view.
Ctrl+2: Select the Fit Width view.
Ctrl+3: Select the Fit Visible view (this enlarges the document so that it
takes up as much of the screen width as possible).
Page Down or Ctrl+↓: Scroll down the text (and move to the next page
in the Fit in Window view).
Page Up or Ctrl+↑: Scroll up the text (to the previous page in the Fit in
Window view).
38
Part I: Presenting Acrobat and PDF Files

Note that if you use Fit Visible, the view that enlarges the document to the
highest degree, you can use the arrow keys to scroll either up, down, left, or
right through the document.
Reading text in the fit-visible viewing mode
Reading a PDF document in full-screen viewing mode is fine as long as you
don’t mind having to navigate the pages with keystroke shortcuts. If, how-
ever, you prefer using the various Adobe Reader screen controls (including
the scroll bars and the navigating buttons on the Navigation toolbar and on
the Document window status bar), you’re out of luck.
To make online viewing as comfortable as possible while still retaining access
to the Adobe Reader screen controls, try viewing the document text in the fit-
visible viewing mode. This viewing mode is very similar to the fit-width mode,
except that it doesn’t retain the space for the document’s left and right mar-
gins, using this margin space instead to further boost the magnification of the
document’s text and graphics.
To use this viewing mode, you need to choose View➪Fit Visible or press
Ctrl+3 (Ô+3 on the Macintosh) because the viewing mode does not have a
button on the Viewing toolbar. Note that the four page view modes (Fit Page,
Actual Size, Fit Width, and Fit Visible) also appear at the bottom of the Zoom
toolbar magnification drop-down list.
Reading reflowed text at larger magnifications
As part of the new accessibility features in Adobe Reader 6, the program is
equipped with a Reflow command that you can use to prevent document text
from disappearing off the page at larger magnifications. This feature is a god-
send for visually impaired users who otherwise wouldn’t be able to read the
text on the screen at all, and it can be a real boon for anyone, particularly
when reading a PDF document that uses especially ornate and decorative
fonts that can be very difficult to decipher given the current screen resolution.
Figures 2-7 and 2-8 illustrate how beneficial reflowing the text can be when
doing online reading in Adobe Reader 6. In Figure 2-7, I selected the Fit Visible
command on the Adobe Reader View menu and then increased the magnifica-
tion setting to 200%. As you can see, at this magnification, you would have to
do a lot of horizontal as well as vertical scrolling to read the text. Figure 2-8
shows what happens when you use the Reflow command by choosing View➪
Reflow. Note how, when this viewing setting is turned on, all the lines of text
now fit within the screen width. Although you have to do more vertical
scrolling to get through the reflowed text at this magnification, you won’t
be forced to do any horizontal scrolling at all.
39
Chapter 2: Accessing PDF Files
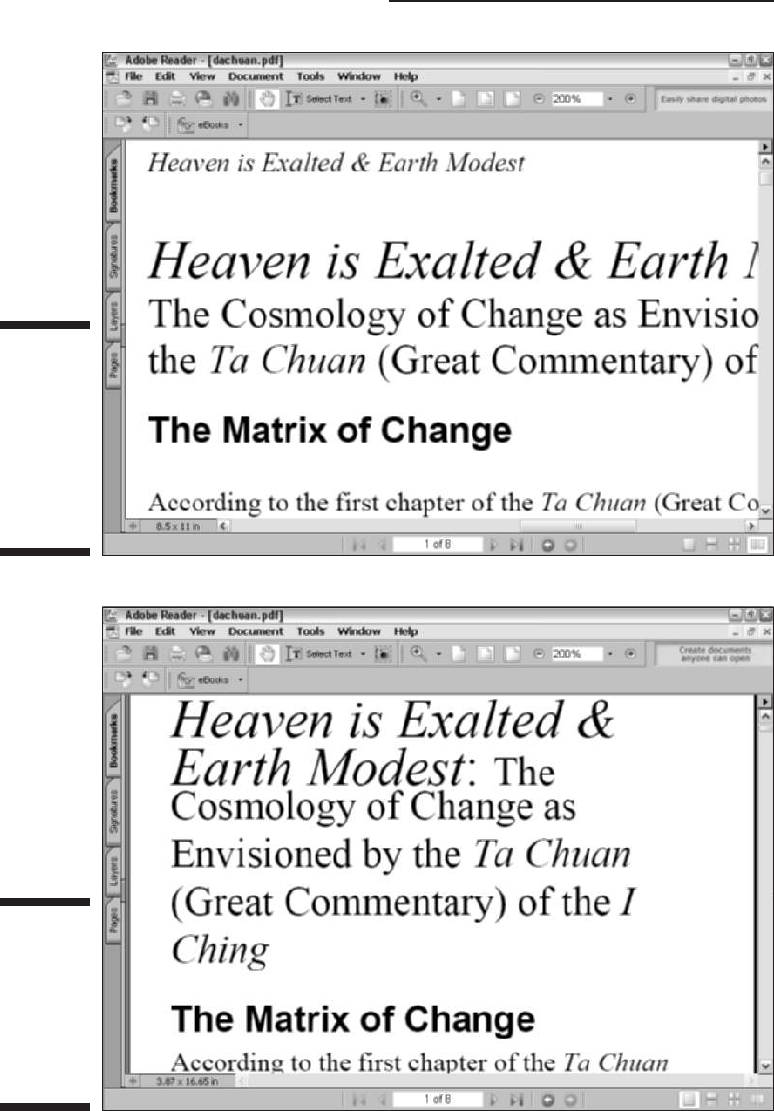
Figure 2-8:
PDF
document
text at
200%
magnifi-
cation after
reflowing.
Figure 2-7:
Viewing PDF
document
text in
fit-visible
mode at
200%
magnifi-
cation.
40
Part I: Presenting Acrobat and PDF Files

You can turn on the reflow viewing mode by choosing View➪Reflow or by
pressing Ctrl+4 (Ô+4 on the Mac). While viewing the PDF document with
Reflow turned on, you can increase or decrease the magnification settings,
and Adobe Reader will immediately reflow the text to accommodate the
increase or decrease in magnification.
To get out of reflow viewing mode, simply select one of the other viewing
modes — Actual Size, Fit in Window, Fit Width, or Fit Visible — from the View
menu or the Viewing toolbar (remember, Fit Visible is available only on the
View menu). When you select one of these other viewing modes, Adobe
Reader automatically reduces the magnification setting to accommodate
the text in the mode.
Using bookmarks to locate a particular spot in the document
Instead of just aimlessly scrolling through the PDF text, you may want to find
a particular place in the text. If the document has bookmarks, you can often
use their links to go right to the spot you want. Simply display the Bookmarks
palette in the Navigation pane, expand the topic of interest, and then click
the heading at which you want to start reading. When you click a bookmark
link, Adobe Reader displays that heading in the Document pane.
If you scroll through the text of a PDF document in the Document pane and
then decide that you want to find your place in the bookmarks, click the
Reveals Bookmark for the Current Page button (the one with the arrow point-
ing toward the tiny sheet of paper) located to the immediate left of the Options
menu at the top of the Bookmarks palette. When you click this button, Adobe
Reader highlights the bookmark in the Bookmarks palette corresponding to the
heading closest to your place in the text displayed in the Document pane.
41
Chapter 2: Accessing PDF Files
Getting a non-tagged PDF to reflow
Note that the Reflow feature works only on
tagged PDF documents that have been prepared
with one of the latest versions of an Acrobat
Distiller including, of course, the Distiller in
Acrobat 6 and PDFMaker for Microsoft Office
2000 and XP (see Chapter 15 for more on tagged
files). If the PDF file you’re viewing isn’t tagged,
you can tell right away because the Reflow
command on the View menu is grayed out and
not available for use. To convert such a PDF
file to a tagged version for use with the Reflow
feature with Acrobat 6, choose Advanced➪
Accessibility➪Add Tags to Document (the
Accessibility items are available on the
Advanced menu when you perform a Complete
installation of Acrobat 6).

Using Search to locate a particular spot in the document
If your document doesn’t have bookmarks (and not all PDF files do), you can
use the Adobe Reader (Full version only) Search function to search for a
heading, key term, or identifying phrase. To search for text with the Search
feature, click the Search button in the File toolbar or choose Edit➪Search to
open the Search PDF pane in the How To window. Enter the word or phrase
you want to locate in the document in the What Word or Phrase Would You
Like to Search For? text box in the Search PDF pane, and then click the Search
button or press Enter to search for it in the document. The program then
scans the entire document and displays the results in a list box. The word or
phrase is highlighted in each occurrence in the Results list, and you can then
click the highlighted term to highlight and move to that occurrence in the
document. If no matching text is located, you receive a warning dialog box
indicating that this is the case.
To find subsequent occurrences after you close the Search dialog box, press
Ctrl+G (Ô+G on the Mac). You can use this keystroke shortcut until you reach
the final occurrence of the term in the document, at which point the command
stops working.
To narrow your search by preventing Adobe Reader from finding matches for
your search text within other, longer words (such as the occurrence of her in
the word whether), select the Match Whole Words Only check box in the
Search PDF pane before you begin the search. To narrow your search to exact
case matches, select the Match Case check box. To search for a term in the
Bookmarks or Comments in a PDF file, check the appropriate check boxes.
The Search PDF pane also provides two radio buttons that specify where you
would like to perform your search. Select the In the Current PDF Document
radio button to search the document displayed in the document window or
select the All PDF Documents In radio button and then choose a location on
your computer or LAN (Local Area Network). You can even select the Search
PDFs on the Internet link at the bottom of the pane to perform your search on
the Internet. This feature is powered by Google, the well-known Internet
search engine, but keep in mind that you are searching across all PDF docu-
ments on the Internet, so the time it takes to perform your search depends
on your Internet connection speed. For more information on the Adobe
Reader/Acrobat 6 Search feature, see Chapter 13.
Perusing PDF Files in Acrobat 6
It should come as little or no surprise to discover that viewing PDF files in
Adobe Acrobat 6 is no different from viewing them in Adobe Reader. After all,
the free, giveaway Adobe Reader is simply a trimmed-down version of the
full-fledged, must-be-purchased Acrobat 6, lacking all Acrobat’s editing tools
(they being what you pay for) but none of the browsing tools.
42
Part I: Presenting Acrobat and PDF Files

This means that if you have Acrobat 6 installed on your computer (and I’m
assuming that you do or will shortly, otherwise why invest in this book?), you
can dispense with Adobe Reader altogether and use Acrobat 6 as your exclu-
sive PDF editing and viewing program. Of course, this means that for details
on how to view and browse your PDF files in Acrobat 6, you need to back up
and read the earlier information on perusing PDF documents in Adobe
Reader, because all of it pertains to using Acrobat 6 to view PDF documents.
(For information on using Acrobat 6’s editing features to create, edit, and
proof PDF files that can then be distributed to readers using Adobe Reader,
refer to the chapters in Parts II and III of this book.)
Reading eBooks with Adobe Reader
and Acrobat 6
Adobe has added eBook support to their new releases of Acrobat 6 and Adobe
Reader. By support, I mean that you can use either program to log onto secure
eBook servers, purchase and download eBooks that are encrypted so that
authors and publishers are protected with respect to copyrights, and even
migrate your old Adobe Acrobat eBook Reader library to the new Acrobat
Bookshelf feature. These enhancements mark the end of the Adobe Acrobat
eBook Reader program, which has been discontinued (the name was too long
anyway). The following sections show you how to use Adobe Reader or
Acrobat 6 to specifically read Adobe eBooks.
If you are using the Basic version of Adobe Reader, you must go online and
download the eBooks plug-in in order to access My Bookshelf and use eBooks.
To get the plug-in, choose Help➪Updates and in the Adobe Reader plug-ins
page choose the eBooks package and click Update. The plug-in is downloaded
and automatically installed in your Basic version of Adobe Reader.
I want my DRM
The first thing you have to do in order to start downloading and enjoying the
huge selection of Adobe eBooks available on the Internet is activate a DRM
(Digital Rights Management) account with Adobe. DRM is a system architec-
ture used to prevent unauthorized copying and distribution of copyrighted
materials. The system uses security and encryption to lock content and limit
its distribution to only those who pay for the content. You cannot purchase
or download Adobe eBooks without activating a DRM account with Adobe.
43
Chapter 2: Accessing PDF Files
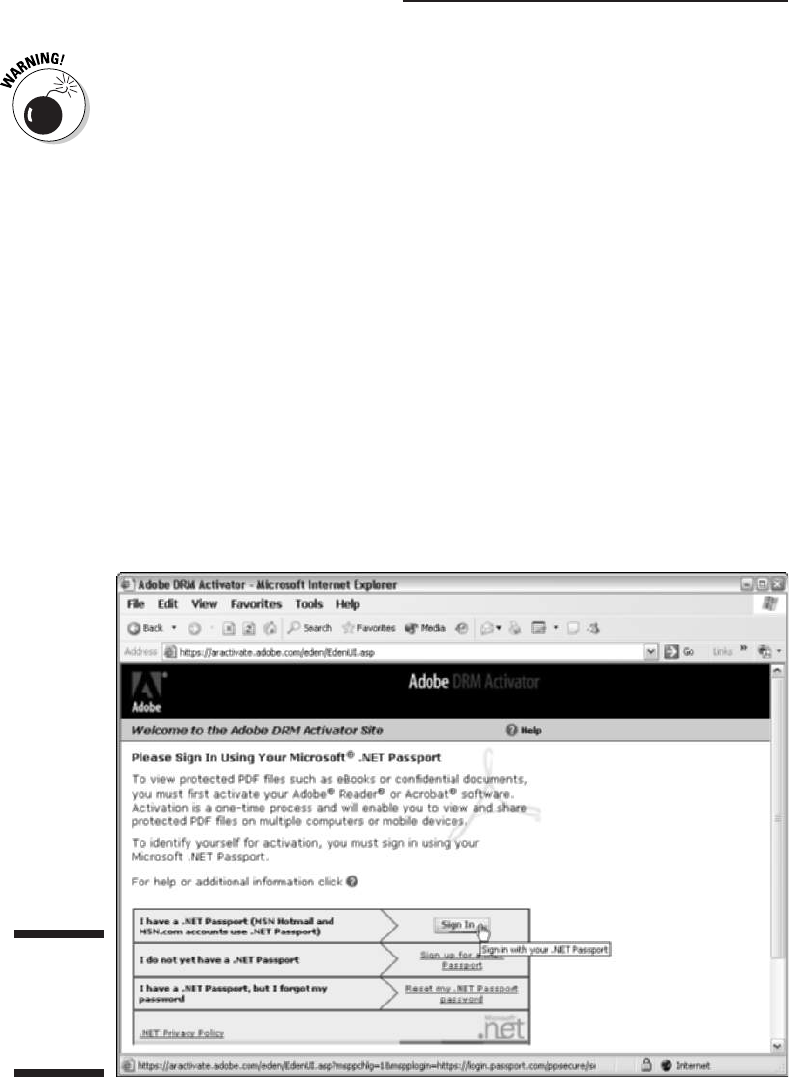
Adobe allows you to activate Acrobat or Adobe Reader on only two devices: a
computer and a PDA (Personal Digital Assistant) running Palm OS. The com-
puter can be a desktop or laptop and the limitation applies to cross-platform
machines — so if you have both Windows and Macintosh computers, you have
to decide which platform you want to use for eBook consumption. Consider
these choices carefully because it’s a one shot deal. If you know you want to
read eBooks on your desktop computer, activate your desktop of choice. If you
plan on reading eBooks while traveling with a laptop, make sure to activate
that machine. Again, you can only activate one of your computers!
Using the Adobe DRM Activator
Adobe makes it a snap to perform this very important eBook DRM business
through My Bookshelf in both Adobe Reader and Acrobat 6. As I mentioned
earlier, My Bookshelf is a separate module that replaces the Adobe Acrobat
eBook Reader Library and can be accessed by either Acrobat 6 or Adobe
Reader. To do so, choose File➪My Bookshelf. The first time you open My
Bookshelf, an Alert box appears, suggesting that you go online to activate a
DRM account. Click OK in this alert box to open your browser and go to the
Adobe DRM Activator Web page, as shown in Figure 2-9.
Figure 2-9:
The Adobe
DRM
Activator
Web site.
44
Part I: Presenting Acrobat and PDF Files

The Adobe DRM Activator site uses Microsoft’s .NET Passport service to
create an online identity for you when performing secure transactions on the
Internet. If you don’t have a .NET Passport you can click the I Do Not Yet
Have a .NET Passport link and easily register yourself. Note that you also
have the option of signing into the Adobe DRM Activator using your Adobe ID
(acquired if you’ve ever done business at the Adobe Store online). Scroll to
the very bottom of the Web page (it’s not shown in Figure 2-9) and click the
tiny I Prefer Not to Sign in Using Microsoft .NET Passport link. With ID in
hand, follow these steps to activate your computer or Palm OS device:
1. Click the Sign In button.
A new page appears with a form for signing into the Adobe DRM Activator.
2. Fill in the E-Mail Address and Password text boxes then click the Sign
In button on this page.
After signing in, the Adobe DRM Activator page appears where you can
perform three important functions: activate Adobe Reader or Acrobat,
activate Adobe Reader on your Palm OS device, and migrate eBooks
from the Adobe Acrobat eBook Reader (both Windows and Macintosh
versions of the eBook Migration Utility are provided).
3. Click the Activate or Activate Palm OS Device button.
After clicking the desired Activate button, a lot of behind the scenes digital
tinkering occurs between the DRM Activator and your computer or Palm
device that results in an alert box telling you Adobe Reader or Acrobat has
been successfully activated. You can now start using My Bookshelf to pur-
chase and download eBooks.
You can access the Adobe DRM Activator page to perform any of its functions
at any time by choosing Tools➪eBook Web Services➪Adobe DRM Activator in
Adobe Reader, or by choosing Advanced➪eBook Web Services➪Adobe DRM
Activator in Acrobat 6. On the eBook Web Services submenu, you also find the
Adobe eBook Central command that takes you online to Adobe’s eBook Web
site, where you can get all manner of eBook information and support, access
online booksellers, and even find out how to use online lending libraries or
create your own lending library using Adobe’s Content Server software.
Dusting Off My Bookshelf
My Bookshelf, similar to the one shown in Figure 2-10, is a separate module
used to access and organize your Adobe eBook collection. You can open My
Bookshelf in either Adobe Reader or Acrobat 6 by choosing File➪My Bookshelf
or by selecting My Bookshelf on the Read an eBook drop-down list on the Tasks
toolbar. Whichever program you use (either Adobe Reader or Acrobat 6) to
open My Bookshelf is the program that is used to view selected eBooks.
45
Chapter 2: Accessing PDF Files
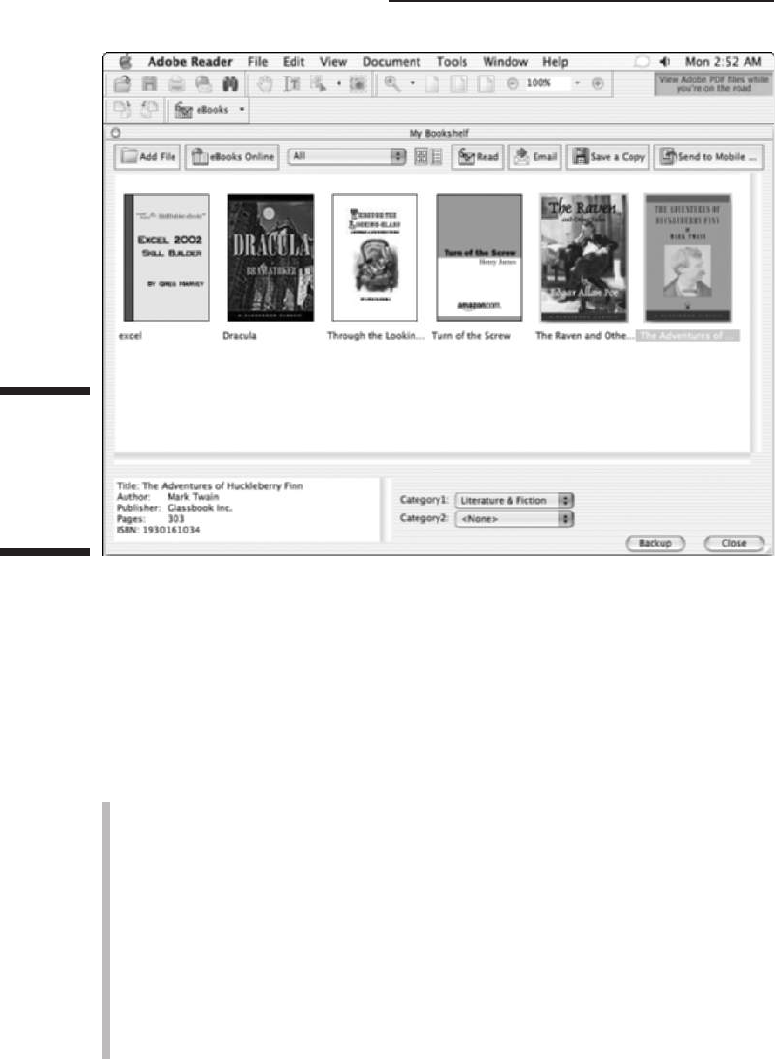
As you can see in Figure 2-10, My Bookshelf displays collected eBooks as
individual thumbnails for each book in the display area. You can use My
Bookshelf as a repository for regular PDF files as well as eBooks. When you
select an eBook, its vital statistics appear in a window in the lower-left corner
of My Bookshelf. To open an eBook or PDF document you’ve added to My
Bookshelf and view it in Adobe Reader or Acrobat 6, double-click its thumb-
nail display. At the top of My Bookshelf is a button bar with the following
buttons and functions:
Add File: Use this button to add a PDF document to My Bookshelf. After
clicking the button, browse for the desired PDF and click OK. You can
then access and manage the file in the same manner as eBooks.
eBooks Online: Use this to go online to the Adobe eBook Central Web
site and from there navigate to the Adobe eBook Mall, where you can
purchase or borrow eBooks from the online Lending Library.
Categories: Use this drop-down list to sort the display of eBooks in
My Bookshelf by either All eBooks, All Documents, or any of six default
categories provided such as Fiction, History, Romance, and so on. You
can also choose Edit Categories on this drop-down list to create custom
categories, as well as delete categories in the Bookshelf Categories
Figure 2-10:
Viewing
an eBook
collection
in My
Bookshelf.
46
Part I: Presenting Acrobat and PDF Files

dialog box. To assign a category to an eBook or document, select the
item in the My Bookshelf display window, and then choose up to two
categories in the drop-down lists provided at the bottom of the My
Bookshelf window.
Thumbnail View: Use this to display thumbnails of all the eBooks and
PDF files stored in My Bookshelf. Double-click a thumbnail icon to open
that eBook or document.
Detail View: Use this to display a list of all the eBooks and PDF files
stored in My Bookshelf. The detailed list includes title, author, access
information, and category. Double-click an item in this list to open that
eBook or document.
Read: Select an eBook or PDF document in My Bookshelf and click this
button to open the item in Adobe Reader or Acrobat 6.
E-mail: Click this button to e-mail a copy of an eBook to another person.
This functionality is set up by the eBook retailer and instructions are
automatically entered in the body of the e-mail for the recipient to follow
in order to gain access to the e-mailed PDF eBook.
Save a Copy: Click this button to create and save a copy of an eBook in a
directory on your hard drive. Restrictions on the ability to copy or the
number of copies that can be made are set forth in the individual eBook
permissions. See the “Viewing eBook permissions” section, later in this
chapter, for more information.
Send to Mobile Device: Use this button to transfer an encrypted copy of
an eBook to a Palm OS hand-held device. You must have a DRM activated
installation of Adobe Reader for Palm OS on the destination handheld in
order to transfer and view a purchased eBook on it. You can’t use this
button to transfer regular PDF files to a Palm device. Use your Palm Hot
Sync software instead. Note: This button appears automatically in My
Bookshelf only if you have a Palm device cradle attached to your com-
puter when you install Acrobat 6 or Adobe Reader.
Viewing Adobe eBooks
When reading an eBook in Acrobat 6 or Adobe Reader, you use the same
viewing and navigational tools (including keyboard shortcuts) that you use
when viewing regular PDF documents. In addition, Adobe has added a new
viewing mode, called Facing mode, that is particularly well-suited to reading
eBooks. Facing mode presents two eBook or PDF document pages at a time
side by side in the document window, emulating the look of an opened book.
Figure 2-11 shows an eBook viewed in Facing mode. The normal viewing
modes found on the View menu (Actual Size, Fit Page, and so on) can be
applied to pages viewed in Facing mode. Paging through an eBook is easily
accomplished via the navigational buttons found on the status bar at the
bottom of the document window.
47
Chapter 2: Accessing PDF Files
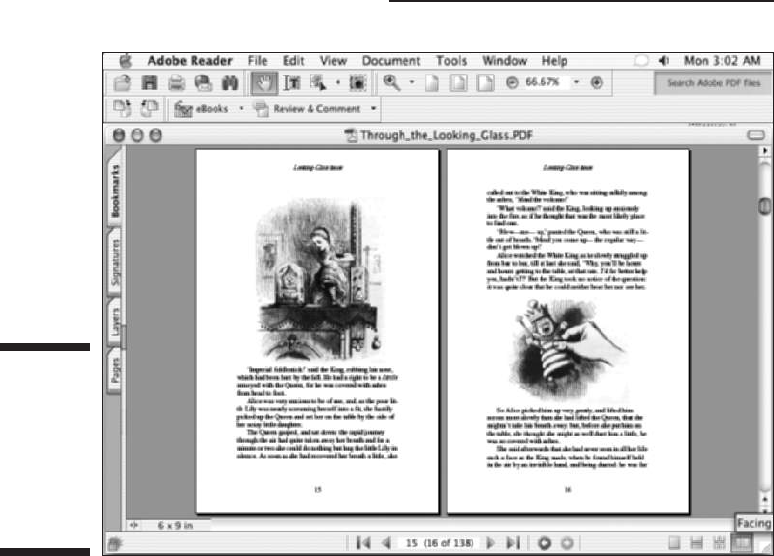
Adobe has also added two features to Acrobat 6 and Adobe Reader. The new
automatic scrolling makes it easier to scan through pages in an eBook, and
the new Read Out Loud feature enhances accessibility for visually impaired
readers by reading eBook or PDF document text out loud.
To use automatic scrolling, choose View➪Automatically Scroll. The docu-
ment window begins a continuous vertical scroll to the end of the document.
To momentarily stop the scrolling, click and hold the mouse button.
Releasing the mouse button continues automatic scrolling. To completely
halt automatic scrolling, press Esc before the end of the document. Note that
there is no control over scrolling speed and the scrolling movement blurs the
text and degrades readability somewhat. This feature is best used to scan for
a particular place in an eBook where you want to start reading.
The Read Out Loud (formerly Read Aloud in the Adobe Acrobat eBook
Reader) uses your Windows or Macintosh speech engine to read an eBook or
PDF document text out loud through your computer speakers. To use Read
Out Loud, choose View➪Read Out Loud, and then choose either Read This
Page Only, or Read to the End of Document on the Read Out Loud context
menu. This context menu also provides Pause and Stop commands for the
Read Out Loud feature. To specify the default voice, volume, and speech
attributes, choose Edit➪Preferences, and then select Reading in the list box
in the Preferences dialog box. In the Reading palette that appears, specify
options in the Read Out Loud Options area.
Figure 2-11:
Using
Facing
mode to
view an
eBook in
Adobe
Reader.
48
Part I: Presenting Acrobat and PDF Files

When you’re reading an eBook, you can look up the definitions of words using
the Select Text tool. Choose the Select Text tool on the Basic toolbar and drag
to select a single word in an eBook or PDF document, and then right-click and
choose Look Up “selected word” on the context menu. Acrobat automatically
takes you online to Dictionary.com and instantly looks up the definition of
your selected word on that Web site. This feature is especially handy if you’re
blessed with broadband (always on) Internet access. If you’ve only got dial-up
access to the Web, it’s probably quicker to use the old fashioned method —
grab your dog-eared copy of Webster’s and look the word up yourself.
Improving readability
You can utilize Adobe’s CoolType technology to improve the on-screen readabil-
ity of eBooks and other PDF documents. CoolType is a font and image smooth-
ing process that increases the contrast of text and images on their background.
The technology works particularly well on flat-screen LCD computer monitors
or handheld devices. To adjust CoolType settings, follow these steps:
1. Choose Edit➪Preferences (Acrobat➪Preferences on Mac) to open the
Preferences dialog box.
2. Select Smoothing in the list box to display the Smoothing palette, as
shown in Figure 2-12.
3. Select the Use CoolType (Recommended for Laptops/LCD Screens)
check box.
Figure 2-12:
Specifying
CoolType
settings to
improve
eBook
readability.
49
Chapter 2: Accessing PDF Files

4. Select one of the example radio buttons (A-F) that is most readable on
your monitor, and then click the Next button.
5. Select one of the example radio buttons (A-D) that is most readable on
your monitor, and then click OK to save your CoolType settings.
Note that you can also experiment with readability settings for the type of con-
tent you’re viewing by selecting different combinations of the Smooth Text,
Smooth Line Art, and Smooth Images check boxes in the Preferences dialog box.
Viewing eBook permissions
All Adobe eBooks you purchase and download have permissions built in as
part of their DRM (Digital Rights Management) architecture. These permis-
sions are set by the publisher of the eBook and specify how many times you
can print and copy an eBook, as well as the eBook expiration date. To view
permissions set for a particular eBook, open the eBook from My Bookshelf
and choose File➪Document Properties. In the Document Properties dialog
box that appears, choose Security in the list box to display the Security set-
tings for your selected eBook.
Migrating eBooks from Adobe Acrobat eBook Reader
Adobe provides a utility on the DRM Activator Web site that enables you to
migrate eBooks you’ve previously purchased using the Adobe Acrobat eBook
Reader into My Bookshelf. Note that if you don’t use this utility to move pre-
viously purchased eBooks into My Bookshelf, you’ll have no choice but to
use Acrobat eBook Reader in order to access these older books, and because
the program has been discontinued, future compatibility is not guaranteed.
To download this valuable utility, go online to the Adobe DRM Activator Web
site by choosing Tools➪eBook Web Services➪Adobe DRM Activator in Adobe
Reader, or by choosing Advanced➪eBook Web Services➪Adobe DRM Activator
in Acrobat 6. After signing in (see the preceding section, “Using the Adobe DRM
Activator”), click the appropriate link on the Adobe DRM Activator Web page
(Windows and Macintosh versions of the migration utility are provided) to
download the migration utility to your computer. After your selected version of
the utility is downloaded, you can run the application to migrate your Adobe
Acrobat eBook library to My Bookshelf. Note that when you run this utility, you
cannot have Adobe Reader or Acrobat 6 open. If either program is open, an
alert dialog box will stop the process and tell you to close those programs and
run the migration utility again. When the process is finished, your old library
eBooks will then be recognized in My Bookshelf.
Browsing PDF Files in a Web Browser
The last way to read PDF files is with your Web browser. In order for your
Web browser to be able to open PDF files, it needs a special PDFViewer
50
Part I: Presenting Acrobat and PDF Files
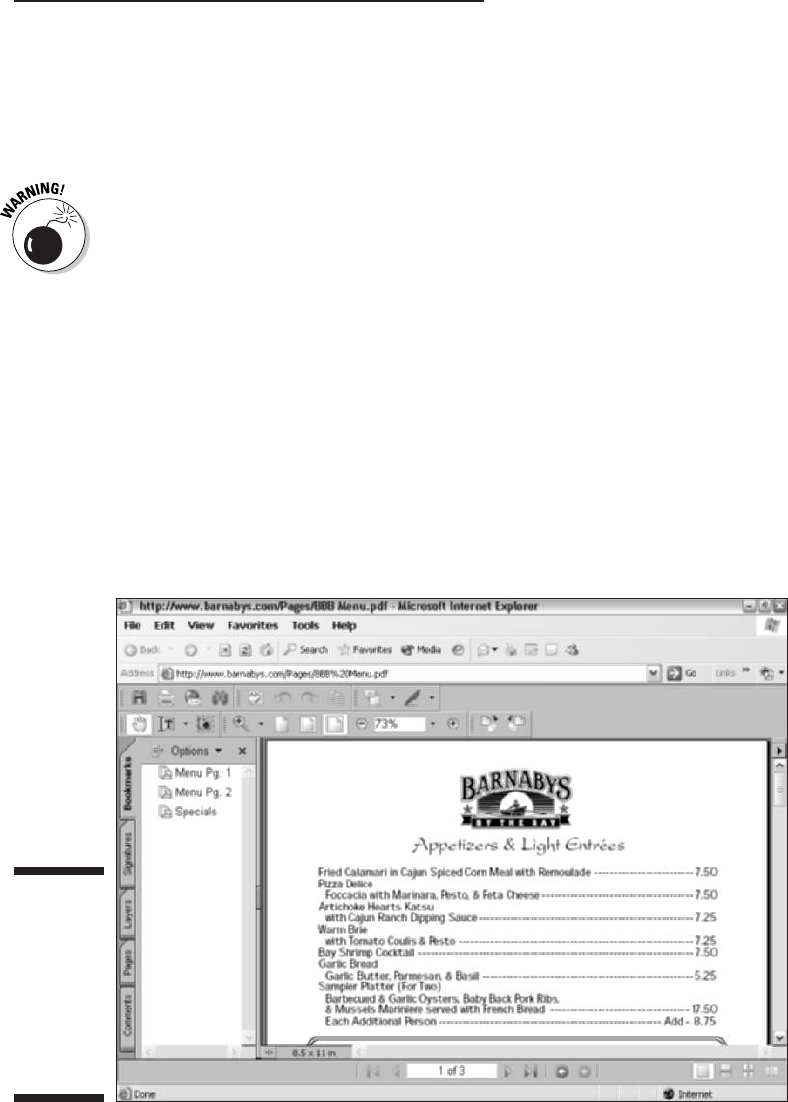
plug-in that is automatically installed when you perform a complete install of
Acrobat 6 or download and install the Full version of Adobe Reader on your
computer. The programs have a detect and repair feature that automatically
checks for the browser plug-in when you launch Acrobat 6 or Adobe Reader
6, so you’re sure to get this plug-in one way or another.
The Acrobat 6 PDFViewer plug-in is not supported on browsers running
under Mac OS X, though the Acrobat 5 version of the plug-in works perfectly
on the Macintosh for OS 9.2.2 and earlier using both Netscape Navigator and
Internet Explorer. Adobe has stated that it will make an OS X version of the
PDFViewer available in the near future. For now, OS X users must configure
their browsers to use Acrobat 6 or Adobe Reader as a helper application in
order to download and view PDF files.
Figure 2-13 shows you how Internet Explorer 6 looks when you open a PDF
file in it. Note how the Adobe Reader toolbars are integrated into the normal
Internet Explorer 6 user interface, along with the Adobe Reader Navigation
bar, complete with the palette tabs for Bookmarks and Pages. If you’re using
Internet Explorer 5.0 or greater as your Web browser, you also get the
PDFMaker plug-in, in addition to the PDFViewer plug-in, when you install
Acrobat 6. This plug-in adds a Create PDF button to the browser toolbars
that allows you to create PDF documents from Web pages you’re viewing in
the browser.
Figure 2-13:
Opening an
online PDF
file for
viewing in
Internet
Explorer 6.0
on Windows
XP.
51
Chapter 2: Accessing PDF Files

If you have Acrobat 6 (the one you have to buy) installed on your computer
instead of just the freebie Adobe Reader, the additional toolbars (Basic Tools,
Commenting, and Editing) and palette tabs (Comments and Signatures) not
found in Adobe Reader are also added to the Web browser’s user interface.
You can save a copy of the PDF document that you’re viewing online with
the Web browser to your hard drive by clicking the Saves a Copy of the File
button (the one with the disk icon at the very beginning of the very first tool-
bar). In the Save a Copy dialog box that appears, specify the folder where you
want the copy saved, and then click the Save button to make the copy. After
the PDF document is saved on your hard drive, you can then open it for read-
ing with Acrobat 6 or Adobe Reader.
52
Part I: Presenting Acrobat and PDF Files

Chapter 3
Getting Acquainted with Acrobat 6
In This Chapter
Finding out ways to start Acrobat 6
Opening and arranging PDF files for viewing and editing
Getting familiar with the Acrobat 6 user interface
Scoping out the Acrobat 6 menus
Becoming familiar with the Acrobat 6 extra toolbars
Getting online help when you need it
Getting familiar with some of the more important keyboard shortcuts
Y
ou can think of Acrobat 6 as the full-Monty edition of Adobe Reader 6.
Adobe Reader acts as the free viewer for the PDF files that you prepare
with Acrobat 6 (which will put you back about U.S. $250 unless you’re
upgrading from a previous version). As the full-featured Acrobat product
goes, its user interface, while similar to a great degree with that of Adobe
Reader 6, is still a wee bit more fun-filled and jam-packed than that of Adobe
Reader (which is covered at length in Chapter 2).
In this chapter, you find out what makes Acrobat 6 so special that it’s worth
all the bucks. As part of this orientation process, you start to discover all the
ways you can use Acrobat 6 to put your PDF files into the hands of all of
those freeloaders using Adobe Reader.
Launching Acrobat 6
When you install Acrobat 6 on a Windows computer, the installer automati-
cally puts a shortcut to the program on the desktop called Adobe Acrobat 6.0.
To launch Acrobat 6, double-click this shortcut, or if you have a PDF file you
want to edit with the program, drag its file icon onto this shortcut or double-
click the PDF file icon to start Acrobat and open the file for editing. You can
also launch the program from the Start menu by choosing Start➪Programs➪
Adobe Acrobat 6.0 (in Windows XP, choose Start➪All Programs➪Adobe
Acrobat 6.0).

If you plan on using Acrobat regularly, you should add an Adobe Acrobat 6.0
button to the Quick Launch toolbar on the Windows Taskbar. That way, you
can launch the program from the Windows Taskbar with a single click of the
Acrobat button, even when another application program is running full-
screen. To add an Adobe Acrobat 6.0 button to your Quick Launch toolbar,
simply drag the Adobe Acrobat 6.0 desktop shortcut to the place on the
Quick Launch toolbar where you want the Adobe Acrobat 6.0 button to
appear, and then release the mouse button. Note that the Quick Launch fea-
ture does not appear by default on the Windows XP Taskbar. To enable this
feature, right-click the Taskbar, choose Properties, and select the Show Quick
Launch check box in the Taskbar and Start Menu Properties dialog box.
You can easily add an Acrobat 6.0 alias to the Dock in the Macintosh OS X by
following these steps:
1. Open Acrobat 6 by double-clicking its icon in the Applications folder.
2. Right-click if you have a two-button mouse (when will Steve Jobs get a
clue about single-button mice?) or
ÔÔ
+click the Acrobat icon on the
Dock and choose Keep in Dock on the context menu that appears.
After creating an Acrobat 6.0 alias on the Dock, you can launch the program
by clicking the program icon on the Dock, or you can launch it and open a
PDF file for editing by dragging its file icon and dropping it on the same pro-
gram icon.
Opening PDF files for viewing or editing
Acrobat 6 and the Adobe Reader 6 enable you to open multiple PDF files at a
time. The easiest way to open more than one PDF file is from the Open dialog
box, which you can display by choosing File➪Open on the Acrobat menu, by
clicking the Open button (the very first button on the File toolbar), or by
pressing Ctrl+O (Ô+O on the Macintosh).
In the Open dialog box, first select the folder that contains the PDF files you
want to open, and then select the multiple PDF files using one of the following
methods:
To select a cluster of files, lasso them by dragging a bounding box
around the group with the Arrowhead mouse pointer (Windows only).
To select a bunch of files in a single column or row, click the first one to
select it and then hold down Shift when you click the last one.
To select individual files not all in a cluster, single column, or single row,
hold down the Ctrl (Ô on the Mac) key as you click each file icon or name.
54
Part I: Presenting Acrobat and PDF Files
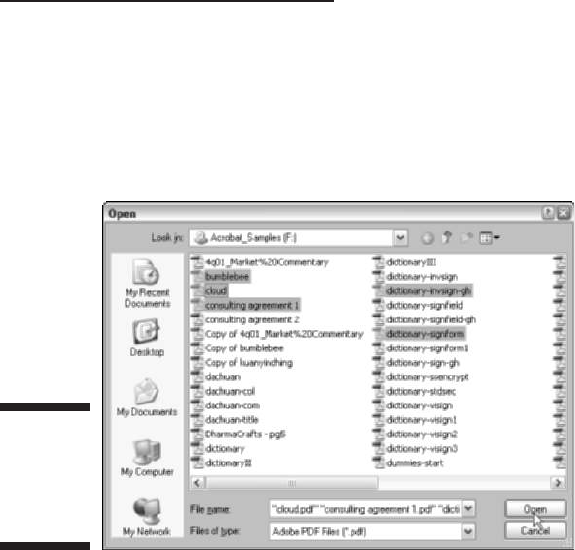
Figure 3-1 shows the Open dialog box in Windows after selecting several indi-
vidual PDF files for opening in Acrobat 6. When you click the Open button
after selecting multiple files for opening, all the selected files open in Acrobat
in alphabetical order by filename, although only the one whose filename is
last in this sequence is actually displayed in Acrobat’s document window.
To display one of the files that’s currently open but not visible on the screen
in the Acrobat document window, choose Window on the Acrobat menu bar
and then type the number or click the name of that PDF file displayed at the
bottom of the Window menu.
Arranging open PDF files
in the Acrobat window
When you’re working with more than one file in Acrobat, you can use the Tile
or Cascade options on the Window menu to display part of all the open files
in the Acrobat document window. You have a choice between two tiling
options, Horizontally or Vertically. When you choose Window➪Tile➪
Horizontally, Acrobat arranges the open document windows one on top of
the other. When you choose Window➪Tile➪Vertically, Acrobat arranges the
open document windows side by side.
Generally speaking, vertical tiling is usually more useful than horizontal
tiling, given that computer monitors are wider than they are tall, so that
when you place them side by side, you can see more of the document’s text
Figure 3-1:
Selecting
multiple PDF
files to open
in Acrobat 6.
55
Chapter 3: Getting Acquainted with Acrobat 6

and graphics. Tiling is very useful when you want to copy text and graphics
from one PDF document to another using the drag-and-drop method.
When you choose Window➪Cascade, Acrobat arranges the open document
windows in a cascade. When you cascade the open document windows, the
title bars and the tabs of the palettes on the Navigation pane are visible for
all the files, although you can only see part of the contents of the first file
(that is, alphabetically speaking). To bring a different PDF file to the front,
simply click its title bar. The cascade arrangement is useful when you need to
see all the names of the PDF files that are open and you want to copy text and
graphics using the Copy and Paste commands.
To end a tiled or cascading window arrangement, click the Maximize button
on the active document (the one whose title bar is highlighted and its file-
name is not grayed out). As soon as you maximize the active PDF document
window in Acrobat in Windows, all the other document windows are automat-
ically maximized as well. In Acrobat on the Mac, however, this is not the case,
and you must still manually maximize the other document windows when
you activate them.
When you have a number of PDF files open at the same time in Acrobat, their
document titles are listed at the bottom of the Window menu on the Acrobat
menu bar. To select a file and make it current in the document window, choose
its name on the Window menu or press Alt+W and then the keyboard shortcut
number that appears next to the document title on the Window menu.
Closing open PDF files
Of course, you can close any document open on the Acrobat screen by clicking
its Close button, by choosing File➪Close, or by pressing Ctrl+W (Ô+W on the
Mac). When you have multiple files open in a tiled or cascading arrangement in
Acrobat, you have to be cognizant of which file is active when you close it, or
you can end up accidentally closing a file that you still want to use.
To activate a particular document for closing (or editing, for that matter)
when ordered in a tiled or cascading arrangement, click its title bar to high-
light the title bar and activate the document window (on Acrobat in
Windows, you can do this by pressing Ctrl+F6) or select its filename on the
Window menu.
Acrobat 6 has a very useful menu command, Window➪Close All, that you can
use to close all the document windows that you have open at that time. Of
course, Acrobat stops and prompts you to save changes to any file or files in
the group it’s closing in which you have edits that have yet to be saved.
56
Part I: Presenting Acrobat and PDF Files

Getting Comfy with the
Acrobat 6 Interface
Adobe has given quite a makeover to the Acrobat 6 UI (User Interface) and fea-
ture set. For the most part, the improvements entail adding depth to features
that were already present in Acrobat 5 and reorganizing menus and toolbars in
a more intuitive fashion. While the initial effect may be disconcerting to “old
school” users of Acrobat, the enhanced usability quickly becomes apparent.
Because Adobe Reader 6 is essentially a watered-down version of Acrobat 6,
you’re already good friends with the basic interface enhancements if you’ve
read the sections pertaining to viewing files with the Adobe Reader 6 in
Chapter 2. If you skipped over that material, you may want to give it a quick
look before reading the Acrobat 6-specific stuff in the following sections of
this chapter.
Acrobat 6, despite its obvious similarity with Adobe Reader 6 in terms of
viewing and navigating PDF documents, offers you a much richer interface
with which to work, given its ability to both generate and edit PDF files. In the
remaining sections of this chapter, you find important information about the
features in the Acrobat 6 interface that make the program the powerful PDF
generating and editing tool that it is.
What’s good on the Acrobat 6
menus today?
The Acrobat 6 menus (File, Edit, View, Document, Tools, Advanced, Window,
and Help) contain all the commands found on the Adobe Reader 6 menus;
however, the items in the Acrobat 6 menus vary greatly from those found on
Adobe Reader. The variance is due to the fact that Acrobat 6 has many
more commands than Adobe Reader 6; in addition, Acrobat 6 sports a new
Advanced menu (Adobe Reader does not have this menu) that contains many
of the commands currently sprinkled throughout the Adobe Reader 6 menu
set. You find, even in cases where the menu items seem to match exactly
between the programs, that the options offered on the Acrobat 6 menus are
either more numerous or their functions are tailored specifically to suit the
program’s editing abilities. The follow sections give you a menu-by-menu
description of the most salient Acrobat 6 menu items.
Fun stuff on the File menu
The File menu in Acrobat 6 (shown in Figure 3-2) is home to the common
command items for opening, closing, and saving PDF files. Because you can
57
Chapter 3: Getting Acquainted with Acrobat 6
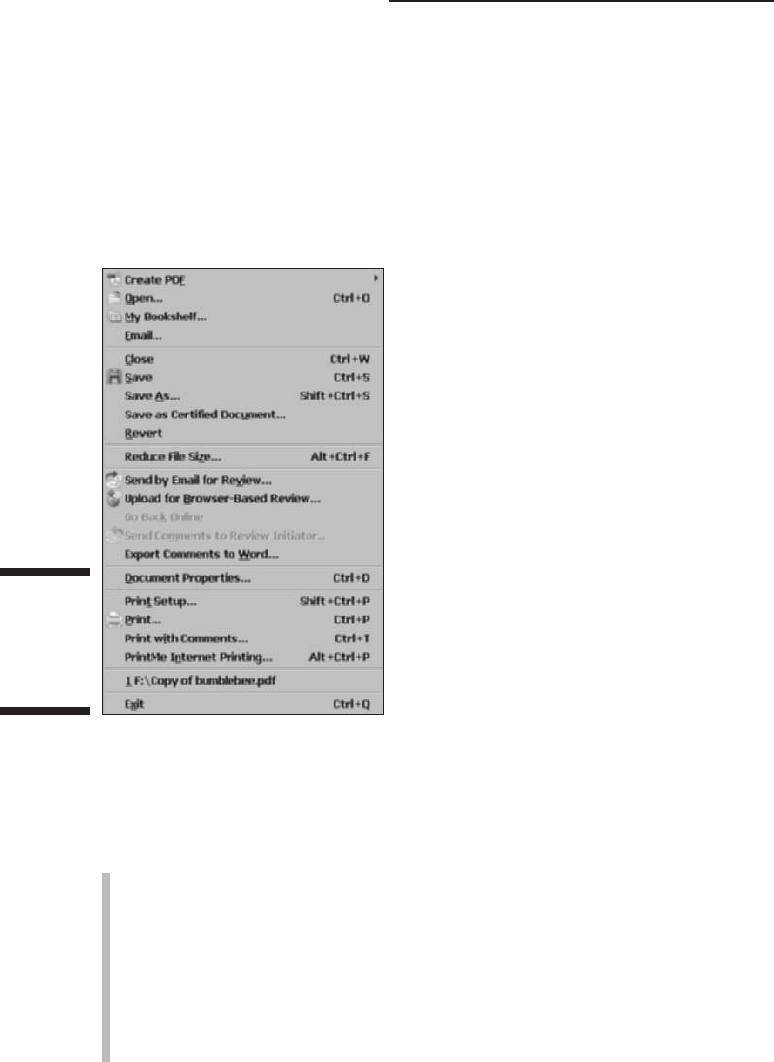
edit PDF files in Acrobat 6, this menu contains a Save option for saving edit-
ing changes, as well as a Save As command for renaming, saving copies, and
changing file formats (Adobe Reader 6 has only a Save as Copy command
that enables users to save to disk a copy of the PDF document that they’re
viewing, and a Save as Text command that converts the current PDF file to
Rich Text Format). Acrobat 6 also lets you use the Save as Certified
Document command to vouch for the contents of a document by digitally
signing it. (See Chapter 11 for more on Certified documents.)
Among the items for opening, closing, and saving files and the standard print
(Page Setup and Print) and exiting commands (Exit on Windows and Quit on
the Mac), are various new File menu commands categorized in the following
areas:
PDF Creation/Viewing: Use the Create PDF command to easily create a
new PDF file from either another file, multiple files, your scanner, a Web
Page, or an item in the Clipboard. Choosing any of the commands on the
Create PDF submenu opens a dialog box that enables you to select your
source items for PDF creation. The My Bookshelf command lets you
access your Adobe eBook library and read eBooks within Acrobat 6. The
new support for EBX encryption that Adobe uses to secure its eBooks,
previously available only in the Acrobat eBook Reader, is also supported
in the Adobe Reader 6 Full version.
Figure 3-2:
Examining
the File
menu in
Acrobat 6.
58
Part I: Presenting Acrobat and PDF Files
E-mail: Use the E-mail command to open your default e-mail program
and attach the current PDF document to a new message. You can also
use the Send by E-mail for Review command to initiate an e-mail review
of the current PDF document. Choosing the command opens a dialog
box where you enter a return e-mail address that reviewers will use to
send Comments from a review of an attached PDF back to you. The
e-mail address you enter is saved for future reviews. When reviewers
receive and open the PDF file in Acrobat 6, they use the Send Comments
to Review Initiator command to send their comments back to you.
Comment/Review: In addition to sending PDF files for review and receiv-
ing comments via e-mail as described in the preceding bullet, you can also
use the Upload for Browser-Based Review command (Windows only) to
send a PDF file to a specified server on a local network, company intranet,
or the Web. Others can then review the online document in their Web
browsers and provide comments that are uploaded and stored in an
Online Comments Repository that you, as the initiator, can review. You
use the Export Comments to Word command to create a Microsoft Word
document containing comments attached to the current PDF file. Note
that the PDF file must be tagged using the Accessibility options in order
to use this command. See Chapter 2 for more on creating tagged PDF files
and Chapter 9 for more on annotating and reviewing PDF files.
Printing: Use the Print with Comments command to select print format-
ting options for a PDF file and its annotations in the Summarize Options
dialog box. Here you choose the page layout, the specific comments and
how they are sorted in the printout, and font size of printed comments.
The PrintMe Internet Printing command enables you to send the current
PDF file to the PrintMe online printing service — a new company offer-
ing Mobile and Internet printing that lets any user with Internet access
print their documents to any fax machine or PrintMe-enabled printer,
regardless of location.
The Reduce File Size command is a much-needed improvement on previous
methods of optimizing a PDF document so that it is the smallest possible size.
To optimize a PDF file in previous versions of Acrobat, you either used the
Save As command (optimizing was accomplished by replacing the current
document by saving under the same name), or you used the multi-stepped
Optimize command in Acrobat 5. The Reduce File Size command is a simple
one-click operation with the added feature of allowing you to set backwards
compatibility with earlier versions of Acrobat. Note that if you really like to
tinker with all the optimizing options available for reducing the size of a PDF
document, you can choose Advanced➪PDF Optimizer for a look at some truly
advanced optimizing options.
59
Chapter 3: Getting Acquainted with Acrobat 6
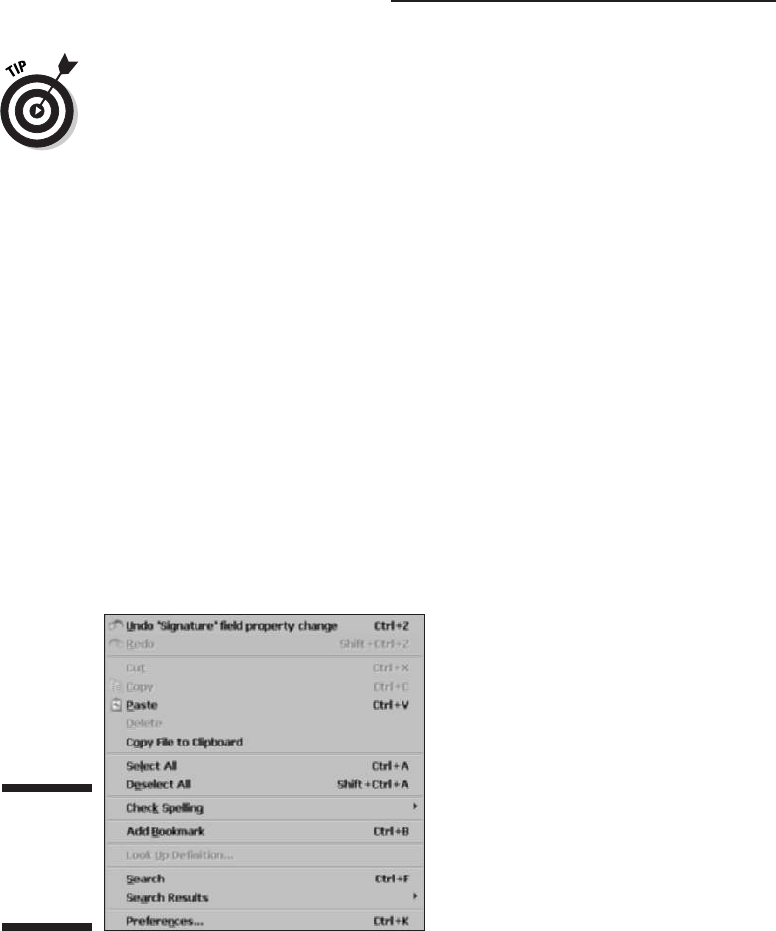
Don’t forget the very valuable Revert item on the File menu. You can use the
File➪Revert command to dump all the edits that you’ve made since you last
saved your PDF document. Click the Revert button in the alert dialog box
that appears, asking you if you want to revert to the previously saved version
of the file, and Acrobat opens this last-saved version without bothering to
save your edits.
Edification on the Edit menu
The Acrobat 6 Edit menu (shown in Figure 3-3) is pretty standard stuff, with
the usual items for undoing and redoing, copying, cutting and pasting, and
searching. A new addition to the Edit menu in both Acrobat 6 and Adobe
Reader 6 is the Check Spelling command that lets you perform a spell check
in the comments and form fields of the current PDF file. The Check Spelling
command also enables you to add or delete words in the spell checker
custom dictionary by choosing the appropriate command on the Check
Spelling submenu. Another new addition to the Edit menu is the Look Up
Definition command, which is activated when you open an eBook and gives
you the definition of a selected word in the eBook. You’ll find that the
Acrobat 6 Edit menu mainly differs from the Adobe Reader 6 menu in its
inclusion of additional Preferences menu items, and additional general prefer-
ence settings that you can set for the PDF document you’re editing in the
Preferences dialog box. You also get the new Add Bookmark command that
lets you, oddly enough, add a bookmark to the current PDF document.
Variations on the View menu
The View menu (shown in Figure 3-4) is one of the areas that Adobe has com-
pletely reworked in Acrobat 6 by altering the UI (User Interface) to improve
usability and give a more intuitive feel to the program. For example, the
Figure 3-3:
Exploring
the Edit
menu in
Acrobat 6.
60
Part I: Presenting Acrobat and PDF Files
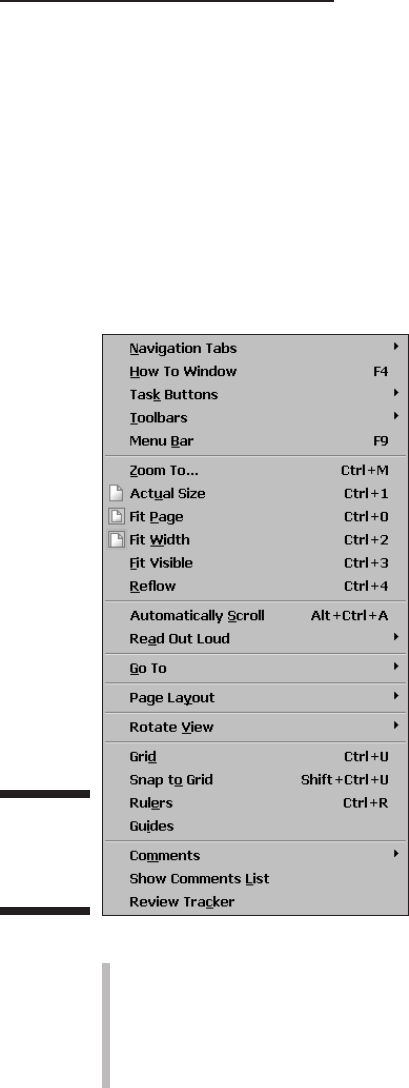
options for the way the document pages are displayed (single-page, continu-
ous, or continuous with facing pages) in the Acrobat Document window, as
well as options for rotating the pages, are now consolidated on submenus
under the commands Page Layout and Rotate View. The options for changing
the page magnification, page fit, and reflow are all grouped together in the
second section of the View menu. In the second-to-last section of this menu,
you find items for using, displaying, and hiding a layout grid for aligning
graphics and form fields, making those items Snap to Grid, and displaying or
hiding Rulers and Guides for graphic and form field layout. (See Chapter 14 to
find out more about interactive forms in Acrobat 6.) These menu consolida-
tions create space on the View menu for the following new feature categories:
eBooks: The Automatically Scroll and Read Out Loud options are
Acrobat eBook Reader features that Adobe integrated in Acrobat 6 and
Adobe Reader 6. These features allow you to automatically scroll down
the current document or have your speech-enabled computer read PDF
document text out loud. As with the Acrobat eBook Reader, the features
work for both eBooks and regular PDF files.
Figure 3-4:
Visiting the
View menu
in Acrobat 6.
61
Chapter 3: Getting Acquainted with Acrobat 6

Comment/Review: At the bottom of the View menu are three options that
aid the initiator of a PDF review cycle or the reviewers themselves. The
Comments options displays a submenu with over a dozen different criteria
that you can use to display reviewer comments, which are pop-up win-
dows that are attached to the current PDF document. Also available are
commands to Open and Close these pop-up windows and specify their
display in relation to the source document. Use the Show Comments List
command to open the Comments tab in a floating window that displays all
comments in a list that you can sort, search, change status, and filter.
Choose the Review Tracker command to open the Review and Comment
pane in the How To window on the right side of the document window.
Here you can display and manage comments that different reviewers have
attached to the current PDF document. You can also e-mail, remind, and
invite more reviewers to the current PDF document review cycle. See
Chapter 9 for more info on annotating PDF documents for review purposes.
As if all of these features weren’t enough for a single menu, Adobe created five
new options for changing the appearance of the Acrobat 6 window and placed
them all in the first section of the View menu. On the submenu of the Navigation
Tabs command, choose any of the 11 navigation tabs (many of which are nor-
mally displayed on the left side of the Acrobat window for viewing in the
Navigation Pane) as floating windows. Choose How To Window to display the
How To window in the right side of the Acrobat 6 window. On the Task Buttons
submenu, you can choose any or all of the six Task Buttons for display in the
toolbar area. Choose any of the 13 Acrobat 6 toolbars listed on the Toolbars
submenu for display as floating boxes. You can also hide, dock, reset, and lock
currently displayed toolbars. Finally, choose Menu Bar to hide the Acrobat
Menu bar and give yourself a tiny bit of more space for all of those toolbars.
When using the Menu Bar command to hide the Acrobat 6 Menu bar, you
must remember its keystroke shortcut F9 and press it when you want to
redisplay the Menu bar. Otherwise, you have to exit the program to get a new
Acrobat window with a Menu bar.
Delights on the Document menu
The Document menu in Acrobat 6 (shown in Figure 3-5) is another example of
Adobe’s efforts to improve the User Interface (UI). The editing command items
that affect all the pages in the PDF file that you’re editing (such as inserting,
replacing, extracting, and deleting pages, as well as commands for cropping
and rotating pages) are consolidated on the submenu of the Pages option.
Consolidating all the Page option commands on the Document menu makes
room for the following sets of options that are either new features or reshuffled/
renamed commands formerly displayed on other menus in Acrobat 5:
Pages: Contains commands on a submenu that enable you to Insert,
Extract, Replace, Delete, Crop, or Rotate pages in the current PDF docu-
ment. Choose Set Page Transitions to specify transitions between pages
when creating a PDF Presentation. See Chapter 16 for more information.
62
Part I: Presenting Acrobat and PDF Files

Add Headers & Footers: Create, position, and format the text of headers
and footers in a PDF file. See Chapter 10 for more information.
Add Watermark and Background: Select a source image, specify page
range, position, appearance, and preview a watermark or background
for a PDF file. For more information, see Chapter 10.
Add a Comment: Annotate a PDF document by inserting a comment.
Compare Documents: Compare the visual or textual differences in an
older and newer version of the same document.
Summarize Documents: Specify the page layout of a PDF file and its
attached comments.
Import/Export Comments: Import or export comments to and from
other PDF files, or export comments in the current PDF document to
Microsoft Word.
File Attachments: Import files that are attached to the current PDF
document.
Security: Restrict the ability to open or edit a PDF file. You can also
encrypt a document by using certificates, display restriction, and security
levels in the current document. See Chapter 11 for more about security.
Digital Signatures: Use this command to digitally sign, validate, and
create signature fields in a PDF document. See Chapter 11.
Paper Capture: Apply OCR (Optical Character Recognition) to scanned
text files so that you can search the text.
Preflight: Choose from an extensive list of preflighting profiles so that
you can validate the content of a PDF file prior to sending it to press.
For more information, see the section on PDF in the press workflow in
Chapter 1.
Treats on the Tools menu
The Tools menu is yet another example of Adobe’s great effort to consolidate
the Acrobat 6 menu items. The veritable smorgasbord of useful tools from
Acrobat 5 (not to worry — they’ve all been reshuffled to various other
menus, most notably the View menu) has been removed to make room for
the addition of six new tool sets. While the Tools menu is in a dead heat with
the Window menu for shortest menu on the bar, as shown in Figure 3-6, its
options and submenus (some of these options have five submenus!) give you
access to the Basic toolbar set and all the tools that aren’t accessible through
the default toolbar display in Acrobat 6. For those of you who can’t possibly
bear the idea of clicking a toolbar button (or would rather not clutter up your
Acrobat window with scads of seldom-used tool buttons), this menu is a god-
send. Because all the tools on the Tools menu have corresponding toolbar
buttons, you can find out about the Basic tools in Chapter 2 and the rest later
in this chapter.
63
Chapter 3: Getting Acquainted with Acrobat 6
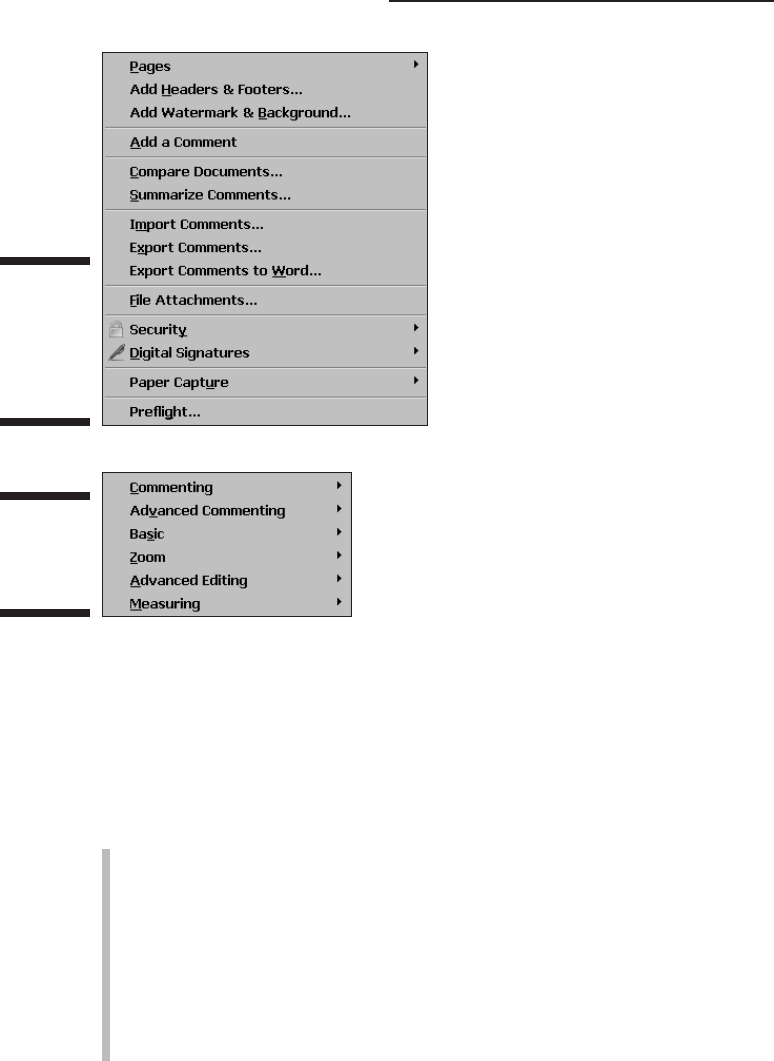
Angst (just kidding) artifice on the Advanced menu
The Advanced menu (shown in Figure 3-7) seems to contain all the more
esoteric options formerly sprinkled throughout the Adobe 5 menus, as well
as a bevy of new and improved options. Here is your veritable smorgasbord
of features. There are so many options that it may be the first time in history
a menu (the first section anyway) has been alphabetized. Starting at the top
of the Advanced menu, you find the following menu items:
Accessibility: Enables you to do a Quick Check or Full Check of the
current document to see if its structure contains tags for reflowing the
document text. If it doesn’t, you can choose Add Tags to Document to do
so. See Chapter 2 for information on viewing reflowed text in Acrobat.
Acrobat Distiller: Opens, you guessed it, the Acrobat Distiller. For more
on this very important Acrobat component, see Chapter 4.
Batch Processing: Select or edit one of the many batch processes that
enables you to perform particular tasks, such as printing or setting basic
security options for a whole bunch of PDF files at one time.
Figure 3-6:
Touring the
Tools menu
in Acrobat 6.
Figure 3-5:
Discovering
the
Document
menu in
Acrobat 6.
64
Part I: Presenting Acrobat and PDF Files

Catalog: Enables you to create a full-text index of a single PDF document
or a collection of PDF documents that can then be searched by using the
Search command.
Document Metadata: Use the Document Metadata command to view and
edit the metadata information (such as Title, Author, Description, and so
on) that is embedded in the current PDF document.
eBook Web Services: Use the Adobe eBook Central command to go
online to Adobe’s eBook Web site. Choosing Adobe DRM Activator logs
you on to Adobe’s secure servers to create an eBook purchaser account
that enables you to download commercial eBooks.
Export All Images: Lets you extract all the images in the current PDF
document as single images in either JPEG, PNG, TIFF, or JPEG2000 file
format.
Forms: Use these commands to perform advanced form use or creation
functions. Choose Import Forms Data to bring form data into the current
PDF document from another PDF form; choose Export Forms Data to
send form data to another PDF form; choose Fields➪Create Multiple
Copies or Fields➪Duplicate to speed up the process of field creation
when building a PDF form; and choose Templates to attach, edit, or
delete a Page Template when creating a PDF form. See Chapter 14 for
more on creating interactive PDF forms.
JavaScript: Lets you access Acrobat’s JavaScript editor, where you can
view, create, edit, and debug JavaScript actions for your PDF forms. See
Chapter 14 for more on using JavaScript actions in interactive PDF forms.
Links: Use the Create from URLs in Document command to convert all
the decipherable URLs (Uniform Resource Locators) to active hyper-
links. Use the Remove All Links from Document command to do just
that. See Chapter 7 for more on creating links in a PDF document.
Manage Digital IDs: Use the commands on this menu to view and edit
your personal Digital ID, as well as those of others who are referred to in
Acrobat as Trusted Identities. See Chapter 11 to discover the ins and
outs of securing PDF documents.
PDF Optimizer: Choose PDF Optimizer to open the PDF Optimizer dialog
box, where you can choose from a comprehensive array of options to
compress images, embed or remove fonts, and compress, discard, or
remove various PDF document features that bulk up its size in order to
reduce the size of a PDF document to optimum levels. You can find out
all about the PDF Optimizer by clicking Complete Acrobat 6.0 Help in the
How To window or by choosing Help➪Complete Acrobat 6.0 Help to
open the Acrobat 6.0 online help guide. In the Contents tab window,
choose Publishing in Electronic Formats and then select Optimizing
Adobe PDF Files.
Web Capture: Use this command to convert Web pages from the
Internet into PDF documents. See Chapter 7 for more on this excellent
Acrobat feature.
65
Chapter 3: Getting Acquainted with Acrobat 6
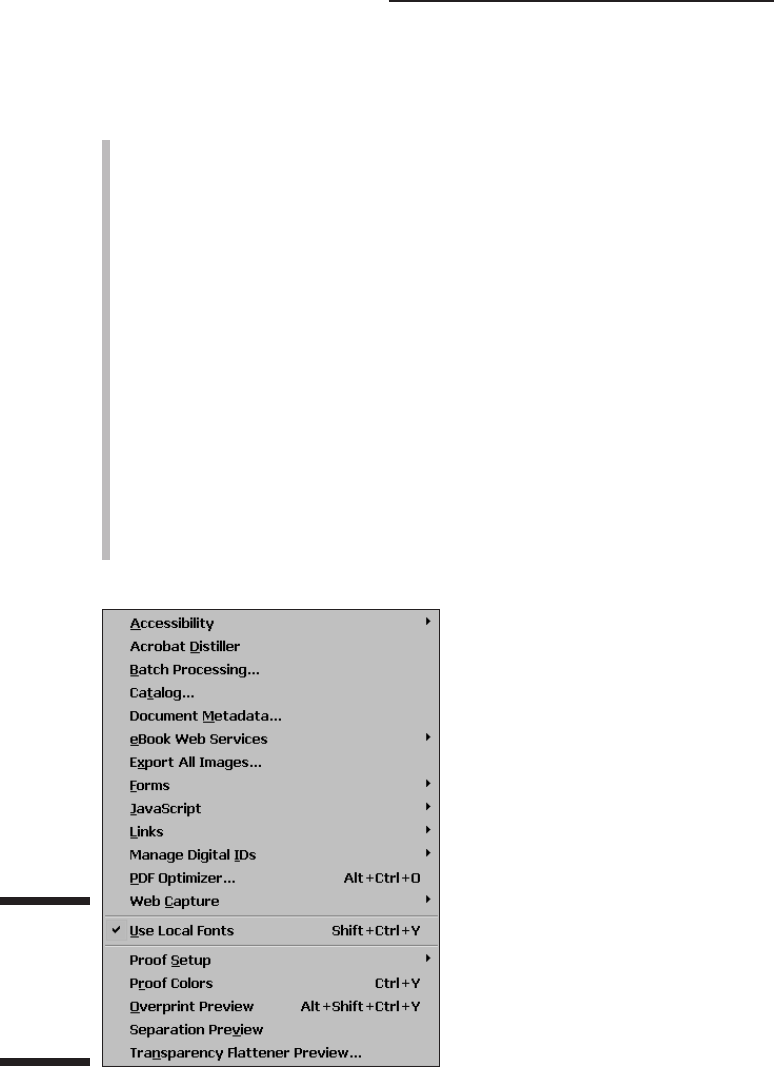
Well, that’s all the alphabetizing fun I have for you courtesy of Adobe.
The bottom sections of the Advanced menu contains these unalphabetized
commands:
Use Local Fonts: This command is turned on by default. When fonts
aren’t embedded in a PDF file, Acrobat uses font substitutions based on
your computer’s system fonts. To see how your PDF document will look
on a computer that doesn’t have your fonts, turn off this feature by click-
ing the command to remove the check mark. You can then preview how
substituted fonts will appear and decide which fonts to embed.
Proof Setup: This command and its associated commands (Proof Colors,
Overprint Preview, Separation Preview, and Transparency Flattener
Preview) in the last section of the Advanced menu allow you to setup,
proof, and preview color separations and overprints on your computer
screen for high-end commercial print output as opposed to printing out
hard copy proofs. Keep in mind that the reliability of these features
depends on the quality of your monitor, use of ICC profiles for color
management, and the ambient lighting of your work environment. If
you’re a printing business professional, this will all make sense. If not,
leave it up to the professionals to develop proofs of your printed PDF
document. The Transparency Flattener Preview command lets you pre-
view how transparent graphic object layers will appear when flattened.
Note that you must have a Postscript printer to use this option.
Figure 3-7:
Aiming
at the
Advanced
menu in
Acrobat 6.
66
Part I: Presenting Acrobat and PDF Files
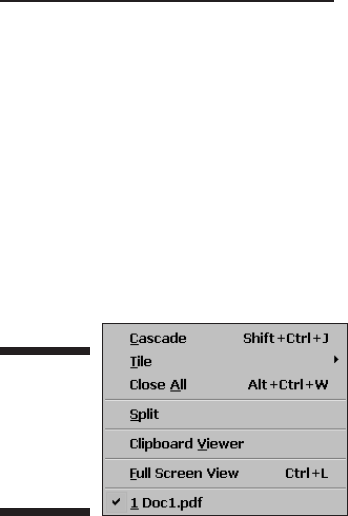
Wonders on the Window menu
The Window menu (shown in Figure 3-8) contains the items you need for
arranging and selecting document windows for the PDF files you’re editing. See
the “Arranging open PDF files in the Acrobat window” section earlier in this
chapter for more information. It also contains the Split command that allows
you to view the same PDF document in two viewing panes, the Clipboard
Viewer for displaying items you’ve copied to the Clipboard, and Full Screen
View for displaying the current document so that it fills your entire monitor
and hides all menus, tools, display windows, and navigation control. You can
toggle Full Screen View on and off by pressing Ctrl+L (Ô+L on the Mac).
Happiness on the Help menu
The Help menu (shown in Figure 3-9) shows the various options for getting
online help with Acrobat 6. The first Help menu item, How To, lets you display
the new Acrobat 6 How To window. This help panel, which opens up on the
right side of the Acrobat window, is similar to the Microsoft Office Help
window. The default set provides links to important help topics, such as
Create PDF, Review & Comment, Secure, Sign, and so on. Clicking a link dis-
plays the corresponding help topics. You can also access the Complete
Acrobat 6.0 Help database and choose whether or not the How To window
is displayed when you start Acrobat 6.
The About Adobe Acrobat 6.0 item displays the program splash screen that
shows your version number, along with your license information, including
your serial number. (You need to click the splash screen to get rid of it, by
the way.) The About Adobe Plug-ins command lets you view the presence and
status of all plug-ins available in your current Acrobat 6 installation. The
About Third-Party Plug-Ins option displays a submenu showing all the third-
party (that is, not made by Adobe Systems) plug-ins installed for your copy
of Acrobat 6. (Two third-party plug-ins, Preflight and PrintMe Internet
Printing, are installed when you first install Acrobat 6 on your computer.)
Figure 3-8:
Walking
through the
Window
menu in
Acrobat 6.
67
Chapter 3: Getting Acquainted with Acrobat 6
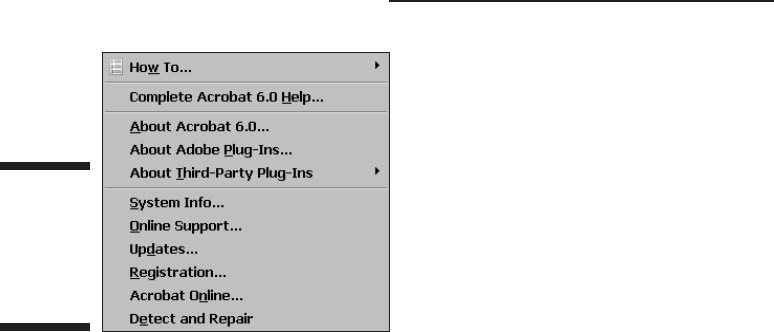
The System Info command creates a report of your current computer system
and Acrobat 6 installation, opens your e-mail client, and attaches the report to
an e-mail for sending to Adobe Tech Support. The Online Support, Updates,
Registration, and Adobe Online commands all launch your Web browser and
connect you to the appropriate pages on the Adobe Systems Web site. Choose
the Online Registration option to register your copy of Acrobat 6 (of course,
you need to do this only once, right after you first install Acrobat 6 on your
computer). The Detect and Repair feature starts a Windows or Macintosh
diagnostic routine that optimizes Acrobat’s performance.
Tons o’ toolbars!
Acrobat 6 contains all the toolbars found in Adobe Reader 6 plus seven more:
Advanced Commenting, Advanced Editing, Commenting, Edit, How To,
Measuring, and Tasks. Figure 3-10 shows these extra toolbars in a custom dis-
play without the Acrobat 6 default toolbars. I’ve docked the extra toolbars in
the order they appear on the Toolbars menu for clarity. To see this menu,
choose View➪Toolbars. The seventh toolbar found in Acrobat 6 and not
Adobe Reader 6 is the Properties toolbar, which is also shown in Figure 3-10,
though not activated. (The Properties toolbar comes alive when you select
certain editing tools and allows quick access to that tool’s functions.) For a
complete rundown on the toolbars and buttons that both Acrobat and Adobe
Reader share, see Chapter 2). The buttons on these extra toolbars are
designed to give you quick access to every editing tool in Acrobat 6 (which
are totally absent from Adobe Reader), and you will undoubtedly make much
use of them as you work in the program. Table 3-1 gives a brief description of
the function of each of these tools.
Figure 3-9:
Helping
yourself to
the Help
menu in
Acrobat 6.
68
Part I: Presenting Acrobat and PDF Files
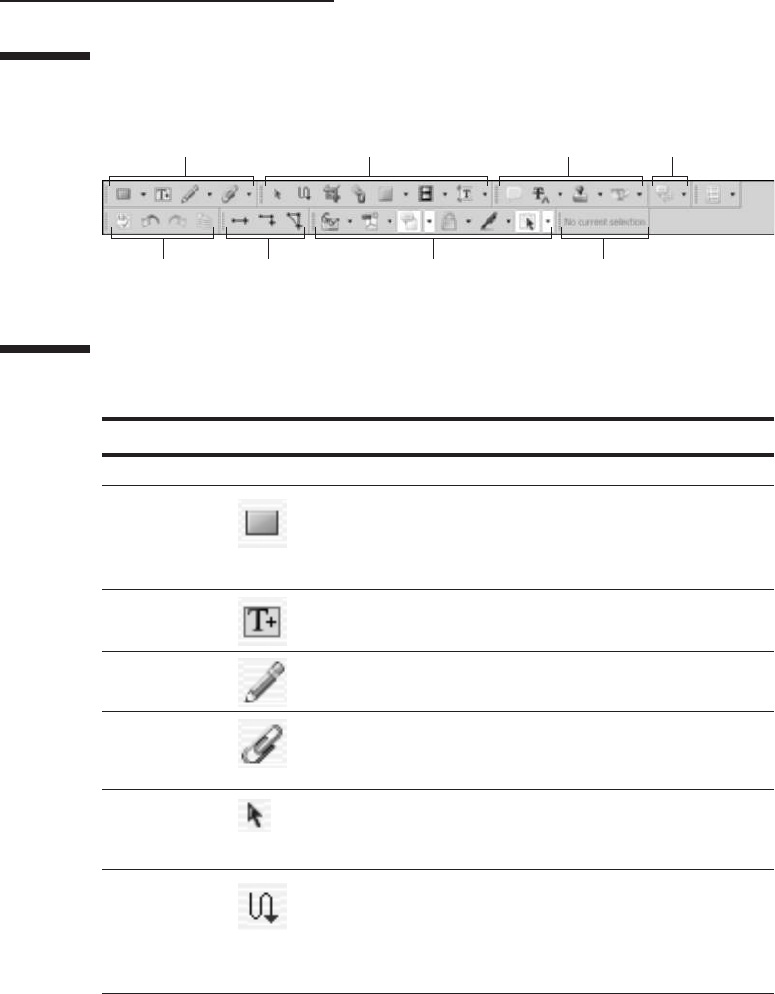
Table 3-1 The Complete Set of Editing Toolbars in Acrobat 6
Toolbar Icon Tool Name Use This Tool To . . .
Advanced Drawing Draw rectangles, ovals, clouds,
Commenting Markup and polygons, as well as lines and
arrows. You can also attach notes
to these markups.
Text Box Mark up your PDF document with
comments written in a text box.
Pencil Markup Draw freehand markups in your
PDF document.
Attachments Attach images, sounds, and
movies as comments in your PDF
document.
Advanced Select Object Select objects, such as links, com-
Editing ments, and form fields, in your PDF
document.
Article Create articles in the document
that designate the order in which
portions of the text are to be read
by using the Article palette in
Adobe Reader 6.
(continued)
Advanced Commenting
Edit
Advanced Editing Commenting Show menu
Measuring Tasks Properties
Figure 3-10:
A custom
display of
the toolbars
used for
editing and
commenting
in Acrobat 6
that don’t
appear in
Adobe
Reader 6.
69
Chapter 3: Getting Acquainted with Acrobat 6

Table 3-1 (continued)
Toolbar Icon Tool Name Use This Tool To . . .
Crop Crop pages in the PDF document.
Link Create a hyperlink in the PDF
document.
Button Add form fields and form objects,
such as check boxes and buttons,
to your PDF document.
Movie Insert a digital movie for playback in
the PDF document.
TouchUp Edit portions of the PDF document.
Text Its More Tools button accesses the
TouchUp Text, TouchUp Object, and
TouchUp Order tools.
Commenting Note Annotate text in the PDF document.
Its More Tools button accesses the
Note, FreeText, Sound Attachment,
and File Attachment tools.
Indicate Mark up text in the PDF document.
Text Edits Use the commands on the pop-up
menu to insert, replace, highlight,
cross out, or underline text, or to add
a note to selected text.
Stamp Apply an electronic rubber stamp;
Approved, Confidential, Received,
and many other stamps in various
visual styles are available.
Highlight Mark up your PDF document with
Text an electronic colored marker. Choose
Highlight, Cross-out, or Underline
from the button’s pop-up menu.
Show View comments and change their
display. Use the pop-up menu to sort
by type, reviewer, and so on. Display
or hide pop-up comments and con-
nector lines, and change the align-
ment of pop-up comments.
70
Part I: Presenting Acrobat and PDF Files
Toolbar Icon Tool Name Use This Tool To . . .
Edit Spell Check Spell check comments and form
Comments and fields that you add to a PDF
Form Fields document.
Undo/Redo Click these two buttons when you
want to undo or redo a change
you’ve made to your PDF document.
Copy Copy a selection in the current PDF
document to the Clipboard.
How To How To Display all the items that appear on
the How To window on the pop-up
menu on the How To button.
Measuring Distance Accurately measure the distance
between two points. Click the first
point, move the mouse pointer to the
second point, and click again.
Distance is displayed in the
Properties toolbar.
Perimeter Accurately measure the distance
between multiple points by clicking
each point you want to measure and
double-clicking the last point.
Perimeter distance is displayed in the
Properties toolbar.
Area Accurately measure the area
between line segments that you
draw. Click at least two points and
then click the first point again. The
measurements (shown in square
inches) are displayed in the
Properties toolbar.
Tasks eBooks Open eBook topics in the How To
window, go online to purchase
eBooks, or display My Bookshelf by
choosing an option from this button’s
pop-up menu.
(continued)
71
Chapter 3: Getting Acquainted with Acrobat 6
Table 3-1 (continued)
Toolbar Icon Tool Name Use This Tool To . . .
Create PDF Open the Create PDF topics in the
How To window or actually create a
PDF from a file, multiple files, a Web
page, a clipboard image, or a scan-
ner by choosing an option from this
button’s pop-up menu.
Review and Open the Review and Comment
Comment topics in the How To window or use
reviewing tools on a PDF document
already in a review cycle by choos-
ing an option from this button’s pop-
up menu.
Secure Open the Security Topics in the How
To window or Restrict and Encrypt a
PDF document or view current secu-
rity settings by choosing an option
from this button’s pop-up menu.
Sign Open the Signature Topic in the How
To window or digitally Sign, Validate,
or Create a Blank Signature Field in a
PDF document by choosing an option
from this button’s pop-up menu.
Advanced Open the Advanced Editing Topics
Editing in the How To window or Hide or
Display the Advanced Editing toolbar
by choosing an option from this
button’s pop-up menu.
Properties Current Tool Edit properties of certain tools or
Bar objects, such as links, media clips,
measuring tools, and bookmarks.
Choose View➪Toolbars➪Properties
Bar to display the floating toolbar.
Zoom Loupe Displays the Loupe Tool window
where you view specific areas of
a PDF document under high magnifi-
cation using the mouse pointer to
navigate.
72
Part I: Presenting Acrobat and PDF Files
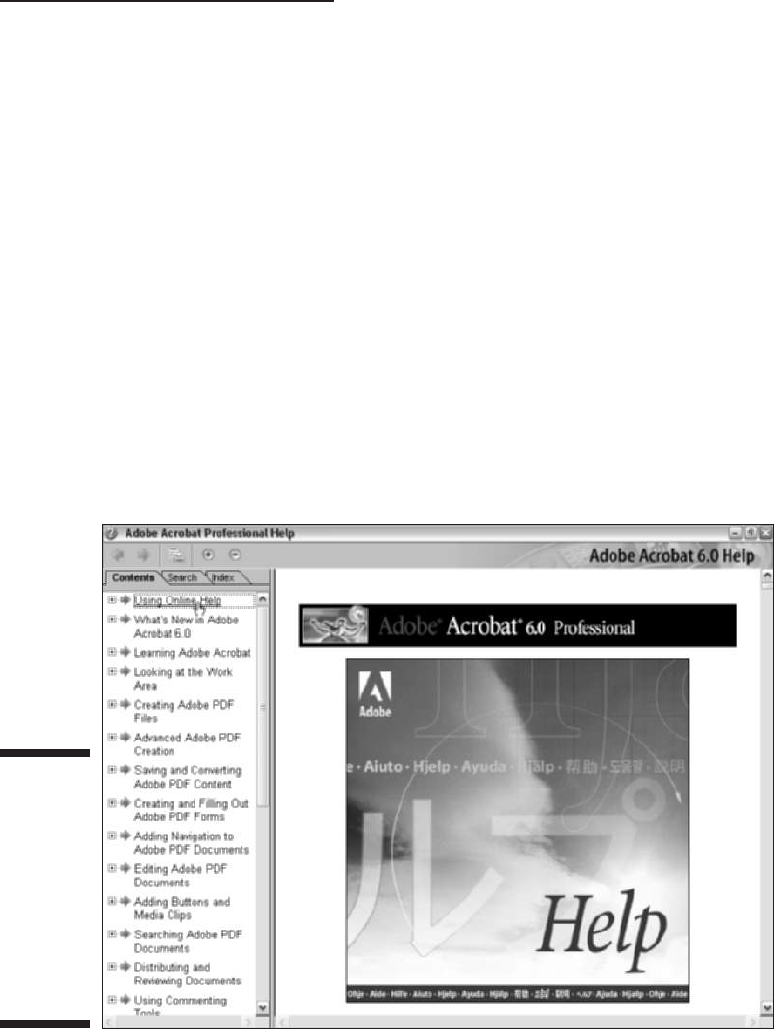
Getting all the help you need
The Complete Acrobat 6.0 Help guide, as it’s now called, is an interactive
hypertext application filled with pages and pages of information (it is called
complete, after all) that you can read online or print out for later and
repeated reference. To open the Adobe Acrobat 6 Help file, choose Help➪
Complete Acrobat 6.0 Help. If you have the How To window open, you can
also click the Complete Acrobat 6.0 Help link there.
As shown in Figure 3-11, when the Complete Adobe Acrobat 6.0 Help file
opens, it displays a Help splash page in a large document viewing area on the
right side of the window and a navigation pane on the left. The navigation
pane has three tabs at the top: Contents, Search, and Index. The Contents tab
is selected by default and contains a scrolling list of hyperlinked topics high-
lighted with blue arrows. Clicking one of these headings displays that topics
subheadings in the viewing window. Each topic also has an Expand button
(plus sign on Windows, triangle on Mac). Clicking the Expand button next to
a Contents topic expands the list to display subtopics that you can click to
display the topic information in the viewing window.
Figure 3-11:
The
Complete
Acrobat 6.0
Help
application
provides
online help
in Acrobat 6
and Adobe
Reader 6.
73
Chapter 3: Getting Acquainted with Acrobat 6

The Search tab enables you to enter search criteria in the Find Pages
Containing text box. Enter your text and click the Search button. Result are
displayed in the scrolling list; you can then click a topic to display its infor-
mation in the viewing window.
Clicking the Index tab displays each letter, A through Z, with an Expand button
next to each letter. To find a help topic by name in the index, click the Expand
button in front of the first letter in your help topic to display all the topics in
the Help guide that start with that letter. For example, to find information on
using the Find command in Acrobat 6, click the Expand button next to the
letter F, and then locate the topic you want in the alphabetical list under F. You
can also use the Show drop-down list to choose one letter and display all the
topics for that one letter in the navigation pane. Clicking any of these links dis-
plays their information in the viewing window. Note that many of the articles
in the Help guide contain links that, when clicked, take you to related topics.
Viewing the How To window
Adobe Acrobat 6 and Adobe Reader 6 provide a new feature, called the How
To window, that supplements the Complete Acrobat 6.0 Help guide. The How
To window appears by default in Acrobat 6 on the right side of the screen,
but you have to manually open it in Adobe Reader 6 by choosing View➪
How To Window or by pressing F4.
The How To window, shown in Figure 3-12, gives you quick access to a number
of everyday tasks you might perform in Acrobat 6. For example, clicking the
Create PDF heading displays a list of links to every method of creating a PDF
file in Acrobat 6. The articles give you quick step-by-step procedures, and
related information links appear with many of the articles. At the top of the
window is a Home button that takes you back to the How To Homepage
(shown in the figure), Back and Forward buttons, and a Hide button to close
the display, thus giving you all the navigational tools you need to easily
browse the How To database.
You can change where the How To window appears on the screen by right-
clicking the How To title bar and choosing Docked Left, Docked Right, or
Hide. If you don’t want to see the How To window every time you launch
Acrobat 6, at the bottom of the How To window, deselect the Show How To
Window at Startup check box.
Every button on the Task toolbar (see the “Tons o’ toolbars!” section, earlier
in this chapter) has a How To topic on its pop-up menu that corresponds to
that task. If you’re in the middle of one of these tasks and need a quick refer-
ence guide, choose the How To command on the Task button pop-up menu to
open the How To window and get some quick help.
74
Part I: Presenting Acrobat and PDF Files
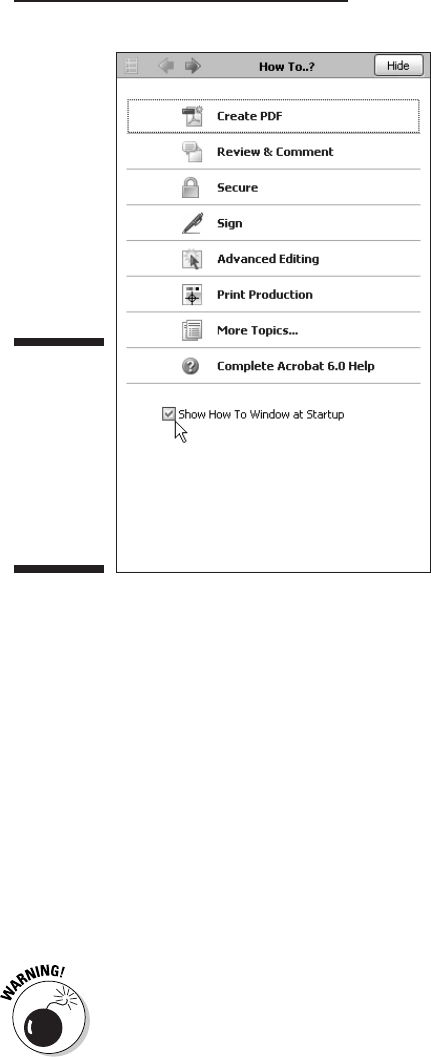
Making quick use of keyboard shortcuts
Acrobat 6 is chock-full of keyboard shortcuts, which is great for a person
like me who likes having access to commands directly from the keyboard
(it really bugs me to have to keep taking my hand off the keyboard in order
to click menu commands and toolbar buttons). The Cheat Sheet card at the
front of this book is full of what I consider to be the most important keyboard
shortcuts when you use Acrobat 6 on a steady basis. Of course, the Cheat
Sheet is designed to tear out of the book so that you can put it up on your
bulletin board or keep it close by your keyboard as you work. In this section,
I want to say only a few words specifically about using the shortcut keys to
select the various tools from the Basic Tools, Zoom, Commenting, Advanced
Commenting, Advanced Editing, and Measuring toolbars, which you use
extensively in your routine editing of PDF files.
Someone at Adobe decided that the keystrokes documented in the following
table were confusing to new users, so the keyboard shortcuts are not activated
by default in Acrobat 6 (much to the chagrin of seasoned users, who might
think Adobe did away with this valuable feature when they first launch the new
Figure 3-12:
The How To
window
gives you
quick
access to
help with
everyday
tasks.
75
Chapter 3: Getting Acquainted with Acrobat 6

program). To make these keystrokes work, choose Edit➪Preferences or press
Ctrl+K (Acrobat➪Preferences or Ô+K on Mac) to open the Preferences dialog
box. Choose General on the scroll list to display those options in the dialog
box, and in the Miscellaneous area, select the Use Single-Key Accelerators to
Access Tools check box, and then click OK. Note that when the feature is acti-
vated, the ToolTips that appear when you hover the mouse pointer over a
button tool show not only the tool’s name but its keystroke shortcut, or single-
key accelerators, as Adobe likes to call them. What’ll they think of next?
This section makes a lot more sense if you turn on single-key accelerators, as
described in the preceding paragraph. Table 3-2 shows you the shortcut key-
strokes for all the tools in Acrobat 6 that use this feature. Note how all the
shortcuts are single letters of the alphabet, used alone, without the usual com-
bination key like Ctrl, Alt, or Ô on Mac. Note, too, that not all of these letters
are mnemonic. (How’d they get N for the Pencil tool and S for the Note tool?)
Table 3-2 Shortcut Keys for Selecting Acrobat 6 Tools
Toolbar Tool Shortcut Key
Basic Tools Hand H
Select Text V
Snapshot G
Zoom Zoom In Z
Commenting Note S
Indicate Text Edits E
Stamp K
Highlight Text U
Advanced Commenting Rectangle D
Text Box X
Pencil N
Attach File J
Advanced Editing Select Object R
Article A
Crop C
76
Part I: Presenting Acrobat and PDF Files

Toolbar Tool Shortcut Key
Link L
Form F
Movie M
TouchUp Text T
Measuring Distance B
To select any of the tools on these toolbars, type the letter of its shortcut key.
Acrobat then selects the tool on the toolbar (indicated by highlighting the
button as though it were depressed), and the mouse pointer changes to the
shape associated with the tool you selected. For example, the pointer changes
to a magnifying glass when you select the Zoom In or Zoom Out tool, and it
changes to an I-beam when you select the TouchUp Text tool.
Many of the Acrobat toolbar buttons have hidden tools that you can view and
select by clicking on their associated pop-up menus. When the single-key
accelerators feature is turned on, you can cycle through and select these dif-
ferent tools by holding down the Shift key and pressing the keystroke shortcut
for the primary (unhidden) tool. For example, the Select Text tool also has the
hidden tools Select Table and Select Image. Press V to choose the Select Text
tool or hold down the Shift key and tap the letter V to toggle through all three
tools in the order that they appear on the pop-up menu. As you cycle through
the menu list, each tool icon is highlighted on the toolbar button to indicate
that tool is selected.
77
Chapter 3: Getting Acquainted with Acrobat 6

78
Part I: Presenting Acrobat and PDF Files
Part II
The Wealth of
Ways for Creating
PDF Files

In this part . . .
G
iven the universal nature of the Adobe PDF (Portable
Document Format), it should come as little surprise
to find out that there are many ways to turn the docu-
ments created with the various software programs you
use into PDF files. This part of the book introduces you to
all the major ways to convert both your electronic and
paper documents to PDF files.
In Chapter 4, you encounter the most common ways to
turn your electronic documents into PDF files. This chap-
ter includes vital information on the most common ways
to convert to PDF, how to customize the settings used in
making these conversions, as well as how to automate
the conversion process. In Chapter 5, you find out how to
turn Microsoft Office documents into PDF files using the
PDFMaker 6.0 utility (automatically installed in Word,
Excel, and PowerPoint when you install Acrobat 6 on your
computer). In Chapter 6, you discover how to convert
paper documents into PDF files by scanning them into
Acrobat 6. In Chapter 7, you find out how to capture Web
pages on your company’s intranet or the Internet and
save them as PDF files (for later viewing and printing in
Acrobat or Adobe Reader). Finally, in Chapter 8, you find
out how to print all or part of the PDF files that you make
using these many methods.

Chapter 4
Distilling PDF Files
In This Chapter
Understanding the common ways to create PDF files
Creating PDF files that fill a variety of functions
Manually distilling PDF files in Acrobat 6
Customizing the Distiller settings
Automating the distilling of PDF files
Using the Adobe PDF Online service to create PDF files
P
DF files don’t grow on trees, but oftentimes it does seem as though they
are produced by every piece of software that you use. The first problem
is understanding how exactly to go about producing PDF versions of your
files, given the software you’re using. (See Chapter 5 for details on producing
PDFs with Microsoft Office programs and Chapter 10 for details on Acrobat
6’s new ability to convert AutoCAD and Microsoft Visio files to PDF.) Then,
after you do understand the software’s procedure, you still have to under-
stand what settings to apply in the Acrobat Distiller utility to produce exactly
the type of PDF file you want.
In this chapter, you find out how to use the Acrobat Distiller (the Distiller util-
ity is included as part of the Acrobat 6 program) to produce the type of PDF
files you need. You also discover how to customize the basic settings and
automate the PDF distillation process.
Common Ways to Create PDF Files
With the advent of Acrobat 6, Adobe Systems has significantly simplified the
process of creating PDF files. In the good old days of PDF production (in other
words, when Acrobat 3 was the latest version), you had little choice but to
print a PostScript file from whatever application program you were using to
create the file to be converted to PDF. You then had to run this file through the
Acrobat Distiller.

Of course, you can still perform this two-part process with Acrobat 6 (which is
generally referred to as manually distilling the PDF file), and, in fact, the rest of
this chapter is devoted to giving you the information you need to create PDF
files using this good old-fashioned way. You need to know how to do manual
PDF distilling primarily because it gives you the most freedom over the settings
that produce exactly the type of PDF file you need. Also, in understanding how
to customize the settings in the Acrobat Distiller, you almost always under-
stand how to customize the distilling settings available in your native applica-
tion software in order to produce precisely the PDF file you require.
Put away that PDFWriter!
Up through version 4 of Acrobat, Adobe distributed a utility called PDFWriter
(no longer automatically installed in Acrobat 6) that enabled you to create
PDF files from popular application software such as Word, Excel, and
PowerPoint in Office 97. Be aware that the PDF files created with the
PDFWriter are PDF 1.2 files, meaning that they lack all the current quality and
security features offered in the PDF 1.4 (generated by Acrobat 5) and 1.5 files
(generated by Acrobat 6).
The PDFWriter is suitable only for the creation of the simplest, text-only PDF
documents, completely lacking in interactivity, and please don’t use it to pro-
duce prepress PDF documents because its 1.2 file format provides no support
for embedded EPS graphics (which can really mess up your workflow).
Instead, use either the Acrobat Distiller described in this chapter or, if you’re
converting Microsoft Office documents, the PDFMaker utility that’s automati-
cally installed with Acrobat 6 (described in Chapter 5).
Using Create PDF in Acrobat 6
Acrobat 6 includes a File menu command, Create PDF, that you can use to open
files saved in the HTML file format (that is, as Web pages) and simple text files,
as well as a number of common graphics file formats including bitmap (
*.bmp
or *.rle), CompuServe GIF (*.gif), JPEG (*.jpg, *.jpeg, or *.jpe), PCX
(
*.pcx), PNG (*.png), and TIFF files (*.tif). Note that Acrobat 6 can now
open Microsoft Office, AutoCAD, MS Visio, and MS Project files using the Create
PDF command as well.
To open one of these file types as a PDF file, follow these steps:
1. Launch Acrobat 6 and then choose File➪Create PDF➪From File.
The Open dialog box appears.
82
Part II: The Wealth of Ways for Creating PDF Files

2. Browse to the folder that contains the text, HTML, or graphics file or
files that you want to open as PDF files in Acrobat 6, and then click
their file icons.
To restrict the file listing in a folder to just files of the type you want to
open in Acrobat, click the file type in the Files of Type drop-down list.
To select multiple files in the folder you open in the Open dialog box,
Ctrl+click each one or, if they’re listed sequentially in the list, click the
first one and then Shift+click the last one.
3. Click the Open button in the Open dialog box.
As soon as you click the Open button, Acrobat opens the selected files as PDF
files (indicated by the appearance of the
.pdf extension after the original file-
name in the Acrobat title bar). To save a file opened as a PDF in its new format,
choose File➪Save to open the Save As dialog box, and then click the Save
button. To change the folder where the file is saved, select the new folder on
the Save In drop-down list. To save the file with a new filename, select the File
Name text box and edit the original filename (leaving the
.pdf file extension)
before you click the Save button.
In Windows, you can convert any of the file types listed at the beginning of this
section to PDF from the desktop, a folder window, or Explorer by simply right-
clicking the file and choosing Convert to Adobe PDF on the context menu.
Options for converting the file and e-mailing it to someone or combining a
group of selected files in Acrobat are also provided on the context menu.
Acrobat 6 enables you to open and convert multiple files to PDF using the
Create PDF commands on the File menu. To do so, follow these steps:
1. Choose File➪Create PDF➪From Multiple Files to open the Create PDF
from Multiple Documents dialog box.
2. Click the Browse button in the Add Files area, choose the file(s) you
want to combine in a new PDF document in the Open dialog box that
appears, and then click the Add button.
Files can be selected individually or grouped in the Open dialog box.
When you click the Add button, selected files appear in the Files to
Combine list box on the right side of the Create PDF from Multiple
Documents dialog box.
3. Select a file(s) in the Files to Combine list box and use the Remove,
Move Up, or Move Down buttons in the Arrange Files area to specify the
order in which selected files appear in the converted PDF document.
4. To append all open PDF documents to your multiple files selection in
a new PDF document, select the Include All Open PDF Documents
check box.
83
Chapter 4: Distilling PDF Files

5. To append the recent PDF files listed on the File menu to your multi-
ple files selection in a new PDF document, select the Include Most
Recent List of Files to Combine check box.
6. Click OK to create a new multiple document PDF file.
Converting graphics files to PDFs by choosing File➪Create PDF➪From File
does not produce the same quality PDF graphics files as distilling them from
their native application or manually distilling them with the Acrobat Distiller.
Reserve this method for Windows graphics that you can’t convert into
PostScript files or that you intend to use only in online PDF documents or
files that will be printed only on in-house printers. Never use this quick-and-
dirty method to produce PDF files that you intend to send out for profes-
sional printing; they lack the encoded PostScript necessary to produce the
quality that prepress demands.
Using the Acrobat 6 Distiller
You use the PDF file Distiller that launches from within Acrobat 6 to convert
only two kinds of files: Those saved as PostScript files (usually printed to
PostScript using the application’s Print command) or those saved in the EPS
(Encapsulated PostScript) file format. This means that before you can use the
Acrobat Distiller, you must have the files you want to convert saved in one of
these two file formats.
Assuming that you have your files readied in these formats, you perform the
following general steps to turn them into PDFs:
1. Launch the Acrobat 6 program.
2. Choose Advanced➪Acrobat Distiller to launch the Acrobat Distiller.
The Acrobat Distiller program window appears, as shown in Figure 4-1.
3. In the Adobe PDF Settings section, select the name of the job option
that uses the desired distilling settings from the Default Settings drop-
down list.
(See the following sections, “To every PDF there is a purpose . . .” for
details on the default Adobe PDF settings, and “Making Adobe PDF set-
tings of your very own” for details on creating customized Adobe PDF
settings.)
4. Choose File➪Open from the Acrobat Distiller menus or press Ctrl+O
(
ÔÔ
+O on the Mac).
The Acrobat Distiller - Open PostScript File dialog box opens.
84
Part II: The Wealth of Ways for Creating PDF Files
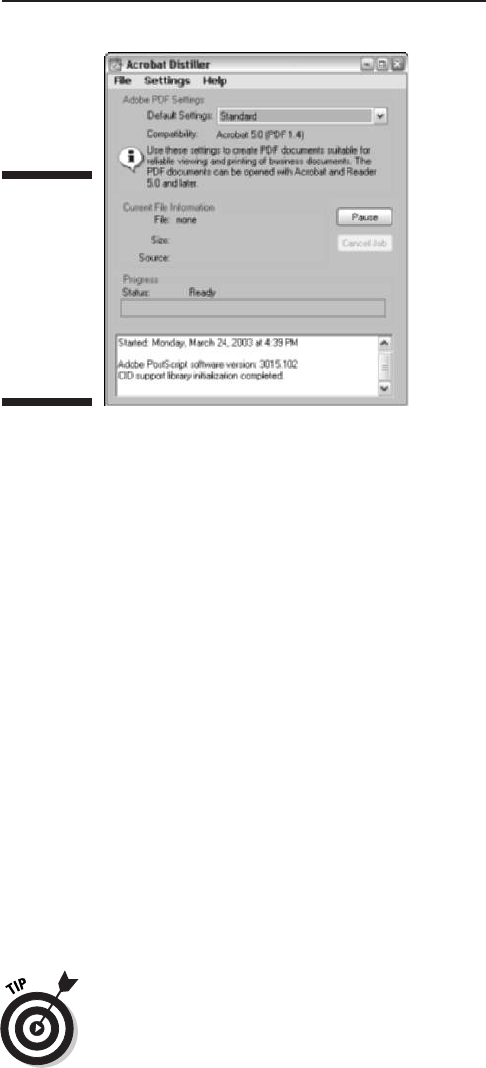
5. In the Acrobat Distiller - Open PostScript File dialog box, browse to
the folder that contains the PostScript or EPS file that you want to con-
vert to PDF, click the file icon, and then click the Open button.
If you’re distilling an EPS (Encapsulated PostScript) file rather than a
plain old PostScript file, don’t forget to select EPS files rather than the
default PostScript files in the Files of Type (Show on the Mac) drop-
down list.
As soon as you click the Open button in the Open PostScript File dialog box,
the Acrobat Distiller begins distilling the selected PostScript file. The pro-
gram displays the progress of the file distillation in the Progress bar in the
middle of the Acrobat Distiller window. If you discover that you’re distilling
the wrong file, click the Cancel Job button. If, for any reason, you need to
pause the distilling job, click the Pause button in the Acrobat Distiller. When
you’re ready to complete the job, click the Resume button (which replaces
Pause as soon as you pause the job).
After the Acrobat Distiller finishes the job, it displays the destination of the
resulting PDF file, the name of the source PostScript file, and the time it took
to do this distillation job in a list box at the bottom of the Acrobat Distiller
window (see Figure 4-2). Distiller automatically saves the new PDF file using
the same name and location as the PostScript source file.
If you want Distiller to prompt you for a new name and destination folder for
your newly converted PDF file, you can specify that in the Acrobat Distiller
Preferences dialog box. Choose File➪Preferences on the Acrobat Distiller
menus or press Ctrl+K (Ô+K on the Mac). In the Acrobat Distiller Preferences
dialog box, select the Ask for PDF File Destination check box, and then click
Figure 4-1:
The Acrobat
Distiller
program
window as it
appears
when you
launch it in
Acrobat 6.
85
Chapter 4: Distilling PDF Files
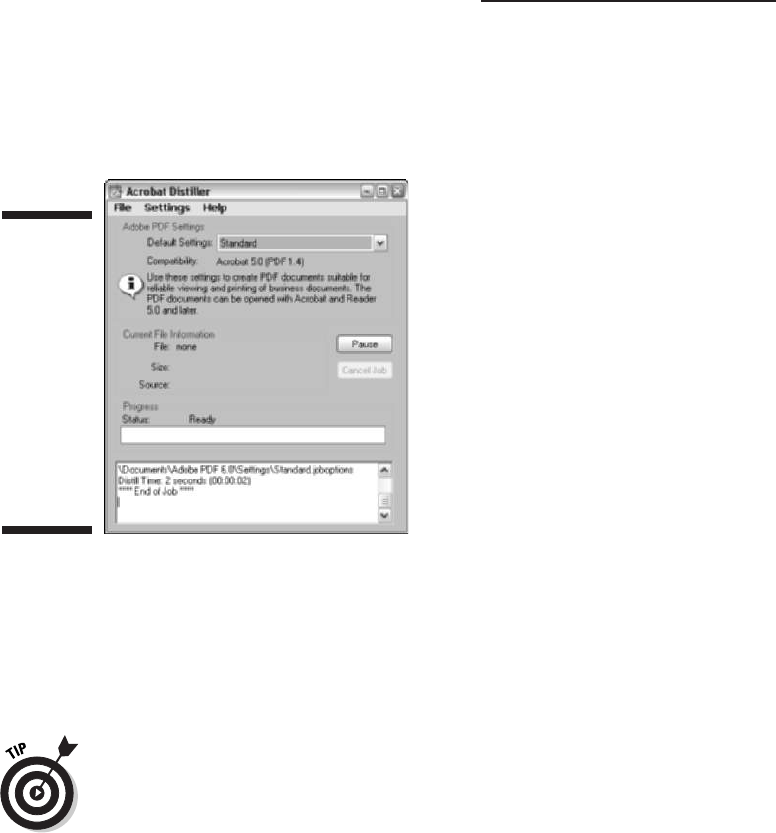
OK. After selecting this check box, upon the completion of each PDF distilla-
tion you perform with the Acrobat Distiller, Acrobat will automatically open
the Specify PDF File Name dialog box so that you can edit the filename in the
File Name text box and navigate to a new destination folder if so desired.
Upon completion of a distilling job, the Acrobat Distiller window remains open
so that you can repeat this process and distill more PostScript files if you wish.
When you’re finished distilling files, close the Acrobat Distiller by clicking its
Close button or by choosing the File➪Exit (Quit on the Mac) command from its
menus. After closing the Acrobat Distiller, you can open the distilled PDF file
and check out the results in Acrobat 6 by choosing File➪Open.
If you don’t already have an authoring program that creates EPS or PostScript
files, such as Adobe Illustrator, installed on your computer, you can simply
double-click an EPS or PostScript file to open Acrobat Distiller and automati-
cally convert a file to PDF. The conversion occurs in a single instance so the
default settings in Acrobat Distiller are automatically applied. If you have a
bunch of PostScript files to convert, you can easily batch process them by
selecting all the files you want to distill in a folder and double-clicking them.
Note that if you do have Illustrator or similar program installed, you just
open all the selected files in that program.
To every PDF there is a purpose . . .
The six preset Adobe PDF settings in the Acrobat Distiller represent what
Adobe considers to be the optimal distilling settings for creating the basic
types of PDF files:
Figure 4-2:
Statistics
on the
completed
distilling job
appear in
the list box
at the
bottom of
the Acrobat
Distiller
program
window.
86
Part II: The Wealth of Ways for Creating PDF Files

Standard: This is the default preset job option that is automatically used
in distilling your file unless you select one of the other preset options or
a custom setting of your own design. Use this job option to generate PDF
files for business documents that will be printed and read. This job option
converts all colors to sRGB, downsamples images to 150 dpi, and provides
Acrobat 5 (PDF 1.4 file) compatibility.
High Quality: Use this job option to generate PDF files with higher
image resolution for improved printing quality. For example, use the
High Quality setting for a document containing photographic images (as
opposed to clipart) that you want to print on an in-house laser printer or
archive on CD-ROM. This job option leaves all colors unchanged, down-
samples images to 300 dpi but provides high-quality JPEG compression,
and embeds all fonts used in the source document. This job option (as
well as PDF/X1a, PDF/X3, and Press Quality) produces PDF files of the
largest file size. When converting especially large and graphically com-
plex documents, you may end up generating enormous PDF files that are
impossible to deliver to your service bureau (in such cases, you have to
split the document up into smaller, separate files that, once distilled,
you can successfully send).
PDF/X1a: Use this job option to generate a PDF that’s destined for a pro-
fessional prepress work flow and that has the same settings as High
Quality. PDF/X1a is an ISO (International Organization for Standardization)
standard for digital graphic content exchange used in the printing indus-
try. This setting creates a report and produces a PDF file only if it is com-
pliant with the PDF/X1a standard. You can get more information about this
feature by choosing Help➪Complete Acrobat 6.0 Help to open the help
guide, clicking the Search tab, and typing About PDF/X in the Find Pages
Containing text box.
PDF/X3: Use this job option to generate a PDF that’s destined for a pro-
fessional prepress work flow and that has the same settings as High
Quality. PDF/X3 is an ISO standard for digital graphic content exchange
used in the printing industry. This setting creates a report and produces
a PDF file only if it is compliant with the PDF/X3 standard. You can get
more information about this feature by choosing Help➪Complete
Acrobat 6.0 Help to open the help guide, clicking the Search tab, and
typing About PDF/X in the Find Pages Containing text box.
Press Quality: Use this job option to generate prepress PDF files are
intended for high-end printing by a professional printer or service
bureau. This job option leaves all colors unchanged and downsamples
images to 300 dpi, but provides high-quality JPEG compression and
embeds all fonts used in the source document.
Smallest File Size: Use this job option to generate PDF files to be posted
on your online Web site on the Internet, a corporate intranet, or a net-
work server for online reading or for quick downloading. This job option
converts all colors to RGB, downsamples images to 100 dpi, and does
not allow font embedding. Of the six presets, this job option produces
PDF files of the smallest file size.
87
Chapter 4: Distilling PDF Files
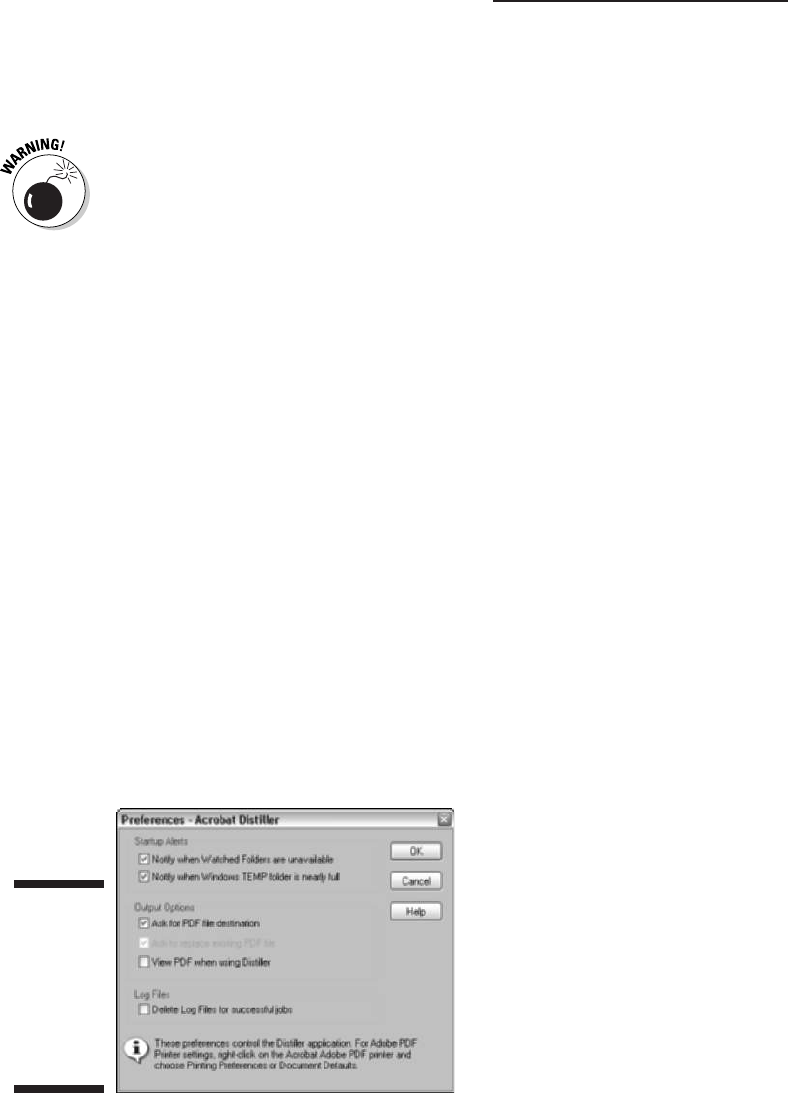
You can use any of these six default Adobe PDF settings as is or as the start-
ing point for creating customized Adobe PDF settings that take into consider-
ation special online display or printing parameters that you need to meet.
The Acrobat Distiller retains the distilling settings last used even after you
close the program so that they are in effect the next time you use the Acrobat
Distiller. This means that if, for example, you distill a file using the Press
Quality job option, Press Quality will be selected as the new default preset
(instead of the original Standard default). This makes it imperative that you
check the Adobe PDF Settings field each time you open the Acrobat Distiller
before you set about distilling files with it. Otherwise, you may end up wast-
ing time distilling a huge file ready for professional printing with the Press
Quality preset when you only needed to generate a smaller, compact file for
your Web site with the Smallest File Size preset.
Automatically displaying your
distilled file in Acrobat
Normally, when you manually distill a PDF file with the Acrobat Distiller, the
program does not automatically display the new PDF file in Acrobat 6. If you
want to automatically check out the results of each distillation you perform
with Acrobat Distiller, you need to select the View PDF When Using Distiller
check box in the Acrobat Distiller - Preferences dialog box.
To open this dialog box, shown in Figure 4-3, choose File➪Preferences from
the Acrobat Distiller menu or press Ctrl+K (Ô+K on the Mac). Then select the
View PDF When Using Distiller check box and click OK. After selecting this
check box, upon the completion of each PDF distillation you perform with the
Acrobat Distiller, Acrobat automatically closes the Acrobat Distiller window
and displays the newly distilled PDF in the Acrobat 6 Document window.
Figure 4-3:
Changing
the Output
options in
the Acrobat
Distiller -
Preferences
dialog box.
88
Part II: The Wealth of Ways for Creating PDF Files

As you see in Figure 4-3, the Output Options section in the Acrobat Distiller -
Preferences dialog box also includes an option called Ask to Replace Existing
PDF File. Select this option to make sure that the Acrobat Distiller always
prompts you if you are about to inadvertently replace an existing PDF file
with the one you’ve just distilled with the Acrobat Distiller. Note that the
Distiller program won’t allow you to select both the Ask for PDF File
Destination and the Ask to Replace Existing PDF File check boxes in the
Acrobat Distiller - Preferences dialog box. When you click the Ask for PDF File
Destination check box, the program immediately grays out the Ask to
Replace Existing PDF File check box. The assumption is that if you have the
Acrobat Distiller prompt you for the destination of the new PDF, you will
notice any filename conflict in the process of selecting the file’s destination
folder.
Making Adobe PDF settings
of your very own
The best way to go about creating your own Adobe PDF settings for distilling
PDF files is to select the preset job option with the settings closest to the
ones you want to customize in the Acrobat Distiller, and then make appropri-
ate changes to individual settings. For example, to create a custom job option
for distilling PDF files for pamphlets with a special trim size and binding that
will be professionally printed by a service bureau using a particular type-
setter, you would start by selecting Press Quality in the Default Settings drop-
down list under the Adobe PDF Settings area in the Acrobat Distiller window.
Then you would open the Press Quality- Adobe PDF Settings dialog box by
choosing Settings➪Edit Adobe PDF Settings on the Acrobat Distiller menus or
by pressing Ctrl+E (Ô+E on the Mac).
Changing the General options
When you first open the Adobe PDF Settings dialog box in the Acrobat
Distiller, the dialog box opens with the General tab selected, as shown in
Figure 4-4. Note that the particular settings selected on the General tab (and
the four other tabs in the Adobe PDF Settings dialog box, for that matter)
reflect the optimal values assigned to whatever preset job option is selected
at the time you open the dialog box (this being the Press Quality job option
in the example shown in Figure 4-4).
You then begin customizing the values for whatever settings need changing in
your custom job option. On the General tab, these settings include:
89
Chapter 4: Distilling PDF Files
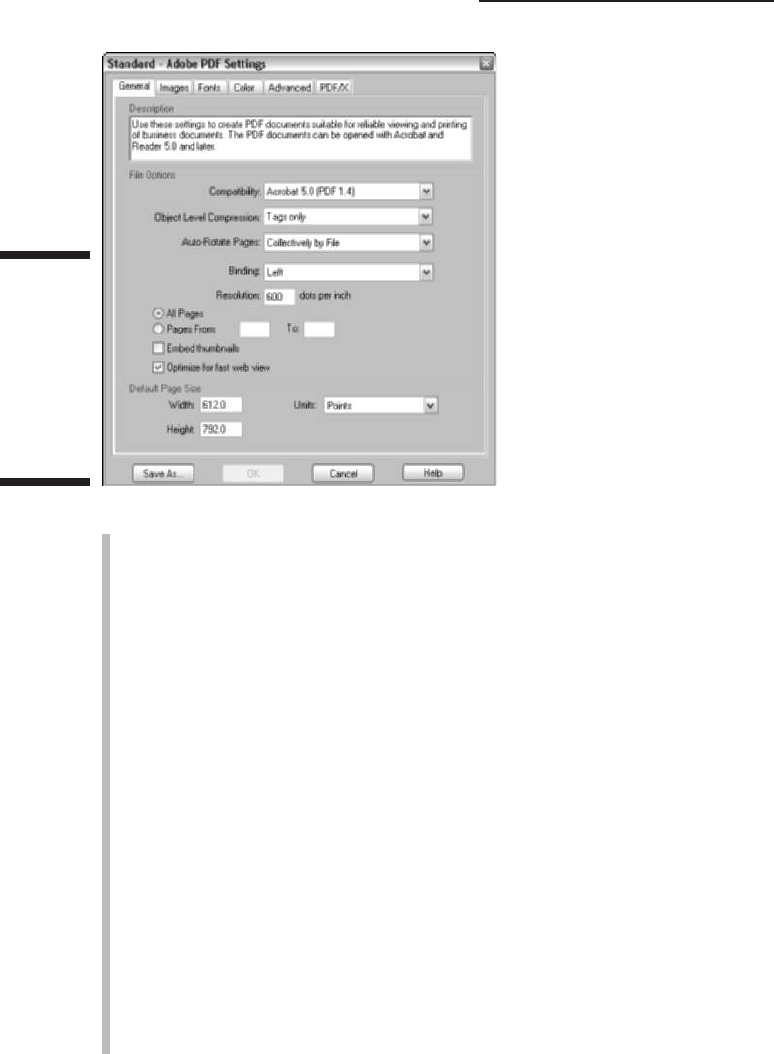
Description: Use this text box to type a description of your custom dis-
tiller settings. The entered description is displayed in the Acrobat Distiller
dialog box when you select your custom setting from the Default Settings
drop-down list.
Compatibility: Specifies the PDF file version for the final distilled docu-
ment and thereby its level of Adobe Reader compatibility. You have a
choice between Acrobat 6.0 (PDF 1.5), Acrobat 5.0 (PDF 1.4), Acrobat 4.0
(PDF 1.3), and Acrobat 3.0 (PDF 1.2). When creating a job option for dis-
tilling prepress PDFs, stay with the default value of Acrobat 5.0 (PDF 1.4)
unless your service bureau specifically tells you that it can handle PDF
1.5 files, or if you need the highest level of file encryption (PDF 1.4 and
1.5 files support 128-bit file encryption — the highest level of security
available). Don’t select Acrobat 3.0 (PDF 1.2) unless you are creating a
custom job option for online files that requires Acrobat Reader 3.0 com-
patibility to reach the widest possible audience.
Object Level Compression: Specifies that small objects in a PDF files,
such as tags, be consolidated so that they can be efficiently compressed.
Choose Off to not compress a document’s structural information. The
resulting PDF file will retain accessibility features and the ability to navi-
gate and interact with bookmarks using Acrobat 5 and later. Choose Tags
Only to compress the document’s structural information. The resulting
PDF can be viewed and printed using Adobe 5, but accessibility, naviga-
tion, and bookmarks are visible only in Acrobat 6.
Figure 4-4:
The options
on the
General tab
of the
Standard -
Adobe PDF
Settings
dialog box.
90
Part II: The Wealth of Ways for Creating PDF Files

Auto-Rotate Pages: When selected, automatically rotates the pages of
the distilled PDF file to match the orientation of the text. You can choose
to apply the Individually to Pages or the Collectively by File setting.
Binding: Specifies how pages and thumbnails are displayed in the Adobe
Reader when the two-page and continuous page viewing options are
selected. This setting has no effect on the printed binding edge. You have
a choice between the Left option (the default) used for all European lan-
guages, and the Right option for this setting.
Resolution: Specifies the print resolution to be used in the distilled PDF
file when this setting is not specified by PostScript commands in the
source file. Most of the time, you can leave the default 600 dpi (dots per
inch) setting as is. If you change the value to match that of the printer
with which the PDF file will be printed, you must enter a value in its text
box that is between 72 and 4000 dpi.
Page Range: Specifies the range of pages in the source document to be
distilled in the final PDF file. The default setting is the All radio button.
To set a range of pages, select the From radio button and then enter
starting and ending page values in the From and To text boxes.
Embed Thumbnails: Creates thumbnail images and embeds them as part
of the distilled file for use in navigating the file’s text in Adobe Reader.
Note that Adobe Reader 6 automatically creates thumbnails whether or
not this option is selected. Users of earlier versions of Adobe Reader will
not have them unless this option is selected. Be aware, however, that
embedding thumbnails does increase the PDF file size, especially for
documents with many pages.
Default Page Size: Specifies the size of the pages in the final PDF docu-
ment when this information is not specified by the PostScript commands
in the source file. By default, the Width and Height values for the Default
Page Size setting are displayed in points. When modifying the page size
values in the Width and Height text boxes, be sure to select the appro-
priate units (Picas, Inches, or Centimeters) in the Units drop-down list.
Changing the Images options
The settings on the Images tab of the Adobe PDF Settings dialog box, shown in
Figure 4-5, determine in large part both the quality and the size of the distilled
PDF file. As you can see in Figure 4-5, the Images settings for a job option fall
into three broad categories: Color Images, Grayscale Images, and Monochrome
Images.
91
Chapter 4: Distilling PDF Files
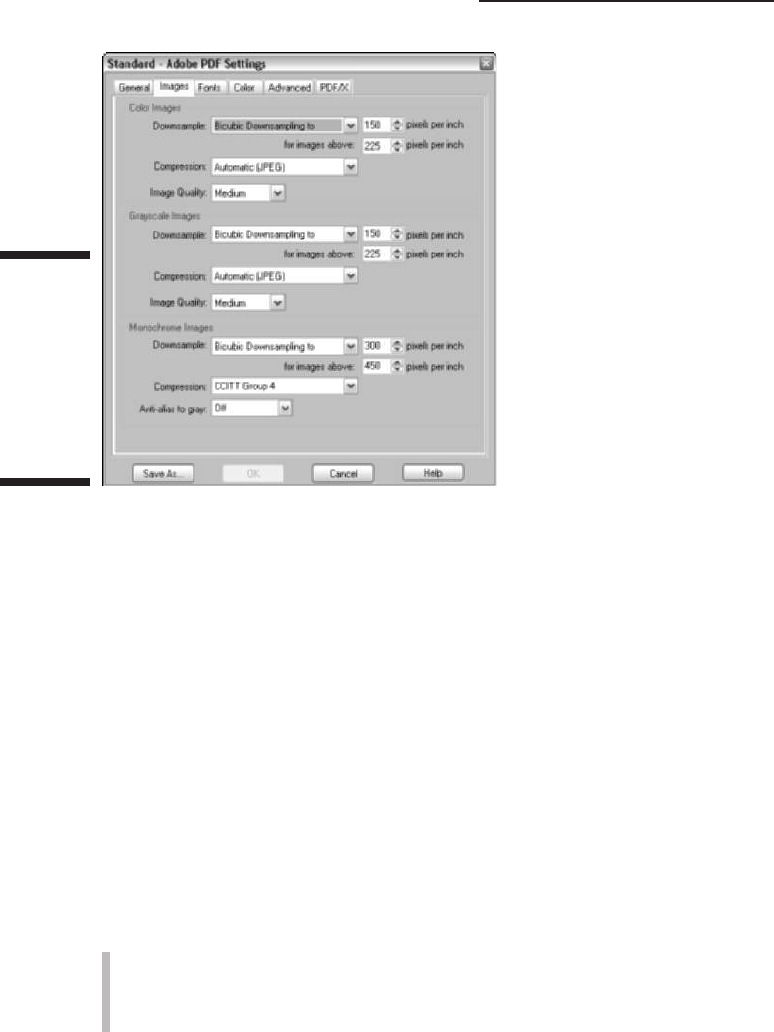
Note that when modifying the Color Images, Grayscale Images, and Mono-
chrome Images settings, you have the ability to change the type of down-
sampling and the rate, as well as the type of compression (and in terms of
color and grayscale images, the quality as well). Downsampling refers to a
process of applying a mathematical algorithm to a bunch of pixels in the
images to determine how to combine them into fewer (but larger) pixels at a
new resolution; in other words, changing the resolution (in pixels per inch) of
an image to make the file size smaller and the print quality lower. Compression
refers to the applying of a mathematical algorithm to the pixels in your
images in order to eliminate redundant pixels. There are two types of com-
pression: Lossless, which results in no loss of image integrity, and lossy, which
removes pixels from the image that can’t be retrieved, and thus results in
some degradation of the image quality. In Acrobat, you apply compression
and downsampling to bitmap images such as photos. If you are converting
text and line art (vector graphics), you use only compression.
In terms of the type of downsampling applied to bitmap images, you have the
following choices:
Bicubic Downsampling To: This is the default option, and it uses a
weighted average to come up with a new pixel color value at a new reso-
lution. This type of downsampling takes the longest but gives the best
results for high-end images with fine color gradations.
Figure 4-5:
The options
on the
Images tab
of the
Standard -
Adobe PDF
Settings
dialog box.
92
Part II: The Wealth of Ways for Creating PDF Files

Average Downsampling To: This option averages the color pixel
values in a particular area to replace them with a new color value at
a new resolution.
Subsampling To: This option uses the color pixel value of a pixel at the
center of a particular region as the replacement value for the pixels in
that region.
When using any of these types, you must specify a threshold value that tells
the Acrobat Distiller which images to downsample and gives the lowest
image resolution to which they can be resampled.
In terms of the type of compression for color and grayscale images, you have
a choice among the following options:
Automatic: This is the default option, and it leaves the decision as to
which type of compression (JPEG or ZIP) to apply to the images in the
distilled file to Acrobat Distiller. This is the best setting in cases where
you have documents that are a mixture of bitmap and vector graphics.
JPEG: This option is a lossy compression scheme best used for photos
in which image data is analyzed in 8 x 8 pixel blocks and redundant
pixels are permanently removed.
ZIP: This option is a lossless compression best used on text and line art
or vector graphics in which the image size is reduced while the image
integrity is preserved.
When you choose the Automatic or JPEG option for compression, you can set
the Quality setting to Maximum (the default), High, Medium, Low, or Minimum.
Note that the higher the setting on this list (with Maximum at the top), the
better the image quality, the less the compression, and the larger the final file
size. The lower the setting on this list (with Minimum at the bottom), the lower
the image quality, the higher the compression, and the smaller the file size.
When you choose ZIP compression, you can choose between 8-bit (the default)
and 4-bit. Always select the type that is equal to or greater than the bit depth of
your images, or you will lose image integrity (note that 4-bit images have 16
colors or shades of gray and 8-bit images have 256 or more colors or shades
of gray).
For monochrome (that is, black and white) images in the source file, you can
choose between ZIP (the default), two types of CCITT (Consulting Committee
on International Telephony and Telegraph) developed for compressing FAX
transmissions, and Run Length (or RLE for Run-Length Encoding) developed
for compressing images with large separate areas of black and white. All of
93
Chapter 4: Distilling PDF Files
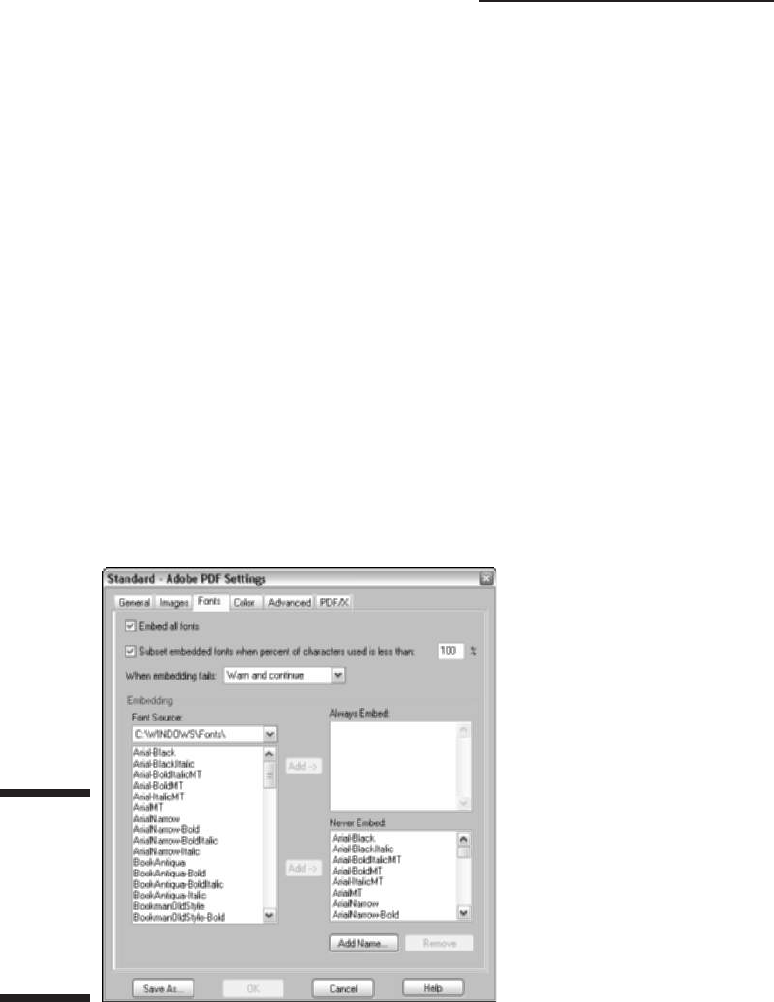
these Monochrome compression settings are of the lossless type and are
pretty comparable in terms of size and quality, so in most cases, you can stay
with the ZIP default.
The last setting that you can change in the Monochrome Images area is the
Anti-Alias to Gray setting. Select this check box to have the Acrobat Distiller
smooth jagged lines (also known as jaggies) on text and black-and-white
images. When you check this option, Acrobat Distiller lets you select the bit
depth for the anti-aliasing (that is, the levels of gray to be generated): 4-bit
(the default) for 2 levels, 8-bit for 4 levels, or 8-bit for 256 levels of gray.
Changing the Fonts options
The options on the Fonts tab of the Adobe PDF Settings dialog box (shown in
Figure 4-6) enable you to determine which fonts are embedded in the distilled
PDF file. By default, all presets (except for the Smallest File Size preset) auto-
matically check the Embed All Fonts check box. When this option is checked,
Acrobat Distiller includes all the fonts used in the source document as part
of the final PDF file. This is essential when creating a custom job option for
distilling prepress PDF files, because nothing can mess up your artwork or
upset your service bureau more than delivering PDF files without the neces-
sary fonts.
To help cut down on the bloat caused by embedding fonts in the final PDF file,
the Fonts tab has the Subset Embedded Fonts When Percent of Characters Is
Figure 4-6:
The options
on the Fonts
tab of the
Standard -
Adobe PDF
Settings
dialog box.
94
Part II: The Wealth of Ways for Creating PDF Files

Less Than check box that, when checked, tells Acrobat Distiller to embed only
the characters in a font that are actually used in the source document. This
means that if your source document uses only 15 characters in Bodoni Bold,
only the PostScript commands for generating those 15 characters, and not for
the entire character set, are included in the final PDF file.
The percentage field to the immediate right of this Subset Embedded Fonts
check box enables you to set the threshold percentage at which the entire
character set is embedded. The 100% default setting means that the only time
that all the characters are embedded is when they are all needed (and you
should leave this percentage at 100% whenever you use the Subset
Embedded Fonts option).
Directly beneath the Embed All Fonts and the Subset Embedded Fonts check
boxes, you find a When Embedding Fails drop-down list box that tells Acrobat
Distiller what warning to display or action to take if, for some reason, font
embedding fails while distilling a PDF file (usually because the font is not
installed on the computer on which the job option is being used).
If you intend to create prepress PDF files with the custom job option you’re
building, be sure to select Cancel Job on the When Embedding Fails drop-
down list so that no prepress PDF file can be created without the necessary
fonts. If you don’t mind that Acrobat or Adobe Reader does some font substi-
tution in the final file, you can select the Ignore option. If you want to be
informed each time font embedding fails during a distilling job, select the
Warn and Continue option instead.
If you prefer to handpick which fonts are to be embedded during the PDF file
distilling and which are not, you use the Embedding section of the Fonts tab
instead of the Embed All Fonts option. To indicate which fonts to embed,
select the location of the fonts in the Font Source drop-down list (by default,
this is set to
C:\Windows\Fonts\, which displays all the fonts installed on
your computer). Click the name of each font you want to specify in the list
box on the left to select it, and then click either the Add button to the left of
the Always Embed list box to add the font there, or click the Add button to
the left of the Never Embed list box to put the selected font there.
To ensure that font embedding doesn’t fail when distilling a file with your
custom job option, make sure to list all the possible locations where fonts are
installed on your system (including networked drives if fonts are stored on a
special volume). To do this, choose Settings➪Font Locations on the Acrobat
Distiller menu (upon closing the Adobe PDF Settings dialog box) or press
Ctrl+L (Ô+L on the Mac), and then use the Add button in the Acrobat Distiller -
Font Locations dialog box (see Figure 4-7) to select and add all the font folders
on your computer system that should be used in font embedding.
95
Chapter 4: Distilling PDF Files
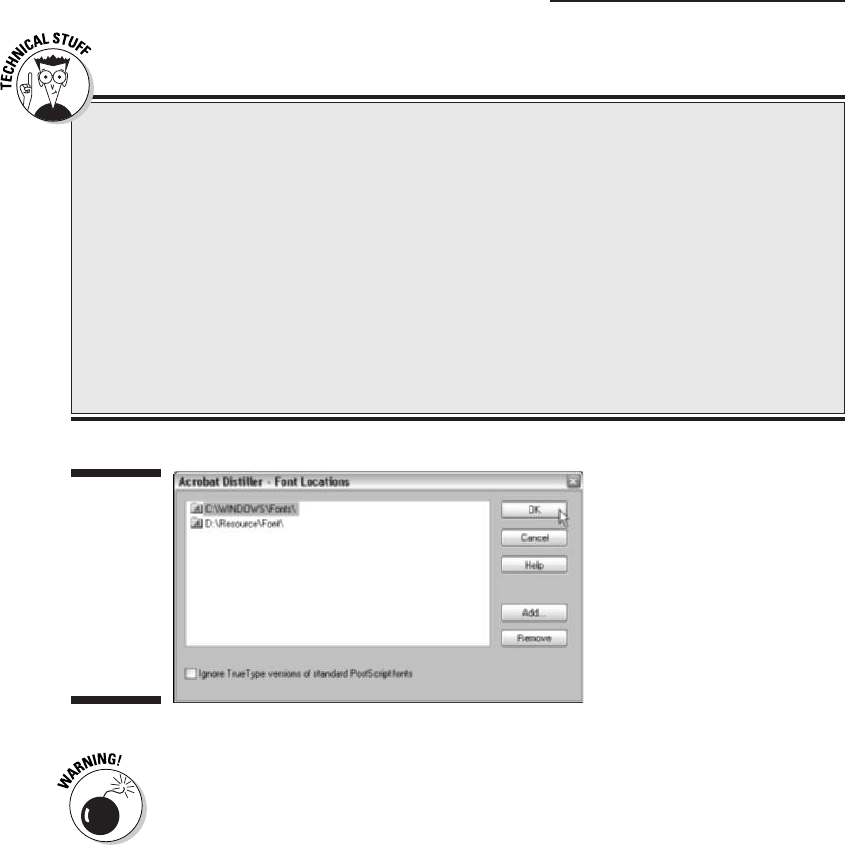
Not all fonts you install on your computer give you the license (that is, the
legal right) to embed them in the PDF files you distill. For example, Adobe lets
you embed the fonts you license from it with impunity. Agfa/Monotype, on the
other hand, does not. You need to check the license that came with the fonts
you installed. Also, when you intend to send the PDF file out to a service
bureau or professional printer, check with those folks, because they may have
special standing licenses that cover the fonts you’re using in a document
they’re printing so that you can embed the fonts without violating the law!
You may be wondering how you can tell which fonts have been embedded
and which, if any, have been substituted when viewing a PDF file in Acrobat 6.
To check on which fonts are embedded in the PDF document you’re viewing,
open the Document Fonts dialog box by choosing File➪Document Properties
Figure 4-7:
Specifying
all the font
folders
on the
computer
system to
aid in font
embedding.
96
Part II: The Wealth of Ways for Creating PDF Files
Font substitution 101
If you don’t embed certain fonts in the final PDF
document, then the Acrobat Distiller does the
best it can at font substitution using what’s
known as the Multiple Master typeface. In font
substitution, Acrobat Distiller matches serif fonts
with serif fonts and sans-serif with sans-serif
fonts and tries to pick available substitute fonts
whose use have little or no impact on the line and
page layout of the final document. It does
an okay job with substituting straightforward,
non-decorative fonts and a less-than-stellar job
with substituting those highly decorative or
script-type fonts with which you just love to
embellish your documents. So if your document
uses simpler fonts, you can get away with not
embedding the fonts. But if you’re using decora-
tive or script-type fonts, you should embed the
fonts to guarantee the best results in the final
PDF document.
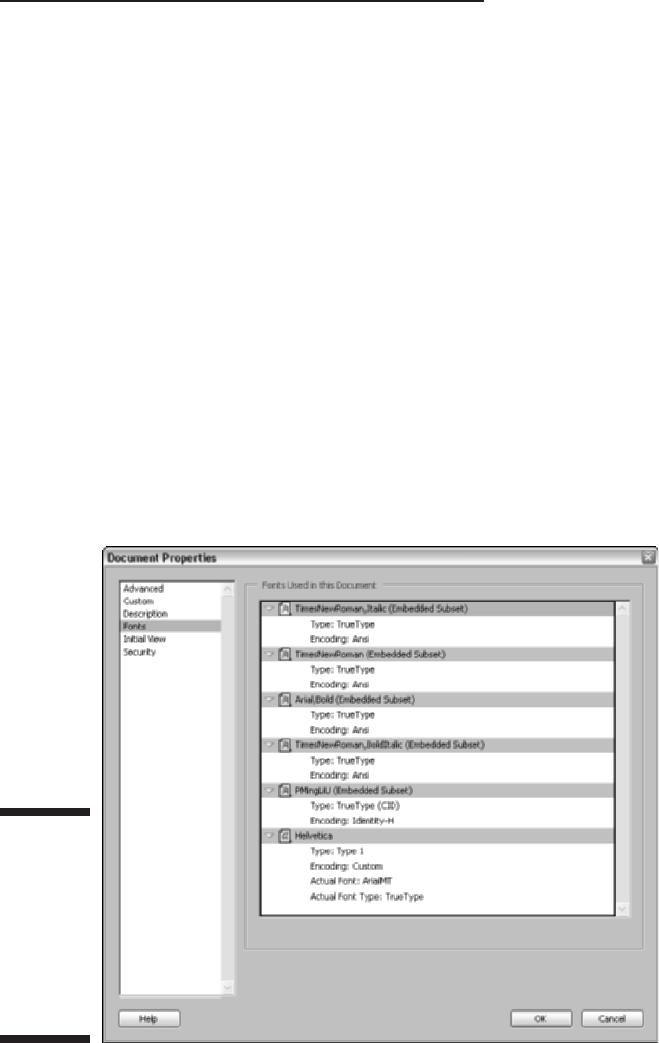
or by pressing Ctrl+D (Ô+D on the Mac). When you select this command, the
Document Properties dialog box opens, as shown in Figure 4-8. Click Fonts in
the scroll box on the left to display a listing of all fonts that are embedded in
the file in the viewing window on the right.
The easiest way to spot substitute fonts in the file you’re viewing in Acrobat
is to toggle off the Advanced➪Use Local Fonts command (press Ctrl+Shift+Y
on Windows or Ô+Shift+Y on the Mac). When you turn this setting off,
Acrobat Distiller ignores the local fonts on your computer and then displays
the substitute fonts. Any fonts that the program can’t substitute are indicated
with bullets, and, of course, if all the fonts are embedded in the file, the PDF
document is not affected by turning this setting off.
Changing the Color options
The Color tab on the Press - Adobe PDF Settings dialog box (shown in
Figure 4-9) enables you to specify how colors are managed in the distilling
process and, most importantly, whether or not you want the colors in the
source document converted into what graphic designers call another color
space (that is, converted to the sRGB — or Red, Green, Blue — model used
by computer monitors to display colors).
Figure 4-8:
Examining
the
embedded
fonts in a
PDF file that
you’re
viewing in
Acrobat 6.
97
Chapter 4: Distilling PDF Files
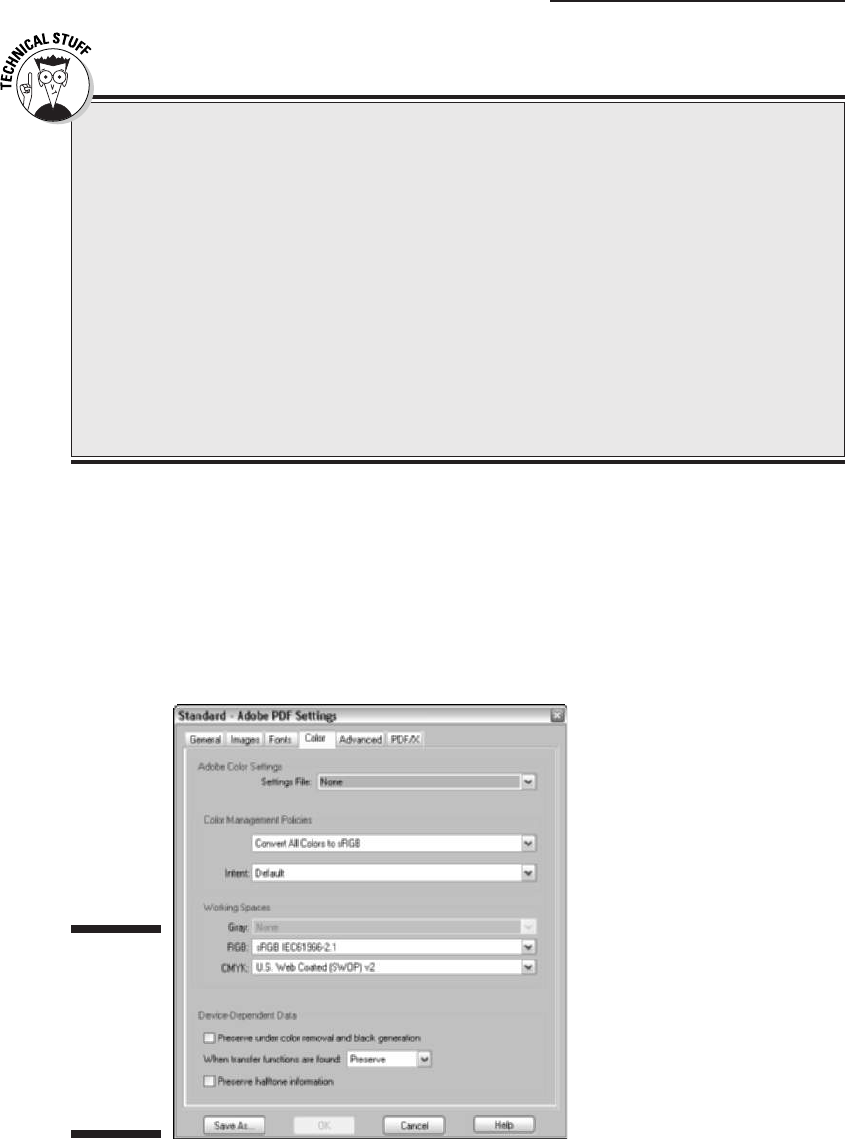
As you would expect, when building a custom job option using either the
Standard or Smallest File Size preset, the Acrobat Distiller automatically
selects Convert All Colors to sRGB in the Color Management drop-down list.
This is because both of these presets are optimized for on-screen viewing
instead of printing. When you build a custom job option using the Press
Quality preset, the Leave Color Unchanged option is automatically selected
so that no CMYK colors are changed during file distillation.
Figure 4-9:
The options
on the Color
tab of the
Standard -
Adobe PDF
Settings
dialog box.
98
Part II: The Wealth of Ways for Creating PDF Files
Color 101
Color and color management are about the most
obtuse of topics (they must give Ph.D.s in the
field). In a nutshell, monitors produce colors
additively using the RGB, or Red, Green, and
Blue, model (just like your color TV), and color
printing produces colors subtractively using the
CMYK model that combines Cyan, Magenta,
Yellow, and BlacK inks. The problem lies in recti-
fying the large gamut of colors in the RGB model
with the more limited and quite different range of
the CMYK model. Enter ICC (International Color
Consortium) color management, which profiles
the range of colors that every device involved in
the displaying and printing of colors can produce
so that colors are displayed or printed consis-
tently across all devices. To discover more about
the wonderful world of color and color manage-
ment, go to
http://studio.adobe.com/
learn/tips/phstamecmb/main.html
and
then follow the links to the articles on color and
color management. Note that you may need to fill
out a simple registration form to access Adobe’s
Expert Center, but it’s well worth the effort.
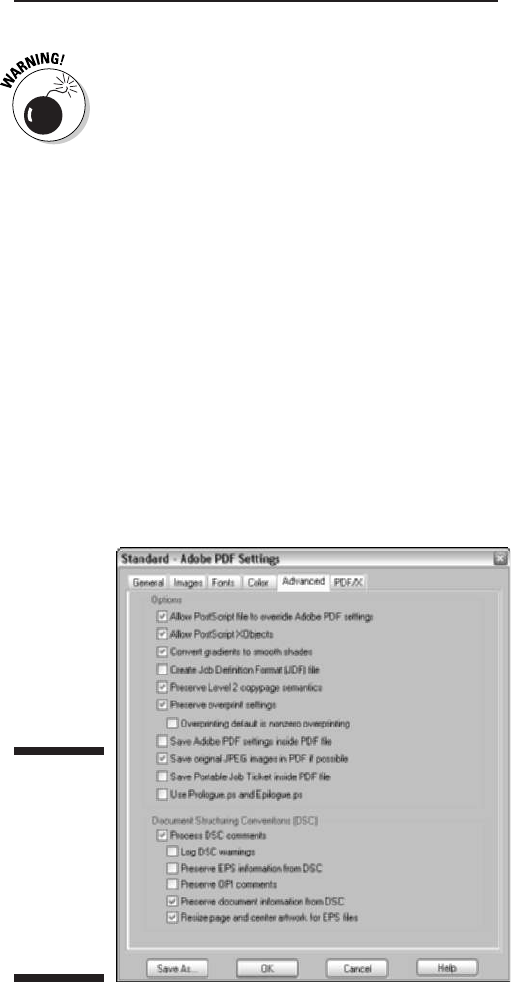
The rest of the options on the Color tab of the Adobe PDF Settings dialog box
should be approached with great caution. Always check with your service
bureau partners before making modifications to these settings, such as
selecting a color management settings file from the Settings File drop-down
list (None is the default setting for all six presets), selecting one of the tag
options in the Color Management drop-down list (Tag Everything for Color
Management or Tag Only Images for Color Management), or, for heaven’s
sake, fooling with any of the Device Dependent options.
Changing the Advanced options
As the name implies, the Advanced tab of the Adobe PDF Settings dialog box
(shown in Figure 4-10) contains a bunch of check box options, most of which,
I’m happy to report, you won’t ever have to monkey with. In case you’re the
least bit curious,
Prologue.ps and Epilogue.ps, just as their names imply,
are the beginning and ending files in between which is sandwiched the file with
the PostScript codes that actually produce the text and images in your docu-
ment. DSC, by the way, is an acronym for Document Structuring Conventions
files. These are the types of files created by QuarkXPress, and they must be
converted into a PostScript or EPS file before distilling, or else the Acrobat
Distiller will burp something silly.
Changing the PDF/X options
The PDF/X tab options of the Adobe PDF Setting dialog box, shown in Figure
4-11, are even more arcane than the Advanced tab options to those (like me)
who don’t jump up and down for joy that Adobe has finally provided this
Figure 4-10:
The options
on the
Advanced
tab of the
Standard -
Adobe PDF
Settings
dialog box.
99
Chapter 4: Distilling PDF Files

functionality in Acrobat 6. Suffice it to say that these options enable you to
specify criteria that Distiller uses when checking to see if your PDF file is
compliant with PDF/X1a or PDF/X3 standards. If your PDF is not destined for
high-resolution print production, fagetaboudit! On the other hand, if this sub-
ject makes you tingle all over, you can get more information about this fea-
ture by choosing Help➪Complete Acrobat 6.0 Help to open the help guide,
clicking the Search tab, and then typing About PDF/X in the Find Pages
Containing text box.
Saving your custom job option
When you finish making your modifications on the various tabs of the Adobe
PDF Settings dialog box, you are ready to save your custom job option. Click
the Save As button on the bottom left of the Adobe PDF Settings dialog box and
then edit the default filename in the Save Adobe PDF Settings As dialog box. Be
careful not to modify the
.joboptions file extension in Acrobat Distiller for
Windows (you may not see file extensions if you’re using Windows XP) and
don’t change the folder where it’s saved (it needs to be in the Settings folder;
otherwise, the Acrobat Distiller won’t know where to find it).
After editing the filename, click the Save button and then click the Close
button in the Adobe PDF Settings dialog box to close it and return to the
Acrobat Distiller window. The name of the custom job option you just defined
now appears in the Default Settings drop-down list, along with the six presets,
so that you can select it anytime you need to in distilling your PDF files.
Figure 4-11:
The options
on the
PDF/X tab
of the
Standard -
Adobe PDF
Settings
dialog box.
100
Part II: The Wealth of Ways for Creating PDF Files
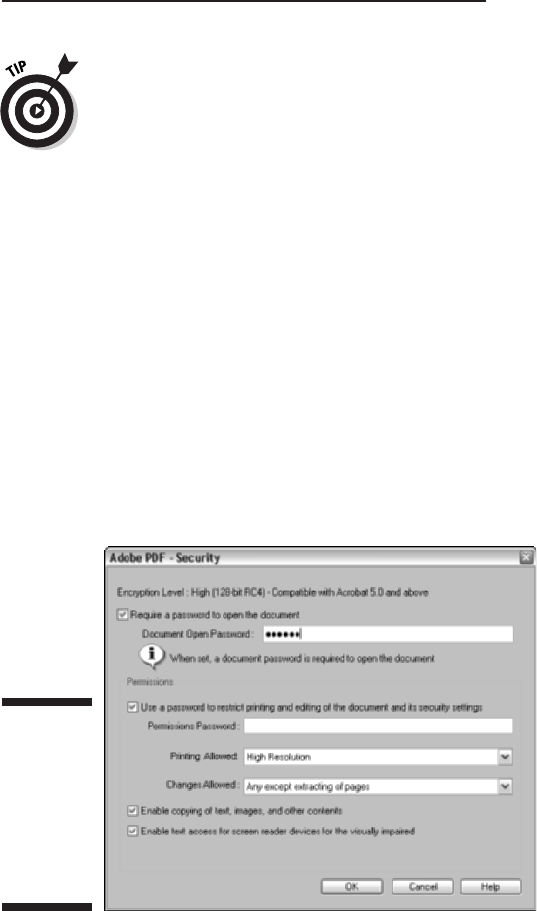
To access a custom option that you need to delete, copy, or share with a
coworker, go to your computer’s operating system and open the Settings
folder found inside the Distiller (it’s misspelled as Distillr on Windows) folder
within the Acrobat 6.0 folder and find the Adobe PDF settings file there. You
can also Add or Delete custom job option settings by choosing the appropri-
ate command on the Settings menu in Acrobat Distiller.
Selecting security settings
for the new PDF file
Whenever you create a PDF file with the Acrobat Distiller, you can restrict
access to its contents by assigning a password to it, and, further, you can
control what other Acrobat and Adobe Reader users can and cannot do with
it by restricting the file permissions. To add these kinds of securities to a file
in Acrobat Distiller, choose Settings➪Security on the Acrobat Distiller menus
or press Ctrl+S (Ô+S on the Mac) to open the Acrobat Distiller - Security
dialog box, as shown in Figure 4-12. You do this after you designate which
Adobe PDF settings to use but before you specify which source file to distill.
To prevent anyone who doesn’t know the secret password from even being
able to open the final PDF document, select the Requires a Password to Open
Document check box and then enter the password in the Document Open
Password text box. To prevent anyone who has the password for opening the
document from changing the password and/or the permissions you set for
Figure 4-12:
Modifying
the options
in the
Acrobat
Distiller -
Security
dialog box.
101
Chapter 4: Distilling PDF Files

the file, select the Use a Password to Restrict Printing and Editing of the
Document and Its Security Settings check box and enter a password in the
Permissions Password text box (make sure you don’t assign the same pass-
word here that you assigned for opening the PDF file).
When setting the permissions for the file, you have the following choices on
the drop-down lists:
Printing Allowed: Select None to prevent users from printing any part of
the PDF document in either Acrobat 6 or Adobe Reader 6. Choose Low
Resolution to enable users to print a lower quality PDF that prevents
reproduction of the PDF with different security settings. Note that this
setting is available only for PDF files compatible with PDF versions 1.4
or 1.5 where 128 bit encryption is supported. Choose High Resolution
to allow printing at any resolution, including high output commercial
printers.
Changes Allowed: Choose None to prevent any changes in a PDF file or
any of the following self-explanatory allowed changes: inserting, delet-
ing, and rotation of pages, fill in of form fields and signing, commenting,
or any except extracting of pages.
Automated PDF files — would you
watch this folder for me?
Acrobat 6 makes it easy to automate the distilling of PostScript files (the print-
to-disk kind and the EPS kind). All you do is set up folders in your operating
system and then tell the Acrobat Distiller to keep an eye on them (such fold-
ers are thereafter known as watched folders). Whenever you copy a PostScript
file into the In subfolder (automatically created along with an Out subfolder)
within one these watched folders, the Acrobat Distiller utility automatically
distills the PostScript file into PDF as soon as the program looks at the con-
tents of the watched folder and determines the file’s ready for distilling.
When setting up watched folders, you determine which Adobe PDF settings
to use in distilling the PostScript files you place there. This means that you
can set up a Standard watched folder to which you assign the Standard job
option or one of your custom Adobe PDF settings based on its settings, as
well as a Press Quality watched folder to which you assign the Press Quality
PDF Setting or one of its variants. Then, to distill a PDF file using the Standard
settings, you just drop the PostScript file into the Standard watched folder.
To distill a PDF file using the Press Quality settings, you drop it into the Press
Quality watched folder.
102
Part II: The Wealth of Ways for Creating PDF Files
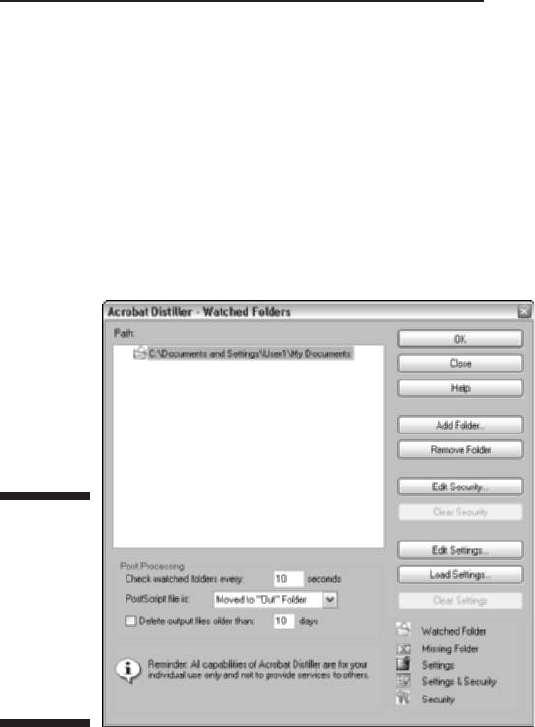
To set up watched folders on your hard drive, follow these steps:
1. In your operating system, create and name the folder you want watched.
2. Launch Acrobat 6, and then launch the Acrobat Distiller by choosing
Advanced➪Acrobat Distiller.
3. Choose Settings➪Watched Folders on the Acrobat Distiller menus or
press Ctrl+F (
ÔÔ
+F on the Mac).
The Watched Folders dialog box appears, as shown in Figure 4-13.
4. Click the Add Folder button, and then in the Browse for Folder dialog
box that opens, select the folder that you created and click OK.
After the Browse for Folder dialog box closes, the folder you selected is
displayed in the list box of the Watched Folders dialog box. (Windows
XP displays the directory path of the watched folder.)
5. Click the folder you created to select it.
6. Click the Load Settings button to display the Load Adobe PDF Settings
dialog box. Click the name of the Adobe PDF Setting to be applied to
the files distilled in this folder, and then click the Open button.
Skip this step if you want to use the current Adobe PDF Setting specified
in Distiller.
Figure 4-13:
Setting up
watched
folders in
the Acrobat
Distiller -
Watched
Folders
dialog box.
103
Chapter 4: Distilling PDF Files

7. If you want to modify any of the settings in the job option you selected
for the watched folder, click the Edit Settings button and modify the
settings as desired.
8. If you want to assign a password to the file or change the file permis-
sions, click the Edit Security button and assign these settings in the
Security dialog box.
(See the “Selecting security settings for the new PDF file” section, earlier
in this chapter, for details, and be sure to jot down your password and
store it in a safe place.)
9. To add another watched folder, click the Add Folder button again and
then repeat Steps 5 through 8.
10. By default, the Acrobat Distiller checks the watched folders you
define every ten seconds to see whether or not they contain a new
file to distill. To modify this interval (usually to lengthen it), click
inside the Check Watched Folders Every text box and enter the
number of seconds there.
11. By default, the Acrobat Distiller automatically moves all PostScript
files that it distills in your watched folders into a folder marked Out
(the PDF versions, however, remain in the watched folder). To have
the PostScript files deleted after they’re distilled, select the Deleted
option from the PostScript File Is drop-down list.
12. To have the Acrobat Distiller automatically clear processed files in the
watched folders that are so many days old, select the Delete Output
Files Older Than check box and then enter the number of days (10 by
default) in the Days text box.
13. After you finish adding watched folders and setting up their param-
eters, click OK.
The Watched Folders dialog box closes.
Note that watched folders are not designed to serve as the clearing house for
all of your PDF distilling across the entire corporate network. If your com-
pany needs to set up just such a clearing house, look into purchasing Adobe’s
Acrobat Distiller Server that is made for just that kind of bulk processing
using watched folders.
Making Acrobat Distiller your printer
You don’t have to launch the Acrobat Distiller in order to use it and its Adobe
PDF settings (including the custom Adobe PDF settings described earlier in
the “Making Adobe PDF settings of your very own” section) to distill your
PDF files. In fact, with certain application software, you don’t even need to
create a print-to-file PostScript or Encapsulated PostScript file in order to do
the distilling. All you have to do is select the Acrobat Distiller as your printer
in the program’s Print dialog box.
104
Part II: The Wealth of Ways for Creating PDF Files
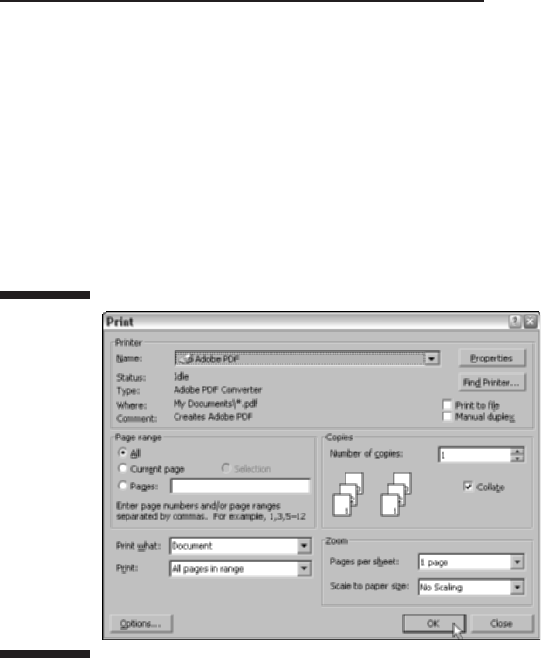
Figure 4-14 illustrates this process using Microsoft Word 2002 in Windows.
Select Adobe PDF as the printer from the Name drop-down list in the Word
Print dialog box. To select the type Adobe PDF settings (called Conversion
Settings in Microsoft programs), click the Properties button in the Print dialog
box and then click the Adobe PDF Settings tab in the Adobe PDF Document
Properties dialog box. Here, you can change the Adobe PDF settings to use
(Standard in this example) in the Default Settings drop-down list and even edit
these Adobe PDF settings by clicking the Edit button — see Chapter 5 for
details.
After selecting the Adobe PDF settings/conversion settings to use and clicking
the OK button to close the Adobe PDF Document Properties dialog box, you
have only to click the OK button in the Print dialog box to run the Acrobat
Distiller. Prior to distilling the file, the Acrobat Distiller opens a Save PDF File
As dialog box that enables you to rename and to relocate the new PDF file if
you wish (otherwise, the new file carries the same filename as the original
Word file with a
.pdf extension and is automatically saved on the desktop of
your computer). Then, after you click the Save button, the Acrobat Distiller
completes the distilling, finally opening the converted PDF file in Acrobat 6.0.
PDF Files Courtesy of Adobe PDF Online
Adobe Systems offers a subscription service available worldwide called
Create Adobe PDF Online that you can use to distill your source files. This
subscription service costs $9.99 a month or $99.99 a year for creating an
unlimited number of PDF files (you can also sign up for a trial subscription to
this service that lets you create up to five PDF files for free).
Figure 4-14:
Making the
Acrobat
Distiller the
printer in
a program
like Word
causes the
Acrobat
Distiller
utility to run
in the
background
as it creates
the PDF file.
105
Chapter 4: Distilling PDF Files
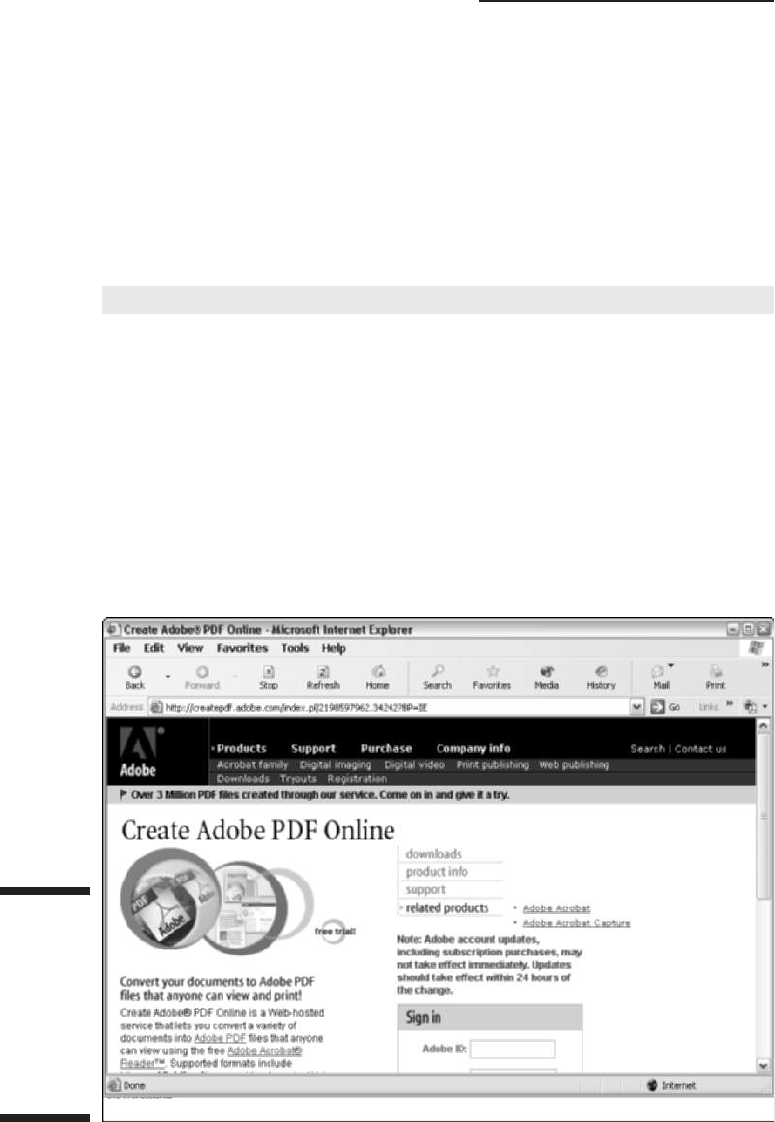
You can submit a wide variety of different file formats to be converted to PDF,
including HTML pages, Microsoft Office files, AutoCAD, Corel WordPerfect, and a
whole bunch of graphics formats, including all those created by Adobe’s many
graphics and page layout programs (basically all the file formats supported by
Acrobat 6). Note, however, that you can’t submit native QuarkXPress files for
converting (you need to convert them to PostScript files as you do with any
other unsupported file format). You can get a complete list of all the file formats
supported by the Create Adobe PDF Online service by visiting its Web site.
To sign up for this service or try it out free, go the following Web address:
http://createpdf.adobe.com
Note that for subscribers of this online service, there is a size limit of 100
pages per PDF file that you can upload for distilling, and these files must take
no longer than 15 minutes to convert. There are, however, no limits on the
amount of conversions that you can request. When submitting a file for dis-
tilling at the Create Adobe PDF Online Web site, shown in Figure 4-15, you can
select any of the six preset Adobe PDF settings (Standard, High Quality, Press
Quality, PDFX1a, PDFX3, or Smallest File Size), and you can also specify file
permissions (although you can’t customize the settings of the presets or
assign password protection to the file). When submitting a file for distilling,
you can also specify whether to have the final PDF file e-mailed to you or dis-
played in your Web browser.
Figure 4-15:
Using the
Create
Adobe PDF
Online
subscription
service to
create PDF
files.
106
Part II: The Wealth of Ways for Creating PDF Files

Chapter 5
Converting Microsoft Office
Documents
In This Chapter
One-touch PDF files using the PDFMaker for Windows and Macintosh
Automatically viewing converted PDF files in Acrobat
E-mailing PDF files as soon as you make them
Customizing the PDFMaker distilling settings
Sending converted PDF documents for review
A
crobat 6 makes it a snap to convert Microsoft Office documents created
and saved in the Word, Excel, or PowerPoint file formats to PDF files so
that they can partake of all the benefits offered by this universal file format.
When you install Acrobat 6 on a Windows or Macintosh computer on which
these Microsoft Office applications (Office 2000 and XP on Windows and
Office X on Macintosh) have already been installed, Acrobat 6 enhances the
Word, Excel, and PowerPoint interface by adding three one-touch buttons
(the Convert to Adobe PDF, Convert to Adobe PDF and E-mail, and Convert to
Adobe PDF and Send for Review buttons) to the Office toolbars, as well as an
Acrobat menu to the Office menus. Note that on Office X for Macintosh, you
don’t get the PDF reviewing features.
As you discover in this chapter, you can use the Convert to Adobe PDF but-
tons and the additional Acrobat menu to convert your native Microsoft Office
documents into PDF documents in a flash. The best thing about this enhanced
PDF conversion functionality is that you retain the ability to use any of the
preset Adobe PDF Settings (Standard, Press Quality, High Quality, PDF/X1a,
PDF/X3, and Smallest File Size) for distilling, as well as all the custom Adobe
PDF Settings you create. Even more importantly, you can have the paragraph
styles used in your Word documents automatically converted into bookmarks
in the resulting PDF documents, and on the Windows platform, you can have
your Word documents automatically converted into tagged PDF documents so
that their text can reflow when viewed in Acrobat 6 or Adobe Reader 6.
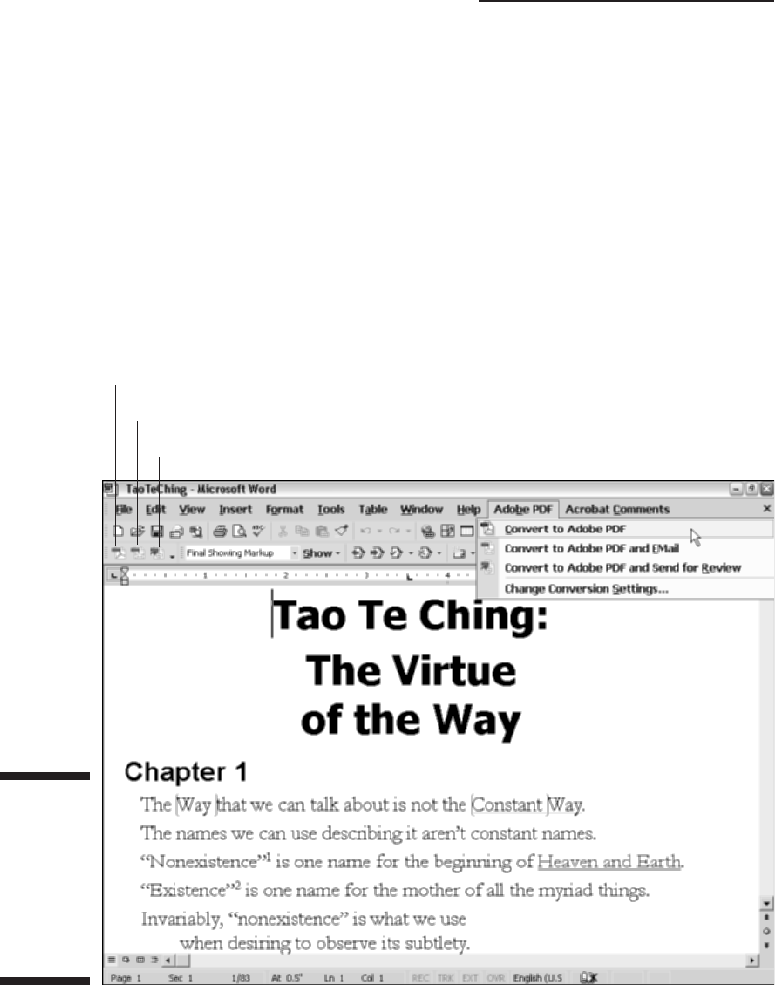
Using PDFMaker in Microsoft
Office for Windows
With the release of Acrobat 6, gone are the days of having to select the
Acrobat Distiller as the name of your printer in the Print dialog box in Word,
Excel, or PowerPoint in order to convert the native Office document file
format into PDF (although you can still make perfectly good PDF files that
way). Figure 5-1 shows the two sets of controls that are automatically added
to the Microsoft Word, Excel, and PowerPoint 2000 and 2002 interfaces when
you install Acrobat 6 on your computer.
Convert to Adobe PDF
Convert to Adobe PDF and E-mail
Convert to Adobe PDF and Send for Review
Figure 5-1:
Examining
the Acrobat
menu and
PDFMaker
6.0 toolbar
in Word
2002.
108
Part II: The Wealth of Ways for Creating PDF Files

All you have to do in order to convert the current document open in Word,
Excel, or PowerPoint into a PDF document is follow these three simple steps:
1. Choose Adobe PDF➪Convert to Adobe PDF in the Office application or
click the Convert to Adobe PDF button on the PDFMaker 6.0 toolbar.
An Acrobat PDFMaker alert dialog box appears, telling you that
PDFMaker needs to save the document before continuing and asking
whether or not you’d like to save the document and continue. Click Yes.
The Save Adobe PDF File As dialog box appears.
2. Edit the filename of the converted PDF file in the Name text box and
select the folder on your hard drive in which to save it.
If you don’t edit the filename, PDFMaker gives the new PDF file the same
name as its Office counterpart but with the
.pdf filename extension.
Note that by default, filename extensions aren’t displayed in Windows XP.
3. Click the Save button.
PDFMaker does the rest. As it converts the open document in the Office
application to PDF, an Acrobat PDFMaker alert dialog box appears to keep
you informed of the progress in converting the document’s text and graphics
in a progress bar. As soon as PDFMaker finishes the document conversion
indicated on the progress bar, this Acrobat alert dialog box disappears.
To view the PDF document you just converted, launch Acrobat 6, and then
choose File➪Open and select the newly converted PDF file (or better yet, open
the PDF file’s folder in the My Documents or the My Computer window and
then just drag its file icon onto the Acrobat 6.0 desktop shortcut). Figure 5-2
shows the Word document (that first made its appearance in the background
of Figure 5-1) as it looks in Acrobat 6 after its conversion to PDF.
Automatically viewing the converted
PDF in Acrobat
If you’d like to view the converted PDF file automatically in Acrobat 6 as soon
as the PDFMaker completes the Office-to-PDF file conversion in your Office
application, select the View Result in Acrobat option before you invoke the
Convert to Adobe PDF button or select the Convert to Adobe PDF item on the
Acrobat menu. In the Office application, choose Adobe PDF➪Change
Conversion Settings to open the Acrobat PDFMaker dialog box. Select the
View Adobe PDF Result check box on the Settings tab and click OK.
109
Chapter 5: Converting Microsoft Office Documents
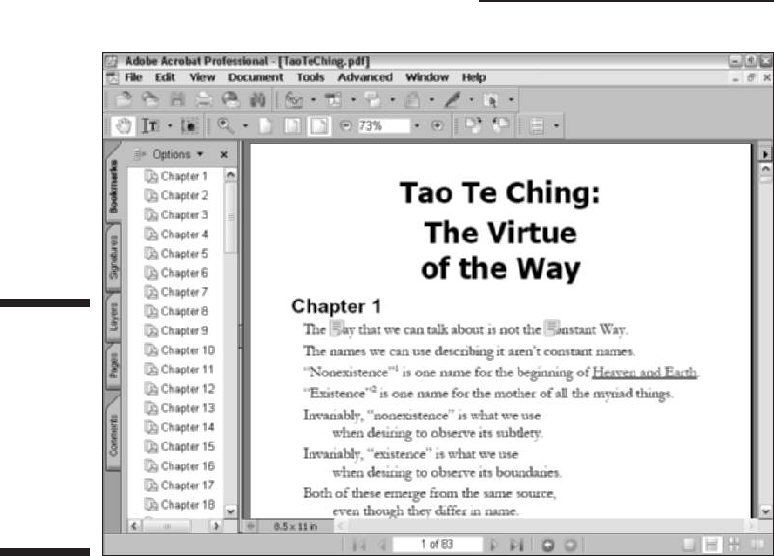
When the View Result in Acrobat option is turned on, PDFMaker converts the
current Office document, displays the Save PDF File As dialog box, and then
automatically launches Acrobat 6 (if it’s not already running in the back-
ground) and displays the converted PDF file as the current document in the
Acrobat Document window.
Converting and e-mailing PDF files
When converting an Office document to PDF, the PDFMaker offers you the
option to automatically send the converted file as an attachment to a new
e-mail message. You can use this option to quickly send a PDF version of an
important Office document to a coworker or client who needs the informa-
tion delivered in the cross-platform PDF format.
To convert the document currently open in Word, Excel, or PowerPoint into a
PDF document and immediately send it off attached to a new e-mail message,
follow these steps:
Figure 5-2:
The PDF
version of
a Word
document
converted
by
PDFMaker
as it opens
in Acrobat 6.
110
Part II: The Wealth of Ways for Creating PDF Files

1. In the Office application, choose Adobe PDF➪Convert to Adobe PDF
and E-mail or click the Convert to Adobe PDF and E-mail button (the
second button) on the PDFMaker 6.0 toolbar.
If you haven’t saved your Office document, Acrobat PDFMaker will
prompt you to do so. After clicking Yes to save the current Office docu-
ment, the Save PDF File As dialog box appears.
2. Edit the filename of the converted PDF file in the Name text box and
select the folder in which to save it on your hard drive.
If you don’t edit the filename, PDFMaker gives the new PDF file the same
name as its Office counterpart but with the
.pdf filename extension. If
you’re using Office XP, the filename extension may not be displayed along
with your title in the File Name text box, but PDF Files is automatically
selected in the Save as Type list box below.
3. Click the Save button to convert the file and then launch your e-mail
program.
4. Fill in the e-mail addresses of the recipient(s) in the To and Cc text
boxes, as required, and then describe the contents of the message in
the Subject text box in the message header before writing a memo to
the recipient(s) in the body of the message.
5. Click the Send button to send the e-mail message to the designated
recipient(s), complete with the attached PDF document, and then
return to your Microsoft Office program.
Customizing the PDF conversion settings
PDFMaker enables you to change and customize the distilling settings used in
any of your Office-to-PDF file conversions. To customize the distilling set-
tings, you choose Adobe PDF➪Change Conversion Settings from the Office
application program’s menu bar to open the Adobe PDFMaker.
Figure 5-3 shows this dialog box as it appears in Microsoft Word with its four
tabs: Settings, Security, Word, and Bookmarks. Note that the Adobe PDFMaker
dialog box that opens when you choose Adobe PDF➪Change Conversion
Settings from the Microsoft Excel or PowerPoint menus has only the two tabs:
Settings and Security. A separate Bookmarks tab is unique to Microsoft Word
and provides the ability to select specific headings and paragraph styles in
your Word document that can be converted into bookmarks in the resulting
PDF file. In addition, you won’t find an application-specific tab (like the Word
tab in Figure 5-3) when using Excel or PowerPoint. Application-specific options
in those programs are either minimal enough to include in the Application
Setting area of the Settings tab (as is the case with PowerPoint) or as a new
menu option (as is the case with Excel) when using PDFMaker 6.
111
Chapter 5: Converting Microsoft Office Documents
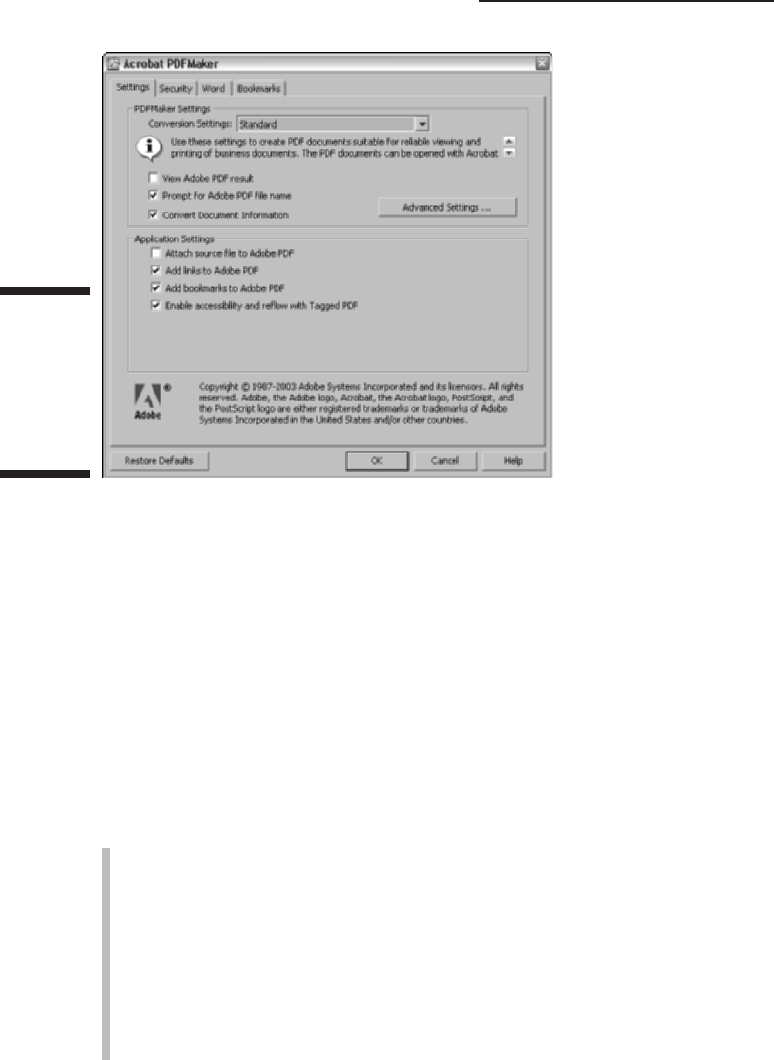
The Settings tab
The Settings tab of the Adobe PDFMaker dialog box enables you to change
the Adobe PDF settings (now called conversion settings in PDFMaker). As
when using Acrobat Distiller to create your PDFs, the default preset job
option is Standard when you first open the Adobe PDFMaker dialog box. You
can use the Conversion Settings drop-down list to select one of the other
preset Adobe PDF Settings (PDFX1a, PDFX3, Press Quality, Smallest File Size,
or Standard) or to select any of the custom Adobe PDF Settings that you
create. In addition to being able to select different settings in the Conversion
Settings drop-down list, you have a number of check boxes in the PDFMaker
Settings and Application Settings areas on the Settings tab. The following
gives a rundown on the options that appear whether you’re using Microsoft
Word, Excel, or PowerPoint:
PDFMaker Settings: Select the View Adobe PDF Result check box to
immediately view your converted PDF in Acrobat after distilling. Select
the Prompt for Adobe PDF File Name check box to have the Save Adobe
PDF File As dialog box open prior to converting your Word document. To
convert the document-specific information (such as the Title, Subject,
Author, and Keywords information found on the Summary tab of the
document’s Properties dialog box) to metadata in the new PDF file that
can be indexed and searched (see Chapter 13 for information on search-
ing), select the Convert Document Information check box. Note that the
PDFMaker Settings area also includes an Advanced Settings button.
Figure 5-3:
Opening the
Adobe
PDFMaker
dialog box in
Microsoft
Word.
112
Part II: The Wealth of Ways for Creating PDF Files

Clicking this button opens the Adobe PDF Settings dialog box in Acrobat
6 where you create customized Adobe Distiller conversion settings. This
process is covered in detail in Chapter 4.
Application Settings: Select the Attach Source File to Adobe PDF check
box if you want to attach the Office source file as a comment in your con-
verted PDF document. Select the Add Links to Adobe PDF check box to
convert the hyperlinks in your Word document to Adobe PDF links. Select
the Add Bookmarks to Adobe PDF check box to convert the headings and
paragraph styles in a Word document to bookmarks in a PDF document.
The Enable Accessibility and Reflow with Tagged PDF check box lets you
create tagged PDF documents from the Word document structure.
To customize one of the preset Adobe PDF Settings and thereby create a new
custom job option, select the preset that uses settings closest to the ones
you want in the custom job option in the Conversion Settings drop-down list
and then click the Advanced Settings button to open the Adobe PDF Settings
dialog box for the selected preset.
The Adobe PDF Settings dialog box that PDFMaker opens in your Microsoft
Office program contain the same tabs (General, Images, Fonts, Color, and
PDF/X) with the same options as the Adobe PDF Settings dialog box that the
Acrobat Distiller opens when you select its Settings➪Edit Adobe PDF Settings
menu command. As is true in the Acrobat Distiller, the particular values and
settings that are selected on the individual tabs of the Adobe PDF Settings
dialog box depend upon which preset you select when you open the dialog
box with the PDFMaker’s Advanced Settings button (refer to Chapter 4 for
detailed information on how to modify these settings).
After customizing the settings on the tabs of the Adobe PDF Settings dialog
box, you save these settings by clicking the Save As button and then naming
the custom Conversion Settings. As with the Acrobat Distiller, any custom
Conversion Settings you save are automatically added to the PDFMaker’s
Conversion Settings drop-down list as soon as you close the Adobe PDF
Settings dialog box.
The Security tab
The Security tab in the Adobe PDFMaker dialog box contains options that
enable you to password-protect the converted PDF file (so that only the
people you give the password can open the file) and set the file permissions
(which control how the document can be edited and whether or not it can be
printed). The options on this tab are identical to the ones found in the Adobe
PDF - Security dialog box (refer to Chapter 4 for details on how to go about
setting the password and file permission options). Note that the Security tab
options are exactly the same whether you are converting a Microsoft Word,
Excel, or PowerPoint document to PDF.
113
Chapter 5: Converting Microsoft Office Documents
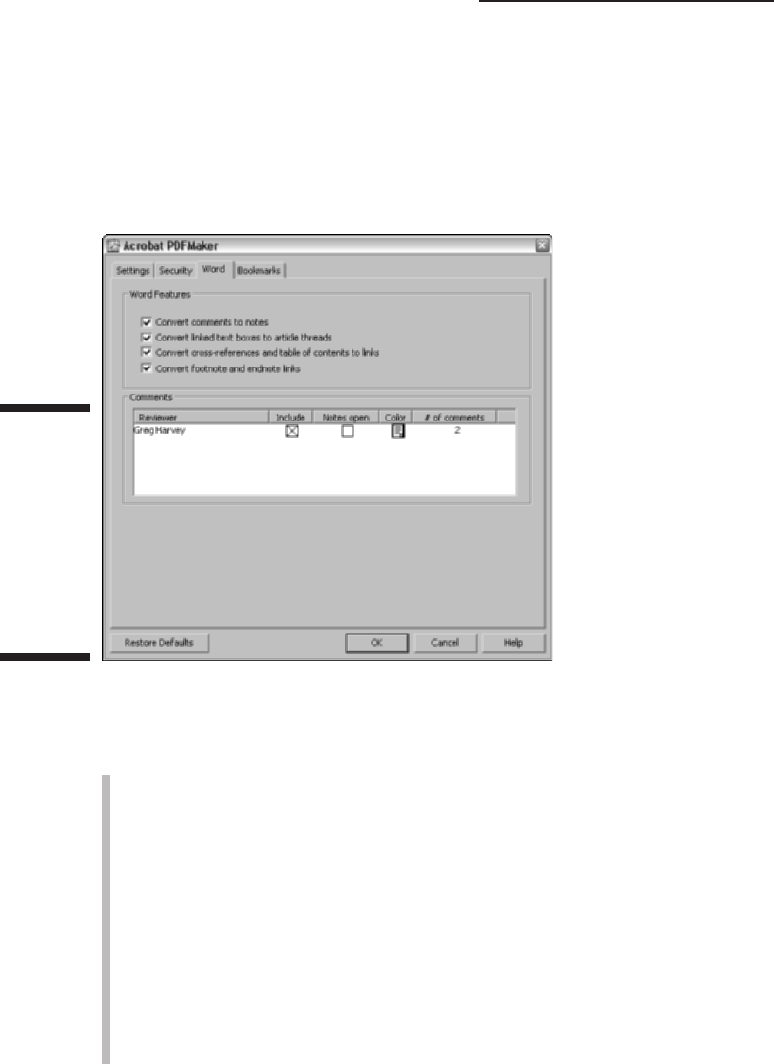
The Word tab
The Word tab in the Adobe PDFMaker dialog box contains a bunch of check
box options that enable you to control what Word-specific information is car-
ried over to the new PDF documents you’ll be generating. Figure 5-4 shows
the Word tab as it appears when you open the Adobe PDFMaker dialog box in
Microsoft Word.
The Word Features area on the Word tab contains the following settings for
converting very specific word processing features into PDF equivalents:
Convert Comments to Notes: Converts all comments added to the Word
document into notes in the resulting PDF document.
Convert Linked Text Boxes to Article Threads: Convert all notations
made in the text boxes found in the Word document into articles that
control the way the text is read in Acrobat 6 or Adobe Reader 6 (see
Chapter 2 for more information).
Convert Cross-References and Table of Contents to Links: Changes all
cross-references and any table of contents found in the Word document
into active hyperlinks in the resulting PDF document.
Convert Footnote and Endnote Links: Converts all footnotes and end-
notes in the Word document into active hyperlinks in the resulting PDF
document.
The Comments area of the Word tab displays all the comments in the
current Word document and lets you choose how they will be displayed in
Figure 5-4:
Examining
the Word
tab in the
Adobe
PDFMaker
dialog box
when using
Microsoft
Word.
114
Part II: The Wealth of Ways for Creating PDF Files
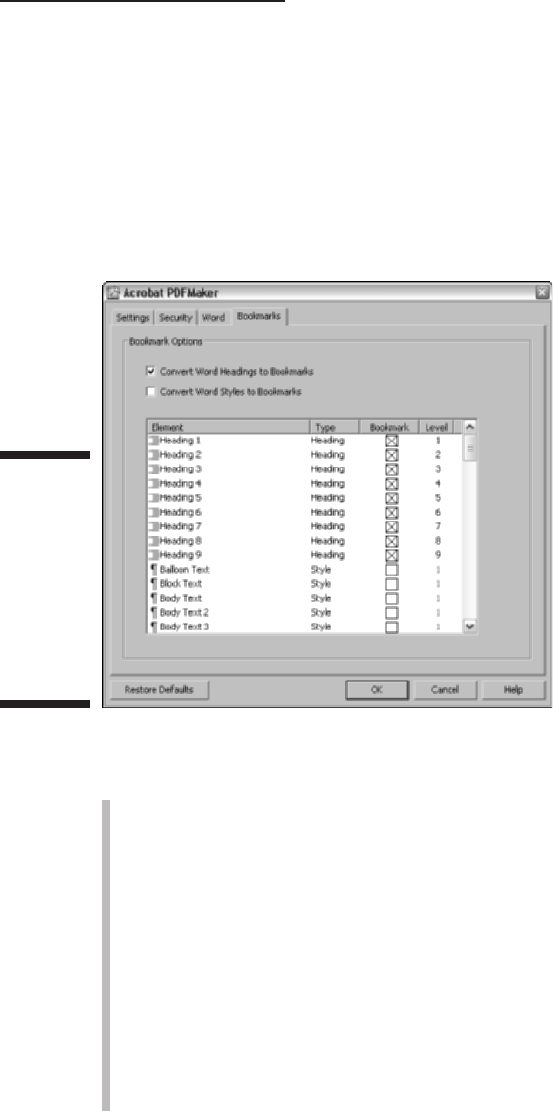
the converted PDF document. You can choose whether or not to include the
comments, whether they appear open, and also specify a background color.
The Bookmarks tab
The Bookmarks tab (shown in Figure 5-5) is unique to the Word version of the
Acrobat PDFMaker dialog box. Its options enable you to convert the headings
and paragraph styles found in the original Word document into bookmarks in
the resulting PDF document.
The Bookmarks tab contains the following options:
Convert Word Headings to Bookmarks: This option automatically con-
verts all Word Heading styles used in the original document to book-
marks in the final PDF document. When this check box is selected (as it
is by default), all Heading styles used in the document are selected in
the list box below. To restrict bookmark conversion to just particular
heading levels, deselect the check boxes for all the Heading styles you
don’t want used in this list.
Convert Word Styles to Bookmarks: This option automatically converts
all styles (not just the heading styles) used in the original Word docu-
ment to bookmarks in the final PDF document. When you select this
check box, the check boxes for all the styles used in your document are
selected in list box below. To restrict bookmark conversion to just par-
ticular paragraph styles, deselect the check boxes for all the individual
styles you don’t want used in this list.
Figure 5-5:
Examining
the
Bookmarks
tab in the
Word
version of
the Adobe
PDFMaker
dialog box.
115
Chapter 5: Converting Microsoft Office Documents
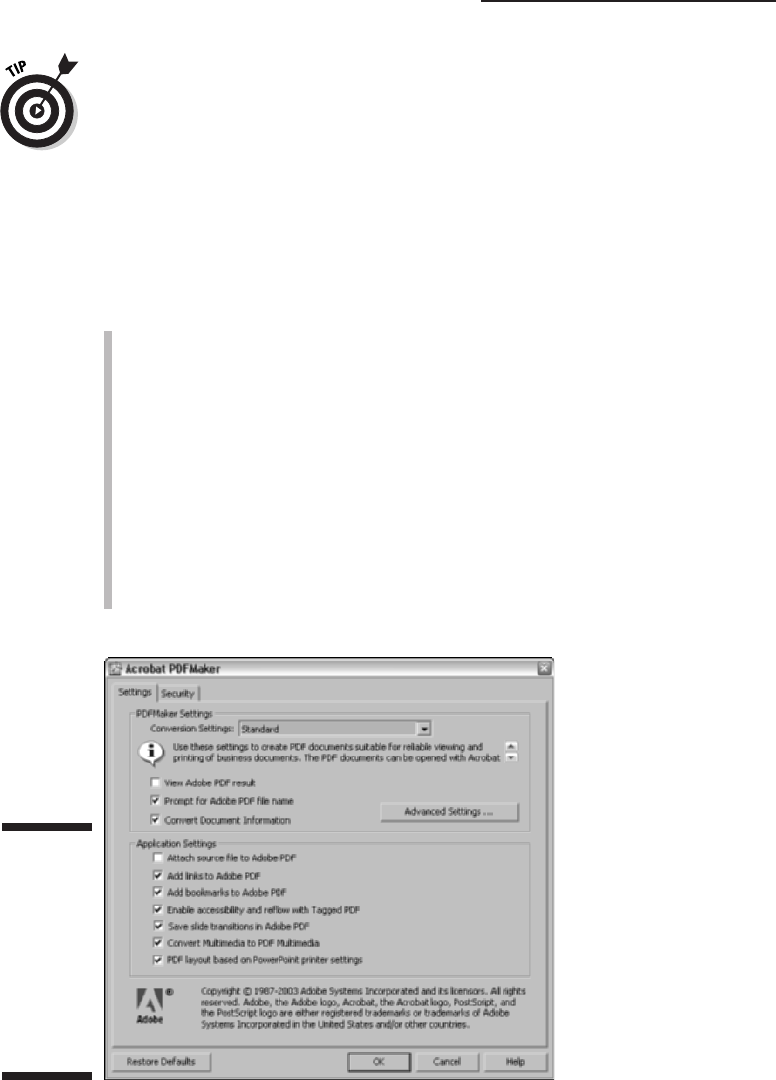
While there are no Excel-specific options on the Acrobat PDFMaker dialog
box when you choose Adobe PDF➪Change Conversion Settings in Microsoft
Excel, there is an important new command on the Adobe PDF menu —
Convert Entire Workbook. The default PDF conversion setting for an Excel
document converts only the active worksheet. If you want to convert all the
worksheets in your Excel workbook to Adobe PDF, choose this command.
The PowerPoint-specific application settings
The following PowerPoint-only options appear in the Settings tab on the
Acrobat PDFMaker dialog box (shown in Figure 5-6) when you choose Adobe
PDF➪Change Conversion Settings in Microsoft PowerPoint:
Save Slide Transitions in Adobe PDF: Ensures that the animated transi-
tions setup in a PowerPoint presentation are carried over in the converted
PDF file.
Convert Multimedia to PDF Multimedia: Ensures that all multimedia
elements in a PowerPoint presentation are converted to Adobe
Multimedia in a PowerPoint-generated PDF file. Adobe Multimedia
format adds interactive features to graphics, sounds, and movies that
enhance their appearance in PDF documents. See Chapter 16 for more
on this subject.
PDF Layout Based on PowerPoint Printer Settings: Ensures that page
layout in a PowerPoint-generated PDF file mirrors the printer settings
specified in the PowerPoint presentation.
Figure 5-6:
Examining
the
Application
Settings for
PowerPoint
in the
Acrobat
PDFMaker
dialog box.
116
Part II: The Wealth of Ways for Creating PDF Files

Converting Office documents to PDF
and sending them for review
The third option for creating a PDF file with PDFMaker enables you to create
a PDF from an Office document and use the resulting PDF file to initiate a
review cycle by sending it out to reviewers. To do so, follow these steps:
1. Choose Adobe PDF➪Convert to Adobe PDF and Send for Review in
the Office application or click the Convert to Adobe PDF and Send for
Review button on the PDFMaker 6.0 toolbar.
If you haven’t saved your document, an Acrobat PDFMaker alert dialog
box prompts you to do so. Click Yes. The Save Adobe PDF File As dialog
box appears.
2. Edit the filename of the converted PDF file in the Name text box and
select the folder in which to save it on your hard drive.
If you don’t edit the filename, PDFMaker gives the new PDF file the same
name as its Office counterpart but with the
.pdf filename extension. Note
that by default, filename extensions aren’t displayed in Windows XP.
3. Click the Save button to close the Save Adobe PDF File As dialog box
and start the conversion process.
When the PDFMaker finishes distilling your Office document, it opens
the Send by E-mail for Review dialog box, as shown in Figure 5-7. Note
that if you haven’t entered a return e-mail address in Acrobat
Preferences, you will be prompted to enter one prior to seeing the dialog
box shown in Figure 5-7.
4. Enter e-mail addresses of those you wish to send the PDF file to for
review, a subject, and message in the appropriate text boxes.
The standard e-mail address text boxes (To, Cc, and Bcc) are provided.
The Subject and Message to Reviewers text boxes have default entries
that you can use or edit.
5. Click the Send button to close the Send by E-mail for Review dialog box.
An alert from your e-mail client program appears, asking you to verify
that you want to send an e-mail with the attached PDF file.
6. Click the Send button (again) to send out the attached PDF file for
review.
The Send for Review dialog box, shown in Figure 5-7, also appears in Acrobat
6 when you choose File➪Send by E-mail for Review. For a complete rundown
on commenting and reviewing features in Acrobat 6 as well as the Acrobat
Comments menu that appears in Microsoft Word, see Chapter 9.
117
Chapter 5: Converting Microsoft Office Documents
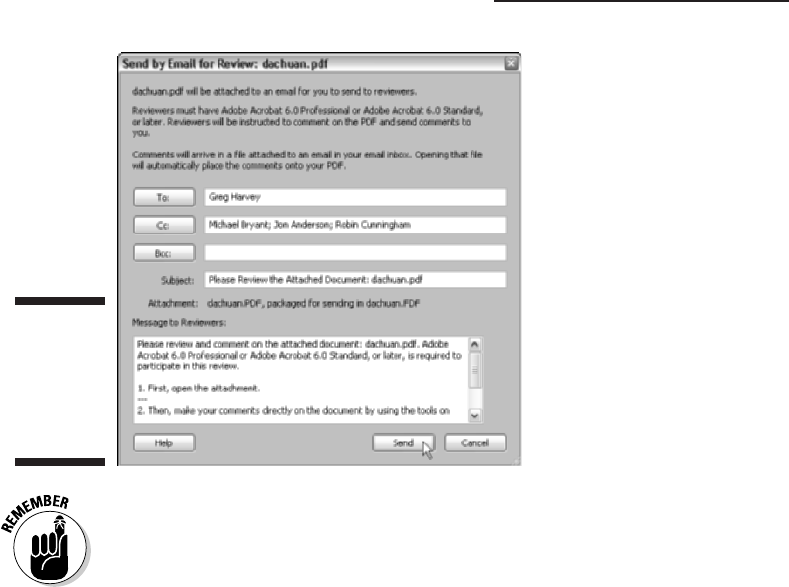
You can add to the notes, links, and bookmarks that are carried over from the
original Word document in the converted PDF document using the annotation
features in Acrobat 6 — see Chapter 9 for details.
Converting Office X files on the Mac
If you’re using Microsoft Office X for Mac OS X (and you have to because
Acrobat 6 runs only on OS X), you have access to both the Convert to Adobe
PDF and the Convert to Adobe PDF and E-mail buttons on the PDFMaker 6.0
toolbar in Word, Excel, and PowerPoint after you install Acrobat 6.0 on your
computer. Note that although PDFMaker 6 does not support the review and
commenting features found in the Windows version, you can use these but-
tons to convert Office documents to PDF files and e-mail them as you would
using Office for Windows. You do not, however, have access to an Adobe PDF
menu as you do in the Windows version of Office. This means that you have
no way to change the conversion settings as described previously in this
chapter. Mac users (I can hear you screaming at Adobe for Acrobat feature
parity with your Windows brethren) can, however, choose Acrobat Distiller 6
preset Conversion Settings or any custom conversion settings you’ve created
in the Print dialog box of your Office X program. To do so, follow these steps:
1. With your Office X document open, choose File➪Print or press
ÔÔ
+P
to open the Print dialog box.
2. Select Adobe PDF on the Printer drop-down list.
Figure 5-7:
Examining
the Send by
E-mail for
Review
dialog box.
118
Part II: The Wealth of Ways for Creating PDF Files
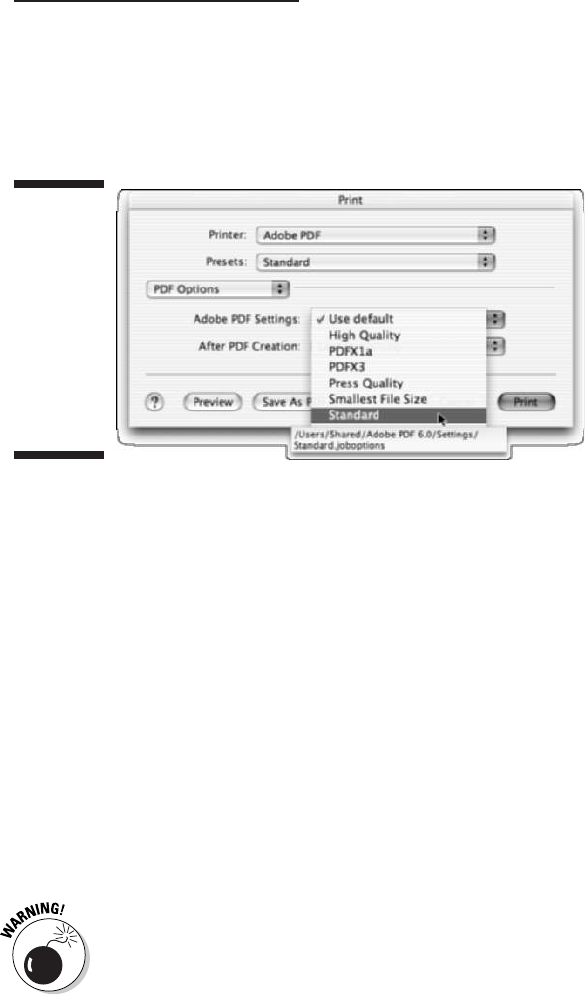
3. Select PDF Options on the drop-down list labeled Pages and Copies.
The PDF Options command is added to the list when you choose Adobe
PDF as your printer. After selecting PDF Options, the Print dialog box
changes to the one shown in Figure 5-8.
4. Click the Adobe PDF Setting drop-down list to select a preset Distiller
Conversion Setting or one you’ve customized.
As shown in Figure 5-8, if you hover the mouse pointer over a conver-
sion setting in this list, a screen tip displays the directory path for that
conversion setting’s location on your hard drive. You also have the
option to choose Launch Nothing or Acrobat on the After PDF Creation
drop-down list to specify whether or not you want to view your con-
verted Office document PDF in Acrobat.
5. Click either the Save as PDF or Print button to open the Save to File
dialog box.
If you want to see how your converted Office document is displayed in
Acrobat, click the Preview button.
6. Type a filename in the Save As text box, choose a location for the fin-
ished PDF file (the default is your desktop), and click the Save button
to convert your Office Document to PDF.
PDF files that are created from Office X documents do not retain their docu-
ment structure tags. This means that those PDF files will not have the capa-
bility of being reflowed in Acrobat or Adobe Reader. For more on reflowing
document text see, Chapter 2.
Figure 5-8:
Selecting a
preset or
custom
conversion
setting
when
creating
PDF files in
Office X for
Max OS X.
119
Chapter 5: Converting Microsoft Office Documents

120
Part II: The Wealth of Ways for Creating PDF Files

Chapter 6
Capturing Paper Documents
In This Chapter
Scanning paper documents into Acrobat 6
Making scanned PDF documents editable and searchable
Finding and correcting scanner foul-ups
Converting previously scanned documents to PDF
Using the Paper Capture Online service
A
crobat 6 makes it easy to turn your paper documents into PDF files
that you can share with clients and coworkers via e-mail or post for
viewing on your company’s intranet or Web site on the Internet. Capturing
paper documents as PDF files also provides a perfect way for you to electron-
ically archive important documents such as contracts, reports, and financial
statements.
Then, after you’ve scanned these documents in as PDF files, if you’re a
Windows user, you can use Acrobat’s Paper Capture feature within Acrobat to
turn them from graphic files to fully searchable text (if you’re a Mac user, you
do this using Adobe’s free [for you] Paper Capture Online service). That way,
even after you catalog the documents and store them on media, such as
CD-ROM or removable disk media, you still retain the ability to search their
text. As you find out in this chapter, all you need to turn almost any of your
paper documents into PDF documents is a scanner connected to your com-
puter and a little know-how about using the Acrobat 6 Paper Capture feature.
Scanning Paper Documents in Acrobat 6
To capture paper documents as PDF files, you first scan them using the import
scan feature in Acrobat 6. The steps for doing this are quite straightforward:
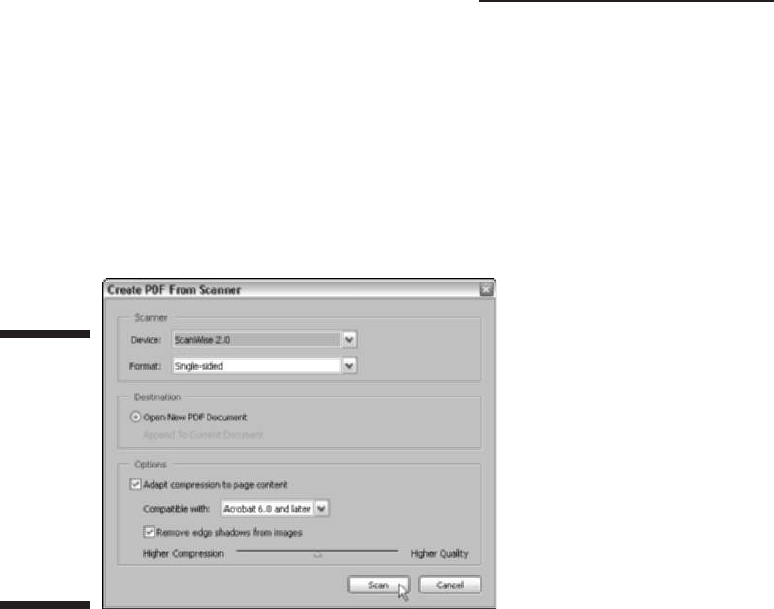
1. Turn on your scanner and position the first sheet of the document
correctly on its glass.
2. Launch Acrobat 6, and if you want to add the pages you’re about to
scan to a particular PDF document, open that document in Acrobat.
3. Choose File➪Create PDF➪From Scanner or click the pop-up menu on
the Create PDF Task button and select From Scanner.
The Create PDF From Scanner dialog box opens, as shown in Figure 6-1.
4. In the Scanner area of the dialog box, select the name of your scanner
and the driver it uses (if the device listed is not the one you want to use,
select its name and driver in the Device drop-down list) and indicate
whether the device should scan one side (the default) or both sides of
the paper.
Select Double-sided in the Format drop-down list if you need to scan
both the front and back of the pages.
5. If you have a PDF document open in Acrobat at the time you choose
File➪Create PDF➪From Scanner, you have a choice in the Destination
area of the Create PDF From Scanner dialog box between the Open New
PDF Document option and the Append to Current Document option.
Note that if you have no PDF document currently open, the Append to
Current Document radio button is grayed out. If a PDF document is cur-
rently open, Acrobat selects the Append to Current Document radio
button by default, and you must remember to select the Open New PDF
Document radio button if you want to avoid adding the scanned pages
to the end of the current document.
6. Click the Scan button.
Figure 6-1:
Select the
scanner,
page format,
and
destination
in the
Create PDF
From
Scanner
dialog box.
122
Part II: The Wealth of Ways for Creating PDF Files
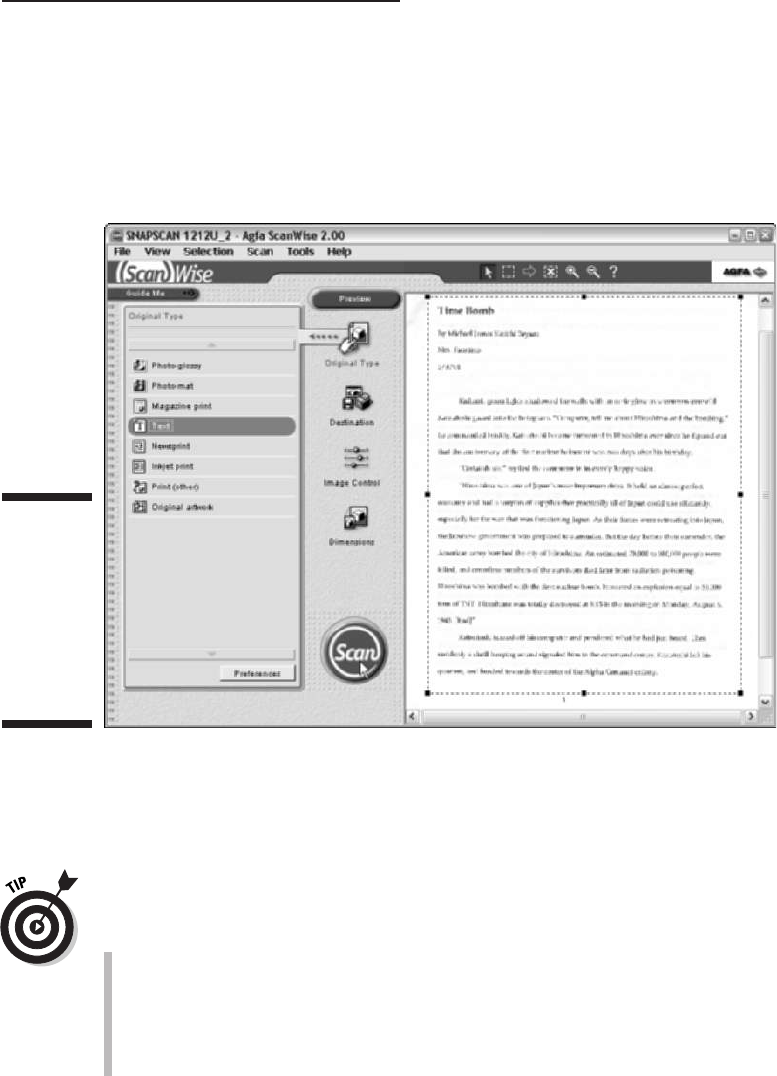
When you click the Scan button in the Create PDF From Scanner dialog box,
the scanning software used by your particular brand of scanner opens its
own window in which you can select the scanning settings and often preview
the scanned page. Figure 6-2 shows the controls in the ScanWise window
used by my Agfa scanner that opens when I click the Scan button in the
Create PDF From Scanner dialog box.
When choosing the scanning settings, you want to select the lowest resolution
quality for the type of document that stills gives you an acceptable image in
the final PDF file. The reason for this is the higher the resolution, especially
when dealing with color images, the larger the file, and at high resolutions
with lots of colors, you can end up with an enormous document.
When selecting the scanning settings, keep these tips in mind:
When scanning black-and-white images and text-only documents, you
must set the resolution between 200 and 600 dpi (dots per inch). When
scanning color images and text, you must select a range between 200
and 400 dpi. This is because the Paper Capture plug-in that recognizes
the text in a scanned document and converts it to searchable and
editable text can only process documents scanned in these ranges.
Figure 6-2:
Select the
scanning
settings
with the
software
installed for
your type of
scanner.
123
Chapter 6: Capturing Paper Documents
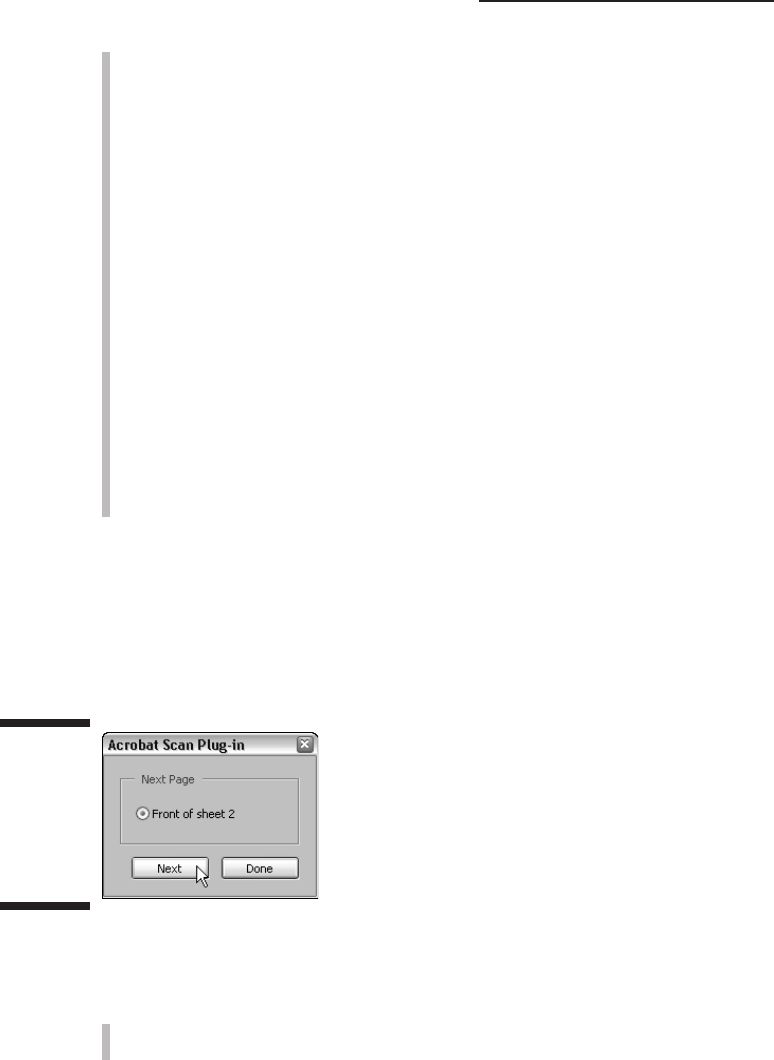
For most documents, scanning at a resolution of 300 dpi produces the
best paper captures. If, when using the Paper Capture plug-in, you find
that the document contains many unrecognized words, or if the docu-
ment has a lot of very small text (9 points or smaller), try scanning at a
higher resolution (up to 600 dpi).
Scan in black and white whenever possible.
When scanning color or grayscale pages containing large type, try scan-
ning at a resolution of 200 dpi for faster processing with Paper Capture.
Avoid using dithering or halftone scanner settings. These improve the
appearance of photographic images but make it difficult for the Paper
Capture plug-in to recognize text.
When scanning text printed on colored paper, increase the brightness
and contrast by approximately 10 percent. If your scanner supports color
filtering capability, select a filter that drops out the background color.
If your scanner has a manual brightness control, use it to get the letters
as clean as possible. If some of the thicker characters in the document
are touching when scanned, try using a higher brightness setting and
scanning again. If some of the thinner characters are too separated in
the scan, try a lower brightness setting next time.
After selecting your scanning settings in your scan software (and previewing
the page if your scan software offers this feature), start scanning the page by
clicking the Scan button (or its equivalent). When your scanner finishes scan-
ning the page, Acrobat displays an Acrobat Scan Plug-In dialog box (similar to
the one shown in Figure 6-3) that prompts you to get the next page ready for
scanning or to signal that you’re done scanning.
When this dialog box appears, you take one of the following three actions,
depending upon what type of document you’re scanning:
If you’re scanning a single-page document, click the Done button in this
Acrobat Scan Plug-In dialog box.
Figure 6-3:
Click the
Next button
to scan the
next page
in the
document.
124
Part II: The Wealth of Ways for Creating PDF Files

If you’re scanning a double-sided document, turn the paper over in the
scanner and then click the Next button.
If you’re scanning single-sided pages but your paper document contains
multiple pages, replace the first page on the scanner with the second
page and then click the Next button.
When you click the Done button, Acrobat closes the Acrobat Scan Plug-In
dialog box and displays the page you just scanned in the Acrobat Document
window. When you click the Next button, Acrobat closes the Acrobat Scan
Plug-In dialog box and returns you to your scanning software, where you can
start scanning the backside of the page or the next page by clicking its Scan
button.
For a multipage document, you continue the process of clicking the Next
button in the Acrobat Scan Plug-In dialog box, replacing the current page with
the next page on the scanner, and then clicking the Scan button in your scan-
ner software. When you finish scanning the last page in your document, click
the Done button in the Acrobat Scan Plug-In dialog box to see the first page of
your new PDF document displayed in Acrobat.
Making scanned documents
searchable and editable
When you scan a document directly into a PDF file (as described in the preced-
ing section), Acrobat captures all the text and graphics on each page as though
they were all just one big graphic image. This is fine as far as it goes, except
that it doesn’t go very far because you can neither edit nor search the PDF doc-
ument. (As far as Acrobat is concerned, the document doesn’t contain any text
to edit or search — it’s just one humongous graphic). That’s where the Paper
Capture plug-in in Acrobat 6 for Windows comes into play: You can use it to
make a scanned document into a PDF that you can either just search or both
search and edit.
To use Paper Capture, all you have to do is choose Document➪Paper Capture
to open the Paper Capture dialog box (shown in Figure 6-4), select the page or
pages to be processed (All Pages, Current Page, or From Page x to y), and then
click the OK button; the Paper Capture utility does the rest. As it processes
the page or pages in the document that you designated, a Paper Capture Plug-
In alert dialog box keeps you informed of its progress in preparing and per-
forming the page recognition. When Paper Capture finishes doing the page
recognition, this alert dialog box disappears, and you can then save the
changes to your PDF document with the File➪Save command.
125
Chapter 6: Capturing Paper Documents

When doing the page recognition in a PDF document, the Paper Capture plug-
in offers you a choice between the following three Output Style options:
Searchable Image (Exact): Select this option to make the text in the PDF
document searchable but not editable (this is the default setting). This
setting is the one to choose if you’re processing a document that needs to
be searchable but should never be edited in any way, such as an executed
contract.
Searchable Image (Compact): Select this option to make the text in the
PDF document searchable but not editable and to compress its graphics.
Use this setting if you’re processing a document whose text requires
searching without editing and that also contains a fair number of graphic
images that need compressing. When you select this setting, Paper
Capture applies JPEG compression to color images and ZIP compression
to black-and-white images.
Formatted Text & Graphics: Select this option to make the text in the
PDF document both editable and searchable. Pick this setting if you not
only want to be able to find text in the document but also possibly make
editing changes to it.
To select a different output style setting, click the Edit button in the Paper
Capture dialog box to open the Paper Capture Settings dialog box (as shown in
Figure 6-5). This dialog box not only enables you to select a new output style in
the PDF Output Style drop-down list, but also enables you to designate the pri-
mary language used in the text in the Primary OCR Language drop-down list
(OCR stands for Optical Character Recognition, which is the kind of software
that Paper Capture uses to recognize and convert text captured as a graphic
into text that can be searched and edited).
Figure 6-4:
Selecting
the pages to
process in
the Paper
Capture
dialog box.
126
Part II: The Wealth of Ways for Creating PDF Files
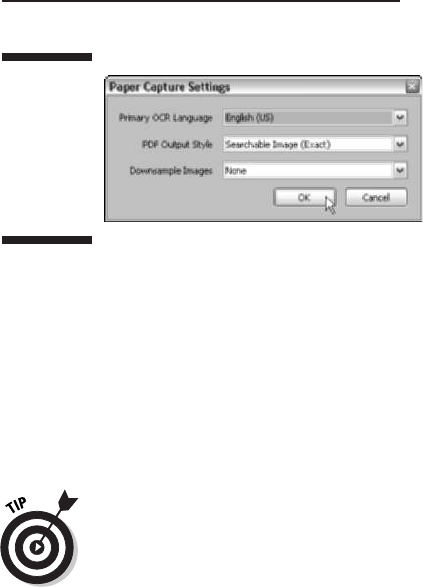
If your PDF document contains graphic images, you can tell Paper Capture how
much to compress the images by selecting the maximum resolution in the
Downsample Images drop-down list. This menu offers you three options in addi-
tion to None (for no compression): Low (300 dpi), Medium (150 dpi), and High
(72 dpi). The Low, Medium, and High options refer to the amount of compres-
sion applied to the images, and the values 300, 150, and 72 dpi (dots per inch)
refer to their resolution and thus their quality. As always, the higher the amount
of compression, the smaller the file size and the lower the image quality.
After processing the pages of your PDF document with the Paper Capture
plug-in, use the Search feature (Ctrl+F on Windows and Ô+F on the Mac) to
search for words or phrases in the text to verify that it can be searched. If
you used the Formatted Text & Graphics output style in doing the page recog-
nition, you can select the TouchUp Text Tool by clicking its button on the
Advanced Editing toolbar or by typing T, and then click the I-beam pointer in
a line of text to select the line with a bounding box (see Chapter 10 for more
on editing with this tool) to verify that you can edit the text as well. Always
remember to choose File➪Save to save the changes made to your document
by processing with Paper Capture.
Correcting Paper Capture boo-boos
Although the OCR (Optical Character Recognition) software used by Paper
Capture has become better and better over the years, it’s still far from per-
fect. After processing a scanned PDF document using the Formatted Text &
Graphics output style, you need to check your processed document for
words that Paper Capture didn’t recognize and therefore wasn’t able to con-
vert from bitmapped graphics into text characters.
To make this check and correct these OCR errors, follow these steps:
1. Choose Document➪Paper Capture➪Find First OCR Suspect.
The program flags the first unrecognized word in the text by putting a
gray rectangle around it and opens the Find Element dialog box. Acrobat
shows a magnified view of the unrecognized word in the Find Element
dialog box, as shown in Figure 6-6.
Figure 6-5:
Selecting
options in
the Paper
Capture
Settings
dialog box.
127
Chapter 6: Capturing Paper Documents
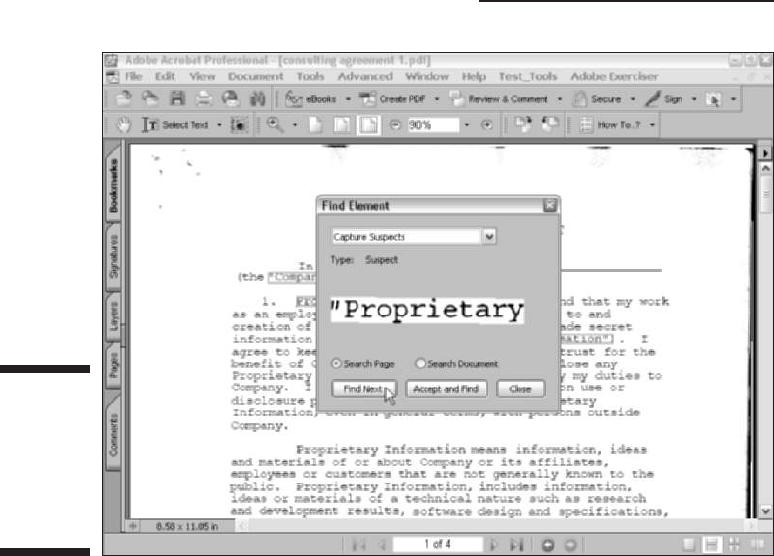
2. Choose the TouchUp Text tool by clicking its button on the Advanced
Editing toolbar.
3. In the Find Element dialog box, choose one of the following options:
• To accept the word displayed and convert it from a graphic into
text and then continue to the next capture suspect, click the
Accept and Find button.
• To edit the suspect word directly in the Find Element dialog box,
type over incorrect characters in the suspect word and then click
the Accept and Find button and go to the next suspect.
• To ignore an unrecognized word and not convert it to text, just
click the Find Next button to move right on to the next suspect.
4. Repeat Step 3 until you’ve checked and corrected all the unrecognized
words in the processed document.
Note that if you choose Document➪Paper Capture➪Find All OCR
Suspects, the program finds and highlights all suspect elements in the
document without opening the Find Element dialog box. This allows you
to individually choose which OCR suspect you’d like to edit.
Figure 6-6:
Finding an
unrecog-
nized
word in the
processed
text.
128
Part II: The Wealth of Ways for Creating PDF Files

5. To edit one of the OCR Suspects in a document after choosing Find
All OCR Suspects command, make sure the TouchUp Text tool is
selected and double-click the desired element to open the Find
Element dialog box.
The selected OCR Suspect appears in the Find Element dialog box. You
can continue by repeating Step 3 or close the Find Element dialog box
and repeat Step 5.
6. Click the Close button in the lower-right corner of the Find Element
dialog box to close it, and then choose File➪Save to save your correc-
tions to the PDF document.
Importing Previously Scanned
Documents into Acrobat
If you already have a scanned document or an electronic fax saved on your
hard drive in a graphics format such as TIFF or BMP (the Tagged Information
File Format and Bitmap format are most commonly used for saving scanned
images), you can open the file in Acrobat 6 and then process its pages with
the Paper Capture plug-in (as described in the previous section). Note that in
order for the Paper Capture plug-in to render a searchable PDF document, the
source document must be scanned at a resolution setting between 200 and
600 dpi. To open the scanned graphic file in Acrobat, follow these steps:
1. Choose File➪Create PDF➪From File to display the Open dialog box.
2. Browse to the folder that contains the graphics file containing the
scanned image and click its file icon.
If the graphics file is saved in a graphics format other than TIFF, select
this file format in the Files of Type drop-down list (the Show drop-down
list on the Mac) so that its file icon is displayed in the Open dialog box.
3. Click the Open button.
The scanned graphic is displayed in the Document window in Acrobat.
4. To save the graphics file as a PDF file, choose File➪Save, and then edit
the filename and the folder in which you want to save it (if desired)
before clicking the Save button.
5. To make the text in the new PDF file searchable, choose Document➪
Paper Capture➪Start Capture.
The Paper Capture dialog box opens.
129
Chapter 6: Capturing Paper Documents

6. To modify the Paper Capture settings before using it to process the
pages of your PDF document, click the Edit button to open the Paper
Capture Settings dialog box. Otherwise, skip to Step 11.
7. Select the language of the text in the Primary OCR Language drop-
down list.
8. In the PDF Output Style drop-down list, select one of the following:
• To be able to both search and edit the text, select the Formatted
Text & Graphics option.
• To make the document text searchable only, select the Searchable
Image (Exact) option.
• To make the text in a document containing many images searchable,
select the Searchable Image (Compact) option instead.
9. To compress the graphics in the PDF document, select the amount of
compression in the Downsample Images drop-down list.
Your choices are Low (300 dpi), Medium (150 dpi), or High (72 dpi).
10. Click OK to close the Paper Capture Settings dialog box and return to
the Paper Capture dialog box.
11. Click OK in the Paper Capture dialog box to begin the page processing.
12. Choose File➪Save a second time to save your changes.
After processing the pages of a scanned image that you’ve saved as a PDF
document with Paper Capture, if you used the Formatted Text & Graphics
output style, you can locate and eliminate all OCR errors in the text by follow-
ing the steps in the preceding section, “Correcting Paper Capture boo-boos.”
Using the Paper Capture Online Service
Adobe’s Paper Capture feature in Acrobat 6 is designed for individual or
small office use. For the needs of larger businesses, Adobe provides their
Create Adobe PDF Online service that enables you convert any type of busi-
ness document to PDF. Company reports, printed archival materials, spread-
sheets, calendars, and even entire Web sites are just a few of the types of
documents that you can convert in order to take advantage of the universal
file-sharing aspects of PDF. The service is subscription based (U.S. $9.99 per
month or about U.S. $99 per year), but Adobe offers the service on a trial
basis that allows you to create five PDF files free of charge.
You can go to Adobe’s Web site and see what all the excitement is about by
typing this URL into your favorite browser’s Address text box:
http://createpdf.adobe.com
130
Part II: The Wealth of Ways for Creating PDF Files
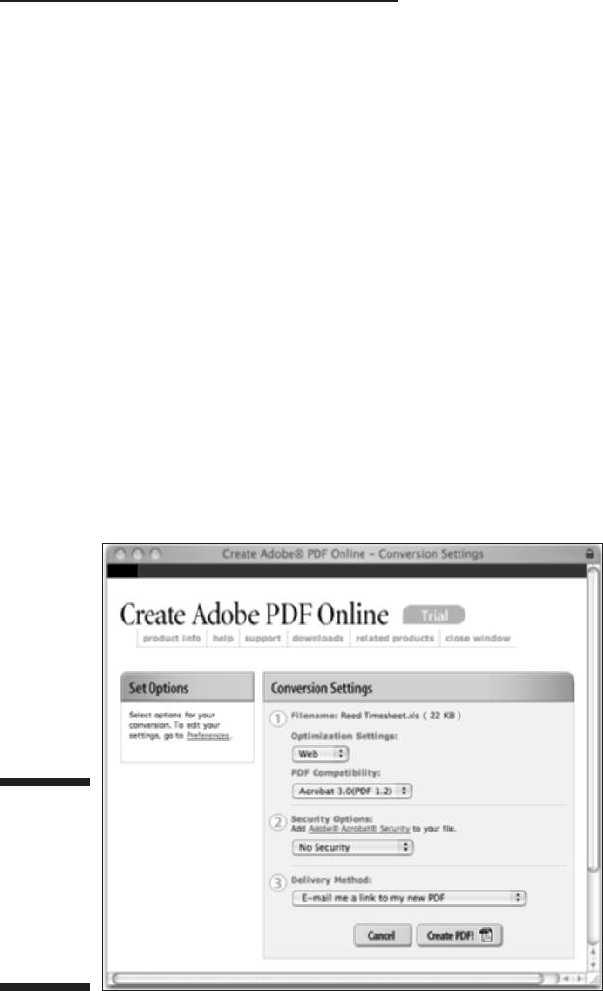
After you’ve subscribed to the service, you can then upload as many scanned
files (of no more than 50 pages in length) as you want and process them
online with Paper Capture as follows:
1. Use your Web browser to go to
createpdf.adobe.com, sign in by
entering your username and password in the Adobe ID and Password
text boxes, and then click the Login button.
The Create Adobe PDF page appears.
2. Click the Choose a File graphic link to open the Create Adobe PDF
Online - Select a File dialog box.
Note that you can also click the Submit a URL link in order to capture a
Web page. A page appears where you specify which file to process.
3. Click the Browse button to locate the desired file on your hard drive,
click Choose, and then click the Continue button on Adobe’s Select a
File dialog box to open the Conversion Settings window shown in
Figure 6-7.
Note that you can click the Supported File Types link to view a list of File
types supported by the Create Adobe PDF Online service.
4. Click the Optimization Settings drop-down list and choose either Web
(the default), eBook, Screen, Print, or Press as the output conversion
setting for your file.
Figure 6-7:
Choose
conversion
settings for
online
creation
of a PDF
document.
131
Chapter 6: Capturing Paper Documents

5. Click the PDF Compatibility drop-down list to select either Acrobat 3.0
(PDF 1.2) (the default), Acrobat 4.0 (PDF 1.3), or Acrobat 5.0 (PDF 1.4)
as the output compatibility setting for your file.
6. Choose a level of security for the converted PDF by clicking the
Security Options drop-down list. The default is No Security.
You have the option of choosing two other basic levels of security: No
Printing (40 bit) or No Printing (128 bit). You can further customize secu-
rity settings for your converted PDF by clicking the Adobe Acrobat
Security link above the Security Options drop-down list.
7. Select the desired method for having the processed file returned to
you in the Delivery Method drop-down list.
Your choices are No E-Mail, Download from Conversion History (which
lets you archive PDF files at Adobe and download them as necessary
from your Conversion History list), Wait for PDF Conversion in Browser,
E-Mail Me a Link to My New PDF, or E-Mail Me My New PDF as an
Attachment.
8. Click the Create PDF button at the bottom of the window to upload
your file and have it processed according to your wishes.
Create Adobe PDF Online lets you create and save your own conversion set-
tings, just as you would in Acrobat 6. To do so, click the Preferences link under
the heading Set Options in the Conversion Settings window and select the new
settings using the drop-down lists provided for various conversion settings in
the Preferences window. Then click the OK button, enter a descriptive name for
the new settings in the dialog box that appears, and click OK. Your new conver-
sion settings will appear in the Optimization Settings drop-down list in the
Conversion Settings window.
When the Create Adobe Acrobat Online service receives your uploaded docu-
ment, it displays a Confirmation screen that gives you an identification number
and that indicates how the processed file will be delivered to you. Depending
upon your settings, the service then delivers the processed PDF file to you
either by displaying it in your Web browser (assuming that you use one that
supports the plug-in for displaying PDF files), in an e-mail message as a link or
a file attachment, or as a link in your Conversion History list.
132
Part II: The Wealth of Ways for Creating PDF Files

Chapter 7
Capturing Web Pages
In This Chapter
Capturing your favorite Web site in a PDF file
Browsing Web pages in Acrobat
Adding Web pages to a PDF file by surfing its links
Changing the Web capture preferences and conversion settings
Appending Web pages to a PDF file
Refreshing the Web pages in a PDF file
W
hen you first hear that Acrobat 6 can capture Web pages as PDF files,
you may wonder why on Earth anyone in her right mind would want
to do such a thing. After all, Web browsers are not only perfectly capable of
displaying any and all Web pages in their native HTML (HyperText Markup
Language) format, but they are also much more widespread than Acrobat and
Adobe Reader. And, of course, this is true — as long as you’re connected to
the Internet. The moment you get disconnected from the Internet, all Web
browser access to online content shuts off (unless your browser is capable of
caching the pages on your hard drive and you know how to set this up).
In this chapter, you discover how easy it is to capture Web pages as PDF files
that you can browse at any time on any computer equipped with a copy of
Acrobat or Adobe Reader. Because the Web pages are PDF files, not only can
you browse them when you don’t have Internet access handy, but you can
also annotate them and distribute them as you would any other PDF docu-
ment. This makes internal Web site design reviews a real joy because it’s easy
to send the PDF versions of the Web pages to clients and coworkers for
approval, as well as elicit feedback from them right on the pages if they’re
using Acrobat 6.

One of the best reasons for capturing a Web site in PDF format is to be able to
browse its contents when you’re traveling and at other times when you can’t
go online. This feature is also a godsend when you need to give a presentation
or conduct a training session that involves the use of Web material because
you still have access to the Web content (internal links and all), even if you
lose your Internet connection or are not able for one reason or another to go
online. When viewing Web pages in Acrobat or Adobe Reader, you can use the
Full Screen view to get rid of all the distracting menus, toolbars, and so on
(see Chapter 2 for details) because you will be using the site’s own links and
navigation controls to move from page to page. You control what page transi-
tions are used and how to navigate from page to page in full-screen mode by
opening the Preferences dialog box (Ctrl+K on Windows and Ô+K on the Mac)
and then clicking Full Screen in the list of preferences.
Opening Web Pages as PDF Files
To be able to capture Web pages (and even entire Web sites) as PDF files for
viewing in Acrobat or Adobe Reader, all you need is Internet access, Acrobat
6, and the Web site’s URL (Uniform Resource Locator). Before you can use
Acrobat to capture Web pages, you must have your computer correctly con-
figured for accessing the Internet. If you already get online with a popular
Web browser, such as Microsoft Internet Explorer or Netscape Navigator,
Acrobat should be able to detect these settings and use them for Web cap-
ture. If you find that you can’t capture Web pages as described in this section,
open the Internet Properties dialog box from within Acrobat by choosing
Edit➪Preferences➪Internet Settings, and then seek help from your ISP
(Internet service provider) or IP personnel in getting your Internet settings
correctly configured in Acrobat.
The steps for capturing the pages are easy as can be:
1. In Acrobat, choose File➪Create PDF➪From Web Page, or click the
Create PDF button on the Tasks toolbar and choose From Web Page
on the pop-up menu.
The Create PDF from Web Page dialog box appears, as shown in Figure 7-1.
2. In the URL text box, type or paste in the URL address of the site whose
Web pages are to be downloaded.
If you’re converting a local HTML document to PDF (that is, one that’s
saved on your hard drive or local area network rather than on the
Internet), click the Browse button. Then open the folder, select the docu-
ment’s file icon in the Select File to Open dialog box, and then click the
Select button.
134
Part II: The Wealth of Ways for Creating PDF Files
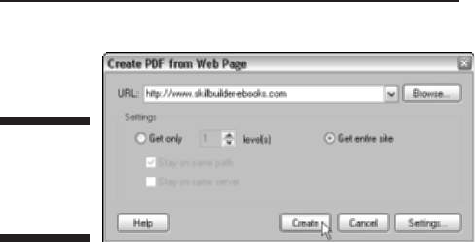
3. In the Settings area of the Open Web Page dialog box, select the Get
Entire Site radio button to capture all the Web pages on the site.
• To capture only the Web site’s start page, leave the Get Only radio
button selected with 1 in the level(s) spinner button text box to
the immediate right.
• To capture all the pages linked to the start page, increase the value
in the level(s) text box to 2; to get all the pages linked to the pages
linked to the start page, increase the level(s) value to 3, and so on.
• To restrict the Web page capture to only pages found on the same
Web site or on the same Web server, select the Stay on Same Path
and the Stay on Same Server check boxes as well.
4. Click the Create button to begin capturing the designated Web pages
as PDF files.
If you select the Get Entire Site radio button, the Potentially Large
Download Confirmation alert dialog box automatically appears, warning
you that you may have bitten off more than your computer can chew.
If you’re sure that you have the patience (or a lightning-fast download
connection), have sufficient hard drive space, and are not attempting
to download the Library of Congress Web site, click the Yes button to
proceed with the potentially large download of the entire site.
As soon as you click the Download button or the Yes button in the Potentially
Large Download Confirmation alert dialog box, Acrobat begins downloading
and converting the designated Web pages and displays the Download Status
dialog box, which keeps you informed of the progress of the first part of the
downloading process.
As the Web pages start arriving on your hard drive, the Download Status dialog
box disappears as quickly as it appeared, and the first page of the Web site
appears in Acrobat’s Document pane. The Navigation pane with the Bookmarks
palette selected is also automatically displayed in the Acrobat window. The
Bookmarks palette illustrates the hierarchical relationship of the pages you
downloaded (see Figure 7-2) as it continues to display the names of the pages
on each level as they are successfully downloaded.
Figure 7-1:
Capturing
Web pages
as PDF files.
135
Chapter 7: Capturing Web Pages
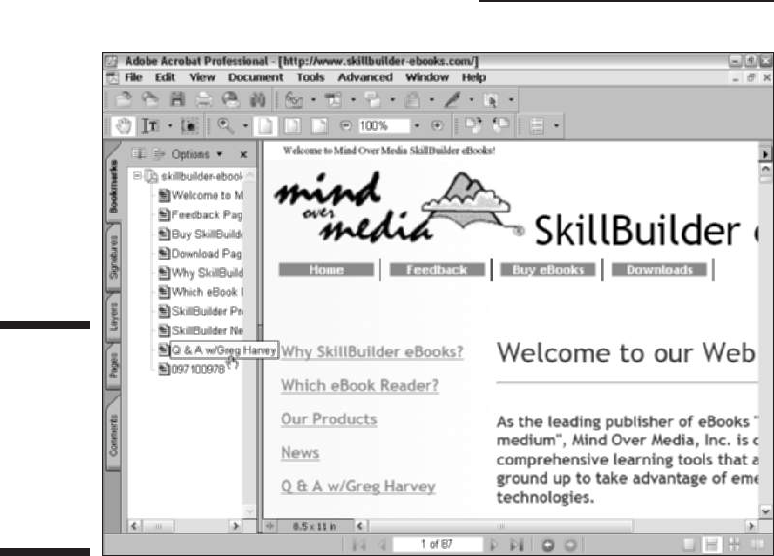
If Acrobat is not able to download the complete contents of all the pages on
the levels you designated for download, it displays a dialog box called There
Were Errors that lists all the files that it could not find or otherwise success-
fully download. After reviewing this list of files, click the OK button in the
There Were Errors dialog box to close it.
After all the Web pages you asked for on a particular Web site are delivered to
your hard drive, you still need to save the pages as a single PDF file so that you
can access them in Acrobat or Adobe Reader without being connected to the
Internet. To do this, choose File➪Save and then give the new PDF file a name,
select the folder in which you want to save it, and click the Save button.
Browsing captured Web pages
in Acrobat or Adobe Reader
After you download Web pages and save them as PDF documents, you can
browse their contents in Acrobat 6 or Adobe Reader 6 just as you would any
other PDF file. You can go from page to page by clicking the page bookmarks
on the Bookmarks tab or the page thumbnails on the Thumbnails tab of the
Navigation pane, or you can use the buttons on the Navigation toolbar. (See
Figure 7-2:
Captured
Web pages
display their
linked
structure
in the
Bookmarks
palette.
136
Part II: The Wealth of Ways for Creating PDF Files

Chapter 2 for more specific information on all the ways to navigate a PDF
document.)
Following Web links in Acrobat 6
In addition to using the normal navigation controls found in Acrobat 6 and
Adobe Reader 6, because you’re dealing with Web pages, you can use their
own navigation controls, usually in the form of various navigation buttons
and hyperlinks, to move from page to page. Be aware, however, that unless
you’ve captured the entire Web site, you will often come upon buttons and
links to pages that haven’t yet been downloaded and aren’t currently part of
the PDF file. If your computer has access to the Internet at the time you’re
viewing the file, you can still follow its Web links and even download its Web
pages and add them to the PDF document.
When browsing the file in Acrobat 6, you can tell when you’re on a link to a
page that you haven’t downloaded as part of the PDF file because the program
adds a plus sign (+) to the Hand-with-pointing-index-finger mouse pointer, and
a ScreenTip showing the page’s URL address appears. In Adobe Reader 6, the
program adds a W (for Web) to the mouse pointer, along with the ScreenTip
showing the page’s URL.
The first time you click a link to a Web page that hasn’t been captured in
Acrobat 6, the program displays the Specify Weblink Behavior dialog box, as
shown in Figure 7-3. To have Acrobat 6 download the Web page in Acrobat
and add it to the current PDF file, leave the In Acrobat radio button selected
and then click OK. To have Acrobat launch your Web browser to display the
page there and, therefore, not add the Web page to your PDF document,
select the In Web Browser radio button instead before clicking OK.
Note in Figure 7-3 that the Do Not Ask Again check box is automatically
selected in the Specify Weblink Behavior dialog box. This means that the next
time you click a link in the PDF file, Acrobat will either automatically download
and display the page in Acrobat (if the In Acrobat option is selected) or in your
Web browser (if the In Web Browser option is selected) without prompting you
to decide between using the In Acrobat and In Web Browser option in the
Specify Weblink Behavior dialog box.
If you want to be prompted each time you click a link to a page that hasn’t yet
been downloaded, deselect the Do Not Ask Again check box. Even if you
don’t deselect this check box, you can still switch between the In Acrobat
and In Web Browser options by pressing the Shift key when you click a link
(that’s what the
When weblinks are clicked on in the future, the
shift key will toggle the above selected behavior
message in the
Specify Weblink Behavior dialog box is trying to tell you). So, for example, if
you leave the In Acrobat radio button selected the first time you follow a
hyperlink to have the page added to the PDF file in Acrobat, but decide at the
next link that you only want to browse the page with your Web browser, you
accomplish this by holding down the Shift key as you click that hyperlink.
137
Chapter 7: Capturing Web Pages
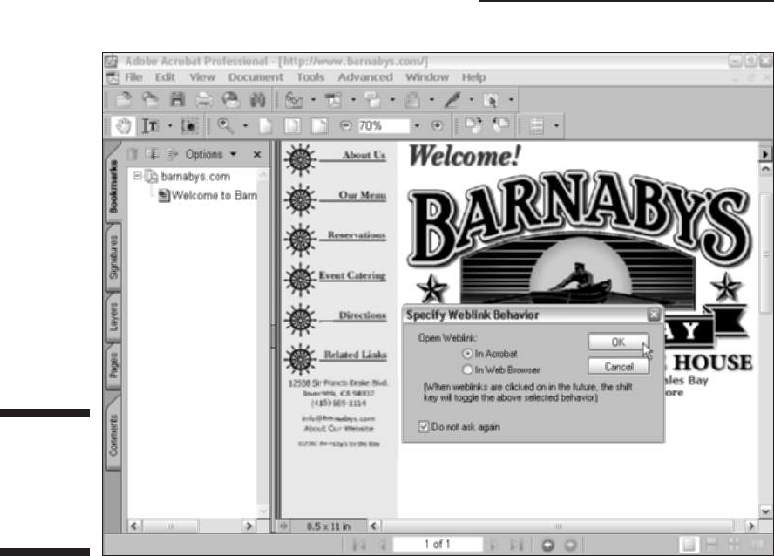
Browsing Web links in Adobe Reader 6
When you follow Web links in a Web-captured PDF file with Adobe Reader 6,
the program always opens the associated Web pages in your Web browser
(only Acrobat 6 has the ability to capture Web pages and save them in PDF
files). You can then surf the Web site by following its links as you would when
browsing any other Web site.
Figure 7-4 shows you what happened when I clicked the About Us link (shown
in Figure 7-3) in the Barnaby’s PDF file after opening this file in Adobe Reader
6. Because Adobe Reader doesn’t let you capture Web pages, it opens the
About Barnaby’s page in my Web browser, which just happens to be Internet
Explorer 6.
Creating Web links in a standard PDF file
You can have Acrobat 6 convert all complete URL addresses (ones that follow
the full format that includes
http:// in the address) entered in a standard
PDF file (one not created with the Web Capture feature) into active hyperlinks
by choosing Advanced➪Links➪Create from URLs in Document. This opens
the Create Web Links dialog box, as shown in Figure 7-5.
Figure 7-3:
Indicating
how to open
the linked
Web page.
138
Part II: The Wealth of Ways for Creating PDF Files
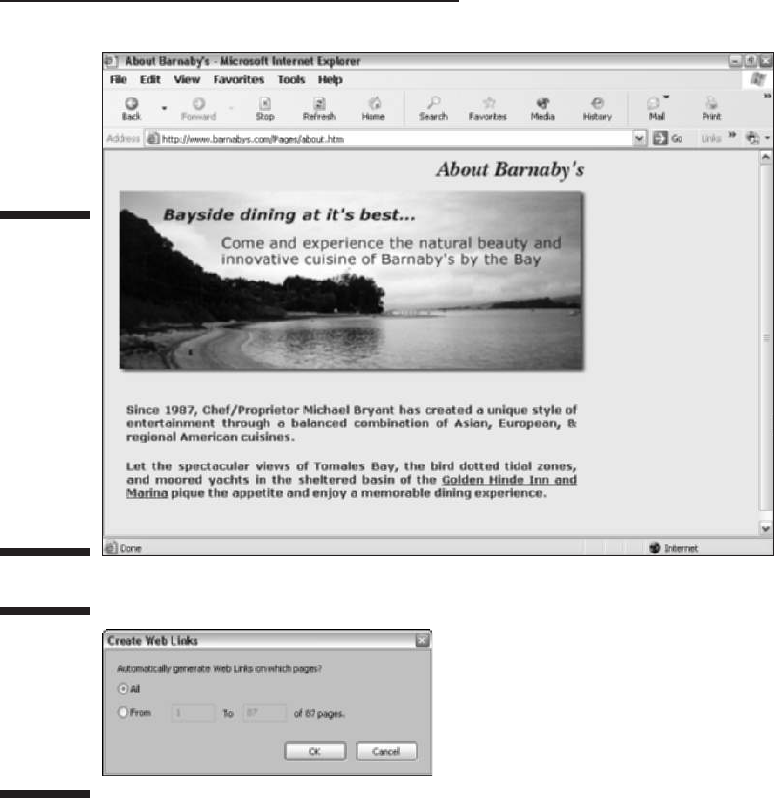
To have Acrobat scan all the pages of the document for URLs to convert to
live Web links, click the OK button. To have the program convert the URLs on
just some of the pages in the PDF document, select the From radio button
and enter the page number of the first and last page in the From and To text
boxes, respectively.
After Acrobat 6 has converted the URLs on the specified pages of the PDF file
to active links, you can follow the links by clicking them with the Hand-with-
pointing-finger mouse pointer. Note that when following the Web links you add
in this manner, Acrobat uses the Web link behavior that’s in effect at that time.
This is indicated by the icon that’s added to the Hand-with-pointing-finger
Figure 7-5:
Converting
URLs to live
Web links in
the Create
Web Links
dialog box.
Figure 7-4:
In Adobe
Reader,
when you
click a link
to a Web
page that
wasn’t
captured in
the PDF file,
the Web
page opens
in your Web
browser.
139
Chapter 7: Capturing Web Pages
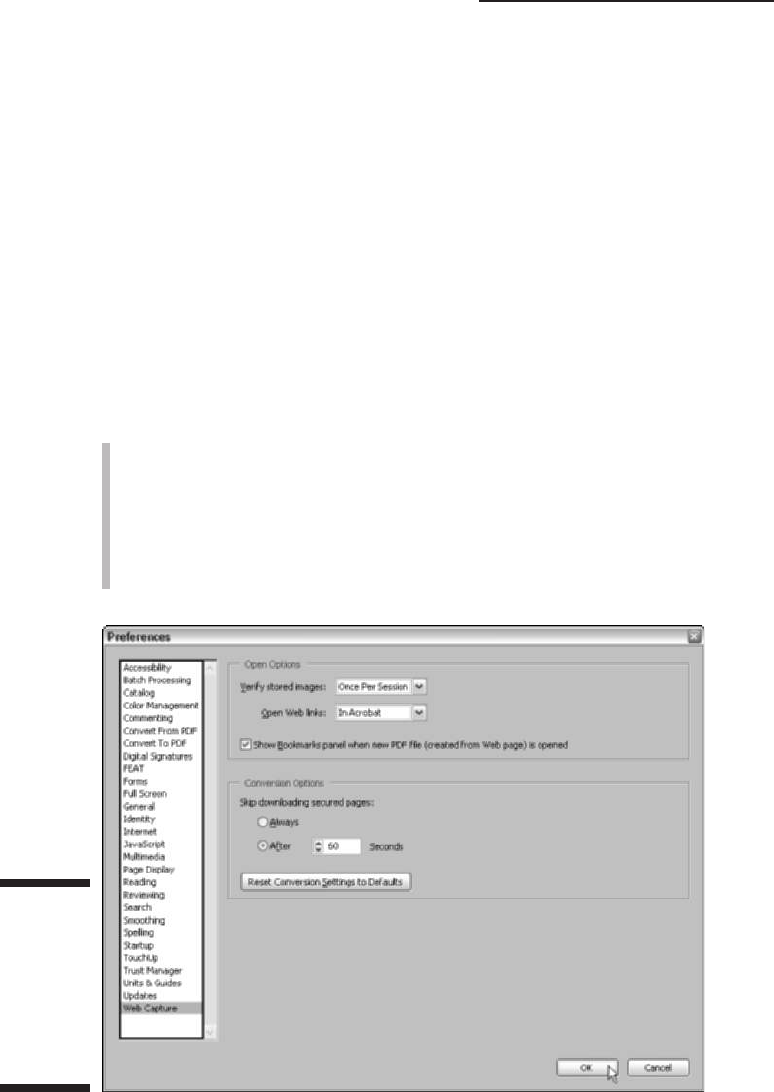
mouse pointer: The appearance of a plus sign (+) means the page will be
downloaded and added to the PDF file, whereas a W indicates that the page
will open in your Web browser.
Modifying the Web capture preferences
When you download and save Web pages as PDF files in Acrobat 6, the pro-
gram uses a set of default capture settings that you can modify. To change
the Web capture settings, choose Edit➪Preferences or press Ctrl+K (Ô+K on
the Mac) to open the Preferences dialog box, as shown in Figure 7-6. Click
Web Capture in the scroll list on the left side of the Preferences dialog box to
view those options.
You can modify the Web Capture default settings by changing any of the fol-
lowing options:
Verify Stored Images: This setting tells Acrobat how often to check
online for updates to the images on the Web pages that you’ve captured
in your PDF files. When the default setting, Once Per Session, is selected,
Acrobat automatically checks for updates just once when you first open
the PDF file (provided that you have Internet access at that time). You
can change this setting by selecting either Always (for continuous
checking) or Never on its drop-down list.
Figure 7-6:
Examining
the Web
Capture
options
in the
Preferences
dialog box.
140
Part II: The Wealth of Ways for Creating PDF Files

Open Weblinks: This setting indicates whether Acrobat should down-
load and save new Web pages in Acrobat when you click their Web links
or simply display the pages in your Web browser. Note that the Specify
Weblink Behavior dialog box inherits the setting you select here as its
default (which you can override by holding down the Shift key when you
click a Web link).
Show Bookmarks Panel When New PDF File (Created from Web Page)
Is Opened: This check box tells Acrobat whether or not to display the
Navigation pane with the Bookmarks palette selected when you first
open a PDF file with the captured Web pages. Deselect this check box
when you don’t want to give up valuable viewing real estate in the
Document window to the Navigation pane. Note that Acrobat creates
bookmarks for the downloaded Web pages whether or not this check
box is selected.
Skip Downloading Secured Pages: The radio buttons under this head-
ing indicate whether or not Acrobat should skip over the downloading of
password-protected Web pages on the site you’re capturing. Select the
Always radio button to have the program immediately skip over all such
pages. Select the After radio button and specify the number of seconds
in the associated text box to have the program stop and prompt you for
the site’s password dialog box for the number of seconds specified, only
to then automatically skip the downloading of that page and continue
downloading other pages if you don’t respond to the prompt.
Reset Conversion Settings to Defaults: This button resets all the conver-
sion settings to their original values (see the following section for infor-
mation on changing the conversion settings).
Modifying the Web capture
conversion settings
Before capturing Web pages from a Web site, you can modify the conversion
settings that tell Acrobat how to treat their content in the new PDF file. To do
this, click the Settings button on the bottom-right side of the Create PDF from
Web Page dialog box. (To open the Create PDF from Web Page dialog box,
choose File➪Create PDF➪From Web Page.) Clicking the Settings button opens
the Conversion Settings dialog box, as shown in Figure 7-7.
The General tab is divided into two areas: File Type Settings and PDF Settings.
In the File Type Settings area, you see a list box listing all the types of text
and graphics files that are downloaded and converted in the new PDF file.
The only settings that you can modify in this list are the HTML and Plain Text
settings. When you click either one of these types, the Settings button to the
right of the list box becomes active.
141
Chapter 7: Capturing Web Pages
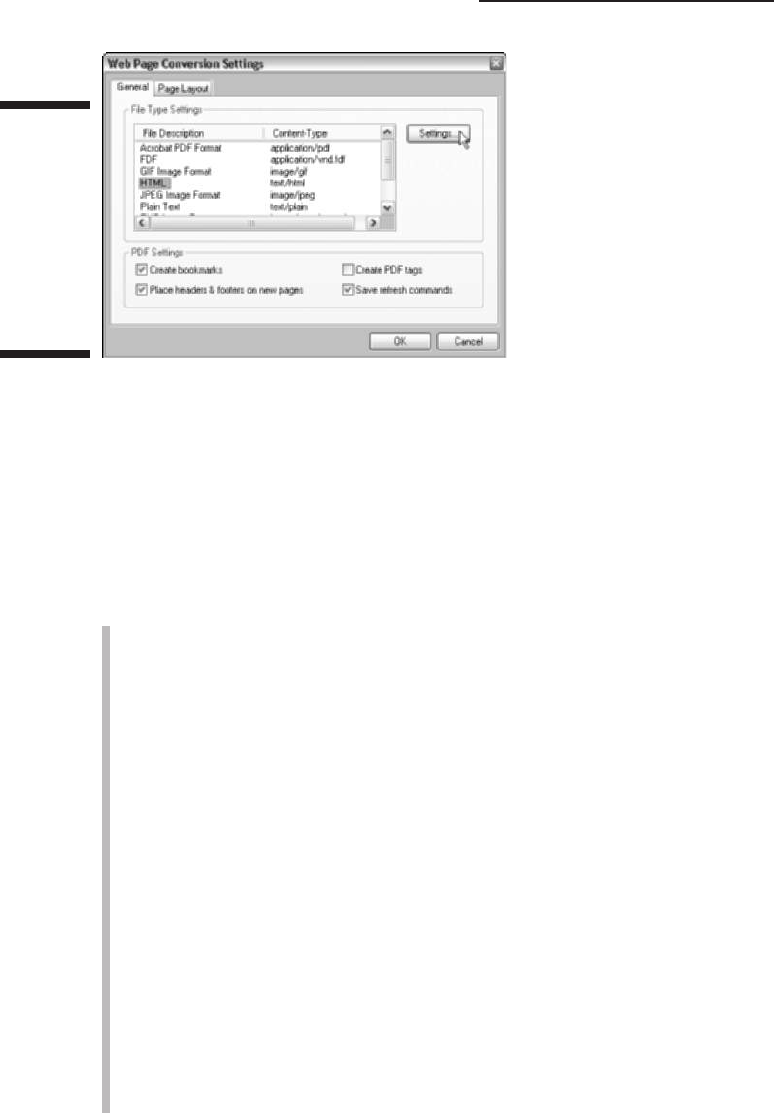
When you click the Settings button when HTML is selected in the list box,
Acrobat opens an HTML Conversion Settings dialog box, where you can con-
trol the default layout, colors, and fonts displayed in the Web pages you cap-
ture. Don’t mess with any of these settings if your purpose is to do a design
review of the Web pages you’re about to capture because these changes
could prevent users from experiencing the pages as the designers intended.
The PDF Settings area in the Web Page Conversion Settings dialog box con-
tains the following four check box options:
Create Bookmarks: When selected, Acrobat automatically creates book-
marks for each Web page you download, using the page’s title as the
bookmark name. Note that if a page doesn’t have a title, Acrobat uses
the page’s URL address as the bookmark name.
Create PDF Tags: When selected, Acrobat creates and stores a hierarchi-
cal structure in the PDF file that tells special screen-reading software for
the visually impaired how to sequence the various Web page elements
for reading at large magnification. The support for screen readers is part
of Acrobat 6’s new group of Accessibility features designed to enhance
the usability of the software for people with disabilities.
Place Headers and Footers on New Pages: When selected, Acrobat cre-
ates page headers and footers that display the title of each Web page in
the header at the top of the page and the URL of the page in the footer at
the bottom.
Save Refresh Commands: When selected, Acrobat saves a list of the
URLs for all the pages captured in the PDF file that it can use to later
check for updated content. You must have this conversion option
selected when you capture Web pages if you want Acrobat to be able to
automatically download new versions of the Web pages when it detects
updated content (see the “Refreshing updated content” section, later in
this chapter, for more on refreshing Web content).
Figure 7-7:
Examining
the options
on the
General tab
of the
Web Page
Conversion
Settings
dialog box.
142
Part II: The Wealth of Ways for Creating PDF Files
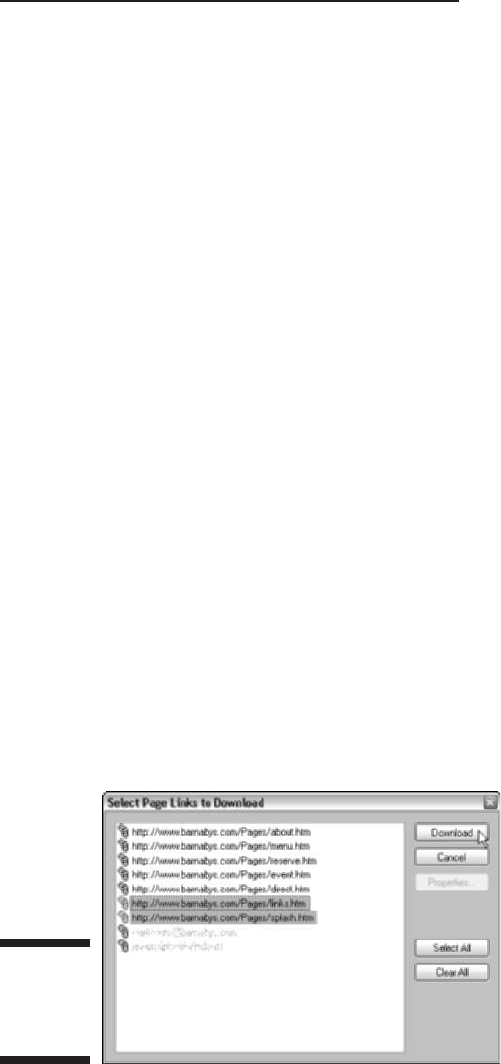
Adding Web Pages to a PDF File
If the need arises, you can always add Web pages to an existing PDF file,
whether or not that PDF document already contains captured Web pages. To
capture Web pages and add them to the PDF currently displayed in the Acrobat
Document window, choose Advanced➪Web Capture➪Append Web Page to
open the Add To PDF From Web Page dialog box. Here, you enter the URL of
the Web page you want to append and specify the number of page levels to
include before clicking the Create button (this dialog box contains the same
options as the Open Web Page dialog box — see the section, “Opening Web
Pages as PDF Files,” at the beginning of this chapter for details). When you
click the Create button in the Add To PDF From Web Page dialog box, Acrobat
downloads the specified pages, automatically adding them to the end of the
PDF file.
Adding linked pages to a PDF file
Another way to add Web pages to a PDF file that contains captured Web con-
tent is through the Web links displayed in the Select Page Links to Download
dialog box. For this method, you view all the Web links on a particular Web
page in the PDF document, and then select the ones for the additional pages
you want to append to the current PDF file as follows:
1. In the Acrobat 6 Document window, display the Web page whose links
you want to use for downloading new pages.
2. Choose Advanced➪Web Capture➪View Web Links.
The Select Page Links to Download dialog box opens, as shown in
Figure 7-8.
Figure 7-8:
Selecting
the URLs to
download.
143
Chapter 7: Capturing Web Pages
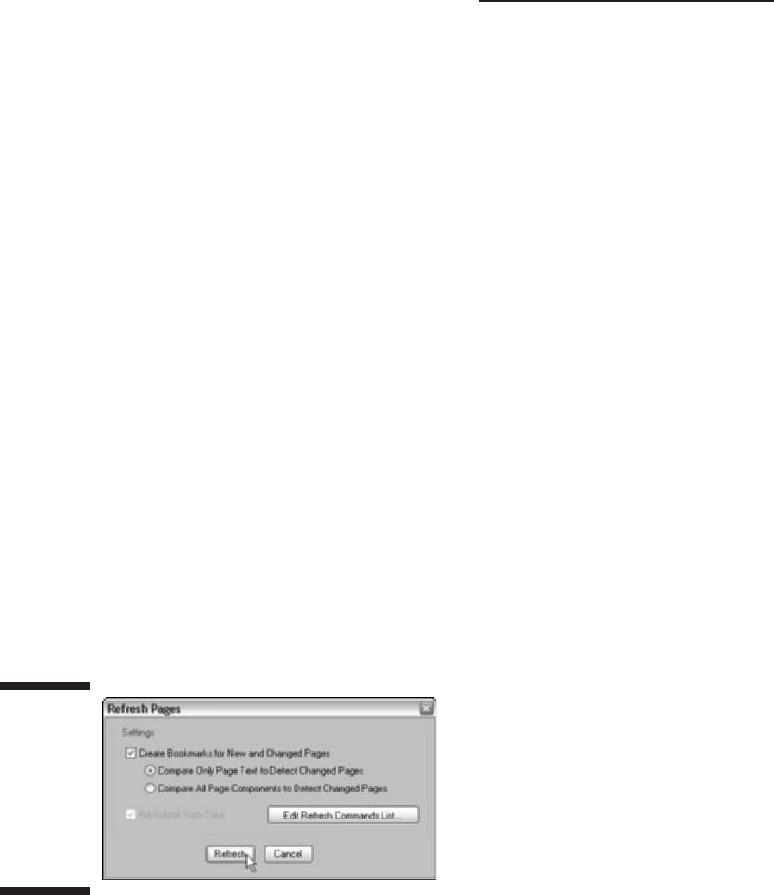
3. Click the URLs in this list for all the Web pages you want to add to the
current PDF file.
To select multiple individual URLs, Ctrl+click them. To select a continuous
range of URLs, click the first one and then Shift+click the last one in the
range. To select all the URLs for downloading, click the Select All button.
4. Click the Download button to add the Web pages for the selected URLs
to the current PDF file.
Note that if you don’t want to select individual links and are sure you want to
download and append all pages linked to the current Web page displayed in
Acrobat 6, choose Advanced➪Web Capture➪Append All Links on Page.
Refreshing updated content
Some Web sites, especially those that cover current affairs or the news, fre-
quently update the content of some or all of their pages. If your purpose in
capturing Web pages is to keep up-to-date on the information offered by a
site, you will need to refresh the pages on a regular basis to ensure that your
file has the most recent content.
To refresh the content of the captured pages in your PDF file, choose
Advanced➪Web Capture➪Refresh Pages. Doing this opens the Refresh Pages
dialog box, as shown in Figure 7-9. Click the Refresh button to have Acrobat
check all the pages in the Refresh Commands list for updates.
By default, the program compares the text of the captured pages with their
counterparts online. If Acrobat detects any discrepancies between the two, it
automatically updates the downloaded page in the PDF file by replacing it
with a copy of the latest page on the Web site. If you want Acrobat to com-
pare all elements on the Web pages when looking for the ones that need
Figure 7-9:
Checking
Web pages
for updated
content with
the Refresh
Pages
dialog box.
144
Part II: The Wealth of Ways for Creating PDF Files

refreshing instead of just comparing the text, select the Compare All Page
Components to Detect Changed Pages radio button in the Refresh Pages
dialog box before you click the Refresh button.
If you want to exclude certain pages from the Refresh Command list, click the
Edit Refresh Commands List button to open the Refresh Commands List
dialog box. This dialog box lists all the pages marked for refreshing. To skip
particular pages in the refresh operation, click the Clear All button and then
select the URLs for all the pages you do want refreshed to highlight them
before you click OK.
Keep in mind that you can’t add new URLs to the list displayed in the Refresh
Commands List dialog box: You can only tell Acrobat which ones to ignore
when refreshing the pages. The only way to add a URL to the Refresh
Commands list is to capture its Web page when the Save Refresh Commands
check box option has been checked in the Web Page Conversion Settings
dialog box.
145
Chapter 7: Capturing Web Pages

146
Part II: The Wealth of Ways for Creating PDF Files

Chapter 8
Printing PDF Files
In This Chapter
Printing with the standard print settings
Modifying the print settings
Looking at the high-end, prepress printing settings
Troubleshooting problems with printing PDFs
Using an online printing service
A
crobat may offer the promise of a paperless office, and PDF may be the
quintessential electronic file format, but despite it all, you will find times
when the one and only thing you want to do with the program is print out the
PDF documents you open in it. In this chapter, you discover all the ways to
print all or just part of a PDF file with your in-house printers, as well as how to
customize the print settings to print selected pages and to accommodate the
printing of oversized pages.
Printing PDF Files
Printing PDF documents in Acrobat 6 or Adobe Reader 6 is very similar to
printing documents in any other Windows or Macintosh application program
that you use.
Before you print a file, you can change the general print settings, such as the
paper size or the printing orientation from the default of portrait mode to
landscape mode. To change these settings, choose File➪Page Setup in
Acrobat or Adobe Reader or press Ctrl+Shift+P (Ô+Shift+P on the Mac) to
open the Page Setup dialog box, modify the printing options as desired, and
then click OK. The actual options and controls available in the Page Setup
dialog box vary according to the actual printer selected as your default.
If you just need a printout of the document’s pages using the standard Print
options, follow these simple steps:
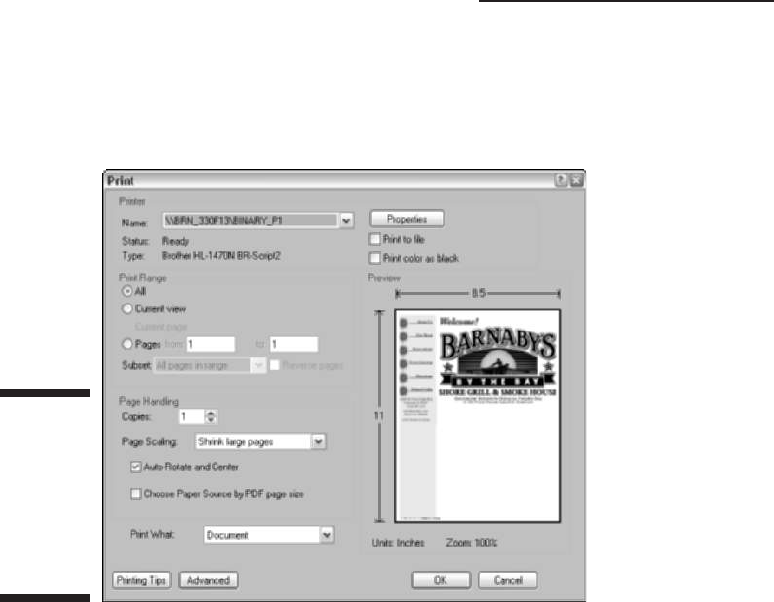
1. Choose File➪Print (in Acrobat or Adobe Reader) or press Ctrl+P (
ÔÔ
+P
on the Mac).
The Print dialog box opens, as shown in Figure 8-1.
2. If you have more than one printer installed on your system, you can
select a different printer to print the PDF document by selecting the
name of the printer in the Name drop-down list (Windows) or by
selecting a different printer on the Printer drop-down list (Mac).
3. Specify which pages you want to print by doing one of the following:
• To print all the pages in the current PDF document, leave the All
radio button selected.
• To print just the area of a document that is currently visible in the
Acrobat document window, select the Current View radio button.
• To print only the page currently displayed in Acrobat or Adobe
Reader, select the Current Page radio button.
• To print a continuous range of pages in the document, select the
Pages radio button and enter the first page to print in the From
text box and the last page to print in the To text box.
See Chapter 9 for details on adding notes and marking up text, and to
find out how to summarize the comments in a document and save them
in a separate file that you can print.
4. Click the OK button to begin printing the pages of your PDF file.
Figure 8-1:
Opening the
Print dialog
box in
Acrobat 6 to
print the
current PDF
document.
148
Part II: The Wealth of Ways for Creating PDF Files

In the upper-right corner of the Windows version of the Print dialog box, you
find two check box options — Print to File and Print Color as Black:
Select the Print to File option only when you want to create a file for a
type of printer that you don’t actually have available on your computer
system. You can then send or take the print file to a computer that has
the targeted printer connected to it but doesn’t have the Acrobat or
Adobe Reader program installed. When you drag the print file on the
printer icon, it prints the PDF document with all the printing options you
specified in Acrobat.
Select the Print Color as Black option to change all non-white colors to
black. This feature is useful when printing technical drawings that have
lightly colored lines.
In the lower-left area of the Print dialog box you find the following Page
Handling options:
Copies: Type in the text box or click the spinner buttons to specify the
number of copies of each page you want printed.
Page Scaling: Reduces, enlarges, or divides pages when printing. The
options on the drop-down list let you select various ways of scaling the
printout of the current PDF document to the selected paper size in your
printer. Choose None to have no scaling applied to a PDF printout or Fit
to Paper to have Acrobat reduce or enlarge a PDF file to fit the paper
size selected in the Page Setup dialog box. See the “Printing oversized
documents” section, later in this chapter, for more on Acrobat’s Page
Scaling print features.
Auto-Rotate and Center: Select this check box if you want the page ori-
entation of the current PDF file to automatically match those specified in
your printer properties.
Choose Paper Source by PDF Page Size: Select this Windows-only
check box to have the PDF page size determine which of your printer’s
paper trays to use rather than the Page Setup option. Use this feature in
cases where a PDF file containing multiple page sizes is printed on a
printer with different-sized output trays.
Print What: Use the options on the drop-down list to specify which visi-
ble contents in a PDF to print. The Document option prints all visible
contents and form fields, the Document and Comments option adds
comments to the printout, and the Form Fields Only option prints out
interactive form fields but no document contents.
Printing Tips: Click this button to go online to Adobe’s Web site for
information on troubleshooting PDF printing problems.
149
Chapter 8: Printing PDF Files
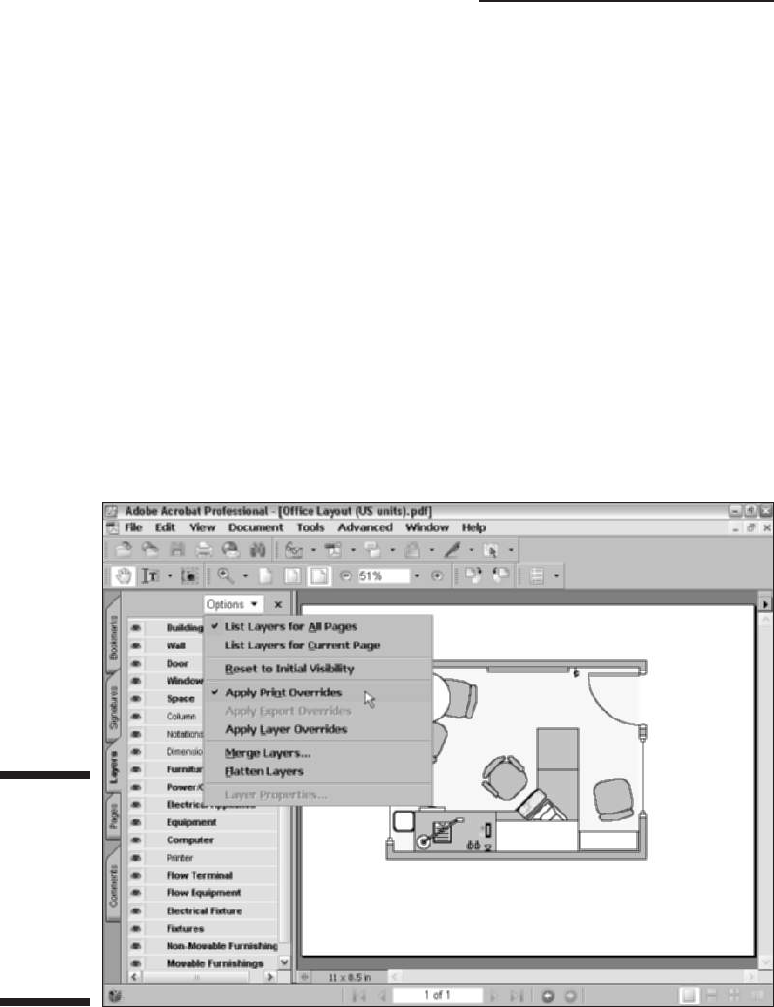
Printing document layers
Acrobat 6 now supports document layers created in the AutoCAD and
Microsoft Visio design programs. Those who create layered drawings in
those programs can specify what layer content, such as watermarks or confi-
dential information, must (or must not) be printed. They can then convert
their documents to PDF, layers and all, to be viewed in Acrobat 6. If the result-
ing PDF file contains content that is not visible on the screen but should be
printed (or vice versa), Acrobat 6 displays a warning message in the Print
dialog box, as well as a preview of how the page will be printed.
You can use commands on the Options menu at the top of the Layers naviga-
tion tab to determine what specific layer content you want to print. To open
the Layers tab, choose View➪Navigation Tabs➪Layers or just click the Layers
tab on the left side of the Navigation pane. To view a document exactly as it
will print, choose Apply Print Overrides on the Options menu, as shown in
Figure 8-2. This option prints all layer content in the document, even if it is
not visible in the Acrobat document pane.
Figure 8-2:
Choosing
the Apply
Print
Overrides
command to
print all the
layers in a
document.
150
Part II: The Wealth of Ways for Creating PDF Files
You can also change print overrides for specific layers. To do so, follow these
steps:
1. Click the Layers tab in the Navigation pane to open the Layers palette
and view the list of layers in the current PDF file.
2. Click a layer name in the Layers palette list to select a layer, and then
choose Layer Properties on the Options menu at the top of the
Navigation pane.
Alternatively, you can right-click the layer and choose Properties on
the context menu to open the Layer Properties dialog box, as shown in
Figure 8-3.
3. Select the option you want from the Print drop-down list as follows:
• Select the Always Prints option to force the selected layer to print.
• Select the Never Prints option to force the selected layer to not
print.
• Select the Prints When Visible option to force the layer to print
only when it is visible in the document.
4. Click OK to close the Layer Properties dialog box.
151
Chapter 8: Printing PDF Files
Playing with the PostScript options
If you have a PostScript printer, you can modify
the PostScript options in the Advanced Print
Setup dialog box in Acrobat or Adobe Reader.
To open this dialog box, click the Advanced
button in the Print dialog box. Use the Font and
Resource Policy drop-down list to specify when
fonts and resources are downloaded to your
printer. Use the Print Method drop-down list to
select the level of PostScript (2 or 3) best suited
for your printer (some older laser printers don’t
understand levels of PostScript). When the
Download Asian Fonts check box is selected,
Acrobat downloads Asian Fonts used but not
embedded in the PDF document to the laser
printer if they are not already installed on it.
Select the Save Printer Memory check box to
have Acrobat download all the fonts for a given
page before that page is printed to save on
printer memory. Note that all options in the
Advanced Print Setup dialog box display
descriptive information in a scroll box below
when you select an option.
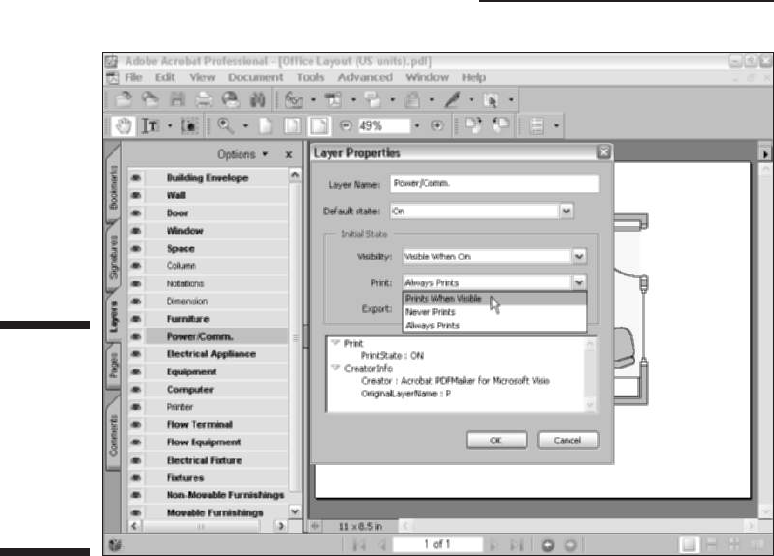
Printing selected pages
Sometimes, you don’t need to print all the pages in a PDF document or even a
continuous range of pages. If you’re using Acrobat 6 or Adobe Reader 6, you
can print individual, nonconsecutive pages in the document. To do this, you
need to select the individual pages before you open the Print dialog box by
following these steps:
1. Click the Pages tab in the Navigation pane to bring its palette to the
front. If the Navigation pane is closed, press F6 to open and select the
Pages palette.
2. To see all the thumbnails for the pages you want to select for printing,
you may need to switch to small thumbnails and widen the Navigation
pane:
• To switch to small thumbnails, click the Options button at the top
of the palette and then click Reduce Page Thumbnails near the
bottom of its pop-up menu.
• To widen the Navigation pane until all the thumbnails are displayed
(or all the ones with pages you want to print), position the mouse
Figure 8-3:
Choosing
print
override
options for
individual
layers in
a PDF
document.
152
Part II: The Wealth of Ways for Creating PDF Files
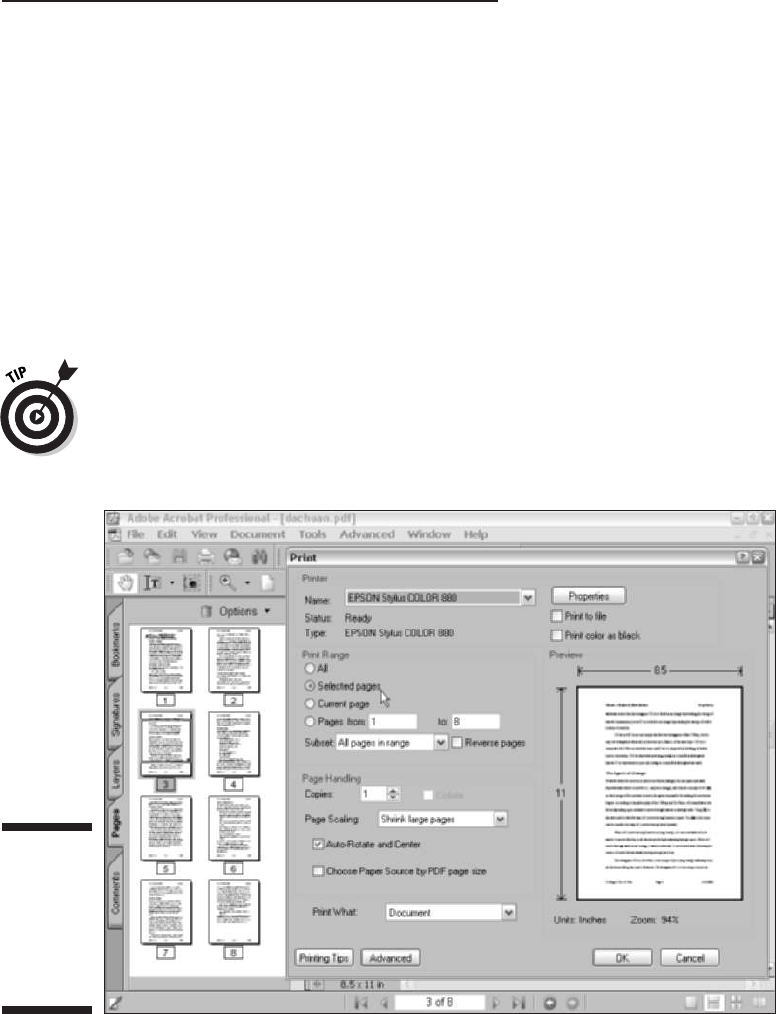
pointer on the border between the Navigation and Document panes
and then, when the mouse pointer becomes a double-headed arrow,
drag the border to the right until the Navigation pane is wide
enough to display all the thumbnails.
3. Ctrl+click (
ÔÔ
+click on the Macintosh) the thumbnails for all the indi-
vidual pages you want to print to select them in the Thumbnail
palette.
4. Choose File➪Print or press Ctrl+P (
ÔÔ
+P on the Mac).
The Print dialog box opens with the Selected Pages radio button
selected, as shown in Figure 8-4.
5. Click OK to begin printing only the selected pages in the PDF document.
To print just a graphic on the page, click the Snapshot tool (G) on the Basic
Tools toolbar and use it to draw a bounding box around the image. After
selecting the image in this manner, right-click (Control+click on the Mac) to
display the image’s context menu and click the Print option to open the Print
dialog box.
Figure 8-4:
Selecting
the
thumbnails
of the
individual
files to print.
153
Chapter 8: Printing PDF Files

Printing oversized documents
Some of the PDF documents that you want to print are too large to fit even
the largest paper sizes that your printer can handle. As you can see in Figures
8-1 and 8-4, Acrobat handles this in the Print dialog box by automatically
selecting the Shrink Large Pages on the Page Scaling drop-down list. This
option automatically scales down the text and graphics on each page to fit
the paper size selected for your printer.
When the Shrink Large Pages option is selected, the program automatically
selects the Auto-Rotate and Center Pages check box option. When this option
is selected, Acrobat routinely rotates PDF documents that are wider than the
selected paper size, while at the same time centering the text and graphics
that do fit. When this check box is selected in conjunction with the Shrink
Oversized Pages to Paper Size option, Acrobat shrinks the text and graphics
on each page so that they all fit and are centered on the page.
If you have a PostScript printer installed on your system, you can print over-
sized pages in your PDF documents using a method called tiling. When you
print oversized pages by tiling, Acrobat or Adobe Reader divides each over-
sized page into sections, each of which is printed on a single page of paper.
You can then fit the printed pages together to see how the oversized page
will appear when printed with a printer that can handle the oversized paper.
Acrobat gives you two print tiling options on the Page Scaling drop-down list:
Tile Large Pages (only pages larger than the selected paper size are tiled) and
Tile All Pages. Selecting either of these options displays the following new
settings in the Print dialog box (see Figure 8-5):
Tile Scale: Enter a value in this text box to scale the printed PDF file
onto tiles. A higher percentage creates more tiles, a lower percentage
creates fewer tiles.
Overlap: Enter a value in this text box to indicate the amount you want
the printing on adjacent tiles to overlap each other so you can more easily
align them with each other. Enter a decimal value for this overlap distance
of anywhere between 0.125 and 0.25 inches. You need this overlap dis-
tance, because laser printers have to maintain a minimum of blank space
on the page where they grab and pull the paper. The exact value you enter
depends on your particular printer and the page size your tiles use.
Cut Marks: Choose an option from this drop-down list to indicate which
guide marks you want printed on the page. Select None to have no
guides printed for cropping the tiled printout, or select either Western
(the crosshatched registration marks universally used in North
American and European printers) or Eastern style cut marks.
Labels: Select this check box to print descriptive labels on each tile.
154
Part II: The Wealth of Ways for Creating PDF Files
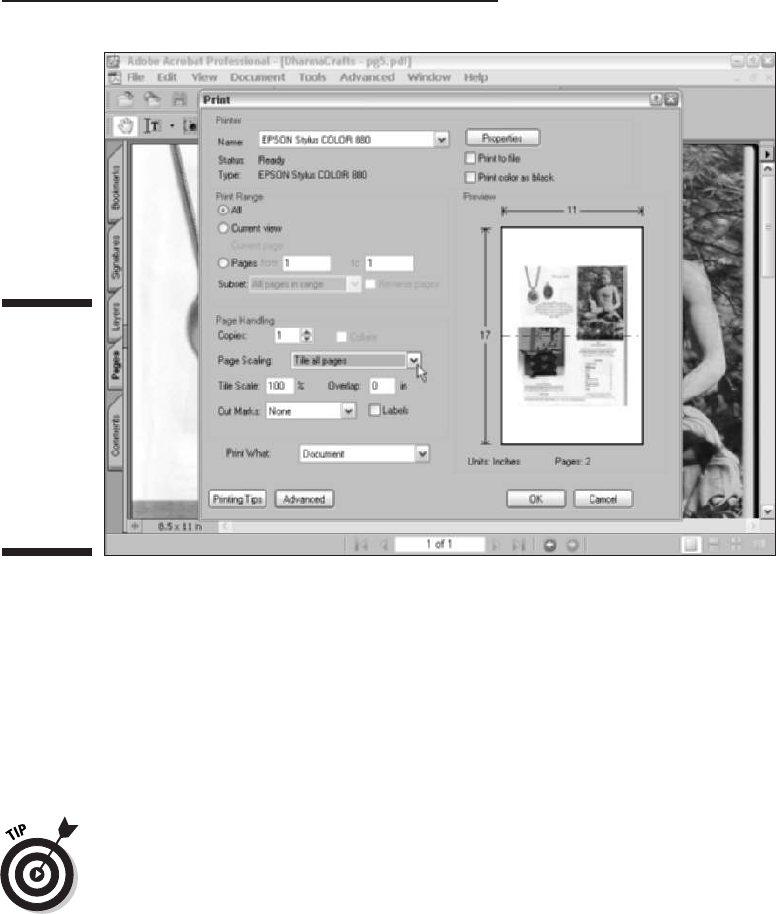
Using the prepress printing settings
In addition to the standard printing options described in previous sections,
the Print dialog box (refer to Figure 8-4) also contains an Advanced button
that opens the Advanced Print Setup dialog box. These features are used only
when preparing a PDF document for professional printing with high-end
imagesetters. Don’t mess with these prepress settings without the advice and
consent of your favorite service bureau people.
When you click the name of any check box option in the Advanced Print
Setup dialog box, Acrobat displays a brief description of that option in a text
box at the bottom of the dialog box. Just be mindful that when clicking the
name of an option to get a brief explanation of its function, you also end up
either selecting or deselecting that check box. If you’re just exploring the
options to discover more about their use, be sure that you don’t inadver-
tently select an option you don’t really want to use.
Troubleshooting Printing Problems
You can click the Printing Tips button in the Print dialog box in Acrobat 6 and
Adobe Reader 6 to go online to the Adobe Web site to get a slew of suggestions
Figure 8-5:
Using the
Tiling
options in
the Print
Settings
dialog box
to print an
oversized
document.
155
Chapter 8: Printing PDF Files
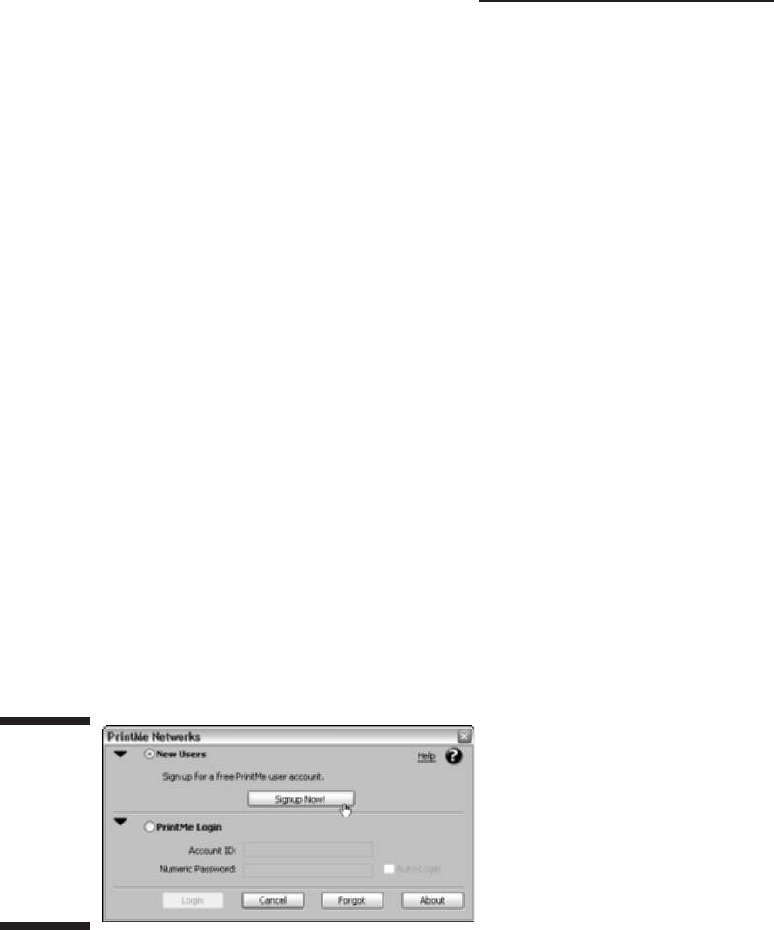
on how to troubleshoot the most common printing problems with Acrobat.
This area of the Adobe support knowledge base is particularly helpful if you’re
having trouble printing a PDF file on a PostScript printer. The Web page
includes instructions on how to enable the PostScript error handler for your
printer, depending upon which operating system you’re using (Windows or
Macintosh) so you can track the specific errors that printing the PDF file is
causing. It also contains a link to another page on the Adobe Web site that tells
you what these PostScript errors really mean and gives you some suggestions
on how to get around them.
Using PrintMe Internet Printing
Acrobat 6 offers support for the PrintMe Internet Printing service that
enables you to print your PDF documents to any printer on the PrintMe
Network or any fax machine in the world, which is a great convenience for
globetrotters. To use the feature, just choose File➪PrintMe Internet Printing.
If you’re not already signed up, the PrintMe Networks dialog box, shown in
Figure 8-6, appears. Select the New Users radio button, and then click the
Signup Now! button in to open the PrintMe New User Signup dialog box,
shown in Figure 8-7, where you fill in the form and get a new user account.
Upon registering as a user with PrintMe Internet Printing, a PrintMe print
driver is downloaded to your computer and you then follow the onscreen
prompts to install the driver. After installation of the print driver, the PrintMe
Networks dialog box (Figure 8-6) reappears, enabling you to log on to the
network.
To use PrintMe Internet Printing, follow these steps:
1. Open the PDF document you want to print to a remote PrintMe printer
or fax machine and choose File➪PrintMe Internet Printing.
The PrintMe Networks dialog box opens (see Figure 8-8).
Figure 8-6:
Opening the
PrintMe
Networks
dialog box in
Acrobat 6 to
sign up for
an account.
156
Part II: The Wealth of Ways for Creating PDF Files
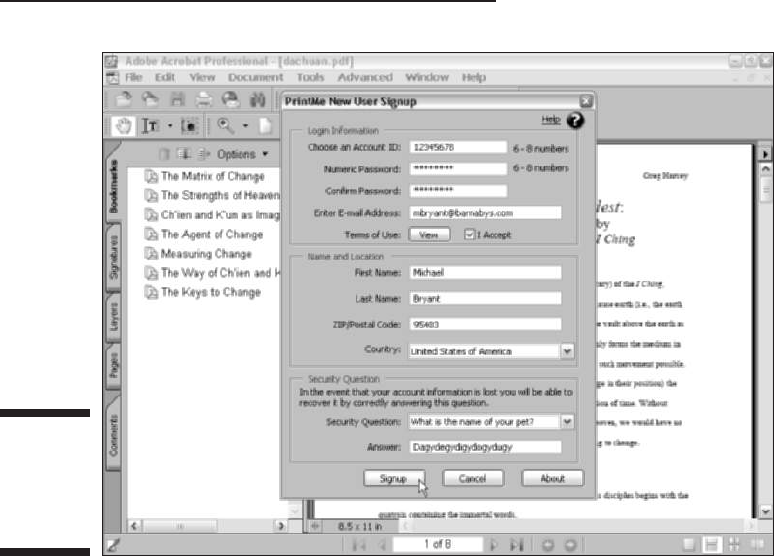
2. Enter a new name for the printed document in the Title text box (the
current document title appears here by default) and then select either
the Print All Pages or Pages options in the Page Range area. If you
select Pages, enter a range of pages to print in the text boxes provided,
and then enter the number of copies to print in the Copies text box.
By default, the My Favorites radio button is selected in the PrintMe To
area.
3. Choose a PrintMe destination or fax number from the Most Recent
drop-down list that displays the last ten PrintMe destinations or fax
numbers used.
4. To choose a new PrintMe printer or fax number, click the More button
(black triangle) if it’s not already selected when the dialog box opens.
5. Click the Printer radio button and then enter a new PrintMe destina-
tion in the PrintMe ID text box or the telephone number of the desti-
nation fax machine in the FAX# text box.
6. Click the PrintMe button to send your PDF document to the selected
PrintMe enabled printer or fax machine.
The PrintMe Networks dialog box also provides an Address Book used to store
PrintMe destination Printer ID’s and fax numbers as well as a searchable online
Figure 8-7:
The PrintMe
New User
Signup
dialog box.
157
Chapter 8: Printing PDF Files
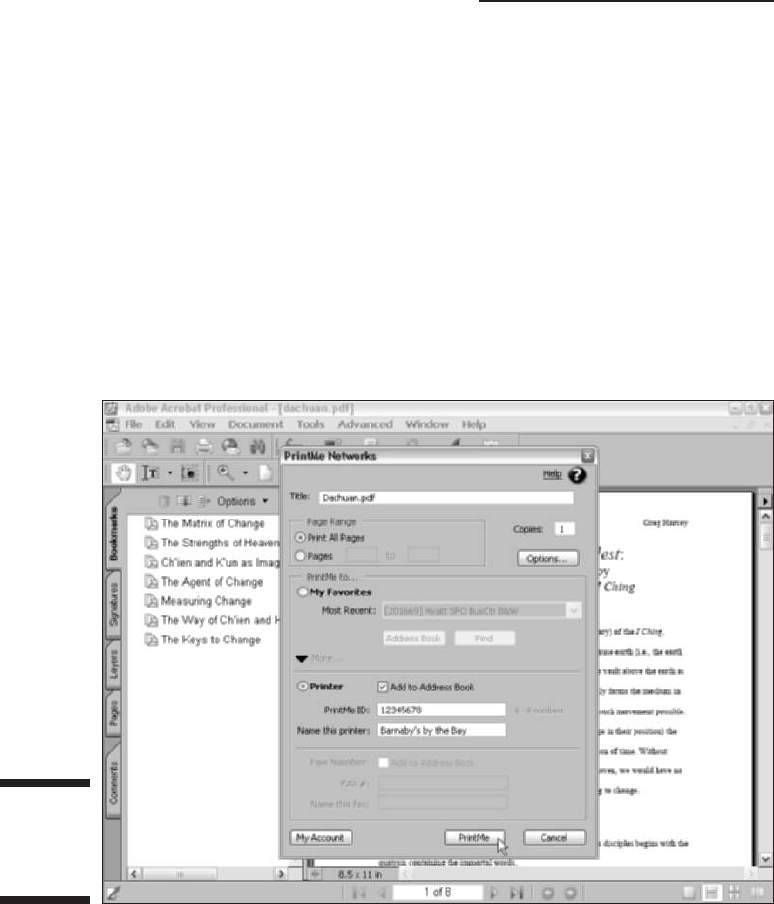
directory that lists the name and Printer ID numbers of host printer locations
currently signed up with the service. The service enables you to print to any
fax machine whose telephone number you know. Click the Address Book
button to access your PrintMe Address Book or the Find button to locate a
PrintMe printer in their online directory. To add a PrintMe destination or fax
number to the Address Book, choose Add to Address Book and enter a name
for the printer or fax number in the appropriate text box as it will appear in
your PrintMe Address Book. The entry is added to your Address Book when
you click the PrintMe button. Click the My Account button to go online and
view status and statistics of your PrintMe account.
Note that after selecting a printer in the PrintMe Networks dialog box, the
Options button activates and provides you with additional printing options
that vary depending on the selected PrintMe enabled printer.
Figure 8-8:
The PrintMe
Networks
dialog box.
158
Part II: The Wealth of Ways for Creating PDF Files
Part III
Reviewing,
Editing, and
Securing PDFs

In this part . . .
A
fter you’ve converted your electronic and paper docu-
ments to PDF files, you’re ready to explore the many
Acrobat 6 features for reviewing, editing, organizing, and
making them secure. Part III introduces all of these kinds of
important, post-production features.
In Chapter 9, you find out how to use Acrobat 6 to annotate
your PDF files so that coworkers and clients alike can
review them online, and you can summarize their feedback.
In the process, I introduce you to the new e-mail-based and
browser-based review features in Acrobat 6. In Chapter 10,
you discover the types of PDF document editing that you
can perform in Acrobat 6. Chapter 11 introduces you to the
ways to secure your PDF files from unwanted changes. It
also gives you the lowdown on how to use digital signa-
tures in Acrobat 6 to sign off on changes, as well as prevent
future changes. Chapter 12 covers the ways you can repur-
pose the contents of your PDF files by extracting the text
and graphics for uses with the other software programs
you commonly use. Finally, Chapter 13 rounds out Part III
by giving you vital information on how to catalog and
archive your PDF files by building searchable PDF docu-
ment collections that you can distribute on CD-ROM or
on your company’s network or intranet.

Chapter 9
Annotating PDF Files for Review
In This Chapter
Sending out PDF files for review
Adding bookmarks to aid in document review
Noting changes in the PDF document
Giving audio comments and stamping the document
Marking up and highlighting proposed changes in the document
Attaching supplemental files to the PDF document
Collecting and summarizing comments
O
ne of the most important groups of features in Acrobat 6 is the annota-
tion features that enable you to mark up and add comments to a PDF
document. These features facilitate the review process by enabling all the dif-
ferent people on a design team to give you their feedback in a consistent and
timely manner. The annotation features in Acrobat 6 also assist in the approval
process by enabling you to get feedback and eventually the final okay from
clients and key personnel in-house.
In this chapter, you discover the many ways to send out a PDF document in
order to initiate a review cycle. You also find out how to annotate a PDF docu-
ment, including adding bookmarks to make it easier to navigate the docu-
ment you’re reviewing, as well as attaching comments (in many different
formats, including text notes, sound notes, and attached files) and marking
up text and graphics. You also become familiar with the ways to collect and
summarize review comments for a particular PDF file in anticipation of
making the final edits (as described in Chapter 10).
Sending Out PDF Files for
Review in Windows
Acrobat is known for its arsenal of useful annotating tools, and Adobe contin-
ues to improve those tools, as you discover in later sections of this chapter.

What makes Acrobat 6 such a worthwhile upgrade is the addition of e-mail-
based and browser-based reviewing. These new reviewing features, available
to users of Acrobat 6 for Windows, streamline the initiation of a review cycle
by allowing you to distribute a PDF review document either by e-mail or by
posting the PDF file on a network (intranet or Internet) server and allowing
participants to review it in a Web browser.
Here’s how a typical Acrobat PDF review cycle works — the initiator of a review
distributes a PDF document to reviewers, known as participants, who then use
the Acrobat commenting tools to annotate the document for the edification of
the review initiator. The initiator then reviews the reviews of the reviewers
(sounds fun, right?). Acrobat enables you to set up either e-mail-based or
browser-based reviews. When deciding which type of review to use, note that
with e-mail-based reviews, participants don’t need access to a shared server;
with browser-based reviews, participants can see each others’ comments on
an ongoing basis.
Initiating an e-mail-based review
In an e-mail-based review, you (the review initiator) send an e-mail to each par-
ticipant. Attached to this e-mail is a copy of the PDF document for review in the
form of an FDF (Form Data Format) setup file that contains configuration set-
tings for importing reviewer comments. FDF is an Adobe variation of PDF used
to import and export form data in PDF documents. (For more on interactive
forms in Acrobat, see Chapter 14.) The participants add comments to the PDF
document copy, and then e-mail the comments back to you via the FDF setup
file. When you open the attached FDF file, Acrobat opens your original PDF
document and automatically imports participant comments and annotations
for viewing in the original document. To get the ball rolling, make sure to save
your PDF document in a convenient place on your hard drive so that the FDF
setup file has no trouble finding it, and then follow these steps:
1. Open the PDF document you want to send out for review and choose
File➪Send by E-mail for Review.
The Send by E-mail for Review dialog box appears, as shown in Figure 9-1.
If you haven’t specified an e-mail address in the Identity window of the
Preferences dialog box in Acrobat 6, an alert dialog box appears,
prompting you to enter an e-mail address where review comments will
be sent. This e-mail address is added to your Acrobat preferences for
future reviews. Enter your e-mail address and click OK.
2. In the Send by E-mail for Review dialog box, enter participant
addresses in the To, Cc (carbon copy), or Bcc (blind carbon copy)
text boxes.
162
Part III: Reviewing, Editing, and Securing PDFs
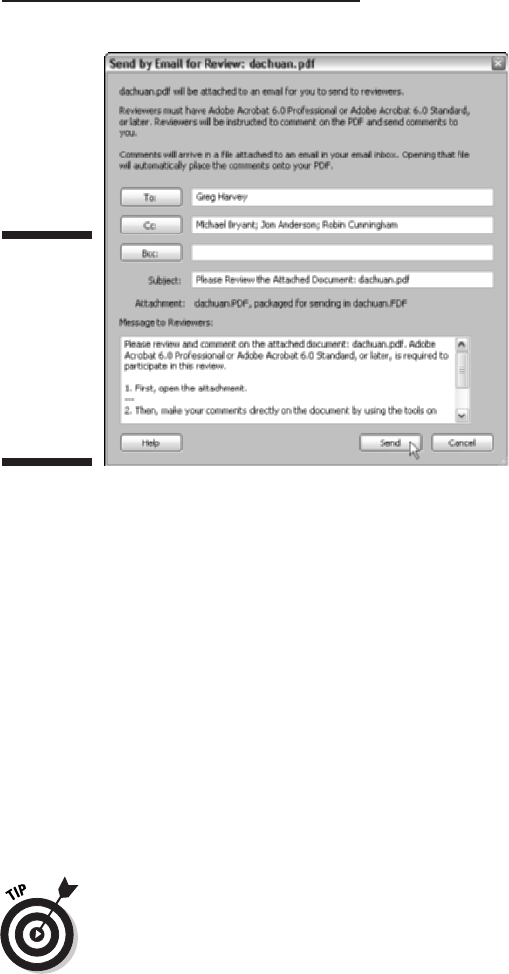
3. Edit the default text in the Subject and Message to Reviewers text
boxes as desired, and then click the Send button.
If your default e-mail client displays an alert dialog box, asking you to
verify sending the e-mail, click the Send button again to distribute your
PDF document to review participants.
E-mail attachments sent using the File➪Send by E-mail for Review command
are in FDF (Form Data Format). When a review participant opens this attach-
ment, a copy of your original PDF file is opened in Acrobat, which the partici-
pant can then add comments to. When the review is finished, the participant
sends the comments back to you by choosing File➪Send Comments to Review
Initiator or by clicking the Send Comments button on the Commenting toolbar.
When you receive and open this FDF attachment, Acrobat opens your original
PDF document and imports the participant’s comments into the PDF docu-
ment for viewing.
E-mail-based reviews can be initiated in the same manner described previously
from applications other than Acrobat 6 that support the PDFMaker plug-in.
These include Microsoft Office 2000 and XP (when using Acrobat 6 Standard or
Professional), as well as AutoCAD, Microsoft Project, and Microsoft Visio (when
using Acrobat 6 Professional only). Note that to initiate an e-mail-based review
in those programs, you have to open the document you wish to send for review
and choose Adobe PDF➪Convert to Adobe PDF and Send for Review on the
program’s menu bar.
Figure 9-1:
Setting up
an e-mail-
based
review in
the Send by
E-mail for
Review
dialog box.
163
Chapter 9: Annotating PDF Files for Review

Participating in an e-mail-based review
The following list gives you some pointers on making a review cycle run
smoothly, whether you’re the initiator or a participant in an e-mail-based
review:
When you open the FDF attachment in an e-mail-based review, a Document
Status message informs you that the document has been sent for review.
You must be using either Acrobat 6 Professional or Standard versions to
participate.
When you’re finished annotating a PDF file, save the file with your changes
in a convenient place on your hard drive so that you can review the docu-
ment without having to open the original e-mail attachment. This also pro-
vides a copy of the reviewed PDF in case you want to share the reviewed
PDF file by e-mailing it to others (you’re not allowed to enter additional
e-mail addresses when you choose File➪Send Comments to Review
Initiator).
If you want to send additional comments to the review initiator, open
your saved version of the reviewed PDF file, edit or make additional
comments, and choose File➪Send Comments to Review Initiator again.
The initiator will receive your revised PDF. (Note that any comments
you deleted in the revised document will still appear in the initiator’s
version.) Initiators can use comment filtering and deletion features to
keep things legible. See the section, “Managing reviews with the Review
Tracker,” later in this chapter.
When you receive a participant’s copy of the reviewed PDF file and open
the FDF attachment, your original PDF document opens. If the original
can’t be found, you are prompted to browse for it.
If you want to make changes to the original PDF document, save those
changes under a different file name in order to preserve the original;
otherwise, participant annotations may appear in the wrong places in
the edited document.
Use the Review Tracker (which is covered a little later in this chapter)
to manage the annotations you collect in a review cycle, whether it is
an e-mail-based review or a browser-based review.
Setting up a browser-based review
In a browser-based review, you can either upload a PDF document to a server
or work with an existing document on a server. Like an e-mail-based review,
the review initiator sends an e-mail to participants with an attached FDF
164
Part III: Reviewing, Editing, and Securing PDFs
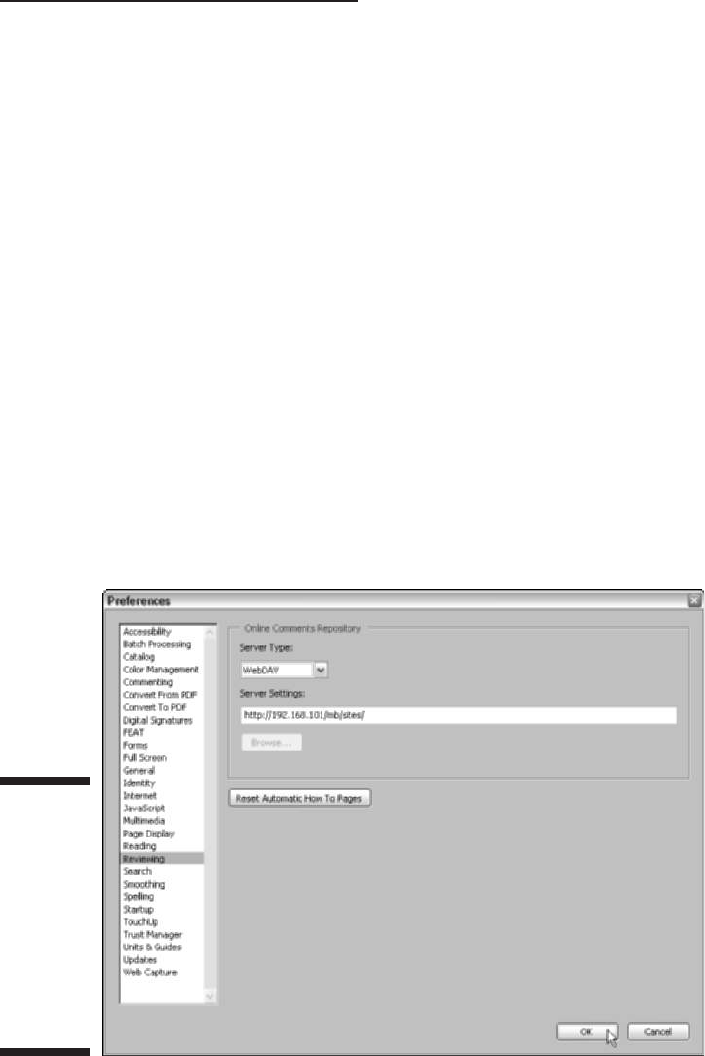
(Form Data Format) setup file that contains configuration settings for import-
ing reviewer comments into the review PDF file. Reviewers must open this FDF
attachment, as opposed to simply opening the PDF document posted on the
server, in order to participate in a browser-based review. When a reviewer
opens the FDF attachment, a copy of the PDF file is opened in their Web
browser. Participants can then make annotations to the PDF document using
tools on the Review and Comment toolbar that appears in their browser when
the PDF file is opened. All participant comments are stored in the FDF setup
file and imported into the shared PDF document for reviewing by everyone
participating in the review cycle. Note that participants cannot edit or delete
one another’s comments, though they can reply to them, as you see in the
next sections.
Looking at the Reviewing preferences for a browser-based review
In order to initiate a browser-based review, you have to first specify the type
of server you’re using and the location of the FDF setup file where all the par-
ticipant comments are stored. Having this file accessible to all browser-based
review participants is what allows everyone to view the ongoing review cycle
in their Web browsers. You specify these settings in the Preferences dialog
box in Acrobat 6. Choose Edit➪Preferences or press Ctrl+K, and then click
Reviewing in the list box on the left side of the Preferences dialog box to dis-
play the Reviewing options, as shown in Figure 9-2.
Figure 9-2:
Specify
reviewing
preferences
for a
browser-
based
review in
the Acrobat
Preferences
dialog box.
165
Chapter 9: Annotating PDF Files for Review

The following list describes the options found in the Reviewing options of the
Preferences dialog box:
Server Type: Use the Server Type drop-down list to define what type of
server you’re using to store the FDF setup file containing browser-based
review annotations. Select the Database option if there is a database
application server setup on your company intranet. Select the Network
Folder option to upload your FDF setup file to a shared folder on your
network. Select the Web Discussions option if you have access to a
Microsoft Discussions server. Note that this type of server needs to be
configured in Internet Explorer as well. Select the WebDAV (Web-based
Distributed Authoring and Versioning) option, which is a special kind of
server that allows users to collaboratively edit and manage files
remotely, if you have access to a WebDAV server.
Server Settings: Fill in the necessary directory path or (HTTP type)
addresses in the Server Settings text box, which activates when you
make a selection on the Server Type drop-down list.
Browse: If you select Network Folder as your Server Type, the Browse
button activates so that you can locate the shared folder you want to
use in a browser-based review. Remember that all participants need
access to this folder in order to participate in the review.
Reset Automatic How To Pages: Click this button to ensure that the
How To window will display topics that are appropriate to the type of
review cycle you define. For more information about getting help in
Acrobat 6, see Chapter 3.
If all this sounds like Greek to you, it’s best to get these settings from your
systems administrator. Otherwise, fill in the appropriate information and
click OK to close the Preferences dialog box.
If you choose WebDAV or have access to your own or someone else’s Web
server, you need to add that server as one of your network places in Windows
XP in order to upload your PDF using the Upload for Browser-Based Review
command within Acrobat. To do so, choose Start➪My Network Places, and
then click Add a Network Place in the Network Tasks area. Follow the prompts
in the Add Network Place Wizard and then click the Finish button. Don’t be
afraid to seek help in completing this wizard from your systems administrator
if necessary.
Initiating a browser-based review
After setting up your Reviewing preferences, you’re ready to upload the PDF
review file and specify review participants. Keep in mind that though the PDF
review file and the FDF setup file do not have to be in the same location, par-
ticipants must have access to both files on a network in order to review the
166
Part III: Reviewing, Editing, and Securing PDFs

PDF document. Also note that you should wait until you’ve uploaded a PDF
for review to make any initial comments. If you don’t, any comments you
make to a PDF file prior to uploading will be embedded in the PDF document
and you won’t be able to further edit them. To upload your PDF document
and initiate a browser-based review, follow these steps:
1. Open the PDF review document in Acrobat 6 and choose File➪Upload
for Browser-Based Review.
2. In the Upload for Review dialog box that appears, click My Network
and locate the folder in which you want to store the PDF review file.
Make sure that all participants have access to this network location.
3. Click the Upload button to copy the PDF review document.
When your PDF file finishes uploading, the Start Browser-Based Review
dialog box appears, as shown in Figure 9-3.
4. In the Start Browser-Based Review dialog box, enter participant
addresses in the To, Cc, or Bcc text boxes.
5. Edit the default text in the Subject and Message to Reviewers text
boxes and click the Send button.
If your default e-mail client displays an alert dialog box asking you to
verify sending the e-mail, click the Send button again to send an e-mail
message to participants that specifies the location of the PDF review file.
Figure 9-3:
Setting up a
browser-
based
review in
the Start
Browser-
Based
Review
dialog box.
167
Chapter 9: Annotating PDF Files for Review
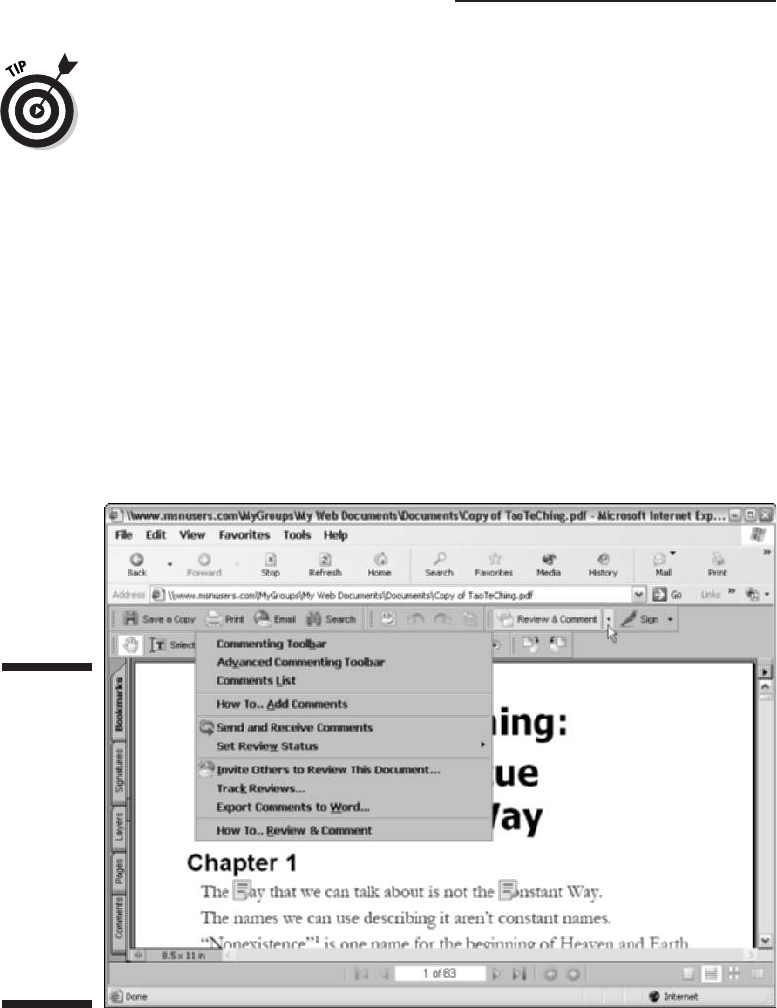
If the PDF file you want to have reviewed already exists on a server, you can ini-
tiate a browser-based review as well as invite new participants to the review
cycle by first navigating to the file and opening it in your browser. The Review
and Comment Tasks button appears in your browser window; from its pop-up
menu, choose Invite Others to Review This Document to open the Start
Browser-Based Review dialog box, where you enter participant addresses
before clicking the Send button. You can also use this same command in
Acrobat 6 during an e-mail-based review to invite more participants to review
your PDF document.
Participating in a browser-based review
When participants open the FDF setup file attached to their invitation e-mail,
a copy of the PDF review document is opened in their browser. In addition to
the basic Adobe Reader tool set displayed in the browser window, you also
get the Review and Comment Tasks button, shown in Figure 9-4, that allows
you to annotate the PDF in your browser. The following list gives you some
pointers on making a review cycle run smoothly, whether you’re the initiator
or a participant in a browser-based review:
Figure 9-4:
Acrobat
displays the
PDF review
document
and the
Review and
Comment
Tasks button
with its pop-
up menu
commands
in your
browser.
168
Part III: Reviewing, Editing, and Securing PDFs

You must use Acrobat 6 Professional or Standard versions to participate
in a browser-based review.
You must open the FDF file attached to your invitation e-mail in order to
participate in a browser-based review.
To annotate a PDF file, use the tools and commands on the Review and
Comment Tasks button because the menu commands in this case are
browser-specific. The Review and Comment Tasks button also contains
commands for displaying the Commenting and Advanced Commenting
toolbars. Like all tool bars in Acrobat, these can be displayed as either
floating or docked.
In order to be able to see other participant’s comments, your Reviewing
preferences must match those of the review initiator. If you can’t see
other people’s comments, request the correct server settings from the
review initiator and make sure you have access to that location.
To view updated annotations from other participants or to enable others
to view your recent contributions, choose Send and Receive Comments
on the Review and Comment Tasks pop-up menu.
When you’re finished adding annotations to a PDF review document, you
can change the status of your review to completed to communicate that
fact to the review initiator and other participants. You complete a review
by choosing Review and Comment➪Set Review Status➪Completed from
the Review and Comment Tasks button pop-up menu.
If you’d like to perform your review in Acrobat rather than your Web
browser, click the Save and Work Offline button on the Commenting
toolbar.
If at anytime you’ve stopped adding annotations to a PDF review document
and want to continue the process, either reopen the FDF attachment in
your original e-mail invitation or, if you’ve saved the document to work
offline, open it in Acrobat and choose File➪Go Back Online. This command
reopens the PDF document in your browser and uploads your comments.
Use the Review Tracker to manage the annotations you collect in a
review cycle, whether it is an e-mail-based review or a browser-based
review. See the next section for details.
Managing reviews with
the Review Tracker
The Review Tracker is a handy new feature that helps the review initiator
organize participant comments, communicate with participants, and keep
track of ongoing or completed review cycles, whether they are e-mail-based
169
Chapter 9: Annotating PDF Files for Review
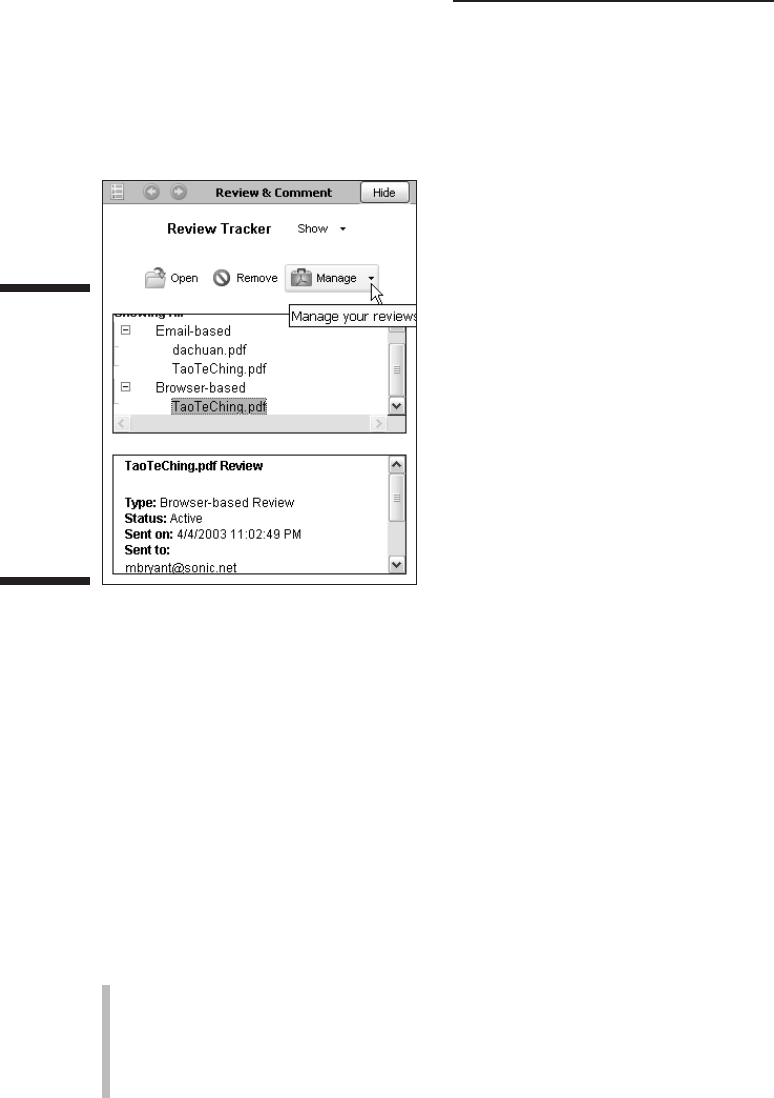
or browser-based reviews. To open the Review Tracker, shown in Figure 9-5,
choose Track Reviews on the Review and Comment Tasks button pop-up
menu, or choose Open Review Tracker on the Options pop-up menu at the
top of the Comments palette in the Navigation pane.
As you can see in Figure 9-5, the Review Tracker has two pop-up menus, Show
and Manage, as well as two list boxes, one on top of the other. The Show pop-up
menu lets you specify which reviews are displayed in the top list box. Choose
either All, Active, Completed, Sent, or Received. Note that displayed reviews are
categorized as either e-mail-based or browser-based. Attached Expand (+) and
Collapse (–) buttons on these categories, when clicked, display or hide individ-
ual review document names. Clicking a review document name in the review list
displays that review’s status information in the list box directly below.
Clicking the Open button displays the review document in either Acrobat, if it’s
an e-mail-based review, or in your Web browser, if it’s a browser-based review.
Clicking the Remove button deletes the review from the Review Tracker.
The Manage pop-up menu enables you to communicate with participants
associated with the selected review and contains the following options:
E-mail All Reviewers: Used to send an e-mail message to all reviewers
associated with the selected review.
Send Review Reminder: Used to send a gentle (or otherwise) reminder
to those participants who might be lagging in their rate of review
contribution.
Figure 9-5:
The Review
Tracker,
displayed in
the How To
window, lets
you manage
e-mail-
based or
browser-
based
reviews.
170
Part III: Reviewing, Editing, and Securing PDFs

Invite More Reviewers: Used to liven up the party, especially if you find
yourself using the Send Review Reminder command a little too often.
Go Back Online: Activates when you select a browser-based review in
the Review Tracker list. This command, surprisingly enough, enables
you to go back online and refresh the selected browser-based review for
those who might be online at the very moment you decide to change the
review status.
The Review Tracker also has the standard How To window navigation but-
tons at the top of the pane — How To, Home, Back, Forward, and Hide. Just
don’t click the Home button and expect to be able to click the Back button to
redisplay the Review Tracker. In order to reopen the Review Tracker, you
have to use the Review and Comment Tasks button or the Options command
on the Comments palette in the Navigation pane.
The Ins and Outs of Bookmarks
Bookmarks are the links that appear on the Bookmarks palette in the
Navigation pane in a PDF document. They are most often used to take you
directly to different sections within the document. Bookmarks can take you to
different pages in the document or even different views of a page. Bookmarks
can also link you to different documents (PDF and non-PDF) on your com-
puter, as well as to Web pages on the Internet. All of these functions make
bookmarks perfect for providing review participants with a quick means of
navigating to annotations and markups you make in a PDF document review
cycle. As if this weren’t enough, bookmarks can also perform certain actions
in the PDF document, such as submitting a form’s data, playing a sound or
movie, or selecting a particular menu item. (See Chapters 14 and 16 for infor-
mation on working with PDF forms and adding interactivity to PDF files.)
To use a bookmark to jump to a particular page or page view, to open a new
document or Web page, or to execute a command or perform a specified
action, all you have to do is click the name or icon of the bookmark in the
Bookmarks palette in the Navigation pane. If you want, you can have Acrobat
automatically close the Navigation pane whenever you click a bookmark by
selecting the Hide After Use setting on the Options pop-up menu at the top of
the Navigation pane. This option is particularly useful for bookmarks that
open pages in the document that are displayed in the Fit Width or Fit Visible
page views and require maximum screen area for legibility.
Generating automated bookmarks
When you use the PDFMaker plug-in to convert documents created with
Microsoft Word for Windows to PDF, you can specify that the document
171
Chapter 9: Annotating PDF Files for Review
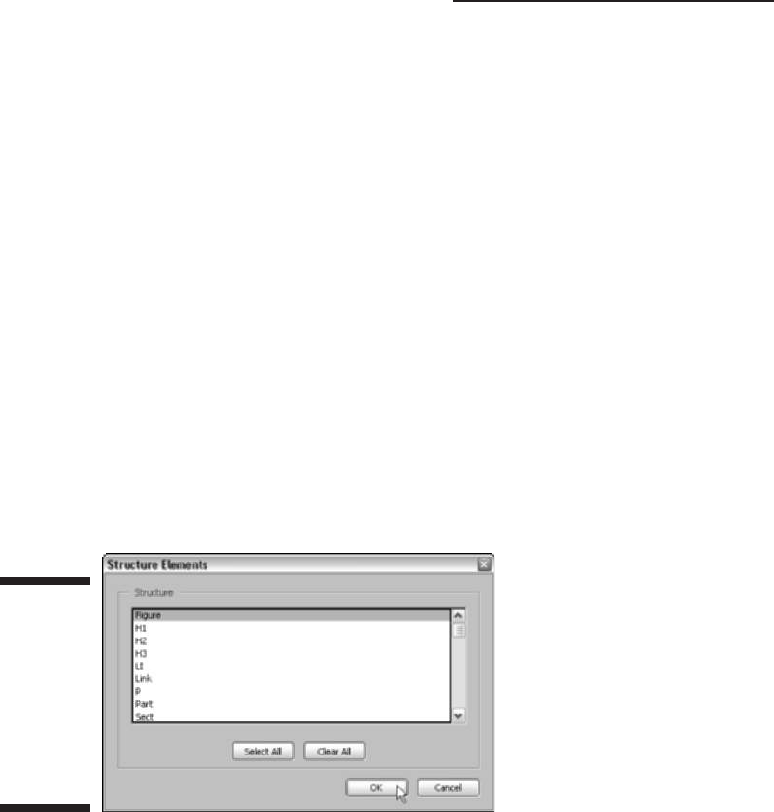
heading and other styles, cross-references, and footnotes automatically be
converted into bookmarks in the final PDF file (see Chapter 5 for details).
Also, when capturing Web pages, Acrobat can automatically generate book-
marks for each page that you capture (see Chapter 7 for details).
When the Add Bookmarks to Adobe PDF option is selected during conver-
sion, the bookmarks automatically generated from Word documents with the
PDFMaker 6.0 and from Web pages in Acrobat 6 are saved as a special type
called tagged bookmarks. Tagged bookmarks keep track of the underlying
structure of the document (such as heading levels and paragraph styles in
Word documents and HTML tags in Web pages) by tagging these elements.
You can use the elements stored in any tagged PDF document or captured
Web page to automatically generate bookmarks for any particular element in
the document. (For details on creating a tagged PDF file or converting a non-
tagged PDF file, see Chapter 15.) To generate automatic bookmarks for a
tagged file, click the Options pop-up menu on the Bookmarks palette and
then click New Bookmarks from Structure on the menu to open the Structure
Elements dialog box, as shown in Figure 9-6. Note that the New Bookmarks
from Structure menu item is grayed out if the PDF document you’re working
with isn’t tagged.
To have Acrobat generate bookmarks for particular elements in the PDF doc-
ument, you then select the names of the elements for which you want the
bookmarks generated (Ctrl+click on Windows or Control+click on the Mac to
select multiple elements) in the Structure Elements dialog box before you
click OK. Acrobat then goes through the document, identifying the tags for
the selected elements and generating bookmarks for each of them.
Figure 9-7 illustrates how this works. In this figure, you see a group of four
automatically generated bookmarks created from the Figure tag in the original
tagged PDF document. As you can see, when Acrobat generates these tags, it
Figure 9-6:
Selecting the
elements to
automatically
bookmark
in the
Structure
Elements
dialog box.
172
Part III: Reviewing, Editing, and Securing PDFs
gives them the name of the tagged element used to create them (which in this
case just happened to be Figure). These four Figure tags are automatically
nested under a generic bookmark named Untitled. All that remains to do is to
rename these bookmarks to something a little bit more descriptive, such as
Table of Figures for the Untitled bookmark, Cover for the first Figure book-
mark, Title Page for the second, Half Title Page for the third, and Copyright for
the fourth and last bookmark. (See the “Editing bookmarks” section, later in
this chapter, for details on how to rename bookmarks.)
Creating manual bookmarks
Although the automated methods are by far the fastest ways to generate
bookmarks, they are by no means the only ways to add bookmarks. You can
also manually add bookmarks to any PDF multipage document that you’ve
opened in Acrobat 6. Each bookmark that you add to a PDF document has
two parts: the bookmark link and the bookmark destination. The bookmark
link consists of a page icon followed by the name of the bookmark in the
Bookmarks palette, and the bookmark destination is the page, page view, new
document, or Web page that is displayed or the action that is executed when
you click the bookmark link.
Figure 9-7:
The
bookmarks
generated
for the
Figure
element in a
tagged PDF
document.
173
Chapter 9: Annotating PDF Files for Review

Making bookmarks to go to pages in the document
When you create a new bookmark to another page in the same PDF document,
Acrobat records not only the page but also the page view and the magnifica-
tion setting in effect as part of the bookmark’s destination. This means that
the most productive way to create manual bookmarks is to first navigate to
the destination page and make any desired change to the page view and/or
magnification settings before you begin creating the bookmark. Although you
can designate the destination page as part of the process of creating the new
bookmark, going to the page and setting things up beforehand just makes the
process all the easier and more efficient.
With this tip in mind, the steps for manually creating a bookmark to a new
page in the same document are as follows:
1. Launch Acrobat and then open the PDF document to which you want
to add bookmarks.
2. If necessary, open the Navigation pane by pressing F6 and click the
Bookmarks tab to display its palette on top.
3. Using the buttons on the Navigation toolbar or navigation buttons on
the Document window status bar, go to the destination page in the
document for the first bookmark.
4. If you want the destination page to be displayed in a different page
view or magnification, select the appropriate options from the View
menu or click the appropriate buttons on Zoom toolbar and the
Document status bar (see Chapter 2 for details).
5. Choose the New Bookmark command on the Options menu at the top
of the Bookmarks palette or right-click the Document window to open
its context menu, and then click New Bookmark (you can also press
Ctrl+B on Windows or
ÔÔ
+B on the Mac).
A new bookmark icon named Untitled is added (see Figure 9-8).
6. Type a descriptive name for your new bookmark and then press the
Enter key (Return on the Mac) or click the mouse pointer somewhere
outside of the bookmark name to add it to the list in the Bookmarks
palette.
Editing bookmarks
If, after creating a bookmark, you discover that you need to make changes to
the bookmark type or its destination, you can do this in the Bookmark
Properties dialog box, which you can open by right-clicking (Control+clicking
on the Mac) the name of the bookmark and then clicking Properties on its con-
text menu. You can also edit the appearance of a bookmark in this dialog box.
174
Part III: Reviewing, Editing, and Securing PDFs
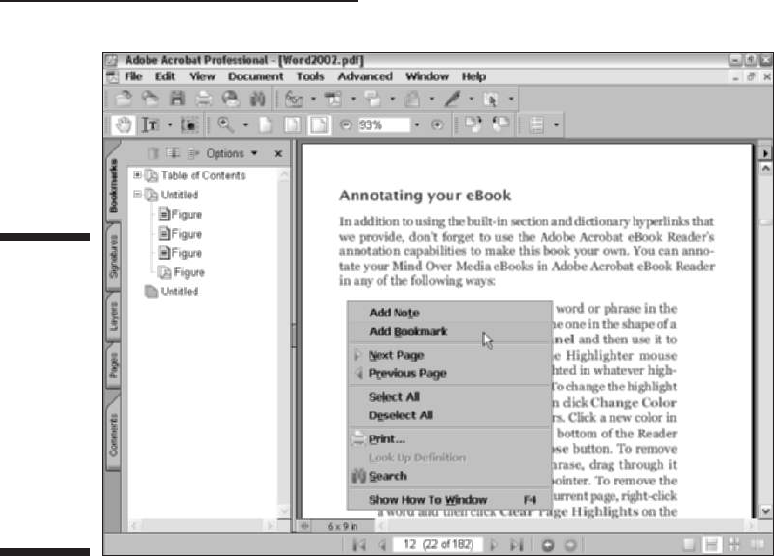
To change the text color of the bookmark as it appears in the Bookmarks
palette, click Appearance tab and then the Color button to select a new color
in the color palette. To change the text style of the bookmark, click the new
style (Bold, Italic, or Bold & Italic) on the Style drop-down list. To assign your
new color and/or text style to the bookmark, click the Close button in the
Bookmark Properties dialog box.
Changing the page destination for a bookmark
If you find that you’ve linked a bookmark that goes to the wrong page, you
can easily edit just its destination by taking these few steps:
1. Using the buttons on the Navigation toolbar or navigation buttons on
the Document window status bar, go to the correct destination page in
the document for the bookmark.
2. Right-click (Control+click on the Mac) the name of the bookmark
whose destination needs editing in the Bookmarks palette and click
Set Destination on the context menu.
3. Click Yes in the alert dialog box that asks you if you’re certain that
you want to make this change.
Figure 9-8:
Adding
a new
bookmark
in the
Bookmarks
palette to
the page
currently
displayed
in the
Document
window.
175
Chapter 9: Annotating PDF Files for Review

To test the edited destination, click the buttons on the Navigation toolbar or
on the Document window status bar to move to a new page, and then click
the bookmark to make sure that it now takes you to the right page.
Renaming and deleting bookmarks
If you aren’t happy with a name of a particular bookmark, you can rename it
in a snap:
1. Right-click (Control+click on the Mac) the name of the bookmark
whose name needs changing in the Bookmarks palette and click
Rename on the context menu.
2. Replace the existing name by typing the new name and then pressing
Enter (Return on the Mac) or by clicking the mouse pointer some-
where outside of the bookmark name.
To delete a bookmark, right-click (Control+click on the Mac) the bookmark in
the Navigation pane and then click Delete on its context menu.
Inserting Document Comments
with the Commenting Toolbar
In its original state, the Commenting toolbar displays the buttons for four
tools — Note, Indicate Text Edits, Stamp tool, and Highlight Text — that you
can use to annotate your PDF document, as well as the Show button that is
used to display or hide (also known as filtering) comments in your PDF docu-
ment. (For more on filtering comments see the “Showing and hiding comments”
section, later in this chapter.) Three of the tool buttons, Indicate Text Edits,
Stamp tool, and Highlight Text, contain pop-up menus that you can click to
display additional features for the selected tool.
When you click the pop-up menu button on the Indicate Text Edits tool, it dis-
plays options for marking up edited text selections. Figure 9-9 shows the
options provided on this menu. You normally use this group of commands in
conjunction with the Indicate Text Edits tool to perform various markups on
selected text in PDF document you’re reviewing for the benefit of other
review participants. These self-explanatory options include Insert Text at
Cursor, Replace Selected Text, Highlight Selected Text, Add Note to Selected
Text, Cross Out Text for Deletion, and Highlight Selected Text, among others.
When you click the pop-up menu button on the Stamp tool, it displays all the
options for using the electronic rubber stamp feature in Acrobat 6. See the
“Using the Stamp tool” section, later in this chapter, for more information.
176
Part III: Reviewing, Editing, and Securing PDFs
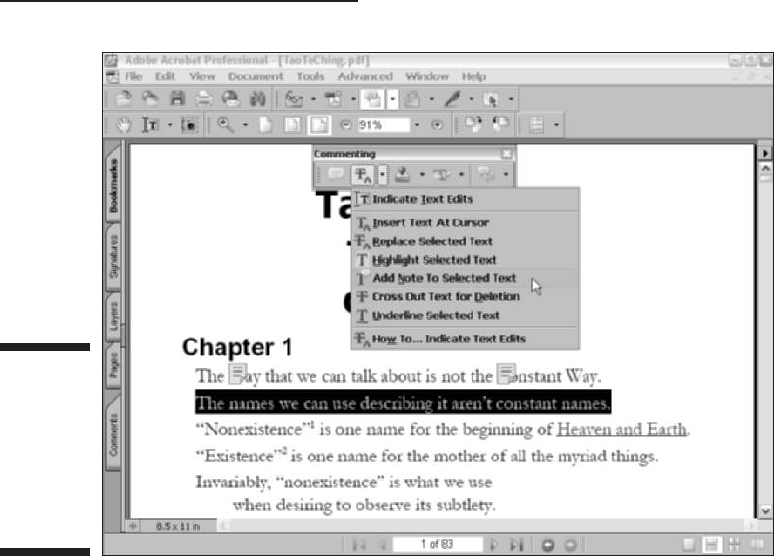
When you click the pop-up menu button on the Highlight tool, it displays dif-
ferent highlighting tools — Cross-Out Text tool and the Underline Text tool, in
addition to the standard Highlighter tool. You usually use this group of tools
to draw attention to text in the PDF document you’re reviewing that needs
some type of editing (normally deletion, when you use the Cross-Out Text
tool) or emphasizing (when you use the Underline Text tool). See the “Hitting
the highlights” section, later in this chapter, for details.
Note that Acrobat saves all notations that you add with Commenting and
Advanced Commenting tools on a distinct and invisible top layer of the PDF
document, keeping them separate from the PDF document text and graphics
underneath. This makes it possible for you to import comments from other
reviewers and add them to the PDF document, as well as to summarize all
comments made in the document and export them as a separate file. For a
description of all Comment and Advanced Comment tools, see Chapter 3.
Using the Note tool
The notes that you can add when reviewing a PDF file run the gamut of
hidden comments (identified by a note icon), simple text displayed at all
times in the document, audio comments that you listen to, and predefined
Figure 9-9:
The
Indicating
Text Edits
pop-up
menu on the
Commenting
toolbar.
177
Chapter 9: Annotating PDF Files for Review
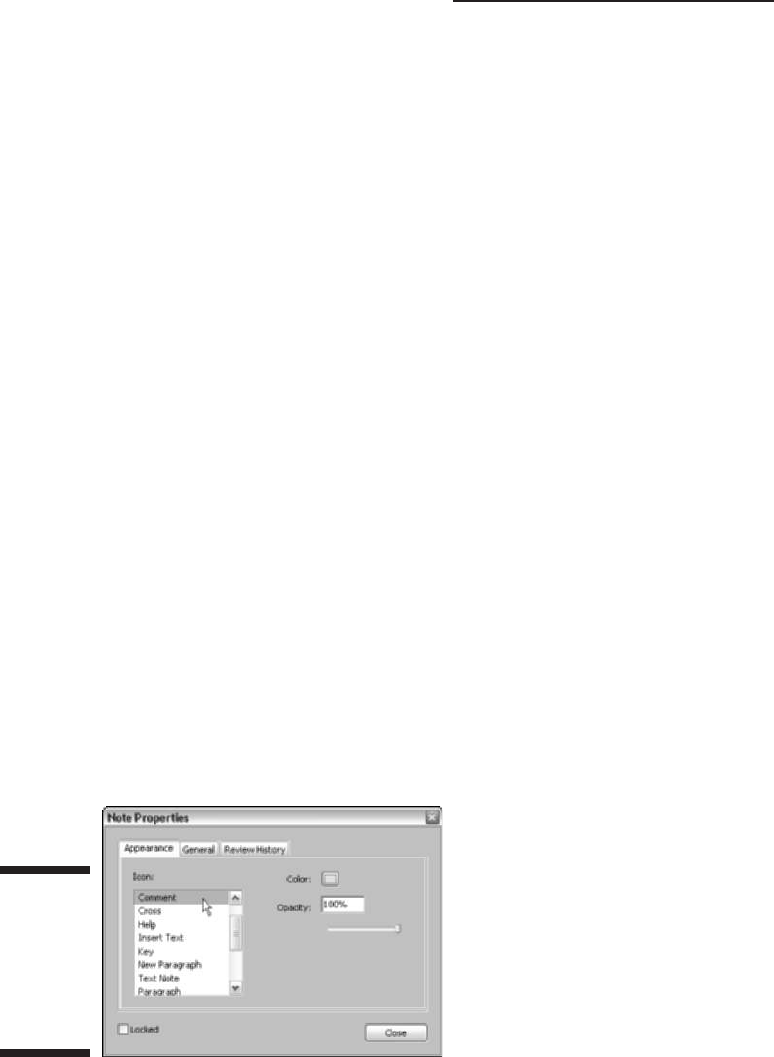
stamps indicating approval, confidentiality, and the like. You can even add
notes that attach files to the PDF document (useful when you want to include
alternative text or graphics that should be considered as possible replace-
ments or additions).
To add a hidden comment with the Note tool, follow these steps:
1. Click the Note tool on the Commenting toolbar or type S if the single-
key accelerators feature is turned on in the Acrobat General
Preferences.
2. Click the Note mouse pointer at the place on the page in the PDF docu-
ment where you want the Note icon to appear.
When you click this pointer, Acrobat opens a comment box that shows
your name and the current date on the colored (yellow by default) title bar.
3. Type the text of the note in the comment box.
4. If the text of your note is short, you can resize the comment box to
better suit the amount of text by positioning the mouse pointer in the
sizing box in the lower-right corner and dragging the outline of the
box with the arrowhead pointer until it’s the shape and size you want.
5. After you finish typing the text of the note, click the Close button in
the upper-left corner of the comment dialog box to close it. You can
also double-click the Note icon to close its comment box.
After you click the Close button in the comment box, only the Note icon
appears on the page, as shown in Figure 9-10. To open the note’s comment
box to read its text, select the Hand tool by pressing H and double-click the
Note icon, or right-click the icon (Control+click on the Mac), and then select
Open Pop-up Note on its context menu. You can leave a comment box open
next to its Note icon on the page by clicking outside of the box rather than
clicking its Close button.
Figure 9-10:
Changing
note
settings in
the Note
Properties
dialog box.
178
Part III: Reviewing, Editing, and Securing PDFs
You can move notes by dragging their Note icons or their comment boxes
(if they’re open) with either the Hand tool or the Note tool. Simply drag the
arrowhead pointer to the desired position on the page (usually off the text
that you’re commenting on) and then release the mouse button. To move a
note back to its original position, right-click (Control+click on the Mac) its
Note icon and click Reset Pop-up Note Location on its context menu. To
delete a hidden comment, choose Delete on the context menu.
You can also change the color and icons used when you add your comments
with the Note tool. This is a good feature to use when many people will be
adding comments to the same PDF. By having the reviewers select individual
colors and icons, you can tell at a glance which notes belong to which review-
ers. To select a new color and/or icon for your notes, follow these steps:
1. Add your first note (by following the preceding steps).
2. Right-click the Note icon (Control+click on the Mac), and then choose
Properties on the context menu.
The Note Properties dialog box appears (refer to Figure 9-10).
3. To select a new Note icon, select it in the Icon list box.
4. To select a new color for the Note icon, click the Color button and
then click a new color in the palette.
Note that you can also increase or decrease the opacity of the Note icon
by entering either a percentage number in the Opacity text box or
moving the slider button right for less opacity or left for more opacity.
5. To change the author or subject for the note, click the General tab and
enter a new name in the Author text box or a new subject in the
Subject text box.
6. Click Close to put your changes into effect.
179
Chapter 9: Annotating PDF Files for Review
Roll me over and line me up
You can have Acrobat automatically open a
note’s comments box to display its text when
you position the mouse pointer on the Note icon.
To do so, open the Preferences dialog box by
pressing Ctrl+K (Ô+K on the Mac), and then
click Commenting in the list box. Then select the
Automatically Open Pop-ups on Mouse Rollover
check box in the Viewing Comments section.
You can also have Acrobat automatically dis-
play connecting lines between Note icons and
its pop-up window when you rollover the Note
icon by selecting the Show Lines Connecting
Markups to Their Pop-ups on Mouse Rollover
check box.

When you close the Note Properties dialog box, Acrobat changes the current
comment to suit the new icon and/or color settings. All notes that you subse-
quently create will use the new note settings. Be aware, however, that the icons
for notes previously added are unaffected by your changes to these settings
(you would have to delete and then re-create them to have all your notes
reflect the new color and icon settings). Also keep in mind that changes you
make in the Author or Subject text boxes of the Note Properties dialog box
affect only the particular note selected at that time.
Acrobat 6 uses your Windows Identity or Log-in name as the default entry in
the Author text box for Notes. If your Windows Log-in name differs from your
Acrobat Identity (entered in the Identity Preferences dialog box), you can
choose your Acrobat Identity for all subsequent notes you create with the
Note tool. To do so, open the Preferences dialog box (Ctrl+K on Windows,
Ô+K on the Mac), click Commenting in the list box, and then deselect the
Always Use Log-in Name for Author name check box in the Making Comments
Preferences area.
You can also change the font and font size for text used in the comments you
create with the Note tool, as well as the opacity of the comment box (by
decreasing it, you can see more of the text and graphics underneath) in the
Viewing Comments area of the Commenting Preferences dialog box. Note that
changes you make in the Font and Font Size drop-down lists affect only new
comments created with the Note tool. The same holds true for any new set-
ting you select with the Opacity text box or slider.
Using the Stamp tool
You can use the Stamp tool to imprint the document with a predefined graphic
mark that mimics real-world rubber ink stamps used to indicate the status of
the document, such as Draft, As Is, Confidential, or Final. When you use one of
these marks, you can also add a hidden comment to it, just like you do when
creating a comment with the Note tool. Acrobat comes with a wide variety of
ready-made stamps that you can use (which are organized into different cate-
gories). You can also add your own marks to these collections.
Don’t confuse adding a stamp to the PDF document you’re reviewing with digi-
tally signing a PDF document. When you stamp a document, you’re simply
adding another, more graphic form of notation to the document. When you
digitally sign a document, however, you’re actually using a secure method
for identifying yourself as the signatory (see Chapter 11 for details on the
process involved in digitally signing a document). Use stamps when you want
to call attention to the current state of the PDF document or add a very visible
review comment, such as red-flagging a change with, of all things, a red flag.
Digitally sign the PDF document when you’re ready to freeze it and prevent all
further changes to it.
180
Part III: Reviewing, Editing, and Securing PDFs
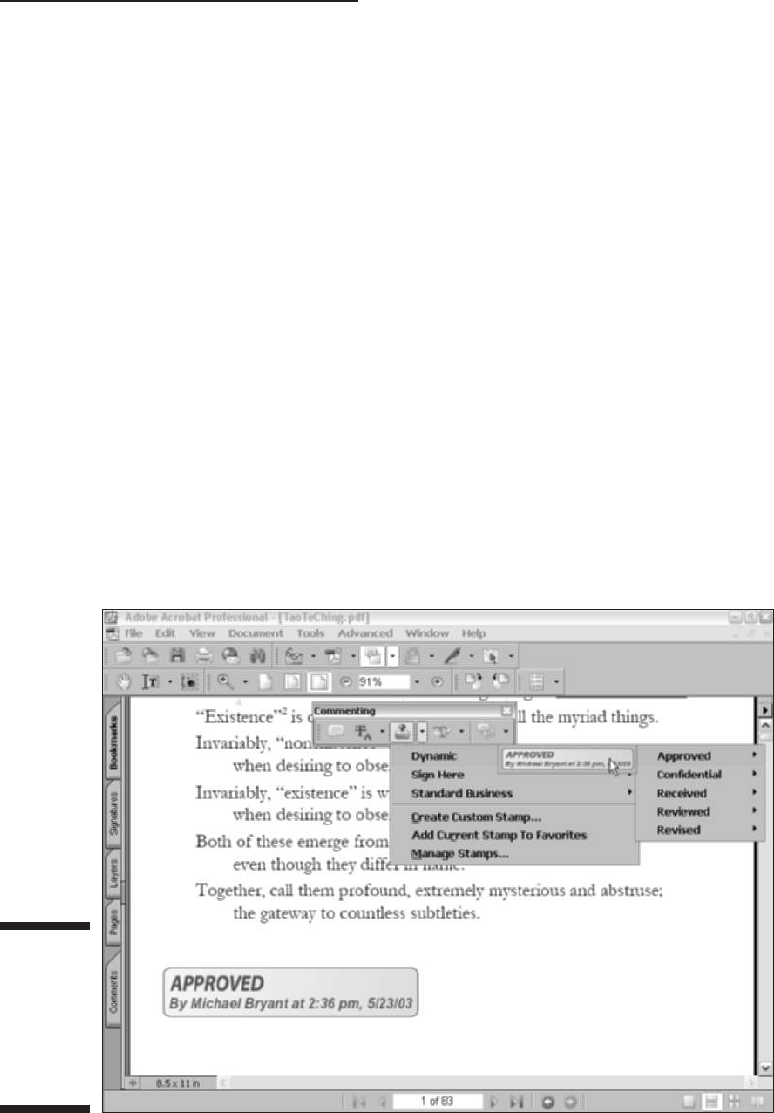
To add a stamp to a PDF document, take these steps:
1. Click the Stamp tool on the Commenting toolbar.
2. Click the Stamp tool mouse pointer at the place on the page in the PDF
document where you want the stamp’s imprint to appear.
When you click the Stamp tool mouse pointer, Acrobat inserts the last-
used stamp at the place you click (this is the Approved mark when you
first begin using this feature in Acrobat).
3. If you want to use a different stamp, click the mark that you just
added to the document to select it (you can tell it’s selected because a
bounding box with sizing handles at the corners appears), and then
click the Stamp tool pop-up menu to select another stamp.
The Stamp tool pop-up menu and submenus contain all the built-in stamps
available in Acrobat 6. These are divided into three categories: Dynamic, Sign
Here, and Standard Business. Dynamic stamps like the Approved stamp, shown
in Figure 9-11, automatically display author, time, and date information, as
opposed to Standard Business like the For Public Release stamp shown selected
on Stamp tool pop-up menu in the figure, which has no additional dynamic
information. The Sign Here category provides a number of stamps used to high-
light digital signature areas, much like the Sign Here Post-It notes you may have
seen attached to paper documents from your accountant or lawyer.
Figure 9-11:
Choosing a
new stamp
on the
Stamp tool
pop-up
menus.
181
Chapter 9: Annotating PDF Files for Review

As mentioned earlier, you can attach hidden comments to stamps (see the
following section to find out how) and also specify properties for those com-
ments. To change properties for comments made with the Stamp tool, right-
click a stamp imprint in the current document and choose Properties on the
context menu to open the Stamp Properties dialog box. The following is a
rundown of the options you find there:
Appearance tab: To change the color used in the title bar of any comment
box that you attach to a stamp, click the Pop-up Color button and then
click the new color in the palette. To decrease or increase the opacity of
the stamp imprint so that you can see more or less of the document back-
ground, enter a percentage number in the Opacity text box or move the
slider button to the left to decrease the opacity or to the right to increase
the opacity of the stamp imprint.
General tab: To change the author associated with the stamp, click the
Author text box and then edit the name. To change the subject of the
stamp, click the Subject text box and edit the default text. Note that
Acrobat 6 uses your Windows Identity or Log-in name as the default
entry in the Author text box for stamps. To use your Acrobat Identity
instead for all subsequent notes you create with the Stamp tool, see the
instructions at the end of the previous section, “Using the Note tool.”
Review History tab: Contains a list box that displays any changes in
status for the selected comment.
When you finish making changes to the settings in the Stamp Properties
dialog box, click the Close button to return to the current document. Note
that when you close the Stamp Properties dialog box, the imprint is still
selected in the current document so that you can resize it and move it to a
new place on the page if you need to.
To resize the imprint, position the mouse pointer on one of the sizing handles
and then drag diagonally with the double-headed pointer. To move the imprint
to a new place on the page (perhaps to the side or above related text or
graphic images), position the arrowhead pointer somewhere within its bound-
ing box and then drag its outline and drop it in place. To delete a stamp from
the PDF document, right-click (Control+click on the Mac) the Stamp’s imprint
and click Delete on its context menu.
Adding a hidden comment to a stamp imprint
If you want to add a hidden text comment to the imprint of a stamp, you can
do so by following these steps:
1. Double-click the imprint of the stamp to which you want to add the
comment.
Acrobat responds by opening a comment box, just like the ones used to
add comments with the Note tool.
182
Part III: Reviewing, Editing, and Securing PDFs
2. Type the text of your comment in the open comment box.
3. To resize the comment box so it better fits the text you entered, drag
the sizing box in the lower-right corner diagonally until it’s the right
shape and size.
4. To move the comment box so that its title bar doesn’t obscure the
stamp’s imprint, drag the comment box by its title bar.
5. When you finish making changes to the comment box, click its Close
button to make the box and its note disappear. You can also double-
click a stamp imprint to toggle between hiding and displaying its
attached comment.
Adding custom marks to your own stamp category
You can create your own marks in graphics programs, such as Adobe
Illustrator or Adobe Photoshop, and then use them as stamps in Acrobat 6.
To do this, convert the graphic image you want to use as a stamp to either a
JPEG, GIF, or bitmap file. You can also convert Illustrator and Photoshop files
saved in their native format (AI or PSD).
After you have the mark saved, follow these steps to make it available as a
stamp in Acrobat 6:
1. Choose Tools➪Commenting➪Stamp Tool➪Create Custom Stamp or
simply click Create Custom Stamp on the Stamp tool pop-up menu.
The Create Stamp dialog box opens.
183
Chapter 9: Annotating PDF Files for Review
Getting your hidden comments added and seen
When using stamps to annotate a PDF docu-
ment, you may want to make a couple of
changes to the Comments Preferences — one
that will help you remember to add hidden com-
ments and the other to let you and your review-
ers know that hidden comments are attached to
particular stamp imprints. To have Acrobat auto-
matically open a blank comment box whenever
you add a new stamp imprint, open the
Commenting section of the Preferences dialog
box (by pressing Ctrl+K on Windows or Ô+K on
the Mac, and then clicking Commenting in the list
box on the left), and then select the Automatically
Open Comment Pop-ups for Comments Other
Than Notes check box in the Pop-up Open
Behavior section. To have the program automat-
ically display the comment boxes you add to
stamp imprints whenever you position the mouse
over them, select the Automatically Open Pop-
Ups on Mouse Over check box in the Viewing
Comments section (note that selecting this check
box option affects hidden comments added with
the Notes tool, as well as those added with the
Stamps tool).

2. Click the Select button to open the Select dialog box.
3. Click the Browse button, and in the Open dialog box that appears,
locate the desired graphic and click the Select button to return to the
Select dialog box.
4. Click OK to close the Select dialog box and return to the Create Stamp
dialog box.
5. Enter the name you want to give the stamp (something with the com-
pany name or a description of the mark) in the Name text box, enter a
name in the Category drop-down list box or select a previously created
custom category, and then click the OK button.
After you add a custom graphic as a new stamp, its category, name, and
thumbnail appear on the Stamp tool pop-up menu as well as the Acrobat
menu bar, and you can start using it in the PDF documents you’re reviewing
as you would any of the other built-in stamps. After clicking the Stamp tool,
select your new custom imprint on the Stamp tool submenus and then click
the Stamp tool mouse pointer at the location in the current PDF document
where you want the stamp to appear. If you want to delete a custom stamp
you’ve created, choose Manage Stamps on the Stamp tool pop-up menu, and
in the Manage Stamps dialog box that appears, select the custom stamp for
deletion by choosing its category and name in the drop-down lists before
clicking the Delete button. When you’re finished deleting custom stamps,
click the OK button to close the Manage Stamps dialog box. Note that you
can also invoke the Create Stamps dialog box by clicking the Create button in
the Manage Stamps dialog box.
Hitting the highlights
Acrobat includes three text-only markup tools: Highlighter tool, Cross-Out
Text tool, and Underline Text tool:
Highlighter tool: Highlights text in a color (yellow by default) just like
the highlighting pens you used to mark key words and phrases to
remember in your text books.
Cross-Out Text tool: Indicates words and phrases that should be deleted
from the text. (Acrobat puts a line through the text just like they do in
voter pamphlets to show what provisions of a referendum will be
removed from a statute.)
Underline Text tool: Underscores the importance of text.
Figure 9-12 shows you examples of three types of text markup: highlighting in
the title, underlining in the first-paragraph text at the top of the first column,
and crossing-out in the title at the top of the second column.
184
Part III: Reviewing, Editing, and Securing PDFs
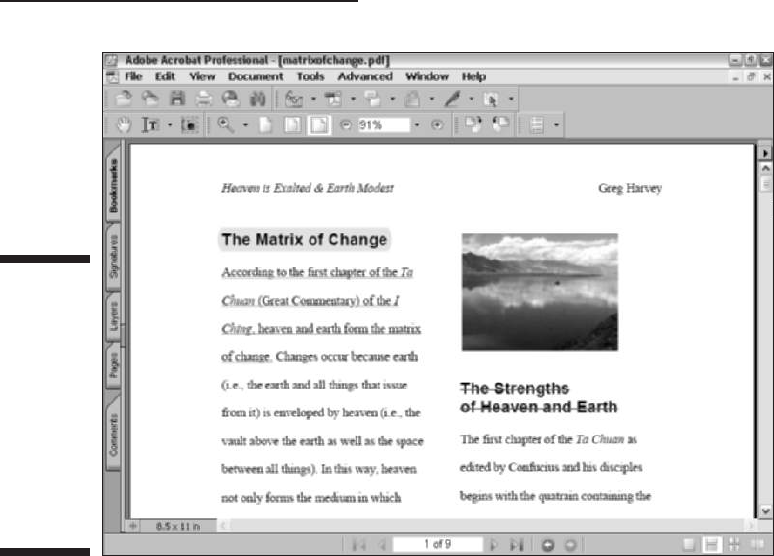
As with the graphics markup tools, when you mark up text with the text-only
tools, Acrobat automatically adds hidden comment boxes to the markups. To
have the comment boxes contain a copy of all the text that you’ve marked with
the text-only markup tool, open the Acrobat Preferences dialog box by choos-
ing Edit➪Preferences or pressing Ctrl+K (Ô+K on Mac), click Commenting in
the list box, and then select the Copy Selected Text into Highlight, Cross-Out,
and Underline Comment Pop-Ups check box in the Making Comment section
before clicking OK to close the Preferences dialog box. You can then annotate
this comment text or replace it with the corrections you’d like to see made.
The text-only tools all work the same way: After you click the desired text-
only markup tool, you drag the I-beam mouse pointer through all the text you
want to highlight, cross-out, or underscore. Each text-only markup tool has
the same Properties dialog box as the graphics markup tools (Note and
Stamp) where you can edit the Color, Opacity, Author, Subject, and Review
History of created markups. To access these options, right-click the marked-
up text and choose Properties on the context menu to open the associated
Properties dialog box.
To delete the highlighting, strikeout, or underlining made to words or
phrases in the PDF document, right-click (Control+click on the Mac) the
marked-up text and then click Delete on its context menu.
Figure 9-12:
A PDF
document
with
highlighted
text, cross-
out text, and
underlined
text, thanks
to the text-
only markup
tools.
185
Chapter 9: Annotating PDF Files for Review

To open the comments box attached to the words or phrases you’ve marked
up with one of the text-only markup tools, double-click the marked-up text to
open its comment box. You can also hide an open comment box in this
manner rather than clicking its Close button.
Remember that you can have Acrobat automatically open a comment box
each time you mark up text with one of the text-only markup tools by select-
ing the Automatically Open Comment Pop-Ups for Comments Other Than
Notes check box in the Commenting Preferences dialog box. You can also
have Acrobat automatically display a hidden comment when you position the
mouse on the marked-up text by selecting the Automatically Open Pop-Ups
on Mouse Rollover check box as well. For details, see the sidebar, “Getting
your hidden comments added and seen,” earlier in this chapter.
Inserting Document Comments with the
Advanced Commenting Toolbar
Options that appear on the Advanced Commenting toolbar give you a lot of
flexibility when annotating a PDF document by providing markup tools that
go way beyond the standard note, text edit, stamps, and highlighting features
found on the Commenting toolbar. You can use the Rectangle tool and its
many built-in variations to create drawn shapes used to highlight text or
graphics that you want to call attention to with an attached comment. The
Text Box tool creates static annotations that always appear in a document
rather than hidden comments made with the Note tool. The Pencil tool draws
free-hand shapes around document elements you want to call attention to
with an attached comment. You can even attach sound files or other docu-
ment files using the Attach Sound tool and Attach File tool. The following sec-
tions give the particulars on these useful markup tools. To get an overview of
the Advanced Commenting toolbar, see Chapter 3.
Using the Text Box tool
You use the Text Box tool to create comments in the PDF document that are
always visible. Because free-text comments are always displayed, you need to
position them in margin areas or places where they won’t obscure document
text or graphics text underneath.
To create a comment with the Text Box tool, follow these steps:
1. Click the Text Box tool on the Advanced Commenting toolbar or press
X if the single-key accelerator feature is turned on.
(See Chapter 3 to find out how to enable single-key accelerators.)
186
Part III: Reviewing, Editing, and Securing PDFs

2. Click the I-beam mouse pointer or draw a marquee at the place on the
page in the PDF document where you want the text of the comment to
appear.
When you click or draw a marquee with this pointer, Acrobat opens a
yellow bounding box (which appears dotted on some monitors) in
which you type the note.
3. Type the text of the free-text note in the note’s bounding box.
As you type a note in a bounding box you created by drawing a marquee
with the I-beam pointer, Acrobat automatically breaks the lines of text to
fit within the width of the bounding box and expands its height.
4. When you finish typing the text of the free-text note, click the Hand
tool and then click outside of the note’s bounding box.
Acrobat displays your free-text note in a box.
If you create a bounding box by simply clicking an area in your document
with the I-beam pointer, you must make the first line break in your text note
by pressing Enter (Return on the Mac) in order for Acrobat to make subse-
quent automatic line breaks. Otherwise, you end up typing a never-ending
line of text that expands the width of the bounding box right off the page!
To resize the Text Box note to make all of its text visible or to eliminate
excess white space around the note text, position the Hand tool somewhere
on the note and then click the arrowhead pointer to display the sizing han-
dles at the four corners of the free-text note box. Next, position the pointer
on one of the sizing handles and drag the double-headed pointer diagonally
until the outline of the note box is the shape and size you need. Click outside
the note box to deselect the sizing handles.
To move a free-text note, click within its note box to display the sizing handles
and then, with the arrowhead mouse pointer inside the box, drag the outline
to a new position on the page before releasing the mouse button. To delete a
free-text note from the PDF document, right-click (Control+click on the Mac)
the note text or its bounding box, and then click Delete on its context menu.
As with comments added with the Note tool, you can change the default set-
tings for the free-text notes you create with the Text Box tool. Right-click the
text box and select Properties on its context menu to open the Text Box
Properties dialog box, as shown in Figure 9-13. As you can see, the setting
options in this dialog box enable you to change the Appearance, General set-
tings, and display Review History by clicking the appropriate tab.
On the Appearance tab, select a border style in the Style drop-down list. Your
choices are Solid or six different dashed-line styles. To make the border of the
text box thicker, increase the value in the Thickness text box. To remove the
border entirely from text box, set this value down to 0. To change the color of
the box border, click the Border Color button and then click a new color on the
187
Chapter 9: Annotating PDF Files for Review
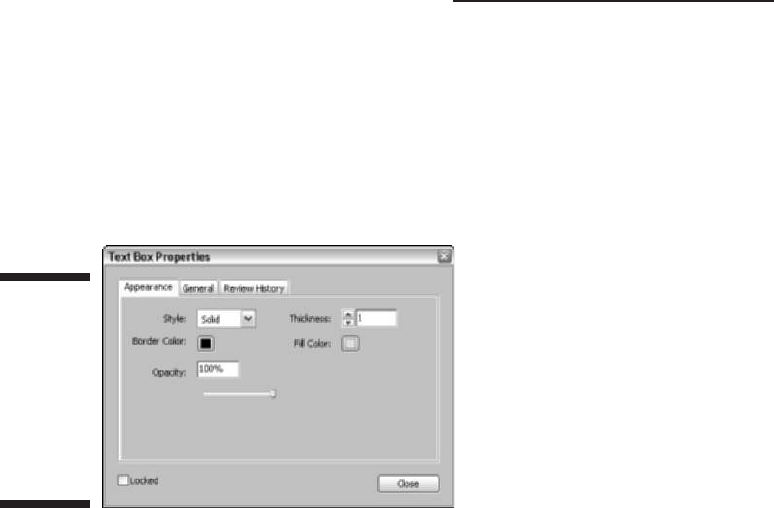
palette. To decrease or increase the opacity of the text box so that you can see
more or less of the document background, enter a percentage number in the
Opacity text box or move the slider button to the left to decrease the opacity
or to the right to increase the opacity of the text box. To add a background
color to the text box, click the Fill Color button and click the background color
from its color palette (but for heaven’s sake, don’t select a background color
on this palette that’s so dark that you can’t read the note text).
The options on the General and Review History tabs are exactly the same as
those for the other markup tools (Note, Stamp, and Indicate Text). Change the
author or subject of a comment attached to a Text Box on the General tab or
display changes of status to the Text Box comment on the Review History tab.
When you finish making changes in the Text Box Properties dialog box, click
Close to see the effects of your changes on the currently selected text box.
Using the Attach Sound tool
You use the Attach Sound tool to record a sound note or select an audio file
that is played back when the user double-clicks the Sound Note icon. Note
that your computer must have a microphone in order to record your own
sound notes and add them to your PDF document.
To record a sound note for playback in your PDF document, follow these steps:
1. Click the Attach Sound tool on the Advanced Commenting toolbar
pop-up menu.
2. Click the Speaker mouse pointer at the place on the page in the PDF
document where you want the Sound Note icon to appear.
When you click this pointer, Acrobat opens a Sound Recorder dialog box.
Figure 9-13:
Changing
the
appearance
of a text
box in the
Text Box
Properties
dialog box.
188
Part III: Reviewing, Editing, and Securing PDFs
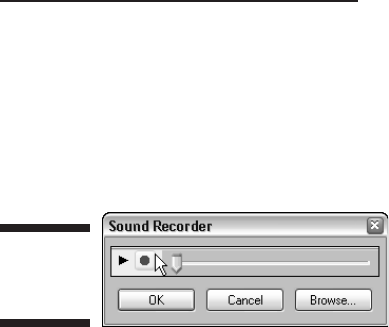
3. To record the sound note, click the Record button and speak into your
computer’s microphone.
When you finish recording, click the Stop button (see Figure 9-14). To
play the note before adding it to your document, click the Play button
(which replaces the Stop button).
4. Click OK in the Sound Recorder dialog box.
The Sound Recorder dialog box closes, and the Sound Attachment
Properties dialog box opens.
5. Click the Appearance tab and select an icon for the sound attachment —
either Ear, Microphone, or Sound (speaker) in the Icon list box.
Click the Color button and select a new color for the sound attachment
icon on the color palette that appears. Increase or decrease the opacity
of the sound attachment icon by typing in a new percentage number in
the Opacity text box or using the slider button.
6. Click the General tab and edit the default text in the Author, Subject,
and Description text boxes.
Text entered in the Description text box identifies the sound file when
you position the mouse pointer over its attached sound icon.
7. Click the Review History tab to view any recent changes to the
status of the attached sound during a review cycle. When you’re
finished changing Sound Attachment properties, click Close to exit
the dialog box.
You can also select a prerecorded sound file to play back when the Sound
Attachment is played. To select a prerecorded sound file, click the Browse
button in the Sound Recorder dialog box to open the Select Sound File dialog
box. Click the folder that contains the desired sound file, click the sound file
icon, and then click the Select button.
To play a sound note that you’ve added to a PDF document, double-click its
Sound Note icon with the Hand tool or right-click (Control+click on Mac) its
icon and then click Play File on the context menu.
Figure 9-14:
Recording a
sound note.
189
Chapter 9: Annotating PDF Files for Review

Using the File Attachment tool
You can use the File Attachment tool to attach or append another file (not
necessarily saved as a PDF) to the PDF document you’re reviewing. You can
use this feature to attach new copy and graphics that you’d like to see
replace particular text passages and images in the PDF file. You can also use
this tool to attach a memo or some other text document that outlines the
review steps or special instructions to the design or review team.
Don’t use this feature to attach files saved in other file formats besides PDF
unless you’re sure that each reviewer has the software necessary to open it
installed on his or her computer. Of course, the way to be sure that each and
everyone concerned will be able to open and evaluate all the files you attach
to a PDF document under review is to save them as PDF files before you
attach them.
To attach a file to the PDF file you’re reviewing, follow these steps:
1. Click the Attach File tool on the Advanced Commenting toolbar or
press Shift+J until its icon (the one with the pushpin) is selected.
2. Click the Pushpin pointer at the place in the PDF document’s text or
graphics where you want the File Attachment icon (a paper clip by
default) to appear, indicating to other reviewers that a file has been
attached.
Acrobat responds by opening the Select File to Attach dialog box.
3. Open the folder and select the icon for the file that you want to attach
to the current PDF document, and then click the Select button.
The File Attachment Properties dialog box opens.
4. Change the properties of the file attachment as follows:
• To select a new icon besides the default paper clip, click the
Appearance tab and choose an item in the Icon list box.
• To change the color of the File Attachment icon, click the Color
button and then click the new color in the palette.
• To increase or decrease the opacity of the file attachment icon,
type in a new percentage number in the Opacity text box or use
the slider button.
• To modify the ToolTip description that appears when the user
positions the mouse over the File Attachment icon, click the
General tab and replace the filename in the Description text box.
Acrobat automatically displays the filename as the ToolTip if you
don’t modify this text box.
190
Part III: Reviewing, Editing, and Securing PDFs

• To change the author or subject associated with this file attach-
ment, click the Author or Subject text box and edit the default text
that appears there.
5. Click the Close button to close the File Attachment Properties
dialog box.
As soon as you close the File Attachment Properties dialog box, you see the
File Attachment icon (a paper clip unless you changed it) at the place you
clicked in the document. To move this icon, drag it with the arrowhead
pointer. To display the ToolTip with the name of the attached file (or some
other description if you modified the Description text box), position the
arrowhead mouse pointer over the File Attachment icon.
To open the attached file, double-click its File Attachment icon, or right-click
(Control+click on the Mac) the icon and then click Open File on the context
menu. Acrobat responds by displaying an Open Attachment alert dialog box,
warning you about possible dangers in opening the file. When you click the
Open button in the alert dialog box, Acrobat then goes ahead and opens
the file.
If the attached file is a PDF document, Acrobat opens it and makes it the
current document (you can then return to the original PDF document by
selecting its name at the bottom of the Windows menu). If the attached file is
saved in some other file format, your computer’s operating system launches
the program that created the file (provided that it can be identified and that
the program is installed on the computer), opening it in a new window. You
can then return to the original PDF document by clicking its program icon
on the Windows taskbar or clicking the Application icon on the OS X Dock.
To remove an attached file from the PDF document, right-click the File
Attachment icon (Control+click on the Mac) and then click Delete on its
context menu. To save the attached file on your hard drive before you
delete it, click Save Embedded File to Disk on its context menu, select the
folder in which you want it saved, and click the Save button.
Mark it well
The graphic markup tools (Pencil and Rectangle) found on the Advanced
Commenting toolbar enable you to mark up elements that need changing in the
PDF document you’re reviewing. When you use these graphic markup tools to
call attention to particular passages of text and graphics, you can add hidden
notes (like you can do when using the Stamp and Note tools) that explain the
type of changes you’d like to see made to the elements you’ve marked.
191
Chapter 9: Annotating PDF Files for Review

* * * Free Preview End * * *
Purchase Required To Gain Total Access
Visit www.landlordleaseforms.com To Purchase Landlord Lease Forms Package