Microsoft Word 2007 For Dummies

Word 2007
FOR
DUMmIES
‰
01_036583 ffirs_2.qxp 12/15/06 10:14 AM Page i
01_036583 ffirs_2.qxp 12/15/06 10:14 AM Page ii
01_036583 ffirs_2.qxp 12/15/06 10:14 AM Page ii
Word 2007 For Dummies
®
Published by
Wiley Publishing, Inc.
111 River Street
Hoboken, NJ 07030-5774
www.wiley.com
Copyright © 2007 by Wiley Publishing, Inc., Indianapolis, Indiana
Published by Wiley Publishing, Inc., Indianapolis, Indiana
Published simultaneously in Canada
No part of this publication may be reproduced, stored in a retrieval system or transmitted in any form or by
any means, electronic, mechanical, photocopying, recording, scanning or otherwise, except as permitted
under Sections 107 or 108 of the 1976 United States Copyright Act, without either the prior written permis-
sion of the Publisher, or authorization through payment of the appropriate per-copy fee to the Copyright
Clearance Center, 222 Rosewood Drive, Danvers, MA 01923, (978) 750-8400, fax (978) 646-8600. Requests to
the Publisher for permission should be addressed to the Legal Department, Wiley Publishing, Inc., 10475
Crosspoint Blvd., Indianapolis, IN 46256, (317) 572-3447, fax (317) 572-4355, or online at http://www.
wiley.com/go/permissions.
Trademarks: Wiley, the Wiley Publishing logo, For Dummies, the Dummies Man logo, A Reference for the
Rest of Us!, The Dummies Way, Dummies Daily, The Fun and Easy Way, Dummies.com, and related trade
dress are trademarks or registered trademarks of John Wiley & Sons, Inc. and/or its affiliates in the United
States and other countries, and may not be used without written permission. All other trademarks are the
property of their respective owners. Wiley Publishing, Inc., is not associated with any product or vendor
mentioned in this book.
LIMIT OF LIABILITY/DISCLAIMER OF W
ARRANTY: THE PUBLISHER AND THE AUTHOR MAKE NO REP-
RESENTATIONS OR WARRANTIES WITH RESPECT TO THE ACCURACY OR COMPLETENESS OF THE CON-
TENTS OF THIS WORK AND SPECIFICALLY DISCLAIM ALL WARRANTIES, INCLUDING WITHOUT
LIMITATION WARRANTIES OF FITNESS FOR A PARTICULAR PURPOSE. NO WARRANTY MAY BE CRE-
ATED OR EXTENDED BY SALES OR PROMOTIONAL MATERIALS. THE ADVICE AND STRATEGIES CON-
TAINED HEREIN MAY NOT BE SUITABLE FOR EVERY SITUATION. THIS WORK IS SOLD WITH THE
UNDERSTANDING THAT THE PUBLISHER IS NOT ENGAGED IN RENDERING LEGAL, ACCOUNTING, OR
OTHER PROFESSIONAL SERVICES. IF PROFESSIONAL ASSISTANCE IS REQUIRED, THE SERVICES OF A
COMPETENT PROFESSIONAL PERSON SHOULD BE SOUGHT. NEITHER THE PUBLISHER NOR THE
AUTHOR SHALL BE LIABLE FOR DAMAGES ARISING HEREFROM. THE FACT THAT AN ORGANIZATION
OR WEBSITE IS REFERRED TO IN THIS WORK AS A CITATION AND/OR A POTENTIAL SOURCE OF FUR-
THER INFORMATION DOES NOT MEAN THAT THE AUTHOR OR THE PUBLISHER ENDORSES THE INFOR-
MATION THE ORGANIZATION OR WEBSITE MAY PROVIDE OR RECOMMENDATIONS IT MAY MAKE.
FURTHER, READERS SHOULD BE AWARE THAT INTERNET WEBSITES LISTED IN THIS WORK MAY HAVE
CHANGED OR DISAPPEARED BETWEEN WHEN THIS WORK WAS WRITTEN AND WHEN IT IS READ.
For general information on our other products and services, please contact our Customer Care
Department within the U.S. at 800-762-2974, outside the U.S. at 317-572-3993, or fax 317-572-4002.
For technical support, please visit www.wiley.com/techsupport.
Wiley also publishes its books in a variety of electronic formats. Some content that appears in print may
not be available in electronic books.
Library of Congress Control Number: 2006934826
ISBN-13: 978-0-470-03658-7
ISBN-10: 0-470-03658-3
Manufactured in the United States of America
10 9 8 7 6 5 4 3 2
1B/QV/RS/QW/IN
01_036583 ffirs_2.qxp 12/15/06 10:14 AM Page iv
About the Author
After physically destroying three typewriters, Dan Gookin bought his first
computer in 1982 at the urging of the guy in the typewriter repair shop.
Contrary to his prejudices, Dan quickly discovered that computers were
about more than math, and he quickly took to the quirky little devices.
Twenty-five years later, Mr. Gookin has written over 100 books about comput-
ers and high tech and gone through more than 50 computers, including a
dozen or so laptops and portables. He has achieved fame as one of the first
computer radio talk show hosts, the editor of a magazine, a national technol-
ogy spokesman, and an occasional actor on the community theater stage.
Dan still considers himself a writer and computer “guru” whose job it is to
remind everyone that computers are not to be taken too seriously. His
approach to computers is light and humorous, yet very informative. He
knows that the complex beasts are important and can do a great deal to help
people become productive and successful. Dan mixes his vast knowledge of
computers with a unique, dry sense of humor that keeps everyone informed —
and awake. His favorite quote is “Computers are a notoriously dull subject,
but that doesn’t mean I have to write about them that way.”
Dan Gookin’s most recent books are PCs For Dummies, 10th Edition, Laptops
For Dummies, 2nd Edition, and some new titles he can’t yet discuss under
threat of death. He holds a degree in communications/visual arts from UCSD.
Dan dwells in North Idaho, where he enjoys woodworking, music, theater,
riding his bicycle, and spending time with the lads.
01_036583 ffirs_2.qxp 12/15/06 10:14 AM Page v

Publisher’s Acknowledgments
We’re proud of this book; please send us your comments through our online registration form
located at www.dummies.com/register/.
Some of the people who helped bring this book to market include the following:
Acquisitions, Editorial, and
Media Development
Project Editor: Paul Levesque
Acquisitions Editor: Greg Croy
Copy Editor: Rebecca Whitney
Technical Editor: Lee Musick
Editorial Manager: Leah Cameron
Media Development Specialists: Angela Denny,
Kate Jenkins, Steven Kudirka, Kit Malone
Media Development Coordinator:
Laura Atkinson
Media Project Supervisor: Laura Moss
Media Development Manager:
Laura VanWinkle
Editorial Assistant: Amanda Foxworth
Sr. Editorial Assistant: Cherie Case
Cartoons: Rich Tennant (
www.the5thwave.com)
Composition Services
Project Coordinator: Adrienne Martinez
Layout and Graphics: Lavonne Cook,
Denny Hager, Stephanie D. Jumper,
Clint Lahnen, Barbara Moore,
Barry Offringa, Lynsey Osborn,
Erin Zeltner
Proofreaders: Laura Albert,
Christine Pingleton, Techbooks
Indexer: Techbooks
Anniversary Logo Design: Richard Pacifico
Special Help: Mary Lagu
Publishing and Editorial for Technology Dummies
Richard Swadley, Vice President and Executive Group Publisher
Andy Cummings, Vice President and Publisher
Mary Bednarek, Executive Acquisitions Director
Mary C. Corder, Editorial Director
Publishing for Consumer Dummies
Diane Graves Steele, Vice President and Publisher
Joyce Pepple, Acquisitions Director
Composition Services
Gerry Fahey, Vice President of Production Services
Debbie Stailey, Director of Composition Services
01_036583 ffirs_2.qxp 12/15/06 10:14 AM Page vi

Contents at a Glance
Introduction .................................................................1
Part I: Hello, Word!......................................................9
Chapter 1: Word Hokey-Pokey ........................................................................................11
Chapter 2: Making Friends with the Keyboard.............................................................25
Chapter 3: A Quick Guide to Word (For the Impatient)...............................................35
Part II: Word Processing Basics...................................45
Chapter 4: Moving Around a Document Hither, Thither, and Yon .............................47
Chapter 5: Editing Text ....................................................................................................55
Chapter 6: Find and Replace ...........................................................................................65
Chapter 7: Text Blocks, Stumbling Blocks, Writer’s Blocks ........................................79
Chapter 8: Proofing Your Document (Spelling and Grammar) ...................................95
Chapter 9: Documents and Files...................................................................................111
Chapter 10: The Printer, the Paper, the Document Maker ........................................125
Part III: Formatting ..................................................137
Chapter 11: Formatting Text .........................................................................................139
Chapter 12: Formatting Paragraphs.............................................................................153
Chapter 13: Setting Tabs................................................................................................167
Chapter 14: Formatting Pages.......................................................................................183
Chapter 15: Formatting Documents.............................................................................197
Chapter 16: The Styles of Word ....................................................................................211
Chapter 17: Themes and Templates ............................................................................227
Chapter 18: Misc. Formatting Stuff...............................................................................239
Part IV: Making Your Document
All Fancy-Schmancy.................................................251
Chapter 19: Borders, Boxes, and Background Color .................................................253
Chapter 20: Turning the Tables ....................................................................................261
Chapter 21: Carousing with Columns ..........................................................................273
Chapter 22: I Love Lists .................................................................................................279
Chapter 23: Going Graphical.........................................................................................289
Chapter 24: Stick
This in Your Document....................................................................301
02_036583 ftoc.qxp 11/16/06 12:43 PM Page vii
Part V: What Else Is Left? .........................................309
Chapter 25: Multiple Documents, Multiple Windows,
Multiple Formats, Multiple Madness.........................................................................311
Chapter 26: Other Ways of Viewing a Document........................................................321
Chapter 27: Working This Out Together......................................................................331
Chapter 28: Merrily We Mail Merge..............................................................................339
Chapter 29: Labels of Love............................................................................................351
Chapter 30: Customizing Word .....................................................................................357
Part VI: The Part of Tens ...........................................365
Chapter 31: The Ten Commandments of Word...........................................................367
Chapter 32: Ten Cool Tricks..........................................................................................371
Chapter 33: Ten Odd Things .........................................................................................379
Chapter 34: Ten Avuncular Suggestions......................................................................385
Index .......................................................................389
02_036583 ftoc.qxp 11/16/06 12:43 PM Page viii

Table of Contents
Introduction..................................................................1
What’s New in Word 2007?..............................................................................1
About This Book...............................................................................................2
How to Use This Book .....................................................................................3
Foolish Assumptions .......................................................................................4
How This Book Is Organized...........................................................................4
Part I: Hello, Word!..................................................................................5
Part II: Word Processing Basics............................................................5
Part III: Formatting .................................................................................5
Part IV: Making Your Document All Fancy-Schmancy........................5
Part V: What Else Is Left?.......................................................................5
Part VI: The Part of Tens .......................................................................5
What’s Not Here ...............................................................................................6
Icons Used in This Book..................................................................................6
Where to Go from Here....................................................................................7
Part I: Hello, Word!.......................................................9
Chapter 1: Word Hokey-Pokey . . . . . . . . . . . . . . . . . . . . . . . . . . . . . . . . .11
How Do I Start Word? Let Me Count the Ways. . . . ....................................11
The good, yet unimaginative, way to start Word .............................12
The better and best ways to start Word............................................13
Starting Word by opening a document..............................................15
Behold Word! ..................................................................................................16
Maximize Word’s window size ............................................................16
Look! Up on the screen! .......................................................................18
The blank place where you write.......................................................19
The mouse pointer in Word ................................................................20
Cajoling Word to Help You ............................................................................21
When You’re All Done....................................................................................22
Quitting Word........................................................................................22
How to quit what you’re doing without quitting Word....................23
Putting Word away for a spell.............................................................24
02_036583 ftoc.qxp 11/16/06 12:43 PM Page ix

Chapter 2: Making Friends with the Keyboard . . . . . . . . . . . . . . . . . . . .25
Behold the PC Keyboard! ..............................................................................25
Typing (Or, the Old Hunt-and-Peck) ............................................................27
Follow the blinking cursor ..................................................................28
When to press that Enter key .............................................................28
When to whack the spacebar .............................................................29
Backing-up and erasing keys...............................................................30
Mind your 1’s and 0’s and L’s and O’s ................................................30
Things to Notice Whilst You Type ...............................................................31
The left end of the status bar..............................................................31
Life between pages...............................................................................32
Spots and clutter in your text.............................................................33
Strange underlines and colored text..................................................33
Word can type that for you .................................................................34
Chapter 3: A Quick Guide to Word (For the Impatient) . . . . . . . . . . . . .35
The Overview .................................................................................................36
Starting Out with a New Document .............................................................37
Typing the Text...............................................................................................38
Formatting a Document.................................................................................38
Save Your Stuff!...............................................................................................39
Finishing a Document ....................................................................................41
Proofing your work...............................................................................42
Previewing a document .......................................................................42
Printing a document.............................................................................42
Wrapping Things Up ......................................................................................44
Part II: Word Processing Basics....................................45
Chapter 4: Moving Around a Document Hither, Thither, and Yon . . . .47
Scrolling a Document.....................................................................................47
The vertical scroll bar .........................................................................47
One paragraph on the horizontal scroll bar.....................................49
Mouse scrolling tricks..........................................................................49
Moving the Insertion Pointer........................................................................50
Commanding the insertion pointer with the mouse........................50
Moving in small increments (basic arrow keys)...............................50
Moving from beginning to end............................................................51
The peculiar cases of PgUp and PgDn ...............................................51
Using Browse Buttons to Navigate...............................................................52
Getting Lost and Going Back ........................................................................53
Go to Wherever with the Go To Command.................................................53
Word 2007 For Dummies
x
02_036583 ftoc.qxp 11/16/06 12:43 PM Page x

Chapter 5: Editing Text . . . . . . . . . . . . . . . . . . . . . . . . . . . . . . . . . . . . . . . .55
Deleting Stuff...................................................................................................55
The delete keys: Backspace and Delete ............................................56
Deleting single characters...................................................................56
Deleting a word.....................................................................................57
Deleting more than a word..................................................................57
Splitting and Joining ......................................................................................59
Making two paragraphs from one ......................................................59
Making one paragraph from two ........................................................60
Splitting lines with a soft return.........................................................60
Mistakes? Mistakes? Undo Them with Haste .............................................60
Now mark me, how I will undo myself...............................................61
Redo, the Undo-Undo command ........................................................61
Redo, the Repeat Typing command...................................................62
Chapter 6: Find and Replace . . . . . . . . . . . . . . . . . . . . . . . . . . . . . . . . . . .65
Text Happily Found........................................................................................65
O villainous text tidbit! Seek it out! ....................................................66
The Super Find command ...................................................................67
Finding stuff you can’t type in ............................................................70
Finding formatting................................................................................72
Replacing What’s Been Found ......................................................................74
The miracle of the Replace All button...............................................76
Finding and replacing formatting.......................................................76
Chapter 7: Text Blocks, Stumbling Blocks, Writer’s Blocks . . . . . . . .79
What Is a Block of Text? ................................................................................80
Marking a Chunk of Text As a Block ............................................................81
Using the keyboard to select text.......................................................81
Marking a block with the mouse ........................................................82
Using the F8 key to mark a block .......................................................84
Blocking the whole dang-doodle document .....................................85
Deselecting a Block........................................................................................86
You’ve Marked the Block — Now What?.....................................................86
Copying a block ....................................................................................87
Moving a block......................................................................................88
Options for pasting text.......................................................................88
Special pasting......................................................................................89
Copying or moving a block with the mouse .....................................90
Copying and moving with the F2 key.................................................91
The Miracle of Collect-and-Paste .................................................................91
Looking at the Clipboard.....................................................................91
Pasting from the Clipboard task pane ...............................................92
Cleansing the Clipboard task pane.....................................................93
xi
Table of Contents
02_036583 ftoc.qxp 11/16/06 12:43 PM Page xi

Chapter 8: Proofing Your Document (Spelling and Grammar) . . . . . . .95
Hun Dewing Yore Mist Aches........................................................................96
Check Your Spelling .......................................................................................96
The red zigzag of shame......................................................................96
What to do when the spell checker stupidly assumes
that a word is misspelled but in fact it isn’t..................................98
Undoing an Ignore All command........................................................99
Un-adding words to the dictionary ..................................................100
Instant Text-Fixin’ with AutoCorrect .........................................................101
AutoCorrect in action ........................................................................101
Do your own AutoCorrect entries....................................................102
Undoing an AutoCorrect correction ................................................103
Grammar Be Good........................................................................................104
Proofing Your Entire Document at Once...................................................104
Customizing Proofing Options....................................................................106
Improving Your Word Power.......................................................................106
A thesaurus is not a colossal prehistoric beast .............................107
The Research task pane.....................................................................108
Making Every Word Count ..........................................................................109
Chapter 9: Documents and Files . . . . . . . . . . . . . . . . . . . . . . . . . . . . . . .111
All About Files...............................................................................................111
Making a New Document.............................................................................112
Quick! A blank sheet of paper!..........................................................113
Using a template.................................................................................114
Saving a Document.......................................................................................115
Saving a new document to disk the first time.................................115
Problems with saving a document to disk......................................117
Saving or updating a document........................................................118
Saving when you’re done...................................................................119
Not saving a document......................................................................120
Opening a Document ...................................................................................120
Using the traditional Open command..............................................120
A handy way to open a recent file....................................................122
Opening one document inside another...........................................122
Chapter 10: The Printer, the Paper, the Document Maker . . . . . . . . .125
Preparing the Printer...................................................................................125
Preview Before You Print ............................................................................126
Printing a Whole Document........................................................................128
Printing backward ..............................................................................130
Printing a document quickly.............................................................131
Choosing another printer..................................................................131
Word 2007 For Dummies
xii
02_036583 ftoc.qxp 11/16/06 12:43 PM Page xii

Printing Part of a Document .......................................................................132
Printing a specific page .....................................................................132
Printing a range of pages...................................................................133
Printing a block...................................................................................134
Printing More than One Copy of Something.............................................134
Canceling a Print Job (Omigosh!)...............................................................135
Part III: Formatting...................................................137
Chapter 11: Formatting Text . . . . . . . . . . . . . . . . . . . . . . . . . . . . . . . . . . .139
How to Format Text .....................................................................................139
Basic Text Formatting..................................................................................140
Changing the font ...............................................................................141
Character formats (bold, italic, and so on).....................................142
Text Transcending Teeny to Titanic ..........................................................144
Setting the text size............................................................................145
Nudging text size ................................................................................145
More Colorful Text Makes Not for More Colorful Writing.......................146
Undoing All This Text-Formatting Nonsense............................................147
Fun and Formatting in the Font Dialog Box ..............................................148
Changing the CASE of Text..........................................................................151
Chapter 12: Formatting Paragraphs . . . . . . . . . . . . . . . . . . . . . . . . . . . .153
How to Format a Paragraph........................................................................153
Where the Paragraph Formatting Commands Lurk.................................155
Paragraph Justification and Alignment .....................................................156
Line up on the left!..............................................................................157
Everyone center!.................................................................................157
Line up on the right!...........................................................................157
Full justification! (Full justification — aye, sir!)..............................158
Making Room Before, After, or Inside Your Paragraphs..........................158
Traditional line spacing.....................................................................158
More line spacing options.................................................................159
That space between paragraphs......................................................160
Paragraph Indentation.................................................................................161
Indenting the first line of a paragraph.............................................161
Making a hanging indent ...................................................................162
Indenting a whole paragraph............................................................163
Setting the paragraph margins .........................................................163
Who Died and Made This Thing Ruler?.....................................................164
xiii
Table of Contents
02_036583 ftoc.qxp 11/16/06 12:43 PM Page xiii

Chapter 13: Setting Tabs . . . . . . . . . . . . . . . . . . . . . . . . . . . . . . . . . . . . . .167
The Story of Tab...........................................................................................167
The Tab Stops Here......................................................................................168
The Standard Left Tab Stop ........................................................................170
The tabbed list....................................................................................170
The tab-tab-paragraph thing.............................................................172
The Center Tab Stop....................................................................................173
The Right Tab Stop.......................................................................................174
Right stop, left stop list .....................................................................175
Tab, right stop list ..............................................................................176
The Decimal Tab...........................................................................................177
The Bar Tab...................................................................................................178
The Tabs Dialog Box ....................................................................................178
Setting a tab in the Tabs dialog box.................................................179
Setting leader tabs..............................................................................180
Default tab stops ................................................................................181
Unsetting a Tab Stop....................................................................................182
Chapter 14: Formatting Pages . . . . . . . . . . . . . . . . . . . . . . . . . . . . . . . . .183
Describe That Sheet o’ Paper .....................................................................183
A page is a sheet of paper about “this” big.....................................184
Page orientation (landscape or portrait) ........................................185
Marginal information .........................................................................186
Behold the Page Setup dialog box....................................................187
Page Numbering ...........................................................................................189
Where to stick the page number? ....................................................190
Starting off with a different page number .......................................191
Numbering with Roman numerals ...................................................192
Removing page numbers...................................................................192
New Pages from Nowhere ...........................................................................192
Starting afresh on a new, blank page ...............................................192
Inserting a whole, blank page ...........................................................193
Page Froufrou ...............................................................................................194
Color your page ..................................................................................194
The distinguished watermark...........................................................195
Chapter 15: Formatting Documents . . . . . . . . . . . . . . . . . . . . . . . . . . . .197
The Oft Misunderstood Yet Useful Concept of Sections.........................197
Understanding sections.....................................................................198
Creating a section...............................................................................199
Using a section....................................................................................200
Deleting a section break ....................................................................201
Adding a Cover Page (Sneaky and Quick).................................................201
Word 2007 For Dummies
xiv
02_036583 ftoc.qxp 11/16/06 12:43 PM Page xiv

Hats and Shoes for Your Pages (Headers and Footers) ..........................202
Adding a header .................................................................................203
Editing a header..................................................................................204
Making odd and even headers..........................................................206
“But I don’t want a header on my first page!”.................................207
Headers and document sections......................................................207
Removing a header.............................................................................209
Chapter 16: The Styles of Word . . . . . . . . . . . . . . . . . . . . . . . . . . . . . . . .211
The Big Style Overview ...............................................................................211
Types of styles....................................................................................212
Styles quick and custom....................................................................213
Using a style........................................................................................213
Effortless Formatting Fun with Quick Styles ............................................214
Applying a Quick Style to your text .................................................214
Employing the Styles task pane........................................................216
The Styles task pane lite....................................................................218
Discovering which style you’re using..............................................218
Switching to another style set ..........................................................219
Unapplying a style..............................................................................219
Do-It-Yourself Styles.....................................................................................220
Creating a style based on text you’ve already formatted .............220
Creating character, list, and other types of styles .........................223
Modifying a style ................................................................................223
Giving your style a shortcut key ......................................................224
Deleting a style ...................................................................................225
Managing All Your Various Styles...............................................................225
Chapter 17: Themes and Templates . . . . . . . . . . . . . . . . . . . . . . . . . . . .227
Formatting Fast and Fancy with a Theme.................................................227
Applying a document theme.............................................................228
Modifying or creating a theme..........................................................229
Whipping Out Similar Documents Based on a Template ........................230
What is a template?............................................................................231
Creating a template based on a document you already have ......231
Making a new template from scratch...............................................234
Modifying a template you created ...................................................234
Attaching a template to a document ...............................................235
Understanding NORMAL.DOTM .......................................................236
Chapter 18: Misc. Formatting Stuff . . . . . . . . . . . . . . . . . . . . . . . . . . . . .239
Automatic Formatting..................................................................................239
Enjoying automagical text.................................................................240
Paragraph formatting tricks..............................................................241
Undoing an AutoFormat ....................................................................242
Disabling the @#$%&! AutoFormat...................................................243
xv
Table of Contents
02_036583 ftoc.qxp 11/16/06 12:43 PM Page xv

Become an Expert in Your Fields ...............................................................244
Inserting a field into your document ...............................................244
Playing with fields ..............................................................................246
Center a Page, Top to Bottom.....................................................................248
Steal This Format! ........................................................................................249
Part IV: Making Your Document
All Fancy-Schmancy..................................................251
Chapter 19: Borders, Boxes, and Background Color . . . . . . . . . . . . . .253
This Border Situation ..................................................................................253
The Border command button...........................................................254
The Borders and Shading dialog box...............................................255
Lines and Boxes Around Your Text............................................................255
Drawing a fat, thick line.....................................................................256
Making rules........................................................................................256
Boxing text or paragraphs.................................................................257
Boxing a title .......................................................................................257
Putting a border around a page of text............................................258
Removing borders..............................................................................259
Background Colors ......................................................................................259
Chapter 20: Turning the Tables . . . . . . . . . . . . . . . . . . . . . . . . . . . . . . . .261
Furnish Forth the Tables.............................................................................261
Starting your table-creation fun .......................................................262
Creating a table yay-by-yay big.........................................................263
Drawing a table...................................................................................264
Transmuting tabbed text into a table ..............................................266
Turning a table back into plain text.................................................266
It’s Your Turn to Set the Table....................................................................267
Using the mouse with a table............................................................267
Putting text into a table .....................................................................268
Table Craftsmanship....................................................................................269
Designing a table ................................................................................269
Adjusting the table.............................................................................271
Deleting a table...................................................................................272
Chapter 21: Carousing with Columns . . . . . . . . . . . . . . . . . . . . . . . . . . .273
All About Columns .......................................................................................273
Here Come the Columns!.............................................................................275
Making more than three columns ....................................................275
Mixing column formats......................................................................276
Adjusting the columns in the Columns dialog box ........................276
The End of the Column................................................................................277
Word 2007 For Dummies
xvi
02_036583 ftoc.qxp 11/16/06 12:43 PM Page xvi

Chapter 22: I Love Lists . . . . . . . . . . . . . . . . . . . . . . . . . . . . . . . . . . . . . . .279
Basic Bullets and Numbers.........................................................................279
Making a bulleted list.........................................................................280
Numbering a list .................................................................................280
Numbering lines of text .....................................................................281
Lists of Things in Your Document..............................................................281
Creating a table of contents..............................................................282
Building an index................................................................................283
Footnotes and Endnotes .............................................................................286
Chapter 23: Going Graphical . . . . . . . . . . . . . . . . . . . . . . . . . . . . . . . . . .289
Here Come the Graphics! ............................................................................290
Inserting a picture from a file on disk..............................................290
Inserting a clip art image...................................................................291
Slapping down an AutoShape ...........................................................292
Inserting a picture or text into an AutoShape ................................293
Deleting an image or artwork ...........................................................294
Images and Text Can Mix ............................................................................294
Wrapping text around the image......................................................295
Moving an image hither and thither ................................................296
Image Editing ................................................................................................297
Changing an image’s size...................................................................298
Cropping an image .............................................................................298
Rotating the image .............................................................................299
Arranging multiple images ................................................................299
Chapter 24: Stick
This
in Your Document . . . . . . . . . . . . . . . . . . . . . . .301
Characters Fun and Funky ..........................................................................301
Nonbreaking spaces and hyphens ...................................................301
Typing characters such as Ü, Ç, and Ñ............................................302
Adding a dash of en or em ................................................................303
Inserting special characters and symbols ......................................303
Say It in WordArt ..........................................................................................304
Spice Up Your Document with a Text Box ................................................306
Instant Graphical Goodness with SmartArt..............................................307
Part V: What Else Is Left?..........................................309
Chapter 25: Multiple Documents, Multiple Windows,
Multiple Formats, Multiple Madness . . . . . . . . . . . . . . . . . . . . . . . . . .311
Multiple Document Mania...........................................................................311
Managing multiple documents .........................................................312
Viewing the same document in multiple windows.........................314
Using the old split-screen trick.........................................................315
xvii
Table of Contents
02_036583 ftoc.qxp 11/16/06 12:43 PM Page xvii

Working with Non-Word Document Formats............................................316
Using the Files Type drop-down list.................................................317
Loading an alien document...............................................................317
Saving a file in a horridly strange and unnatural format...............319
Updating older Word documents .....................................................319
Chapter 26: Other Ways of Viewing a Document . . . . . . . . . . . . . . . . .321
Organize Your Thoughts .............................................................................322
Entering Outline view ........................................................................322
Adding topics to your outline...........................................................323
Demoting a topic (creating subtopics)............................................324
Promoting a topic...............................................................................325
Adding a text topic.............................................................................326
Rearranging topics .............................................................................326
Expanding and contracting topics ...................................................326
Printing an outline..............................................................................328
Sit Back and Read.........................................................................................328
Chapter 27: Working This Out Together . . . . . . . . . . . . . . . . . . . . . . . . .331
Here Are My Thoughts ................................................................................331
Adding a comment .............................................................................332
Hiding comments ...............................................................................333
Reviewing comments.........................................................................333
Printing comments (or not) ..............................................................334
Deleting comments ............................................................................334
Whip Out the Yellow Highlighter................................................................334
Look What They’ve Done to My Text, Ma .................................................335
Comparing two versions of the same document............................335
Reviewing the changes ......................................................................337
Tracking changes as you make them...............................................338
Chapter 28: Merrily We Mail Merge . . . . . . . . . . . . . . . . . . . . . . . . . . .339
All About Mail Merge ...................................................................................339
Mail Merge Ho!..............................................................................................340
Creating the main document (Task 1 of 5)......................................341
Assigning fields (Task 2 of 5) ............................................................343
Building records (Task 3 of 5)...........................................................345
Inserting fields into the main document (Task 4 of 5)...................347
Merging it all together (Last task)....................................................348
Chapter 29: Labels of Love . . . . . . . . . . . . . . . . . . . . . . . . . . . . . . . . . . . .351
The Label Thing............................................................................................351
Here’s a Sheet of Identical Labels ..............................................................352
Print That Address List ...............................................................................353
A Label Trick with Graphics .......................................................................355
Word 2007 For Dummies
xviii
02_036583 ftoc.qxp 11/16/06 12:43 PM Page xviii

Chapter 30: Customizing Word . . . . . . . . . . . . . . . . . . . . . . . . . . . . . . . .357
All the Better to See You, My Dear.............................................................357
The Status Bar Configuration Menu...........................................................359
The Quick Access Toolbar ..........................................................................360
Finding the toolbar.............................................................................360
Moving the toolbar.............................................................................361
Adding command buttons to the toolbar........................................361
Removing commands from the toolbar...........................................363
Restoring the Quick Access toolbar ................................................363
Part VI: The Part of Tens............................................365
Chapter 31: The Ten Commandments of Word . . . . . . . . . . . . . . . . . . .367
Thou Shalt Remember to Save Thy Work .................................................367
Thou Shalt Not Use More Than One Space...............................................368
Thou Shalt Not Press Enter at the End of Each Line ...............................368
Thou Shalt Not Neglect Thy Keyboard......................................................368
Thou Shalt Not Manually Number Thy Pages ..........................................369
Thou Shalt Not Use the Enter Key to Start a New Page ..........................369
Thou Shalt Not Click OK Too Quickly........................................................369
Thou Shalt Not Forget Thy Undo Command ............................................369
Honor Thy Printer........................................................................................370
Thou Shalt Have Multiple Document Windows Before Thee .................370
Chapter 32: Ten Cool Tricks . . . . . . . . . . . . . . . . . . . . . . . . . . . . . . . . . . .371
Automatic Save with AutoRecover ............................................................371
Keyboard Power!..........................................................................................372
Build Your Own Fractions ...........................................................................372
Electronic Bookmarks .................................................................................373
Document Inspection...................................................................................374
The Drop Cap................................................................................................374
The Document Map......................................................................................375
Add an Envelope to Your letter ..................................................................376
Sort Your Text...............................................................................................376
Text That Doesn’t Print ...............................................................................377
Chapter 33: Ten Odd Things . . . . . . . . . . . . . . . . . . . . . . . . . . . . . . . . . . .379
Equations ......................................................................................................379
Math...............................................................................................................380
Document Defense Options ........................................................................381
Hyphenation .................................................................................................381
Document Properties...................................................................................381
The Developer Tab.......................................................................................382
xix
Table of Contents
02_036583 ftoc.qxp 11/16/06 12:43 PM Page xix

Cross-References..........................................................................................382
Smart Tags.....................................................................................................383
Click-and-Type..............................................................................................383
Word and the Internet .................................................................................384
Chapter 34: Ten Avuncular Suggestions . . . . . . . . . . . . . . . . . . . . . . . .385
Keep Printer Paper, Toner, and Supplies Handy ......................................385
Get Some References ...................................................................................386
Keep Your Computer Files Organized .......................................................386
Know a Little Windows................................................................................386
Back Up Your Work ......................................................................................387
Use AutoCorrect...........................................................................................387
Use Those Keyboard Shortcuts..................................................................387
Try New Things ............................................................................................388
Let Word Do the Work .................................................................................388
Don’t Take It All Too Seriously ...................................................................388
Index........................................................................389
Word 2007 For Dummies
xx
02_036583 ftoc.qxp 11/16/06 12:43 PM Page xx

Introduction
A
re you nervous? Intimidated? Befuddled and confused beyond all
recourse?
What did they do to Word? Just when you thought you finally
had a leg up on the program, just as you finally remembered that the Sort
command is on the Tables menu, they’ve gone and changed . . . everything!
What a headache!
Welcome to
Word 2007 For Dummies, which is a better solution to your word
processing pains than taking two aspirin and calling tech support in the
morning. This book is your friendly, informative, and entertaining guide to
the newfangled way of processing words that is Word 2007.
I’m not telling you that this book will make you all cozy and pleased with the
new ways of Word. No, I’m merely promising that this book eases the pain
everyone feels with Word 2007. Let other authors apologize for the program!
I’m here to kick Word in the butt and, hopefully, you’ll enjoy watching that.
What’s New in Word 2007?
Earlier versions of Word all looked alike. They had menus, toolbars, task
panes, and other pop-up, drop-down, leak-out nonsense. With Word 2007, all
that stuff is gone, nailed shut in a box and wheeled away into that huge ware-
house where the U.S. government keeps the Ark of the Covenant. Word 2007
sports no menus. It has only one tiny toolbar.
Replacing the menus and toolbars is a tabbed Ribbon system. The tabs are
like the menus of old, but their commands are grouped into graphical com-
mand buttons. Some buttons are commands, some buttons are menus. This
setup can be overwhelming at first, but I must admit that it makes it possible
to do some tasks in fewer steps than with the old Word interface. Knowing
that, of course, doesn’t make the thing less intimidating.
Beyond the interface, Word is a bit stricter on styles and formatting. The ben-
efit here is
instant previews, or the ability to instantly see how changes affect
your document as you browse a menu. Part III of this book explains more.
Word’s main mode of operation is Print Layout view. If you were a fan of
Normal or Draft view in previous versions of Word, I highly recommend that
you switch to Print Layout view, if you haven’t already.
03_036583 intro.qxp 11/16/06 12:43 PM Page 1

Finally, many commands didn’t survive the transition from older versions of
Word to Word 2007. You won’t find any of the following in Word 2007:
AutoFormat Save All
Close All Save As Web Page
Character Animation Speech
File Search Wizards
Frames WordPerfect Help
Office Assistant
These items were either dropped entirely or replaced with something better.
About This Book
I don’t intend for you to read this book from cover to cover. It’s not a novel,
and if it were, it would be a musical novel and you’d be required to sing the
songs and go through the dances with all the characters in a book and, quite
honestly, I don’t think that the people near you would let you get away with it.
This book is a reference. Each chapter covers a specific topic or task that
Word does. Within a chapter, you find self-contained sections, each of which
describes how to perform a specific task or get something done. Sample sec-
tions you encounter in this book include:
Saving your stuff
Moving a block of text
Quickly finding your place
Aligning paragraphs
Cobbling a table together quickly
Creating a table of contents
Adding topics to your outline
There are no keys to memorize, no secret codes, no tricks, no videos to sleep
through, and no wall charts. Instead, each section explains a topic as though
it’s the first thing you read in this book. Nothing is assumed, and everything
is cross-referenced. Technical terms and topics, when they come up, are
neatly shoved to the side, where you can easily avoid reading them. The idea
here isn’t for you to learn anything. This book’s philosophy is to help you
look it up, figure it out, and get back to work.
2
Word 2007 For Dummies
03_036583 intro.qxp 11/16/06 12:43 PM Page 2

How to Use This Book
You hold in your hands an active book. The topics between this book’s
yellow-and-black covers are all geared toward getting things done in Word
2007. Because nothing is assumed, all you need to do is find the topic that
interests you and read.
Word uses the mouse and keyboard to get things done. Still, the program
looks different from traditional Windows programs, so pay attention!
This is a keyboard shortcut:
Ctrl+P
This shortcut means that you should press and hold the Ctrl (control) key
and type a P, just as you would press Shift+P to get a capital P. Sometimes,
more than two keys need to be pressed at the same time:
Ctrl+Shift+T
In this line, you press Ctrl and Shift together and then press the T key.
Release all three keys.
Commands in Word 2007 exist as
command buttons on the Ribbon interface.
This book may refer to the tab, the command group, and then the button
itself to help you locate that command button — for example, the Page
Layout tab, Page Background group, Page Color button. Or, I might say “the
Page Color button found in the Page Layout tab’s Page Background group.
Often times, command buttons are shown in the margin, which can help you
locate them.
Menu commands are listed like this:
Table
➪Insert Table
This command means that you choose the command named Insert Table
from the Table menu. Note that Table is most likely a button on the Ribbon.
The File menu from previous versions of Word now exists as the Microsoft
Office Button menu, which I refer to as the Office Button menu. You still press
Alt+F to access this menu, and it contains items similar to the old File menu.
3
Introduction
03_036583 intro.qxp 11/16/06 12:43 PM Page 3

When I describe a message or something you see on-screen, it looks like this:
Why should I bother to learn about compound interest when
robots will eventually destroy the human race?
If you need further help operating your computer or a good general reference,
I can recommend my book
PCs For Dummies, published by Wiley Publishing,
Inc. The book contains lots of useful information to supplement what you find
in this book.
Foolish Assumptions
Though this book was written with the beginner in mind, I still make a
few assumptions. Foremost, I assume that you’re using a computer. You
use Windows as the computer’s operating system, either Windows Vista
or Windows XP or any other version of Windows that can run Word 2007.
There are no specific issues between Word and Windows as far as this book
is concerned, but keep in mind that this book isn’t about Windows.
Your word processor is Microsoft Word 2007. It is
not Microsoft Works. It is
not an earlier version of Word. It is not WordPerfect. It is not a version of
Word that runs on a Macintosh.
Throughout this book, I use “Word 2007” and “Word” interchangeably. Both
refer to the same thing. (Word 2007 may also be referred to as Word 12 in
some instances, although not in this book.)
Word 2007 is a part of the Microsoft Office 2007 suite of programs. This book
doesn’t cover any other part of Microsoft Office, nor do I assume that you
even have the Microsoft Office suite installed.
How This Book Is Organized
This book contains six major parts, each of which is divided into several chap-
ters. The chapters themselves have been sliced into smaller, modular sections.
You can pick up the book and read any section without necessarily knowing
what has already been covered in the rest of the book. Start anywhere.
Here’s a breakdown of the parts and what you can find in them:
4
Word 2007 For Dummies
03_036583 intro.qxp 11/16/06 12:43 PM Page 4

Part I: Hello, Word!
This part provides a quick introduction to Word and word processing.
Information is offered on how best to use your keyboard, plus a simple
overview of the typical word processing day. Part I contains lots of good,
basic information.
Part II: Word Processing Basics
The chapters in this part of the book cover the 7 basic tasks of any word
processor: moving around a document, editing text, search and replace,
working with blocks of text, document proofing, saving and opening, and
finally printing.
Part III: Formatting
This part deals with formatting, from the smallest iota of text to formatting
commands that span an entire document and more. Formatting is the art of
making your document look less ugly.
Part IV: Making Your Document
All Fancy-Schmancy
This part is formatting dessert, or things you can do beyond regular format-
ting to help make your document look like more than a typical, boring docu-
ment. It covers lines, borders, tables, columns, lists, graphical goodness, and
all sorts of stuff that makes Word more than a typical word processor.
Part V: What Else Is Left?
This part covers a few dangling details that I consider myself fortunate to
write about, such as outlining, collaboration, mail merge, label-making, and
other interesting things that Word does.
Part VI: The Part of Tens
The traditional last part of any For Dummies book contains chapters with lists
of ten items. You’ll find lots of helpful stuff here, some weird things you may
not know about, plus even more useful tips, tricks, and good suggestions.
5
Introduction
03_036583 intro.qxp 11/16/06 12:43 PM Page 5

What’s Not Here
Word is one heck of a program. Covering the entire thing would take a book
several thousand pages long. (I kid you not.) My approach in this book is to
cover as much basic word processing as possible. Because of that, some
advanced features did get pushed off the table of contents.
You won’t find any information here on macros in Word. Although they can be
useful, it’s tough to get into macros without broaching the more technical topic
of Microsoft Office Visual Basic, which is a true programming language —
definitely not beginner stuff.
Some of the more esoteric features are touched upon lightly here. For exam-
ple, I could spend about 70 pages detailing what can be done with graphics in
Word, but I limited myself to only a dozen pages.
Finally, this book doesn’t cover using Word to do anything on the Internet.
That includes using e-mail, making a Web page, blogging, online publishing,
creating forms, or doing that kind of stuff. This is a word processing book,
and Word is a word processor.
Icons Used in This Book
This icon flags useful, helpful tips or shortcuts.
This icon marks a friendly reminder to do something.
This icon marks a friendly reminder
not to do something.
This icon alerts you to overly nerdy information and technical discussions of
the topic at hand. The information is optional reading, but it may enhance
your reputation at cocktail parties if you repeat it.
6
Word 2007 For Dummies
03_036583 intro.qxp 11/16/06 12:43 PM Page 6

Where to Go from Here
Start reading! Observe the table of contents and find something that interests
you. Or, look up your puzzle in the index.
Because Word 2007 has changed, whether you’re new to the program or not,
you should start reading at Chapter 1.
Read! Write! Let your brilliance shine on a sheet of paper.
My e-mail address is
dgookin@wambooli.com. Yes, that’s my real address. I
try to reply to all the e-mail I get, although sometimes I’m not that speedy.
And, although I enjoy saying “Hi” or answering questions about this book,
please do not e-mail me with technical support questions or problems with
your computer. For that, I can recommend reading my book
Troubleshooting
Your PC For Dummies
(Wiley).
You can also visit my Web page for more information or as a diversion:
www.wambooli.com. Be sure to check out the Wambooli Forums while
you’re there.
Enjoy the book. And enjoy Word. Or at least tolerate it.
7
Introduction
03_036583 intro.qxp 11/16/06 12:43 PM Page 7

8
Word 2007 For Dummies
03_036583 intro.qxp 11/16/06 12:43 PM Page 8
Part I
Hello, Word!
04_036583 pt01.qxp 11/16/06 12:43 PM Page 9
In this part . . .
B
lame it all on Homer. One day, he was telling his
epic poem
The Iliad to a crowd of eager Greeks.
The Greeks were thrilled. One Greek in particular was
so enamored with the tale that he blurted out, “This
stuff is great! If only we could remember it all!”
Irritated at being interrupted, Homer replied, “Why not
write it down?”
The Greeks collectively went “Huh?”
Homer explained, “Me? I’m blind. I had to memorize the
whole thing. You — you have sight. You can write it down.
Of course, it would be nifty if you had a word processor,
which would make typing the thing easy, as well as format-
ting and printing it. But you’re thousands of years too early
for that. So my advice is to start by creating an alphabet.
Better still, you’re Greeks: Steal an alphabet.”
And so the long quest began. From the Greek alphabet
to reading and writing for the masses to moveable type to
the fountain pen and the typewriter, and now . . . this, this
word processor, which I introduce to you in the chapters
that comprise this part of the book.
04_036583 pt01.qxp 11/16/06 12:43 PM Page 10

Chapter 1
Word Hokey-Pokey
In This Chapter
Starting Word
Reading the Word screen
Getting help from Word
Exiting Word (or not)
C
heer up! Word processing is one of the best things that a computer can do.
It’s much better than trying to compose your thoughts on a typewriter. It’s
better than worrying about good penmanship. It’s much more efficient than
using Gutenberg’s moveable-type machine. It’s cheaper than paying a scribe to
scribble hieroglyphics on a papyrus roll. And it’s certainly better than chipping
a stone tablet with a rock. Keep that rock handy, though: You may still need
something to smash the computer when it frustrates you.
This chapter provides an overview of Microsoft Word 2007. It’s your introduc-
tion to the newfangled way that people are word processing during this, the
breakfast of the 21st century. So, sit back, relax, grab a refreshing beverage,
and definitely put down that rock! You’ll be on your way to writing words
electric in no time.
How Do I Start Word? Let Me
Count the Ways. . . .
Anyone using a computer suspects that there’s probably a better, faster, or
more serious way to get things done. There are so many options! Who knows
when someone will amble up to you and point at how you start your word
processor. “You do
that?” they’ll snicker and walk away. Oh, no. What now?
The question isn’t really how to start Word, but rather how
best to start Word.
In Windows, there are a bazillion ways to start any program. Other books drag
out every last method, but for starting Word (or any program that you use
05_036583 ch01.qxp 11/16/06 12:44 PM Page 11
often), there are definitely good, better, and best ways. Before going there,
consider taking some general steps before you begin your word processing
odyssey:
1. Ensure that your computer is on and toasty.
Any computer that’s on is, in fact, toasty. The only way to make it
toastier is to insert bread, which I don’t recommend.
2. Prepare yourself physically.
Make sure you’re seated, with a nice, upright, firm posture. They tell me
that your wrists should be even with your elbows and that you shouldn’t
have to tilt your head forward. Shoulders are back and relaxed.
Close your eyes. Unwind. Breathe in, breath out.
3. Prepare yourself mentally.
Yes, you can do this! Hail the muse scribborrhea, the forest nymph of
electronics and typing. Think calm thoughts. Concentrate on letting the
thoughts flow from your brain and rush down your arms and into your
fingers as they dance upon the keyboard. Remember that you are the
master. Mutter that over and over: “I am the master. . . .”
If you need help starting your computer, refer to my book
PCs For Dummies
(Wiley Publishing) for quick and accurate turning-on-the-computer instructions.
You can stop muttering “I am the master” now.
The good, yet unimaginative,
way to start Word
Without fail, the place to start any program in Windows is at the fabled Start
button. It may not be the coolest way to start a program, but it’s consistent
and reliable — good things to have in a computer. Obey these steps:
1. Click the Start button.
Use your computer mouse to click the Start button, which is often found
on the left side of the taskbar, at the bottom of the screen, adorned with
the Windows logo and often (cleverly) the word
Start.
Clicking the Start button displays the Start menu.
2. Choose Word from the All Programs menu.
Now, you may be lucky and see the Word program icon on the Start
menu. If so, click the Word icon to start Word. If not, you have to click the
All Programs menu and look for Word in that vast labyrinth.
12
Part I: Hello, Word!
05_036583 ch01.qxp 11/21/06 10:39 AM Page 12
Behold! Word starts! Watch in amazement as your computer whizzes and
whirs. Before too long, Word appears on the computer’s monitor, trying to be
friendly and inviting but failing utterly.
Don’t let Word’s appearance overwhelm you! I describe what you’re looking
at later, in the section “Behold Word!”
If you can’t find Word on the All Programs menu, look for a submenu
named Microsoft Office or Office 12 or even Office 2007. Word may be
lurking on that submenu.
The Start menu contains a list of many interesting things, including pro-
grams, recently used programs, and fun locations to visit in Windows.
One of those Start menu things is the All Programs menu, which may
also be called Programs (without the word
All).
Supposedly, every program ever installed on your computer has
installed its icon in a spot somewhere on the All Programs menu.
I refer to the program as Word, though the icon may be labeled Microsoft
Word, Microsoft Office Word, Word 2007, or some other clever variation
on that theme.
The better and best ways to start Word
When you use Word a lot, it helps to have quick access to its icon — that icon
is the way you start Word — and then start your work. A better way than
keeping Word hidden on the All Programs menu is to create a Word shortcut
icon on the desktop. Heed these steps:
1. Locate the Word icon on the All Programs menu.
Don’t start Word now! Just point the mouse at the Word icon on the Start
button’s All Programs menu or wherever else it may be found.
13
Chapter 1: Word Hokey-Pokey
Automatically starting Word every
ding-dong time you start Windows
To get your computer to start Word whenever you
start Windows, you need to move the Microsoft
Word item from its current location on the All
Programs menu to the All Programs
➪Startup
folder. The items in the Startup folder start up auto-
matically when Windows begins its day. As with
all things in Windows, there exists a multitude of
ways to accomplish the move. Refer to your
favorite Windows reference for the details, or just
grab someone who looks like a Windows nerd and
have them perform the task for you. Suggestion:
Bribe them with something salty and crunchy.
05_036583 ch01.qxp 11/16/06 12:44 PM Page 13
2. Right-click the Microsoft Word menu item.
A pop-up menu appears.
3. Choose Send To➪Desktop (Create Shortcut).
Whew! The scary part is over. You haven’t changed anything, but you
have added a new icon to the desktop, an icon you can use to start
Word, if you like. To prove it:
4. Click the mouse on the desktop.
The desktop is the background you see when you use Windows. Clicking
the desktop hides the Start menu.
5. Locate the Microsoft Word shortcut icon.
It looks like the icon shown in the margin. That’s your shortcut to Word.
You can now use that icon to start Word: Just double-click, and you “open”
the program. Then you can start clack-clack-clacking away at the keyboard.
That’s faster than using the All Programs menu.
The
best way to start Word, and the way I do it every day, is to place the Word
icon on the Quick Launch Toolbar.
The
Quick Launch Toolbar, found right next to the Start button on the taskbar,
is a row of icons representing programs, which you can start with a single click
of the mouse. And, unlike the desktop, the Quick Launch bar is always handy.
To put the Word icon on the Quick Launch bar, you need to drag and drop, so
it helps to have a Word icon already on the desktop, as described in the pre-
ceding set of steps. From the desktop, use the mouse to drag the Word icon
to the Quick Launch bar, and then release the mouse button to “drop” the
icon, as shown in Figure 1-1.
Starting Word from the Quick Launch bar is the best way to go: Just point the
mouse at the Word icon and click, and Word is summoned to the screen.
The Quick Launch Toolbar may not be visible on your computer. Refer
to my book
PCs For Dummies for more information or if the Quick
Launch bar is too narrow and you cannot see the Word icon.
Another way to have the Word icon always handy is to pin it to the Start
menu directly. In Step 3 (a few paragraphs back), choose the item named
Pin to Start Menu.
Making these multiple copies of the Word icon does not consume extra
hard drive space. You’re merely copying
shortcuts to the Word program,
not copies of the entire program itself.
14
Part I: Hello, Word!
05_036583 ch01.qxp 11/16/06 12:44 PM Page 14
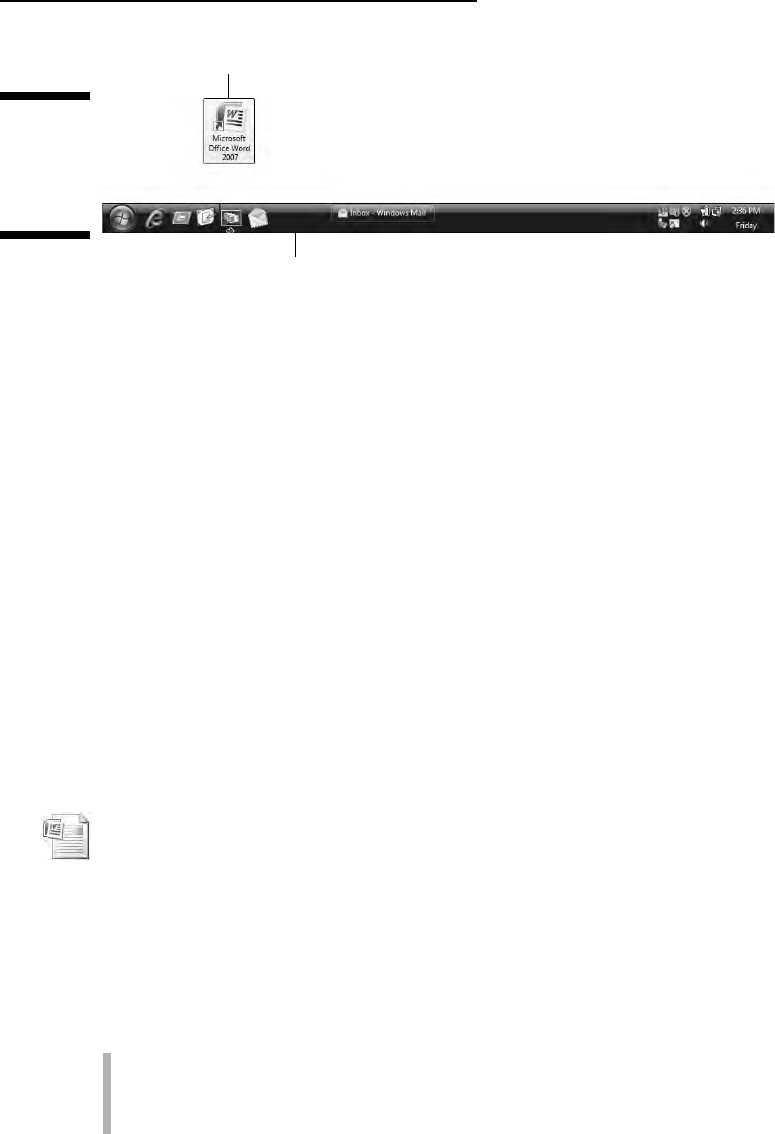
Starting Word by opening a document
Word is a computer program. You use that program to create documents,
which are stored on your computer in much the same way as people pile junk
into boxes and store them in their garages. But that’s not important. What is
important is that you can use those documents to start Word: Opening a Word
document causes Word to start
and to display that document for editing,
printing, or just giving others the impression that you’re doing something.
Here’s one way you can start Word by opening a document:
1. Open the Documents folder.
The Documents folder, also called My Documents in some versions of
Windows, is where Word, as well as other applications, stores the stuff
you create. You can find this folder on the desktop, or you can get at it
from the Start menu.
The Documents folder opens and displays its content, which is the stuff
you’ve already created and saved to disk.
2. Locate a Word document.
A Word document appears, as shown in the margin.
3. Double-click the Word document icon.
Word starts and loads the document for editing, reading, modifying,
perusing, cussing, mangling, and potentially fouling up beyond all
recognition.
You can open any Word document by following these steps. The document
can be on the desktop, in the Documents folder, or in any other folder or
location where a Word document icon can lurk.
The document name appears beneath or to the right of the icon. You
can use the name to determine the document’s contents — as long as
the document was properly named when it was saved to disk. (More
on that later.)
Word shortcut icon on the desktop
Drag the Word icon here.
Figure 1-1:
Putting
Word on the
Quick
Launch bar.
15
Chapter 1: Word Hokey-Pokey
05_036583 ch01.qxp 11/16/06 12:44 PM Page 15
If you have one document you open consistently, consider putting a
shortcut to that document on the desktop for quick access: Right-click
the document’s icon and choose Send To
➪Desktop (Create Shortcut).
Word is capable of opening other types of documents, including docu-
ments from previous versions of Word, Rich Text Format documents,
and others. Each of these documents has its own icon, though the icon
looks similar to the standard Word document icon. See Chapter 25 for
more information on opening alien documents in Word.
You can see a list of the recent documents you’ve worked on by choos-
ing the Recent Items or My Recent Documents submenu from the main
Start menu. Choose your document from that list to open it.
Behold Word!
Word appears on your computer’s monitor just like any other program, nes-
tled within its own window. Look on the screen and at Figure 1-2. There’s
more to Word and word processing than an electronic version of the blank
sheet of paper.
The details of what you see on the screen are covered elsewhere in this book.
Because you may not know what each doodad and greeblie is called, I’ve
labeled some of the important things in Figure 1-2. Use this book’s index to
help you find stuff you might be curious about.
Word 2007 represents a new approach to word processing. Gone are the
menus and toolbars that have dominated computer programs for a
decade or more. Replacing them is a new, tabbed, Ribbon interface.
Although it may be intimidating at first, don’t let it overwhelm you. Just
keep reading this book and you’ll be fine.
The very first time you start Word, you may be asked some questions:
Enter your name and initials, set up Word security, and set Microsoft
update options. I recommend the updates.
Maximize Word’s window size
Unless your computer system has one of those huge monitors, you probably
want to maximize the Word program window just before you start working.
To run Word in full-screen mode, click the Maximize button (the middle one)
in the upper-right corner of the window.
Maximizing forces a window to fill the entire screen. If Word is already maxi-
mized, two overlapping boxes appear on the button; you don’t need to click
anything in that case.
16
Part I: Hello, Word!
05_036583 ch01.qxp 11/16/06 12:44 PM Page 16
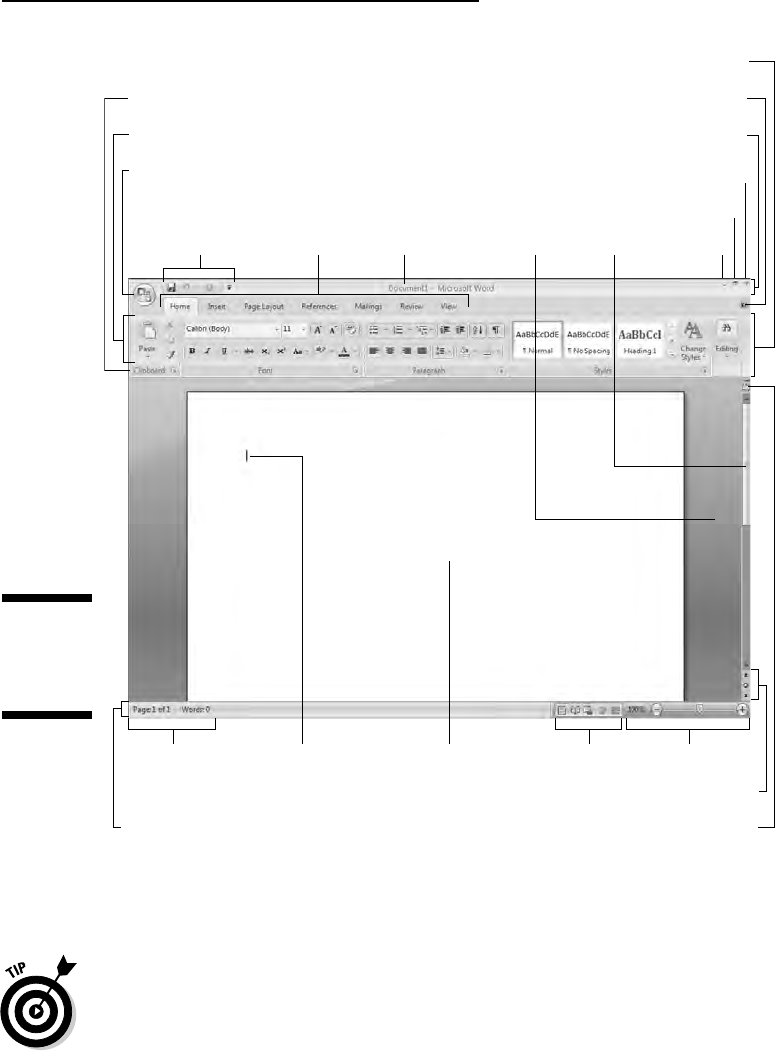
Just in case your computer system is blessed with a giant monitor, you can
resize the Word window without maximizing it; drag any of the window’s
edges in or out.
Word’s window size affects what you see in the Ribbon’s command groups.
On smaller screens, fewer buttons show up, or they may show up in three
rows. On larger screens, you see more buttons, usually in two rows.
Ethereal
void
Word Help
The Ribbon
Vertical
scroll bar
Minimize
Maximize
Close (Quit)
Groups
File menu
Tabs Title bar
Command buttons
File menu
Quick Access
toolbar
Browse buttons
View Ruler
Zoom
View buttons
Status bar
Document
information
Blank page
to write on
Insertion pointer
(cursor)
Figure 1-2:
Word’s
frontal
assault.
17
Chapter 1: Word Hokey-Pokey
05_036583 ch01.qxp 11/21/06 10:39 AM Page 17

Look! Up on the screen!
Everything in the Word window is designed to help you write. No, I’m serious!
Well, I don’t mean
write in the sense of Ernest Hemingway or Jane Austen,
although that’s possible. Word wants you to manage, organize, and create
things with words. That’s the essence of word processing. What you see on
the screen, on Word’s
interface, is designed to make writing an easy and
effortless task.
The largest portion of the Word screen is for composing text. It’s blank and
white, just like a fresh sheet of paper. (Refer to Figure 1-2.) That’s where you
compose and format your text, and I cover that area specifically in the next
section.
Surrounding the text-composing area is a host of goobers that are as bewilder-
ing as an exhibit in a modern art museum, as intimidating as the cockpit of a jet
fighter, and almost as dangerous as a plate of sushi. Despite their overwhelm-
ing appearance, the things that cling to the Word program window are there to
help you write. The following list gives you the quick top-to-bottom explana-
tion. Use Figure 1-2 for reference. And, please: Do not memorize anything!
The title bar lists the document’s title, or merely Document 1 until you
give the document a title by saving it to disk. (See Chapter 9 for informa-
tion on saving documents — very important!)
The Office button replaces the traditional File menu of most Windows
programs.
Clicking the Office Button displays the Office Button menu, a
list of commands that deal with files and documents.
Tabs organize Word’s various and sundry commands into groups based
on word processing activities. Tabs appear and disappear depending on
what you’re doing in Word.
Groups and command buttons help keep commands for the various
tabs organized. Each group contains command buttons that do specific
things to your text.
The Ruler may or may not be visible. When the Ruler is visible, it helps
you set margins and tabs. The View Ruler button (refer to Figure 1-2)
shows and hides the Ruler.
Below the writing area dwells the status bar. This informative strip of graphi-
cal goodness contains trivial information about your document as well as the
following ornaments:
Document information lists optional data specific to your document.
The View buttons specify how the blank page appears in the window
(also refer to the next section).
The Zoom thing sets how large or small your document appears inside
the window. (See Chapter 30 for more information on zooming.)
18
Part I: Hello, Word!
05_036583 ch01.qxp 11/16/06 12:44 PM Page 18
Don’t fret over these things! What’s important now is that you recognize the
names of things so that you don’t get lost later.
The tabs, groups, and command buttons change as you take on various
activities in Word. Although this may seem disruptive, it’s in fact quite
handy.
You can hide the Ribbon if you would rather have more room to write:
Right-click anywhere on the Ribbon and choose the Minimize Ribbon
command from the pop-up menu. To restore the Ribbon, right-click any
tab and choose the Minimize Ribbon command again.
Another part of the window, not shown in Figure 1-2, is the task pane. It
shows up when it’s needed, to offer more choices, options, or information.
A Document Recovery task pane may show up when Word starts, telling
you that Word has saved a document that may have been lost because
of a power failure or computer crash. Refer to Chapter 32 for informa-
tion on the AutoRecover feature.
The Windows taskbar, located at the bottom of the screen, is a part of
Windows itself and not Word. However, as you open documents in Word,
buttons representing those documents appear on the Windows taskbar.
Unlike in previous versions of Word, the tabs, groups, and command but-
tons
cannot be customized, moved, or resized. You can customize the
Quick Access toolbar (refer to Figure 1-2), but that’s about it.
The blank place where you write
The words you write appear in the center part of Word’s program window, in
that blank area shown in Figure 1-2. That pallid vista is the equivalent of a
blank sheet of paper, and the documents you create on that electronic sheet
of paper look just the way they will when they’re eventually printed on a real
sheet of paper. Such is the magic of word processing.
Word lets you view the blank sheet in five different ways. Two of the views
are the most popular for wordsmiths:
Print Layout: Activate this view by clicking the status bar’s Print Layout
button. In Print Layout view, you get to see the entire page, just as it
prints. Graphical images, columns, and all sorts of other fancy items
show up on the page fully visible. You can see the edge of the page and a
blank space between pages (the “Ethereal void” in Figure 1-2).
Draft: Set this view by clicking the Draft button on the status bar. Draft
view is favored by writers who don’t really want to clutter the page with
anything other than text. In Draft view, you see your text and not the
fancy graphics, columns, headers, page breaks, and other things that
clutter Print Layout mode.
19
Chapter 1: Word Hokey-Pokey
05_036583 ch01.qxp 11/16/06 12:44 PM Page 19

There are three other ways to view your document: Full Screen Reading, Web
Layout, and Outline. None of these views has anything to do with basic word
processing. Refer to Chapter 26 for more information on these different views.
Word automatically switches to Print Layout view from Draft view when
necessary. So, when you’re working in Draft view and you want to edit
a header or insert a picture, Print Layout view is activated. You need
to manually switch back to Draft view, if that’s your preferred way of
using Word.
One thing that’s visible in Draft view that you don’t find in Print Layout
view is a thick, horizontal bar on the left side of the page, just below a
document’s last line of text. That heavy bar marks the end of your docu-
ment. You cannot delete the bar — unless you switch from Draft view to
Print Layout view.
Draft view may also be referred to as Normal view, as it was in previous
versions of Word.
Writing (or typing, depending on how good you are) is covered in the
next chapter. That would be Chapter 2.
Any weird stuff you see onscreen (a ¶, for example) is a Word secret
symbol. Chapter 2 tells you why you may want to view those secret sym-
bols and how to hide them if they annoy you.
The mouse pointer in Word
Word processing is a keyboard thing, although the computer’s mouse comes
in handy. In Word, you use the mouse to choose commands and to move the
insertion pointer around as you edit text.
The mouse pointer changes its look as you work in Word:
For editing text, the mouse pointer becomes the I-beam.
For choosing items, the standard eleven o’clock mouse pointer is used.
For selecting lines of text, a one o’clock mouse pointer is used.
In Print Layout view, the mouse pointer may change its look when
click-and-
type
mode is active: Lines appear to the left and right of, and below, the
I-beam mouse pointer. Refer to Chapter 33 for more information on using
click-and-type.
20
Part I: Hello, Word!
05_036583 ch01.qxp 11/16/06 12:44 PM Page 20
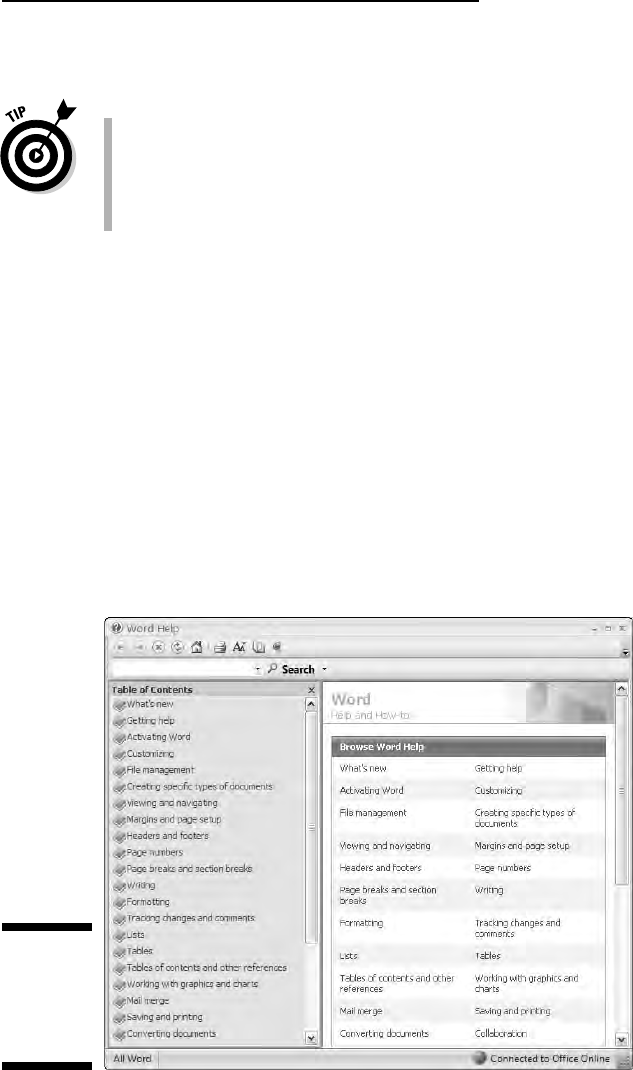
Memorizing these mouse pointer types isn’t important, but remember that
the mouse pointer changes as you use Word.
You can use the mouse to see what some of the little buttons and things
with pictures on them do in Word. Just hover the mouse pointer over
the button, and — voilà! — it’s like Folgers instant information crystals.
Chapter 4 discusses how to use the mouse pointer to move the insertion
pointer, allowing you to edit different parts of your text.
Cajoling Word to Help You
There are many ways to extract help from Word, the most common of which
is to press the F1 key. That key not only works in Word’s main window, but
can also summon specific help for when you’re doing certain things, such as
when you’re performing some obscure task way inside some dialog box or
task pane.
Summoning Word Help displays a separate program window labeled Word
Help, as shown in Figure 1-3. You can type a topic, command name, or ques-
tion into the box in the upper-left corner of the window, or you can browse
the table of contents for help.
Figure 1-3:
Word’s
feeble
attempts to
help you.
21
Chapter 1: Word Hokey-Pokey
05_036583 ch01.qxp 11/16/06 12:44 PM Page 21

You can also summon help by clicking the wee round question mark
button near the upper-right corner of the Word window.
Word’s help works best when you have an Internet connection, espe-
cially a high-speed, or
broadband, connection.
If you’ve used previous versions of Word, note that there’s no more
Office Assistant in Word 2007. You can mourn or rejoice as appropriate.
Of course, this book can be your handiest and most useful source for
Word help. Sadly, I don’t have room here to document
everything, so
Microsoft relented and decided to provide
everything in its Word Help
window.
When You’re All Done
It’s the pinnacle of etiquette to know when and how to excuse oneself.
Leaving can be done well or poorly. Experience taught me this lesson when I
was dining with royalty and suddenly all conversation stopped. I had to
meekly raise my hand, mutter “It was me,” and then run off all red-faced and
ashamed. I hope that such a thing never happens to you.
Just as there are many ways to start Word, there are several ways to quit. You
can quit the program outright, you can pause and start over, or you can set
Word aside. These options are covered in this section.
Quitting Word
When you’re done word processing and don’t expect to return to it anytime
soon, you need to quit the Word program. Quitting a computer program is
like putting away a book on a shelf. In the electronic world of the computer,
this is how you do such a thing:
1. Choose Exit Word from the Office Button menu.
2. Save any files when Word prompts you to do so.
Word always warns you before it leaves; if you have any unsaved docu-
ments, you’re prompted to save them to disk. You see a warning dis-
played on the screen, as shown in Figure 1-4.
Click Yes to save your file. You may be asked to give the file a name, if
you haven’t yet done so. (Chapter 3 tells you how to do it.)
If the slop you typed isn’t worth saving, click No.
You can click Cancel to “quit” the Exit Word command and return to
Word for more word processing delight.
22
Part I: Hello, Word!
05_036583 ch01.qxp 11/16/06 12:44 PM Page 22
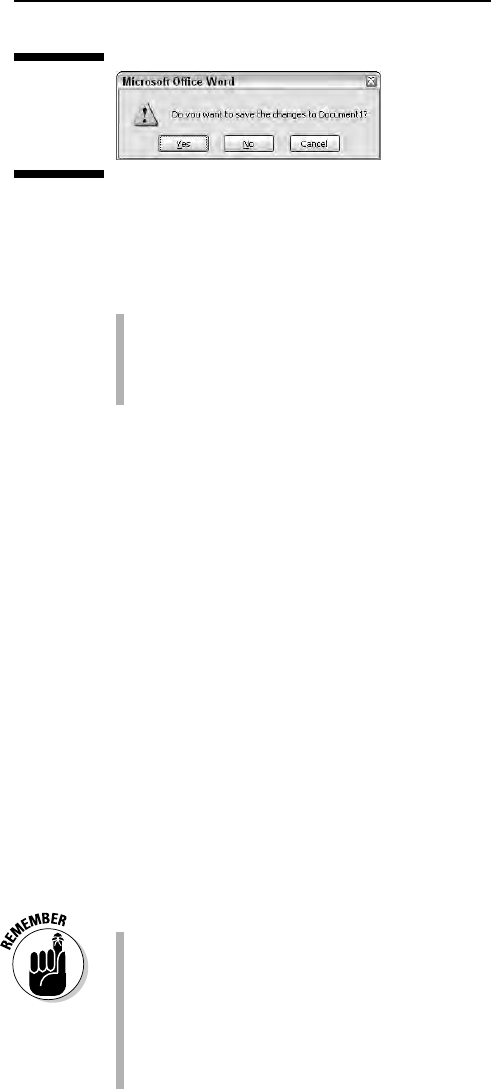
If you elect to quit, Word closes its window. Poof! It’s gone. You return to
Windows or some other program, such as FreeCell, which you know you
shouldn’t be playing anyway.
You don’t have to quit Word just to start editing another document.
Refer to the next few sections for helpful, time-saving information!
Do not quit Word by resetting or turning off your computer! It’s a bad
thing
. Trust me on this one.
How to quit what you’re doing
without quitting Word
It’s not always necessary to quit Word. For example, if you’re merely stopping
work on one document to work on another, quitting Word is a waste of time.
Instead, you can close one document and then open another. Or, better still,
you can simply open the new document and keep the old one active; you can
then easily switch between the documents.
To close a document in Word, choose the Close command from the Office
Button menu. This doesn’t quit Word, but it removes the document from the
screen, allowing you to stay in Word or work on another document.
Likewise, you can start up a new document in Word, just like sticking a blank
sheet of paper into a typewriter. See Chapter 3, the section about starting out
with a new document.
Bottom line: There’s no point is quitting Word when all you want to do is start
editing a new document.
Closing a document in Word is similar to ripping a sheet of paper out
of your typewriter — but without the satisfying
SSHHHHHTHWP! sound
it makes.
There’s no need to close a document, really. In fact, I work on a docu-
ment over a period of days and keep it open (and my PC on) the entire
time. Doesn’t hurt a thing. (I do occasionally save it to disk, which
is
important.)
Figure 1-4:
Better click
that Yes
button!
23
Chapter 1: Word Hokey-Pokey
05_036583 ch01.qxp 11/16/06 12:44 PM Page 23

When you try to close a document before it has been saved, Word dis-
plays a warning dialog box. Click the Yes button to save your document.
If you want to continue editing, click the Cancel button and get back
to work.
The keyboard shortcut for the Close command is Ctrl+W.
Putting Word away for a spell
There’s no need to quit Word if you know that you will be using it again soon.
In fact, I’ve been known to keep Word open and running on my computer for
weeks at a time. The secret is to use the Minimize button.
Clicking the Minimize button shrinks the Word window to a button on the
taskbar. Thwoop! It’s gone! With the window out of the way, you can do other
things with your computer. Then, when you’re ready to word-process again,
click the Word button on the taskbar to restore the Word window to the screen.
The Minimize button is the first of the three buttons in the window’s upper-
right corner. Refer to Figure 1-2.
24
Part I: Hello, Word!
05_036583 ch01.qxp 11/16/06 12:44 PM Page 24

Chapter 2
Making Friends
with the Keyboard
In This Chapter
Knowing the PC keyboard
Typing tips
Using the Enter key
Using the spacebar
Backspacing and deleting
Observing the status bar
Marking the space between pages
Seeing stuff in your text that isn’t there
Living with colored underlines and text
D
espite the mouse, despite the graphics, Word exists as a program
requiring a lot of keyboard input. To best enjoy Word, you should know
your computer’s keyboard. This means knowing not only where and how to
press the keys, but also how certain keys on the keyboard are used in a word
processor. This chapter unlocks those secrets that would otherwise linger
inside your computer keyboard — along with all those potato chip crumbs,
nail clippings, and gross strands of hair.
Behold the PC Keyboard!
Despite all the fancy keyboard extras, as far as word processing is consid-
ered, you use only the core keys on the keyboard, keys commonly found on
every computer keyboard, as illustrated in Figure 2-1.
Take a look at your own keyboard. If you’re lucky, it may be color-coded to
help you identify the separate areas.
06_036583 ch02.qxp 11/16/06 12:44 PM Page 25
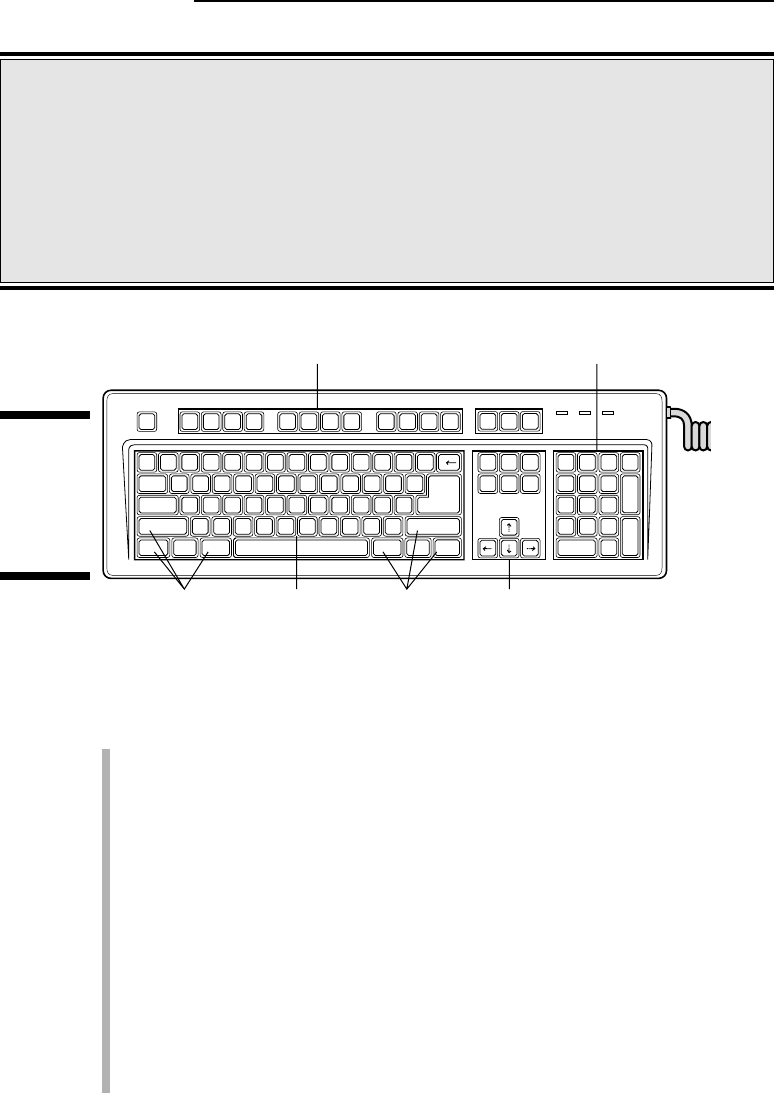
When you use Word, you use the keys in groups, either alone or in combina-
tion with other keys. Here are the names by which the computer nerds know
these things:
Function keys: The function keys are labeled F1 through F12. You can
use them alone or in cahoots with the Ctrl, Alt, and Shift keys.
Typewriter keys: These are the standard alphanumeric keys that the
computer inherited from the antique typewriter:
A through Z and the
number keys, plus symbols and other exotic characters.
Cursor keys: Also called the arrow keys, these keys control the cursor.
Also included are the non-arrow keys: Home, End, PgUp (or Page Up),
PgDn (or Page Down), Insert, and Delete.
Don key: A domesticated ass.
Numeric keypad: These keys are sometimes cursor keys and other
times number keys. The split personality is evident on each key cap,
which displays two symbols. The Num Lock key and its corresponding
light are on if the numeric keypad (1, 2, 3) is active. If the cursor keys
(arrows, Home) are active, Num Lock is off.
Shift Keys Shift KeysTypewriter Keys
ESC
F4F3F2F1 F8F7F6F5 F12F11F10F9
NUM
LOCK
CAPS
LOCK
SCROLL
LOCK
ENTER
1234567890–=
!@# $%^& ( )—+
*
SHIFT
QWE R T Y U I OP
{}
ASDFGHJKL : "
ZXCVBNM<> ?
[]
;'
,.
/
*
/
TAB
ALT
ALT
CAPS
LOCK
CTRL
SHIFT
NUM.
LOCK
-
789
+
456
123
ENTER
0.
CTRL
`
~
INS
HOME
PAG E
UP
DEL
END
PAG E
DOWN
OPT OPT
\
|
PRINT
SCRN
SCROLL
LOCK
PAU S E
Cursor Keys
Numeric KeypadFunction Keys
Figure 2-1:
Famous
attractions
on the
typical PC
keyboard.
26
Part I: Hello, Word!
Depressing the keys
You don’t actually depress a key on a computer
keyboard. Nope. Instead, you press and release.
Any swift tapping motion will do. Some key-
boards even generate a pleasing
click
when a
key is pressed.
Now, if you really want to depress a key, just
stare at it and say “You’re one ugly, good-for-
nothing key!” If that doesn’t work, keep up with
the insults. Eventually, any well-adjusted key
will succumb to your verbal taunts and find itself
sufficiently depressed.
06_036583 ch02.qxp 11/16/06 12:44 PM Page 26
Shift keys: These keys don’t do anything by themselves. Instead, the Shift,
Ctrl, and Alt keys work in combination with other keys.
Here are some individual keys worth noting:
Enter: Marked with the word Enter and sometimes a cryptic, curved
arrow-thing:
↵. You use this key to end a paragraph of text.
Esc: The “escape” key, which doesn’t really do anything in Word. However,
pressing the Esc key in a dialog box is the same as clicking the Cancel
button with the mouse.
Spacebar: The only key with no symbol; inserts spaces between the
words.
Tab: Inserts the tab “character,” which shoves the next text you type
over to the next tab stop; an interesting and potentially frustrating for-
matting key (and nicely covered in Chapter 13).
Backspace: Your backing-up-and-erasing key — very handy.
Delete: Also labeled Del; works like Backspace but doesn’t back up to
erase. Read more on that in Chapter 5.
Every character key you press on the keyboard produces a character on the
screen, on the blank part where you write. (Check out Figure 1-2, over in
Chapter 1.)
The Shift key is used to produce capital letters, just like on a typewriter
(in case you’ve ever used one of those).
Ctrl is pronounced “control.” It’s amazing the variety of names people
give to the Ctrl key before they know it as
the control key.
The Caps Lock key works like the Shift Lock key on a typewriter. After
you press Caps Lock, the Caps Lock light on your keyboard comes on,
and everything you type is in ALL CAPS.
Typing (Or, the Old Hunt-and-Peck)
Words electric march across the screen because you type those words on the
keyboard. Despite all the commands and graphical goobers, the thing you do
most often in Word is type.
Clackity-clack-clack-clack.
Everything you type on the keyboard appears on the screen, even the typos
and mistakes and bad grammar: It all falls into place on the screen regardless
of your intent, posture, or good looks.
27
Chapter 2: Making Friends with the Keyboard
06_036583 ch02.qxp 11/16/06 12:44 PM Page 27
Follow the blinking cursor
The key to writing in Word is to look for the insertion pointer in your text. It’s
a flashing vertical bar:
|
Text you type appears
before the insertion pointer, one character at a time.
After a character appears, the insertion pointer hops to the right, making
room for more text.
For example, type this line:
Why blame the computer?
The insertion pointer moves to the right, marching along as you type. It’s
called
insertion pointer for a reason: Press the left-arrow key a few times to
move the insertion pointer back before the word
blame.
Type the word not and a space. The word (and the space) are inserted into
your text. The text to the right is pushed off to make room for the new text.
Now the sentence should read:
Why not blame the computer?
Chapter 4 covers moving the insertion pointer around in more detail.
When to press that Enter key
In word processing, you press the Enter key only when you reach the end of a
paragraph. Not the end of a line, the end of a
paragraph. You do this thanks to
28
Part I: Hello, Word!
“Do I need to learn to type?”
No one needs to learn to type to use a word
processor, but you do yourself a favor when you
learn. My advice is to get a computer program
that teaches you to type. I can recommend the
Mavis Beacon Teaches Typing program, even
though I don’t get any money from her and none
of her children resembles me. I just like the
name Mavis, I suppose.
Knowing how to type makes a painful experi-
ence like using Word a wee bit more enjoyable.
06_036583 ch02.qxp 11/16/06 12:44 PM Page 28

a neat-o feature called word wrap. When the text you type reaches the right
margin, the insertion pointer automatically hops down to the next line of
text, taking any incompletely typed word along for the ride.
To witness word wrap for yourself, start Word and type the following text,
without pressing the Enter key:
When the times were hard, we knew what had to be done.
Eatin’ was necessary. So as we all sat down to the meal,
and that sweet aroma of roasted meat hit our nostrils for
the first time in months, we held firm. It was especially
hard when little Dana innocently asked where her pet bunny
Fluffy had gone.
As you type, and as words grow precariously close to the right margin, Word
magically picks up an incomplete word and places it on the following line.
That’s word wrap in action. It’s automatic, and it means that there’s no need
to press the Enter key until you reach the end of a paragraph.
Some people end a paragraph with two presses of the Enter key; others
use only one press. If it’s extra space you want between paragraphs, refer
to Chapter 12, the section about putting space between paragraphs, to see
what to do.
There’s no need to use the Enter key when you want to double-space your
text. Double-spacing is a formatting command in Word. See Chapter 12 for
more information.
If you want to indent a paragraph, press the Tab key after pressing Enter.
This can also be done automatically; refer to (you guessed it) Chapter 12.
When to whack the spacebar
The spacebar isn’t the same thing as the right-arrow key on the keyboard.
Pressing the spacebar doesn’t just move the insertion pointer; it inserts a
space character into the text. Spaces are important between words and sen-
tences. Withoutthemreadingwouldbedifficult.
The most important thing to remember about the spacebar is that you need to
whack it only once. In word processing, as in all typing done on a computer,
only
one space appears between words and after punctuation. That’s it!
I’m serious! If you’re an old-timer, you’re probably used to putting two
spaces after a period, which is what they taught in typing class. This
extra space is wrong on a computer. Type only one space!
Anytime you feel like using two or more spaces, what you really need is
a tab. Tabs are best for indenting text as well as for lining up text in
columns. See Chapter 13 for more information.
29
Chapter 2: Making Friends with the Keyboard
06_036583 ch02.qxp 11/16/06 12:44 PM Page 29
The reason you need only one space between sentences is that computers
use proportionally spaced type. Old-fashioned typewriters used mono-
spaced type, and so pressing the spacebar twice after a sentence was
supposed to aid in readability (though that’s debatable). Computer type
is more like professionally typeset material, and both typesetters and
professional-document folk put only one space after a period or a colon.
So there!
Backing-up and erasing keys
When you make a typo or other typing error, press the Backspace key on the
keyboard. The Backspace key is used to back up and erase. The Delete key
can also be used to erase text.
Refer to Chapter 5 for more information on deleting text with Backspace
and Delete.
The Backspace key is named Backspace on your keyboard, or it may
have a long, left-pointing arrow on it:
←.
Backspace doesn’t work like the Backspace key on a typewriter. The dif-
ference is that when you press Backspace in Word, the cursor backs up
and
erases. (The Word equivalent of the typewriter’s Backspace key is
the left-arrow key.)
Mind your 1’s and 0’s and L’s and O’s
If you’re a former typewriter user, you’re probably pushing 40! Man, you’re
old! Seriously, my geriatric friend, the typewriter is merely inspiration for the
computer keyboard. Beyond that, the similarity is purely superficial. Please
heed these advice nuggets:
Do not use the little L or the big I in place of the number one. Use the 1
key. That’s what it’s there for.
Do not use the O (oh) key for the number zero. Use the 0 (zero) key.
These habits may be hard to break, but the computer is keen on being exact.
Oh, and Geritol now comes in cherry flavor.
30
Part I: Hello, Word!
06_036583 ch02.qxp 11/16/06 12:44 PM Page 30
Things to Notice Whilst You Type
The text you type appears on the computer screen, in the blank, page-like area
in the middle of the Word window. But that’s not all! As you type, you may
notice other things going on. These aren’t bugs crawling on the screen, nor
are they signs that you need to have your eyes checked. These side effects of
typing may puzzle you or annoy you; either way, this section explains things.
The left end of the status bar
The reason it’s called the status bar is that it can show you the status of your
document, lively updating the information as you type, as shown in Figure 2-2.
The type of information that’s displayed, as well as how much information is
displayed, depends on how you’ve configured Word. Chapter 30 explains
which features the status bar can display.
The status bar also displays information when you initially open a docu-
ment, giving the document’s name and character count. That disappears
quickly, however.
When a document is saved, the status bar displays information about
the save, though often the information appears too fast to see.
Page position count
Word count
Other stuff may appearProofing
Figure 2-2:
Stuff that
grows on
the status
bar.
31
Chapter 2: Making Friends with the Keyboard
Curse you, StickyKeys!
As your mind wanders, your fingers absently
press and release the Shift key. Suddenly, you
see the warning: StickyKeys! By pressing the
Shift, Ctrl, or Alt key five times in a row, you acti-
vate the Windows XP StickyKeys function, a tool
designed to help disabled people more easily use
a computer keyboard. Rather than be glad for the
help, you’re annoyed at the intrusion.
Don’t panic! It’s easy to turn off the StickyKeys
thing: Open the Control Panel’s Accessibility
Options icon to display the Accessibility Options
dialog box. In that dialog box, remove the check
mark by the item labeled Use StickyKeys. Click
OK, and you’ll never be bothered again!
06_036583 ch02.qxp 11/16/06 12:44 PM Page 31
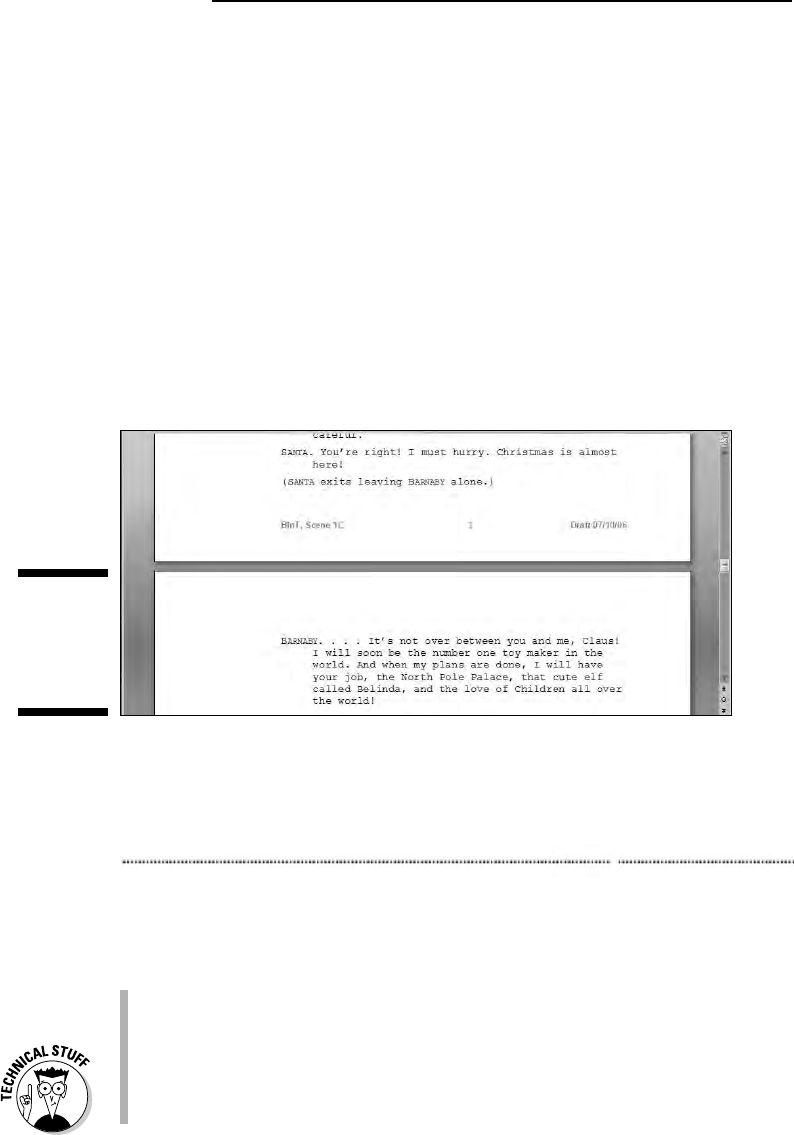
Life between pages
Word not only shows you on the screen your text as it will be printed, but
also tries its best to show you where one page ends and another page begins.
This feature is most helpful because often times you want to keep things on
one page, or it could just be that folks like to know when they’re moving from
one page to the next.
The status bar helps you discover which page you’re working on, as dis-
cussed in the previous section. Visually, Word also helps you by graphically
showing you where one page ends and another begins.
In Print Layout view, you see virtual pages and a space between them, as
shown in Figure 2-3. That’s your best visual clue to where one page ends and
another begins.
In Draft mode, the visual break between pages is shown as a faint line of dots,
like ants marching across the page:
Text appearing above the line of dots is on one page, and text below is on the
next page.
Refer to Chapter 1, the section “The blank place where you write,” for
more information on Print Layout and Draft views.
Technically, the page break is a soft page break, meaning that one
page full of text and Word must start putting text on a new page. See
Chapter 14 for information on forcing page breaks and other types of
page breaks in Word.
Figure 2-3:
A page
break in
Print Layout
view.
32
Part I: Hello, Word!
06_036583 ch02.qxp 11/16/06 12:44 PM Page 32
You can adjust the gap between pages in Print Layout view. Point the
mouse at the gap. When the mouse pointer changes, as shown in the
margin, press the Ctrl key and click the mouse to remove or set the gap.
Use the Page item on the status bar to confirm which page you’re writing
on. Note that the page number changes as you move from one page to
the next.
Spots and clutter in your text
There’s no cause for alarm if you see spots — or dots — amid the text you
type, such as
This•can•be•very•annoying.
What you’re seeing here, and potentially on the screen, are nonprinting char-
acters.
Word uses various symbols to represent things you normally wouldn’t
see: spaces, tabs, the Enter key, and more.
To turn these items on or off, click the Show/Hide button on the Home tab in
the Paragraph group. Click once to show the goobers; click again to hide them.
The keyboard shortcut for the Paragraph button is Ctrl+Shift+8.
Why bother? Sometimes it’s useful to see the marks to check out what’s up
with formatting, find stray tabs visually, or locate missing paragraphs, for
example. (WordPerfect users: This is as close as you can get to Reveal Codes
in Word.)
Strange underlines and colored text
Adding underlining to your text in Word is cinchy; Chapter 11 tells you all
about that character format. Yet, sometimes Word may do some underlining
on its own, with colorful zigzags or dots. What Word is doing is alerting you
to certain special aspects of that underlined text.
Red zigzag: Spelling errors in Word are underlined with a red zigzag. See
Chapter 8.
Green zigzag: Grammatical errors in Word are underlined with a green
zigzag. See Chapter 8.
Blue zigzag: Word-choice errors are really grammatical errors, but Word
flags them with a special blue zigzag regardless. The blue underlined
word is most likely not the best word to use given the sentence structure.
Again, see Chapter 8.
33
Chapter 2: Making Friends with the Keyboard
06_036583 ch02.qxp 11/16/06 12:44 PM Page 33
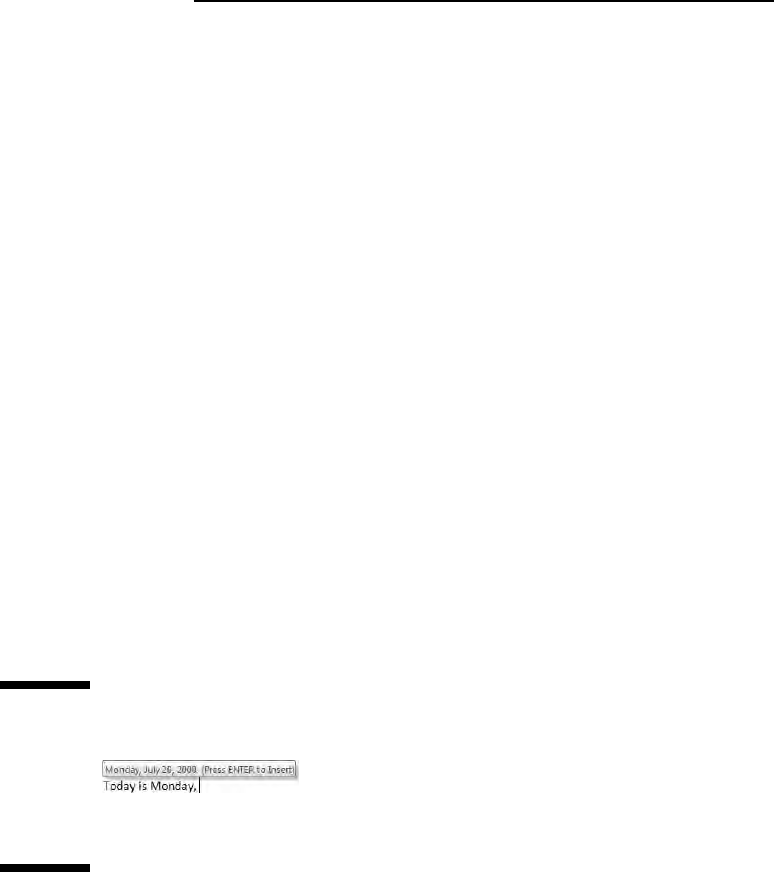
Purple dots: Word’s Smart Tags feature uses purple dots to highlight
information such as names, dates, places, and similar data that can be
shared with other programs in Microsoft Office. Smart Tags are briefly
discussed in Chapter 33.
Blue underlines. Word courteously highlights Web page addresses using
blue, underlined text in your document. You can Ctrl+click that blue
underline text to visit the Web page.
Colored text and underlines: When your text appears in color and under-
lined, or with strikethrough, and assuming that you haven’t specifically
set those formatting options, it means you have
revision marks turned on.
Refer to Chapter 27 for more information on revision marks and how to
turn them off.
Generally speaking, ignore all squiggly lines until you move into the editing
phase for your document. (Well, unless you become obsessive, but that tends
to slow down the writing process.) Later chapters in this book describe how
to deal with the various underlines I just mentioned.
Word can type that for you
Sometimes when you’re typing and in the middle of something, you see a
pop-up bubble appear above your text, as shown in Figure 2-4. That’s the
AutoComplete feature in action. Basically, AutoComplete is Word guessing at
what you’re typing.
When Word has guessed correctly, press the Enter key, and Word inserts the
rest of the text. If Word is out of its mind, keep on typing, and the bubble goes
away.
Figure 2-4:
Word
assumes
that it
knows what
you’re about
to type.
34
Part I: Hello, Word!
06_036583 ch02.qxp 11/16/06 12:44 PM Page 34

Chapter 3
A Quick Guide to Word
(For the Impatient)
In This Chapter
Understanding word processing
Beginning a new document
Typing your thoughts
Formatting chores
Saving the document
Proofing, previewing, and printing
Closing the document
A
s far as word processing software goes, Word is like a wardrobe full of
clothing: Word’s closet of clothes includes a selection of formal wear,
office attire, casual and “golf” clothing, beach and boating wear, gardening
attire, semiformal evening wear, and everything else from shorts to slacks,
socks to spats, and cuff links to top hats. Given all that Word offers, most
folks spend only two seconds in the Word wardrobe, donning every time the
same old pair of jeans and ratty T-shirt.
It’s estimated that most people use less than one-tenth of Word’s features.
There’s nothing wrong with that; the power and variety are there when you
need them. For most word processing chores, though, getting by with the
simple steps outlined in this chapter is about all you need. The rest is fluff,
there when you need it — or when you want your work to look better than
the mediocre junk made by the masses, who only scratch the surface of what
Word can do.
07_036583 ch03.qxp 11/16/06 12:44 PM Page 35

The Overview
The word processing routine works like this:
1. Start a new document.
2. Type.
3. Format.
4. Save.
5. Review or preview (optional).
6. Print.
7. Save and close.
Everyone follows these steps in one way or another. A good Word user
repeats Steps 2, 3, and 4, sometimes varying the order. Overall, most of the
time you’re typing in Word.
When you’ve saved a document and want to work on it again, replace Step 1
with “Open a document on disk.” A lot of word processing involves working
on stuff you’ve already started or on things started by others. Refer to
Chapter 9 for more information on opening documents.
Formatting, at this level, merely involves selecting a font or two, perhaps
applying some character formatting (italics or bold), and maybe adding page
numbering. This is really “formatting as you type,” as opposed to the more-
formal formatting used by the pros. See Part III of this book for chapters on
formatting various parts of a Word document.
Skipping Step 4 is one of the biggest mistakes beginners make. Save your
stuff! Even trivial stuff. Deleting trivial stuff later is easier than re-creating it
from scratch. See Chapter 9 for information on saving.
Steps 5 and 6 are necessary only when you’re done and plan on printing your
work. Refer to Chapter 8 for a discussion on how to proof your document.
Chapter 10 covers printing.
When you’re done, of course, you need to properly quit Word or merely close
and save the document you created. Then you’re ready to do something else
with the computer. Quitting Word is covered at the end of Chapter 1.
36
Part I: Hello, Word!
07_036583 ch03.qxp 11/16/06 12:44 PM Page 36
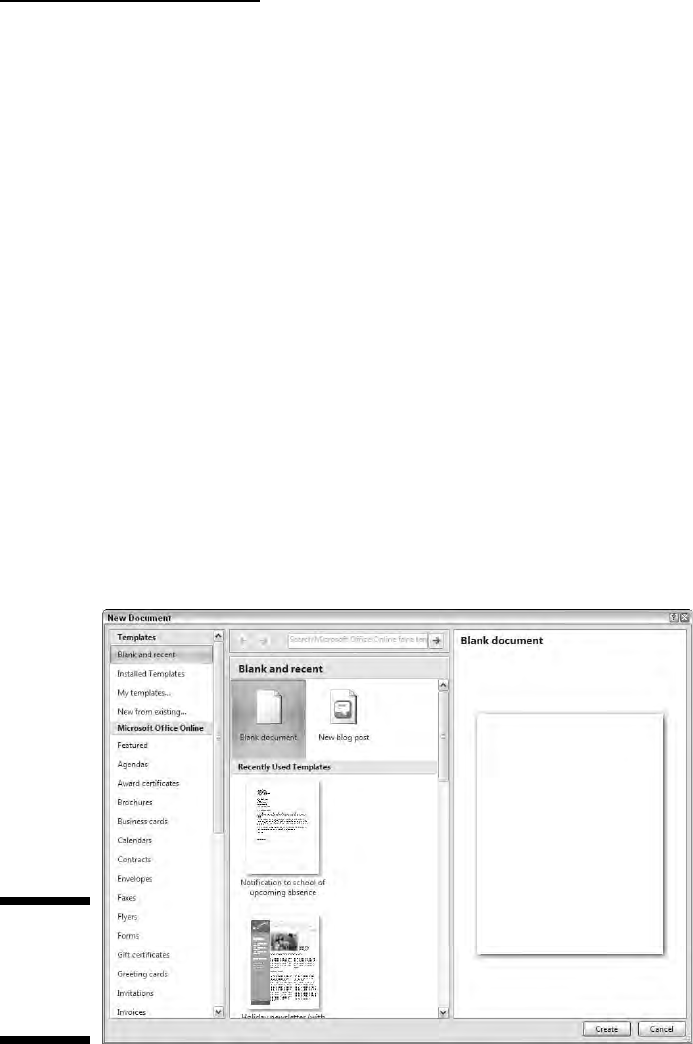
Starting Out with a New Document
When you start your word processing day, Word automatically presents you
with a blank sheet of paper — a blank
document — on which you can start
writing. That’s what most folks do, making this the easiest step of your word
processing day.
If you’re ready to start typing, skip to the next section.
When you’re already using Word and need to start a new document, follow
these steps to summon that blank sheet o’ paper:
1. Choose the New command from the Office Button menu.
The New Document window appears, giving you too many options for
creating a new something-or-other, as shown in Figure 3-1. What you
want is a
blank document.
2. Click the Create button to choose Blank Document.
The blank document option is preselected for you. All you need to
do is click the Create button, or press the Enter key, to make the New
Document window go away, and you see your blank page, ready for
typing.
Figure 3-1:
Overwhelm-
ing new
document
options.
37
Chapter 3: A Quick Guide to Word (For the Impatient)
07_036583 ch03.qxp 11/16/06 12:44 PM Page 37

You can repeat these steps as often as you need new documents; Word lets
you work with many documents at a time. (See Chapter 25 for information on
multiple-document mania.)
Ah, the shortcut: Press Ctrl+N to quickly summon a new blank document
in Word.
Another way to start your work is to open a document on disk. To
do this, use the Open command form the Office Button menu, which
is covered in Chapter 9.
The New Document window contains many options for starting some-
thing new in Word. Rather than use the Blank Document choice, lots
of folks use templates to start documents.
Templates help save time by
predefining document layout and formatting (and sometimes even text).
See Chapter 17 for more information on the handy-dandy template.
Typing the Text
Of all the wacky things you can do with a computer, typing makes the most
sense. In Word, the text you type at the keyboard appears on the screen. It’s
easy. In fact, there are few hang-ups regarding typing in Word.
Refer to the section in Chapter 2 about typing (or the old hunt-and-peck)
for typing tips and suggestions.
A big part of typing in Word includes moving the insertion pointer, or
cursor, around inside your document. Although some people find
moving the cursor an easy thing, I recommend checking out Chapter 4
to help hone your insertion pointer prowess.
Formatting a Document
Formatting makes your documents look professional and not like you’re
using an abused typewriter from a smelly thrift store. And formatting is more
than just making some text italic or bold or adding a heading to your docu-
ment. In Word, formatting includes lines, styles, colors, textures, pictures —
all sorts of fun stuff.
In Word, you can format the following parts of a document:
Characters
Paragraphs
Tabs
38
Part I: Hello, Word!
07_036583 ch03.qxp 11/16/06 12:44 PM Page 38

Pages
Columns
Headers and footers
The entire document
Word lets you manipulate each of these items in a variety of interesting and
creative ways: margins, boxes, spacing, indents, lines, shading, page orienta-
tion, and on and on. But remember the following admonishment:
Your primary duty in word processing is to get down the text.
Text comes first! Get your ideas down. After that, you can go back and format
and change the text style or adjust the margins. Speaking from experience
here, when you get hung up on formatting, you lose your train of thought and
your document suffers. Write first; format afterward.
Most folks format text as they type, by adding italic or bold or whatever.
That’s fine, and this book shows you some keen shortcuts that make such
character formatting easy and not distracting to your chain of thought.
You can also format paragraphs as you write, although I still recommend
keeping the major formatting chores for
after you write your text.
Word also lets you format your document by adding drawings, pictures,
lines, tables, columns, or other elements that can really make things
look snazzy. Parts III and IV covers those topics.
Save Your Stuff!
The biggest mistake made by computer users is not saving their stuff. In Word,
you must soon, regularly, and often save your documents to disk. Only when a
document has been saved on disk can you use it again later or retrieve it after
a power outage or when you forgetfully quit Word without saving.
There are two ways to save a document:
The first time
Every time after the first time
The first time you save a document, you must assign the document a name, or
filename. That’s the name by which you can recognize the document when you
see its icon in Windows. The name also helps you determine the file’s contents.
39
Chapter 3: A Quick Guide to Word (For the Impatient)
07_036583 ch03.qxp 11/16/06 12:44 PM Page 39
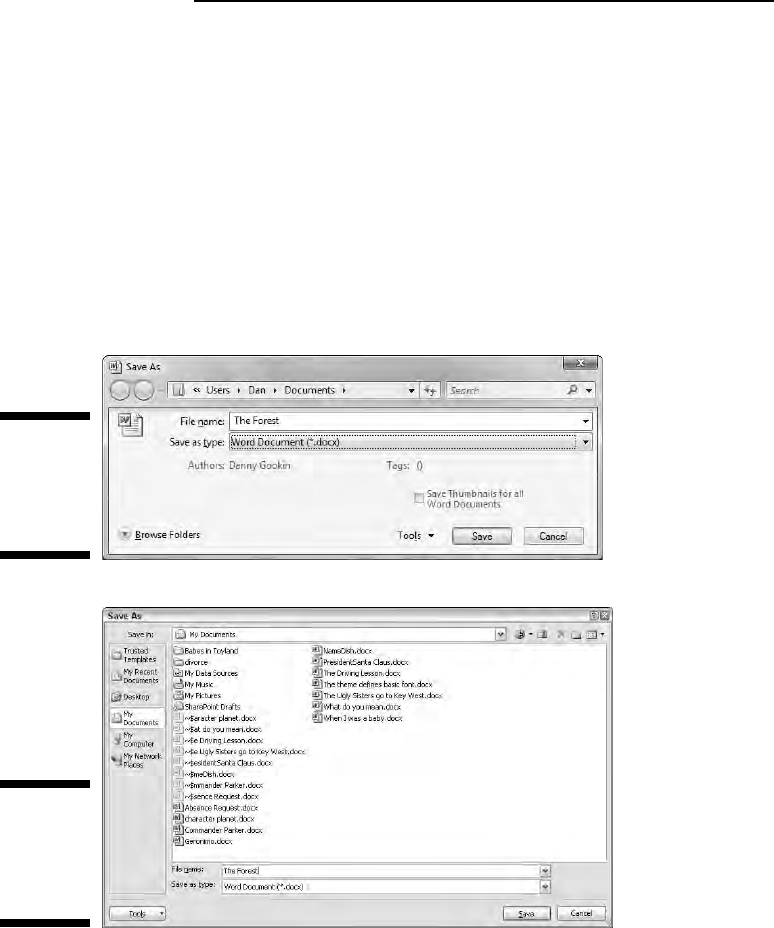
After initially saving a document to disk, you merely need to update it. So,
as you’re working, you save again. There’s no need to choose the filename at
this point; the computer merely overwrites the old file on disk with your new,
updated document.
To save a document to disk the first time, choose the Save command from the
Office Button menu. The first time you save a document, the Save As dialog box
appears. It looks different between Windows Vista and Windows XP, as shown
in Figures 3-2 and 3-3, yet both dialog boxes work the same: Type a name for
your document in the File Name area. (The name “The Forest” is shown in
Figures 3-2 and 3-3.) If you make a mistake typing, press the Backspace key to
back up and erase. Click the Save button to save your document.
To save a document as you’re working on it, just keep choosing the Save com-
mand from the Office Button menu. It updates the document on disk with
your most recent changes.
Figure 3-3:
The Save As
dialog box,
Windows
XP.
Figure 3-2:
The Save As
dialog box,
Windows
Vista.
40
Part I: Hello, Word!
07_036583 ch03.qxp 11/16/06 12:44 PM Page 40

Refer to Chapter 9 for more details about saving your document.
Computers are forgetful beasts. Saving a document to disk is like making
a permanent copy of the document and storing it in a file cabinet. In fact,
the computer refers to documents saved on disk as
files. Understanding
the concept of the file is important in using a computer. If you need
more information, I recommend my book
PCs For Dummies (Wiley
Publishing, Inc.).
If you’ve opened a document already on disk, there’s no need to save it
for the first time; in fact, the document has already been saved once! You
merely need to choose the Save command from the Office Button menu
to update the document as you make changes.
Rather than choose the Save command from the Office Button menu,
you can click the Save button on the toolbar. Or, from the keyboard, you
can press the Ctrl+S keyboard shortcut.
When you save a document, watch the status bar — it temporarily dis-
plays a message telling you that Word is saving your document (or
fast
saving,
for our frequent fliers).
After the document is saved to disk, you see its name displayed on the
window’s title bar. That name is your clue that your document has been
saved to disk.
Finishing a Document
The last thing you need to do is finish your work. Mostly, that involves print-
ing your document. In fact, you may not think of printing simply because
until the word processor came about, every other writing device in history
was also its own printer: the rock, the stylus, the pen, the typewriter — each
of those writing implements printed as the author wrote. With word process-
ing, printing becomes a necessary, if not final, step.
I recommend three steps to the printing process:
Proof
Preview
Print
Each of these steps is covered in this section.
41
Chapter 3: A Quick Guide to Word (For the Impatient)
07_036583 ch03.qxp 11/16/06 12:44 PM Page 41

Proofing your work
Just because you’re writing on a word processor and the text looks really
neat and graphics and nifty things are right up there on the screen doesn’t
mean that what you wrote is perfect. I highly recommend that you proof your
document before you print.
Proofing means reading. Read and review your documents. It also means
checking spelling and grammar, which Word does automatically. Refer to
Chapter 8 for more information.
Previewing a document
Before you print, I recommend previewing what the final document looks like.
Yeah, even though what you’ve written is supposed to look the same on the
screen as it does on the paper, you may still see surprises: missing page num-
bers, blank pages, or half pages, for example. The best way to find those sur-
prises before printing is to use the Print Preview feature.
Choose Print
➪Print Preview from the Office Button menu. The Print Preview
command changes the way Word looks on the screen, as shown in Figure 3-4.
You can review your document one page at a time or as multiple pages. You
can zoom in and out, and you can even edit, although I don’t recommend it.
Click the Close Print Preview button to leave Print Preview mode, in case you
need to return to your document for editing and touch-ups. Otherwise, you
can print directly from Print Preview mode by choosing the Print command
button in the Print group (shown in Figure 3-4).
Printing a document
Printing the document is easy to do:
1. Make sure that the printer is on and ready to print.
2. Choose the Print command from the Office Button menu, or click the
Print button when you’re using the Print Preview feature.
The Print dialog box opens. In this busy place, printing and related activ-
ities happen.
3. Click the OK button.
The document comes out of your printer.
42
Part I: Hello, Word!
07_036583 ch03.qxp 11/16/06 12:44 PM Page 42
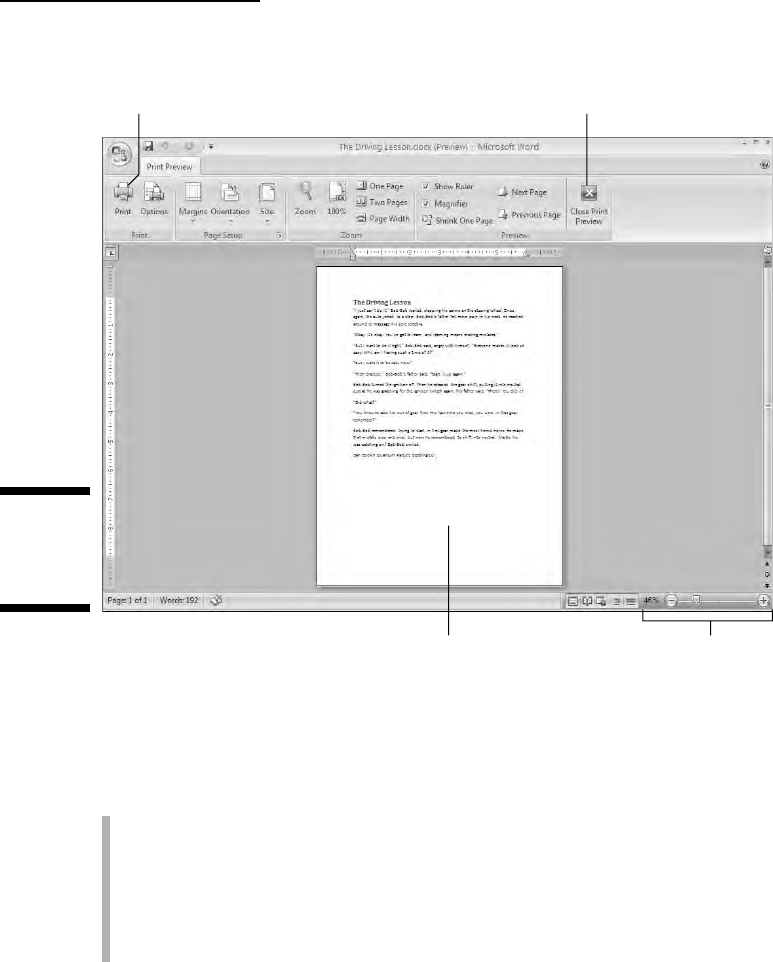
Printing is often a source of woe for computer users. That’s because the
printer really is its own, specialized computer, one that’s designed for print-
ing stuff. Getting your computer and the printer/computer to work well
together can be an art form.
⻬ See Chapter 10 for additional information about preparing the printer if
you need to.
⻬ You can also summon the Print dialog box by pressing Ctrl+P on the
keyboard.
⻬ I highly recommend that you save your document before you print —
just in case! I’m a stickler for saving, saving, saving your document.
Leave
Print
Preview
Print
the
document
Zoom in/outDocument preview
Figure 3-4:
Print
Preview
mode.
43
Chapter 3: A Quick Guide to Word (For the Impatient)
07_036583 ch03.qxp 11/20/06 6:45 PM Page 43

44
Part I: Hello, Word!
Wrapping Things Up
When you’re done writing, you need to do the electronic equivalent of putting
a document away. That electronic equivalent is the Close command: Choose
the Close command from the Office Button menu, or use the handy Ctrl+W
keyboard shortcut.
If you haven’t saved your document recently, Word prompts you to save before
you close; click the Yes button and the document is saved. (If it hasn’t yet been
saved — shame on you! — you see the Save As dialog box; refer to Chapter 9).
When the document has been saved, closing it simply removes it from view.
At that point, you can quit Word, start up a new document, open a document
on disk, or just put away Word and hit another game of Spider Solitaire.
Also refer to Chapter 1 for more quitting options.
You don’t have to choose the Close command. You can choose the Exit
Word command from the Office Button menu if you’re all done with
Word, which is almost the same thing: You’re prompted to save your
document if it needs saving; otherwise, the Exit Word command quits
Word rather than keeps the window open.
If you’re working on only one document and you close it, Word looks like
it has vacated the premises: Tabs and command buttons dim, and other
screen debris goes away. Don’t panic; you’ve just closed a document, and
Word has little else to do. Word sits patiently and waits for your next com-
mand: Start a new document, open a document on disk, or quit Word.
07_036583 ch03.qxp 11/16/06 12:44 PM Page 44

Part II
Word Processing
Basics
08_036583 pt02.qxp 11/16/06 12:45 PM Page 45
In this part . . .
A
lthough it never made the papers, for the past
25 years a word processing revolution has been
taking place. The primitive, steam-powered computers
of the 1970s had word processors that were little more
than text editors, with simple features, such as deleting
and inserting text, search and replace, and maybe even
word wrap.
As competition arose, various word processors had to
evolve with new features to stay competitive. At first,
the features were honestly useful to the wordsmith:
text and paragraph formatting, page numbering, and
even spell checking. But as the competition grew fierce,
some clunky features were added as each word process-
ing program tried to one-up the other. (This explains why
Word has so many commands and options.)
It was in the late 1980s, at the height of the feature wars,
that a basic set of word processing duties evolved. Over
time, these duties were honed into the core tasks covered
by the chapters in this part of the book. These tasks are
what I call the word processing basics.
08_036583 pt02.qxp 11/16/06 12:45 PM Page 46

Chapter 4
Moving Around a Document
Hither, Thither, and Yon
In This Chapter
Using the scroll bars
Moving the insertion pointer
Getting around with keyboard shortcuts
Navigating with the browse buttons
Getting lost and getting back
Using the Go To command
T
he beauty of the word processor is that it allows you the freedom to edit
your text, and to write and rewrite, without having to start over each
time with a new, blank sheet of paper. After the words are on the screen, edit-
ing becomes simple: You can delete text, move text, and insert new text, all
without starting over. But before you can do that, it’s important to know how
to move around a document. This chapter covers one of the first things you
need to learn in Word: how to move about inside your document.
Scrolling a Document
Word’s window can show you only so much of a document at a time. To see
more of the document, you can employ the handy scroll bars as well as some
nifty mouse tricks.
The vertical scroll bar
On the right side of the document part of the window is the vertical scroll
bar (see Figure 4-1). Its operation is similar to the scroll bar in any Windows
program:
09_036583 ch04.qxp 11/16/06 12:45 PM Page 47
Click the up- or down-arrow buttons at the top and bottom of the verti-
cal scroll bar to scroll your document up or down. The document scrolls
one line of text for each time you click those up- or down-arrow buttons.
An elevator button appears inside the scroll bar. You can drag this button
with the mouse, up or down, to scroll the document.
You can click above or below the elevator button to scroll up or down
one screen of text at a time.
The elevator button’s size reflects how much of your document you can see
at a time. When the button doesn’t show up, or is dimmed, the whole docu-
ment appears on-screen. Otherwise, the elevator button gets smaller as your
document grows longer.
The elevator button’s position also helps show you which part of your
document is visible. When the elevator button is at the top of the scroll bar,
you’re viewing pages near the start of the document. When the elevator
button is toward the bottom of the scroll bar, you’re seeing pages near the
document’s end.
Some special bonuses are involved when you drag the elevator button to scroll
through your document. As you drag the button up or down, you see a page
number displayed, as shown in Figure 4-2. When a document is formatted with
heading styles, you also see the heading title below the page number.
Portion of document
visible on screen
Browse buttons
Scroll down one line
Scroll down one screen
Indicates relative
position in document
Elevator button
(drag to scroll)
Scroll up one screen
Scroll up one line
Figure 4-1:
Reading the
vertical
scroll bar.
48
Part II: Word Processing Basics
09_036583 ch04.qxp 11/16/06 12:45 PM Page 48
Scrolling through your document doesn’t move the insertion pointer. If you
start typing, don’t be surprised when Word jerks you back to where the inser-
tion pointer lurks. (Refer to the later section “Commanding the insertion
pointer with the mouse” for help if such a thing bugs you.)
Scrolling a document doesn’t move the insertion pointer!
Also refer to Chapter 26 for information on Word’s Reading mode.
Refer to the section “Using Browse Buttons to Navigate,” later in this
chapter, for information on using the browse buttons, which are located
below the vertical scroll bar.
One paragraph on the horizontal scroll bar
The horizontal scroll bar appears just above the status bar at the bottom of
Word’s window — but only when your document is wider than the window.
When that happens, you can use the horizontal scroll bar to shift the page
back and forth, left and right.
When the horizontal shifting bugs you, consider using Word’s Zoom tool to
adjust the size of your document on the screen. See Chapter 30.
Mouse scrolling tricks
Aside from manipulating the scroll bars, you can use your computer mouse
to fly and flutter about your document. Sadly, this works only when you have
one of those wheel mice. Coincidentally, these tricks are all done by manipu-
lating that unique wheel button:
Roll the wheel up or down to scroll your document up or down. (The
Mouse icon in the Windows Control Panel sets the number of lines the
document scrolls per wheel click.)
Press and hold the wheel button to activate scrolling mode. With the
wheel button down, you can move the mouse up or down to
pan your
document in that direction.
If the mouse’s wheel button also tilts from side to side, you can use it to
pan left and right.
Figure 4-2:
Vital page-
numbering
information.
49
Chapter 4: Moving Around a Document Hither, Thither, and Yon
09_036583 ch04.qxp 11/16/06 12:45 PM Page 49
Moving the Insertion Pointer
The beauty of the word processor is that you can edit any part of your docu-
ment; you don’t always have to work at “the end.” The key to pulling off that
trick is to know how to move the insertion pointer to the exact spot you want.
Moving the insertion pointer is important! Scientific studies have shown that
merely looking at the computer screen does no good. As hard as you wish,
new text appears only at the insertion pointer. And, the text you edit or
delete? Yup, the insertion pointer’s location is important there as well.
Obviously, knowing how to move the insertion pointer is a big deal.
Commanding the insertion pointer
with the mouse
The easiest way to put the insertion pointer exactly where you want it is to
point the mouse at that spot in your text and then click the mouse button.
Point, click, move insertion pointer. Simple.
Moving in small increments
(basic arrow keys)
Using the mouse is perhaps the easiest way to move the insertion pointer, but
most experienced Word users take advantage of the keyboard’s cursor keys to
quickly move the insertion pointer to any position in their documents.
The four basic arrow keys move the insertion pointer up, down, right, and left:
Key To Move the Cursor . . .
↑ Up to the preceding line of text
↓ Down to the next line of text
→ Right to the next character
← Left to the preceding character
Moving the cursor doesn’t erase characters. See Chapter 5 for information on
deleting stuff.
50
Part II: Word Processing Basics
09_036583 ch04.qxp 11/16/06 12:45 PM Page 50
If you press and hold the Ctrl (Control) key and then press an arrow key, you
enter hyper-jump mode. The supercharged insertion pointer leaps desper-
ately in all four directions:
Press These Keys To Move the Cursor . . .
Ctrl+↑ Up to the start of the previous paragraph
Ctrl+↓ Down to the start of the next paragraph
Ctrl+→ Right to the start (first letter) of the next word
Ctrl+← Left to the start (first letter) of the previous word
You can use either set of arrow keys on the computer keyboard, but when
using the numeric keypad, ensure that the Num Lock light is off. Do this by
pressing the Num Lock key. If you don’t, you see numbers in your text rather
than the insertion pointer dancing all over — like444this.
Moving from beginning to end
The insertion pointer also bows to pressure from those cursor keys without
arrows on them. The first couple is End and Home, which move the insertion
pointer to the start or end of things, depending on how End and Home are
used:
Key or Combination To Whisk the Insertion Pointer . . .
End To the end of a line of text
Home To the start of a line of text
Ctrl+End To the very end of the document
Ctrl+Home To the tippy-top of the document
The peculiar cases of PgUp and PgDn
One would think, logically, that the Page Up or PgUp key moves a document
up one page and that the Page Down or PgDn key moves a document down.
’Tain’t so, though. Rather than slide your document around a page at a time,
these keys move things one
screen at a time:
51
Chapter 4: Moving Around a Document Hither, Thither, and Yon
09_036583 ch04.qxp 11/16/06 12:45 PM Page 51
PgUp The PgUp key moves the insertion pointer up one
screen. Or, if you’re looking at the tippy-top of your doc-
ument, pressing this key moves the insertion pointer to
the start of the document.
PgDn The PgDn key moves the insertion pointer down one
screen or to the end of the document, if you happen to
be near there.
If the functions of PgUp and PgDn aren’t confusing enough, you can absorb
these two combinations, which are just this side of pressing all the keys on
the keyboard at one time:
Ctrl+Alt+PgUp Moves the cursor to the top of the current screen.
Ctrl+Alt+PgDn Moves the cursor to the bottom of the current screen.
Ctrl+PgUp and Ctrl+PgDn? Yup, they’re used in Word, but not as you would
expect. Refer to the following section for the details.
Using Browse Buttons to Navigate
Lurking at the bottom of the vertical scroll bar are three buttons, as shown in
the margin. These
browse buttons allow you to scroll through your document
in leaps and bounds of various sizes.
The top button is the
Browse Up button, which is linked to the Ctrl+PgUp key
combination.
The bottom button is the
Browse Down button, which is linked to the
Ctrl+PgDn key combination.
The center button is the What-the-heck-am-I-browsing-for? button, which is
linked to the Alt+Ctrl+Home key combination.
When you click the center button, a pop-up palette of things to browse for
appears, as shown in Figure 4-3. Pointing the mouse at any one of the items
displays text that explains the item in the bottom part of the palette.
Figure 4-3:
Various
things to
browse for.
52
Part II: Word Processing Basics
09_036583 ch04.qxp 11/16/06 12:45 PM Page 52

Unless you’ve chosen another item from the browsing palette (refer to
Figure 4-3), the browse buttons (and Ctrl+PgUp and Ctrl+PgDn) leap through
your document by full pages.
Whenever an option other than Page is chosen from the browsing palette, the
browse buttons change color. So, when the buttons are black, you know that
you’re browsing by page. When the browse buttons turn blue, they’re search-
ing for something else. (Alas, the browsing palette doesn’t tell you which
option is currently chosen.)
Getting Lost and Going Back
With all the various commands for moving the insertion pointer, it’s quite pos-
sible to make a mistake and not know where you are in a document. Yea, verily,
the insertion pointer has gone where no insertion pointer has gone before.
Rather than click your heels together three times and try to get back the
wishful way, just remember this keyboard combination:
Shift+F5
Pressing the Shift+F5 keys forces Word to return you to the last spot you
edited. You can do this up to three times before the cycle repeats. But the
first time should get you back to where you were before you got lost.
The Shift+F5 command is the same as the Browse by Edits option, found
on the Browse palette. Refer to the preceding section.
Sadly, the Shift+F5 keyboard shortcut works only in Word; you can’t use
this command in real life.
Go to Wherever with the Go To Command
Word’s Go To command allows you to send the insertion pointer to a specific
page or line or to the location of a number of interesting things Word can
potentially cram into your document. The Go To command is your word pro-
cessing teleporter to anywhere.
Press the Ctrl+G key combination to see the Go To tab portion of the Find and
Replace dialog box, as shown in Figure 4-4.
53
Chapter 4: Moving Around a Document Hither, Thither, and Yon
09_036583 ch04.qxp 11/16/06 12:45 PM Page 53
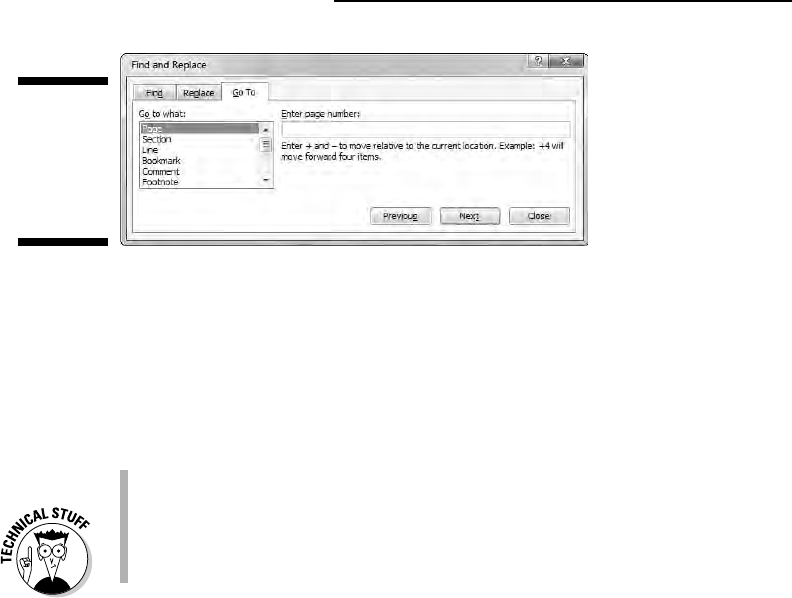
Choose what to go to, such as a page, from the scrolling list on the left side of
the dialog box. Then type the relevant information, such as a page number, in
the box on the right side of the dialog box. Click the Go To button to go to
that location.
For example, type
14 in the box and press Enter, and you go to page 14 — if
you have a page 14 to go to.
You can also summon the Go To command by double-clicking the page
number on the status bar.
Note that you can go to a page relative to the current page. For example,
to go three pages forward, choose Page and type
+3. To go 12 pages
backward, type
-12 in the box.
Figure 4-4:
How to tell
Word to
Go To
you-know-
where.
54
Part II: Word Processing Basics
09_036583 ch04.qxp 11/16/06 12:45 PM Page 54

Chapter 5
Editing Text
In This Chapter
Deleting characters with Backspace and Delete
Deleting lines, sentences, paragraphs, and pages
Splitting and joining paragraphs
Undoing your mistakes
Using the Redo (un-undo) command
W
hat is editing? At its best, editing is making the stuff you write read
better. A good editor helps a writer perfect his words, guiding him in a
way that avoids the ambiguous, keeps the pace tight, completes thoughts,
checks this weird thing called “subject-verb agreement,” and, above all,
ensures that the writer’s intention is best understood by the reader.
Okay. I got that off my chest. Now, deep down in that secret place where you
hide your desire to jump on the couch and run with scissors, as a writer you
resent editing. That’s because at its core, editing is about
deleting text.
Despite all good intentions, the editor is at her best when she’s slashing, snip-
ping, cutting, gouging, severing, goring, obliterating, and replacing those oh-
so-vital words you poured your soul into and struggled over for hours. It’s
hard to accept (even more so because the editor will say that it’s
difficult to
accept), but it’s true: Editing text is about deleting stuff, which is also the
subject of this chapter. Or this chapter’s subject. Whatever.
A good editor also checks your document’s spelling and grammar. See
Chapter 8 for more information.
Deleting Stuff
Credit the guy who put the eraser on the end of the pencil: It’s a given that
human beings make mistakes. The round, soft eraser counterbalances the
sharp point of the pencil in more ways than one.
10_036583 ch05.qxp 11/16/06 12:45 PM Page 55

When the typewriter was at its peak, the ability to erase or untype text was a
popular feature. And, of course, even now — years after the typewriter has
been consigned to the curiosity corner of the public library — people still
know what WiteOut is and why it was a necessity.
On just about every front, the ability to erase text is just as valuable as the
ability to create that text. The same holds true with your word processor.
Deleting is part of the creation process, part of thinking and rethinking, and
part of self-editing. Writing. Deleting. Rewriting. Redeleting. That’s how it goes!
The delete keys: Backspace and Delete
Both creating and destroying text are accomplished by using the computer
keyboard. The majority of keys are used to create text. Only two keys delete
text: Backspace and Delete. How these keys work, and how much of your text
they can delete, depends on how the keys are used.
Deleting single characters
By themselves, the Backspace and Delete keys are used to delete single char-
acters of text:
Backspace key: Deletes the character to the left of the insertion pointer
Delete key: Deletes the character to the right of the insertion pointer
In the following example, the insertion pointer is “flashing” (okay, it
would be
flashing on a computer screen) between the
h and the a in that. Pressing the
Backspace key deletes the
h; pressing the Delete key deletes the a.
No one would have suspected th|at you were a robot,
Hubert, until you began to articulate your love for
the waffle iron.
After you delete a character, any text to the right or below the character
shuffles over to fill the void.
You can press and hold Backspace or Delete to continuously “machine-
gun-delete” characters. Release the key to halt such wanton destruction,
although I recommend using other delete commands (covered in this
chapter) rather than the machine-gun approach.
Special types of text in Word cannot easily be deleted using either the
Backspace or Delete key. An example is an updating text
field, which is
special text that always shows, say, today’s date. This type of text
appears shaded in a light gray color when you try to delete it. That’s
Word reminding you of the unusualness of the text. Press the Delete or
Backspace key again to delete such text.
56
Part II: Word Processing Basics
10_036583 ch05.qxp 11/16/06 12:45 PM Page 56

Deleting a word
To gobble up an entire word, add the Ctrl key to the Backspace or Delete
key’s destructive power:
Ctrl+Backspace deletes the word in front (to the left) of the insertion
pointer.
Ctrl+Delete deletes the word behind (to the right) of the insertion
pointer.
These keyboard shortcuts work best when the insertion pointer is at the
start or end of a word. When you’re in the middle of the word, the commands
delete only from that middle point to the start or end of the word.
After you delete a word, the insertion pointer sits at the end of the preceding
word (or paragraph) when you use Ctrl+Backspace. Deleting a word with
Ctrl+Delete puts the cursor at the beginning of the next word. This is done to
facilitate the rapid deletion of several words in a row.
After deleting the text, Word neatly wraps up the remaining text, snuggling it
together in a grammatically proper way.
No mere pencil eraser can match Ctrl+Delete or Ctrl+Backspace for sheer
speed and terror!
Deleting more than a word
Beyond deleting a word or character, Word lacks keyboard-specific commands
to delete lines or paragraphs of text. There are ways to delete these things —
they’re just not obvious. Before going into the details, first come some
definitions:
A line of text is merely a line across the page (not really a grammatical
thing).
A sentence is a sentence. You know: Start with a capital letter and end
with a period, question mark, or exclamation point. You probably
learned this concept in grammar school, which is why they call it
gram-
mar
school anyway.
A paragraph is one or more sentences, or a heading, ending with a press
of the Enter key.
A page of text is just that — all the text from where the page starts to
where the page ends.
57
Chapter 5: Editing Text
10_036583 ch05.qxp 11/16/06 12:45 PM Page 57

Word can also delete odd-size chunks of text by marking that text as a block.
Refer to Chapter 7 for more information on blocks of text.
Deleting a line of text
The easiest way to delete a line of text is to use the mouse:
1. Move the mouse into the left margin of your document.
You know you’ve found the sweet spot when the mouse pointer changes
into a northeast arrow.
2. Point the mouse pointer arrow at the line of text you want to obliterate.
3. Click the mouse.
The line of text is highlighted, or selected.
4. Press the Delete key to send that line into the void.
Deleting a sentence
Making a sentence go bye-bye is cinchy:
1. Point the mouse at the offending sentence.
2. Press and hold the Ctrl key and click the mouse.
The sentence is selected.
3. Press the Delete key.
Oomph! It’s gone.
Deleting a paragraph
The fastest way to delete a full paragraph:
1. Point the mouse at the paragraph.
2. Click the mouse button thrice.
Thrice means “three times.”
3. Press the Delete key.
If clicking thrice is befuddling you, move the mouse pointer into the left
margin next to the offending paragraph. When the mouse pointer changes to
a northeasterly-pointing arrow, click twice. That selects the entire paragraph,
which you can now whack by pressing the Delete key.
58
Part II: Word Processing Basics
10_036583 ch05.qxp 11/16/06 12:45 PM Page 58

Deleting a page
Pages aren’t something that Word deals with offhand. In fact, pages are really
a printer thing. Even so, to delete a page, mind these steps:
1. Go to the top of the page you want to delete.
Refer to Chapter 4 for information on the Go To command. In the Go To
dialog box, specify the number of the page to delete. (Remember to click
the Close button to banish the Find and Replace dialog box.)
2. Press the F8 key.
The F8 key is used to enter a special selection mode in Word, which I
cover in detail in Chapter 7.
3. Press Ctrl+PgDn.
The insertion pointer moves to the bottom of the page.
4. Press the Delete key.
The page is gone.
Refer to Chapter 10 for special information on deleting that annoying extra
blank page at the end of your document.
Splitting and Joining
Editing can also involve the basic chores of splitting and joining lines or para-
graphs of text. To
split is to make two paragraphs where once there was one.
To join is to make one paragraph where once there were two.
Making two paragraphs from one
To split a single paragraph in twain, locate the point where you want them to
break — say, between two sentences. Move the insertion pointer to that loca-
tion, and then press the Enter key. Word splits the paragraph in two; the text
above the insertion pointer becomes its own paragraph, and the text follow-
ing it then becomes the next paragraph.
Depending on where you placed the insertion pointer, you may need to delete
an extra space at the beginning of the second paragraph or at the end of the
first paragraph.
59
Chapter 5: Editing Text
10_036583 ch05.qxp 11/16/06 12:45 PM Page 59

Making one paragraph from two
To join two paragraphs and turn them into one, you delete the Enter charac-
ter between the paragraphs. To do that, move the insertion pointer to the
start of the second paragraph, and then press the Backspace key. Removing
the Enter character joins two paragraphs. (You may need to add a space
between the newly joined paragraphs.)
Splitting lines with a soft return
The Enter key inserts a hard return into your text to end a paragraph. To end
a line of text without ending a paragraph, a
soft return is used instead. This is
done by pressing Shift+Enter.
The
soft return, or line break, is used primarily in titles and headings. For
example, when you have a long title and need to split it up between two lines,
you press Shift+Enter to insert the soft return. For example, type this line:
Filbert & Hazel
Press Shift+Enter. A new line starts. Continue typing:
A Couple of Nuts
The soft return keeps the title text together (in the same paragraph), but on
separate lines.
Mistakes? Mistakes? Undo
Them with Haste
That quaffing and drinking will undo you.
—
Twelfth Night, William Shakespeare
There’s no need to be afraid of obliterating your text, or of doing anything
else in Word. Anything! That’s because Word sports a handy Undo command.
What you can do, you can also undo.
60
Part II: Word Processing Basics
10_036583 ch05.qxp 11/16/06 12:45 PM Page 60
Now mark me, how I will undo myself
The Undo command undoes anything you do in Word, which includes format-
ting text, moving blocks, typing and deleting text, formatting — the whole
lasagna. You have two handy ways to unleash the Undo command:
Press Ctrl+Z.
Click the Undo command button on the Quick Access toolbar.
I prefer using the Ctrl+Z key combination, but an advantage of the Undo com-
mand button is that it sports a drop-down menu that helps you review the
past several things you’ve done, or that can be undone.
Word’s Undo command is handy, but don’t use it as an excuse to be
sloppy!
Regrettably, you cannot pick and choose from the Undo command
button’s drop-down menu; the menu merely allows you to undo multiple
instances of things all at one time.
There are sporadic times when Undo doesn’t work. Before this happens,
Word warns you. For example, you may see a message such as “There is
not enough memory to undo this operation, Continue?” Proceed at your
own peril.
The Undo command doesn’t work when there’s nothing to undo, or if
something just cannot be undone. For example, you cannot undo a
save-to-disk operation.
To undo an Undo, choose Redo. See the next section.
Redo, the Undo-Undo command
If you undo something and — whoops! — you didn’t mean to, you must use
the Redo command to set things back. For example, you may type some text
and then use Undo to “untype” the text. You can use the Redo command to
get the typing back. You have two choices:
Press Ctrl+Y.
Click the Redo command button on the Quick Access toolbar.
61
Chapter 5: Editing Text
10_036583 ch05.qxp 11/16/06 12:45 PM Page 61
The Redo command serves two functions. First, it does exactly the opposite
of whatever the Undo command does. So, if you type text, Undo untypes the
text, and Redo recovers the text. If you use Undo to recover deleted text,
Redo deletes the text again. (The second function is covered in the next
section.)
Redo, the Repeat Typing command
When the Redo command has nothing left to redo, it changes functions and
becomes the Repeat Typing command. Boy, can the Repeat Typing command
be a real timesaver!
62
Part II: Word Processing Basics
For the few who are fond of Overtype mode
The writing you do in Word is in
Insert mode,
which means that any new text you type is
inserted just before the blinking insertion pointer.
The new stuff pushes any existing text to the
right and downward as you type. This is Insert
mode. But things don’t always have to work that
way.
Insert mode’s evil twin is Overtype mode. In
Overtype mode,
all the text you type overwrites
the existing text and replaces it as you go. The
new text you type literally types over
(overtypes)
the existing text, all except for the Enter key; you
cannot overtype from one paragraph to the next.
I don’t recommend writing in Overtype mode;
Insert mode is fine. All the Word documentation,
all the Microsoft Office Word Help, and this
book assume that Insert mode is what you’re
using. Still, if you insist, to activate Overtype
mode, heed these steps:
1. Choose Word Options from the Office
Button menu.
2. Click Advanced from the list on the left side
of the Word Options dialog box.
3. Put a check mark by the item on the right
labeled Use Overtype Mode.
4. I also recommend putting a check mark by
the item above it, Use the Insert key to
Control Overtype Mode.
5. Click OK.
No visual clue or message on the screen
informs you when Overtype mode is active; you
merely know that you’re in Overtype mode
because any new text you type replaces the
existing text. Use the Insert or Ins key to switch
between Overtype and Insert modes.
10_036583 ch05.qxp 11/16/06 12:45 PM Page 62
For example, type the following lines in Word:
Knock, knock.
Who’s there?
Knock.
Knock who?
Now press Ctrl+Y or choose the Repeat Typing command button from the
Quick Access toolbar. Word repeats the last few things you typed. (If you had
to press the Backspace key to back up and erase, Ctrl+Y repeats only from
that point on.)
The Repeat Typing command can also used to reapply formatting. When
you’re working through a document and changing styles on various
chunks of text, using the Repeat key or Redo command can save oodles
of time, especially in applying formatting. (See Part III of this book for
information on formatting.)
If you can remember the F4 key, it works the same as Ctrl+Y; both are
the Repeat Typing command keys.
63
Chapter 5: Editing Text
10_036583 ch05.qxp 11/16/06 12:45 PM Page 63

64
Part II: Word Processing Basics
10_036583 ch05.qxp 11/16/06 12:45 PM Page 64

Chapter 6
Find and Replace
In This Chapter
Finding text in your document
Using various Find command options
Searching for text that cannot be typed at the keyboard
Hunting down formatting codes
Replacing found text with other text
Fixing formatting with the Replace command
I
magine being able to combine the power of the computer with the ancient
practice of alchemy. Computers are excellent at being obedient; they don’t
mind doing any task, even the most boring, repetitive things. Alchemy had as
its goal the transmutation of lead into gold. Now, combine the two so that the
computer, which can easily find the single word
needle in a haystack of docu-
ments, has the ability to change that word
needle into the word gold, and you
have a quick and potentially misleading introduction to the powerful yet
basic word processing ability of search and replace.
Search and replace is one of the most basic and ancient word processor
functions. In Word, it’s known as
Find and Replace (don’t ask me why), and
it consists of two features: The first feature involves searching up or down
through a document for a tidbit of text, and the second adds the ability to
change that tidbit of text and replace it with something else.
Text Happily Found
Finding text is the domain of the Editing group, found on the far right end of
the Home tab on Word’s Ribbon interface. The Editing group may appear in
its full glory, as shown in Figure 6-1, or it may simply appear as an Editing
button. When it’s a button, you must click that button first to see the palette
of commands, which (surprisingly) looks like what’s shown in Figure 6-1.
11_036583 ch06.qxp 11/16/06 12:46 PM Page 65
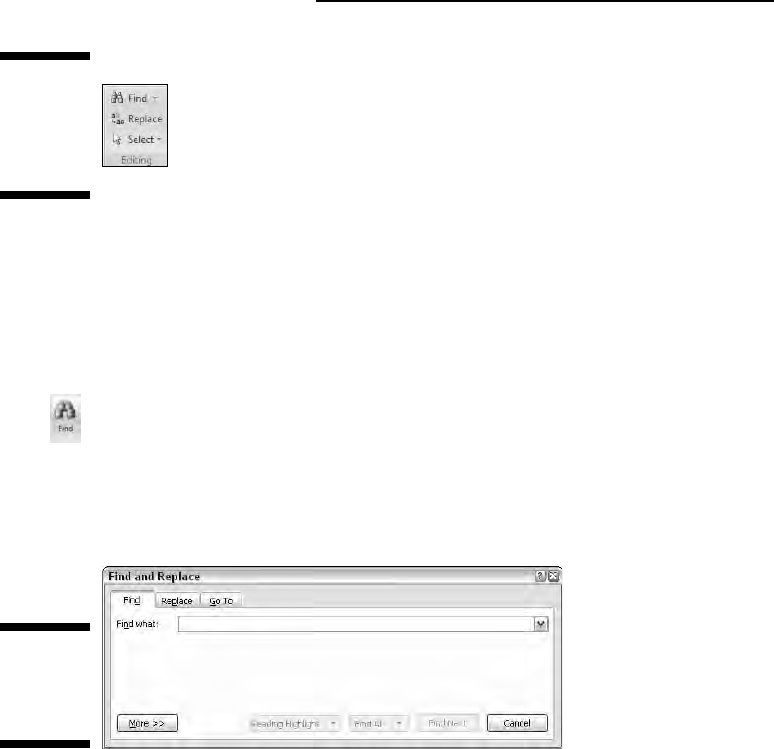
O villainous text tidbit! Seek it out!
Locating text in your document is a snap, whether it’s a protracted diatribe
or the tiniest monosyllabic utterance. Either way, the Find command stands
ready to tackle the task. Abide by these steps:
1. On the Home tab, click the big Find button in the Editing group.
Refer to Figure 6-1; sometimes you may have to click the Editing button
to get to the Find button. If all else fails, use the keyboard shortcut: Ctrl+F.
Clicking the Find button summons the Find and Replace dialog box,
illustrated in Figure 6-2.
2. Type the text you want to find into the Find What box.
Be exact. For example, if you want to find yourself, type yourself — no
period or spaces or quotes. Type only the text you’re looking for.
3. Click the Find Next button to start the search.
Or, you can just press Enter.
Word searches for the text you typed, starting from the insertion pointer’s
location to the end of the document. If any text is found, it’s highlighted
(or
selected) onscreen, and the insertion pointer moves to that location in
your document. At that point, you can click the Cancel button to make the
Find and Replace dialog box go away.
Figure 6-2:
The Find
and Replace
dialog box.
Figure 6-1:
The full
Editing com-
mand button
group.
66
Part II: Word Processing Basics
11_036583 ch06.qxp 11/16/06 12:46 PM Page 66
The Find and Replace dialog box may already display text in the Find
What box. If so, you can delete that text by pressing the Backspace key.
Do not end the text with a period unless you want to find the period too.
The Find command can find things that you can’t readily type in, such as
the Tab or Enter key. See the section “Finding stuff you can’t type in,”
later in this chapter.
If you’re not sure whether the text is typed in uppercase or lowercase
letters, use lowercase.
If the text isn’t found, you may be asked to search “at the beginning,” which
means the beginning of the document. Click the Yes button to do so.
If the text isn’t found and you’re certain that it’s in there, check your
spelling. If that’s okay, try searching for a single word rather than two or
more words or a sentence.
Word finds text only in the current document (the one you see on the
screen). To find text in another document, click that document’s button
on the taskbar and try searching again.
To find an additional occurrence of the text, click the Find Next button.
You can use the drop-down arrow gizmo (to the right of the Find What
text box) to display a scrolling list of text you’ve previously searched for.
To search again for a bit of text you’ve already searched for, click the
drop-down arrow and click the text you want to find again. Click the Find
Next button, and Word frantically begins searching.
You can limit the Find command’s scope (the range of text it searches
through) by marking text as a block. See Chapter 7 for block info.
After using the Find command, you can use the Browse Down button to
continue your finding foray. Simply close the Find and Replace dialog
box, and then click the Browse Down button (or press Ctrl+PgDn). So, if
you’ve already searched for and found
crap, clicking the Browse Down
button finds even more
crap.
The Super Find command
On a simple level, the Find command hunts down chunks and chunklettes of
text. Yet the Find command is far more powerful than that. You can use the
Find command to find text
exactly as it’s typed, text you cannot type, format-
ting commands, and just about anything in a document. Yes, it’s still the same
Find command, but it’s
more.
67
Chapter 6: Find and Replace
11_036583 ch06.qxp 11/16/06 12:46 PM Page 67
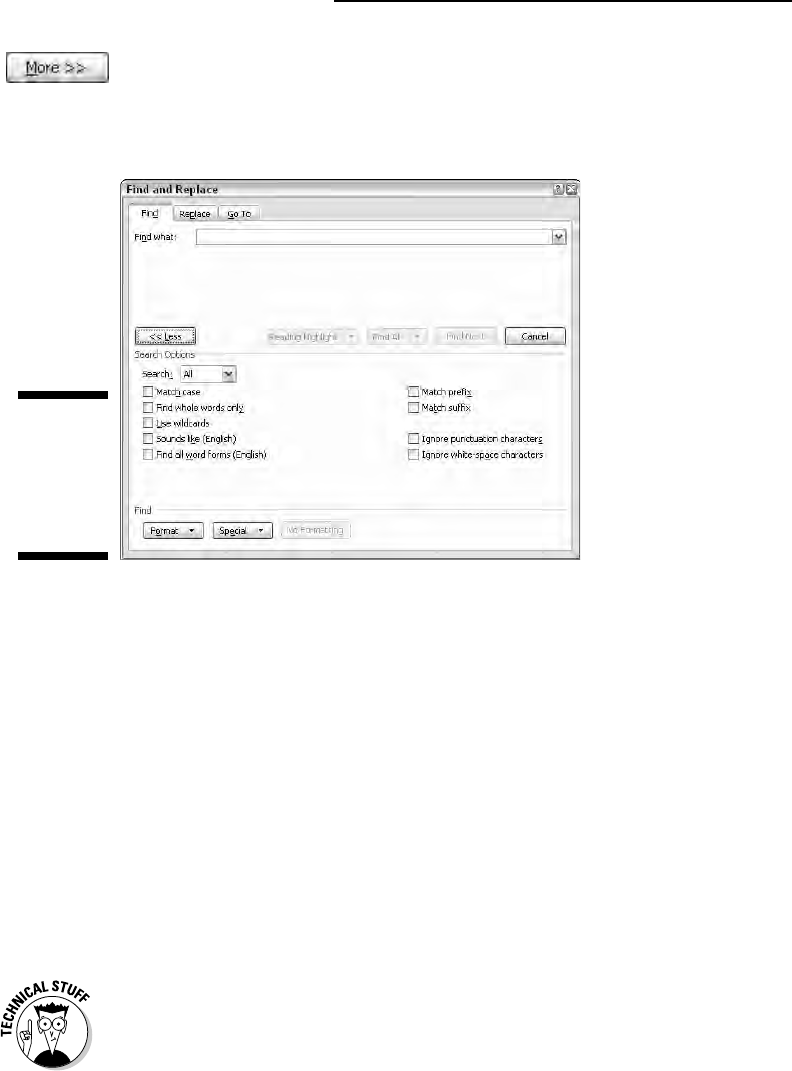
To unveil the Super Find command, beckon forth the Find and Replace dialog
box (press Ctrl+F). Click the More button. The Find and Replace dialog box
gets taller, with a bunch of options and doodads at the bottom, as illustrated
in Figure 6-3.
The following sections tell you why you may want to mess with some of the
doodads in the Find More dialog box.
Finding an exact bit of text
There’s a difference between Curt and curt. One is a name, and the other is
being rude and abrupt. To use the Find command to find one and not the
other, select the Match Case option under Search Options. That way,
Curt
matches only words that start with an uppercase C and have lowercase urt in
them.
Finding a whole word
The Find Whole Words Only option allows you to look for words such as right
and set without also finding words like alright and upset.
Finding text that you know only a small part of (by using wildcards)
Here’s a can-o-worms for you. It’s possible to use wildcards to find words that
you know only a part of, or a group of words with similar letters. This trick is
a highly technical operation, so I advise you not to drive or operate heavy
machinery when reading the following text.
Figure 6-3:
The more
detailed
Find and
Replace
dialog box.
68
Part II: Word Processing Basics
11_036583 ch06.qxp 11/16/06 12:46 PM Page 68

The two basic wildcard characters are ? and *, where ? represents any single
letter and * represents a group of letters. Suppose that you type the following
line in the Find What box:
?up
If you select the Use Wildcards option (in the More part of the Super Find and
Replace dialog box), Word searches for any three-letter word that starts with
any old letter but must end with “you pee” —
cup, pup, and sup, for example.
The asterisk finds a group of characters, so the following wildcard locates
any word starting with
w and ending with s (there are lots of them):
w*s
Finding text that sounds like something else
The Sounds Like (English) option allows you to search for homonyms, or
words that sound the same as the search word. You know:
their and there
or deer and dear or hear and here. How this is useful, I’ll never know.
Oh! This isn’t a rhyming search command. If you try to use it to find everything
that rhymes with
Doris, for example, it doesn’t find Boris, chorus, pylorus, or
anything of the like.
Finding variations of a word
Thanks to global warming, the protagonist in your novel no longer walks
across an isthmus; he
swims. And that’s some journey! To make Word search
for every variation of
walk (walking, walked, and so on), type walk in the
Find What box and select the Find All Word Forms (English) option in the
Search Options area.
Searching this way or that
When I’d lose things as a kid, my mom would say “Retrace your steps!”
This wisdom can be applied in Word as well, where the Find command can
be directed to look not only forward through a document, but backwards as
well. The secret is found in the Search drop-down list in the More part of the
Find and Replace dialog box:
All: When this option is chosen, Find searches the entire document, from
the insertion pointer’s location down to the end of the document, back
up to the beginning, and then back to the toothpick cursor’s location.
Down: Find searches from the toothpick cursor’s location to the end of
your document, and then it stops.
Up: Find searches from the toothpick cursor’s location to the start of
your document, backward. Then it stops.
69
Chapter 6: Find and Replace
11_036583 ch06.qxp 11/16/06 12:46 PM Page 69
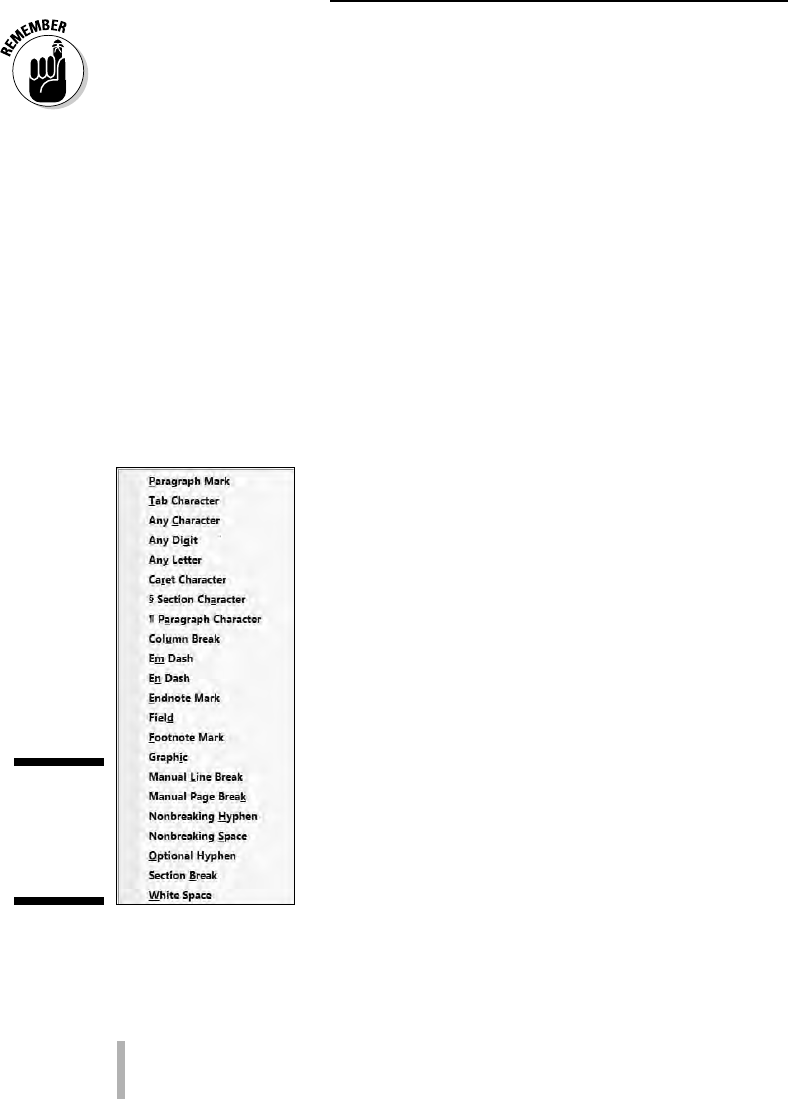
You can also use the Browse buttons to repeat the Find command up or
down, depending on which Browse button you press.
Finding stuff you can’t type in
There are things you can search for in a document, things that just cannot
be typed at the keyboard. No, I’m not talking about nasty things; this isn’t
a censorship issue. Instead, I’m referring to things like tabs, Enter keys
(paragraphs), page breaks, graphics, and other, similar non-typable things.
To find a special, unprintable character, click the More button to see the
superdooper Find and Replace dialog box (refer to Figure 6-3), and then click
the Special button. Up pops a list of various things Word can search for but
that you would have a dickens of a time typing, similar to what’s shown in
Figure 6-4.
Naturally, the items on the list may not be recognizable to you. That figures.
There are 22 things on the list, and I’ve used maybe 6 of them myself. Here
are some of the handier things you can use from the Special pop-up menu:
Any Character, Any Digit, and Any Letter are special characters that
represent, well, just about anything. These items can be used as wild-
cards for matching lots of stuff.
Figure 6-4:
Items to
search for
that you
can’t type.
70
Part II: Word Processing Basics
11_036583 ch06.qxp 11/16/06 12:46 PM Page 70
Caret Character allows you to search for a caret (^) symbol, which is
a special character. If you type just the caret symbol itself (^), Word
thinks that you’re trying to type something special, as covered later
in this section.
Paragraph Mark (¶) is a special character that’s the same as the Enter
character — what you press to end a paragraph.
Tab Character is the character that moves the cursor to the next tab mark.
White Space is any number of blank characters: one or more spaces,
tabs, empty lines, or a combination of each one.
Choose one of the items from the list to search for that special character.
When you do, a special, funky shorthand representation for that character
(such as ^t for Tab) appears in the Find What box. Click the Find Next button
to find that character.
To search for the Enter key press, which marks the end of a paragraph,
choose Paragraph Mark. To search for the paragraph character, ¶, choose
Paragraph Character.
Yes, you can mix special characters with plain text. For example, to find a
Tab character followed by
Hunter, you use the Special button to insert the
tab character (^t on the screen), and then type
Hunter. It looks like this:
^tHunter
It’s possible, although nerdy, to type the special characters manually.
Although this method avoids using the Special menu, which can be big
and baffling, it means that you need to memorize the character codes.
Each one starts with the caret character, ^, and some of them are logical,
such as ^p for Paragraph Mark (Enter) or ^t for Tab. Here are a few other
handy shortcuts, for reference:
Paragraph mark ^p
Tab character ^t
Any character ^?
Any digit ^#
Any letter ^$
Caret character ^^
Em dash ^+
En dash ^=
Manual line break ^1
Manual page break ^m
White space ^w
71
Chapter 6: Find and Replace
11_036583 ch06.qxp 11/16/06 12:46 PM Page 71
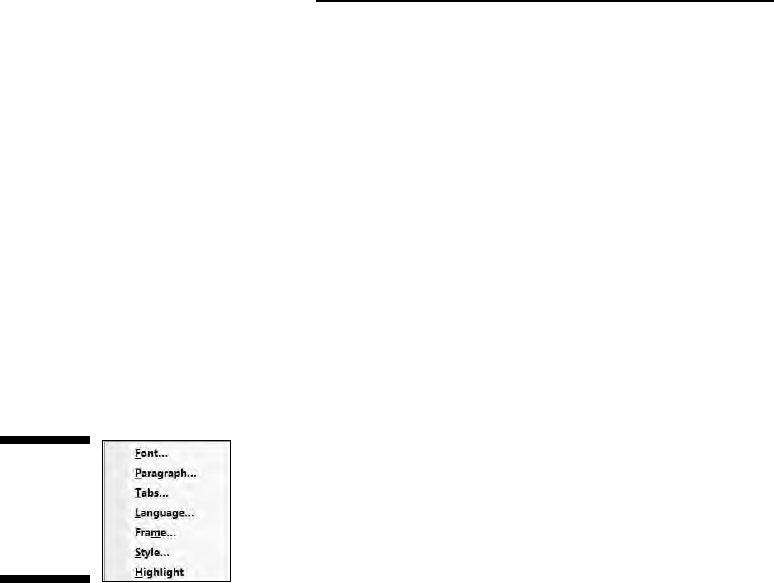
Finding formatting
In its most powerful superhero mode, the Find command can scour your
document for formatting information. For example, if you want to find only
those instances of the word
lie in boldface type, you can do that. Before you
attempt this task, I recommend that you understand Word’s formatting abilities
and commands, which are covered in Part III of this book.
The formatting options you can search for are revealed to you with a click
of the Format button, which appears in the Find and Replace dialog box
when the More button is clicked (refer to Figure 6-3). Clicking the Format
button displays a pop-up menu of Word’s primary formatting commands, as
shown in Figure 6-5. Choosing any item from that list displays a correspond-
ing dialog box, from which you can choose the formatting attributes to
search for.
Suppose that you want to find a large
goose egg in your document. Follow
these steps:
1. Summon the Find and Replace dialog box.
Pressing Ctrl+F is the only sane way to do this step.
2. Type goose egg in the Find What box.
3. If needed, click the More button to display the bottom part of the Find
and Replace dialog box.
4. If the No Formatting button is available, then click it.
This button is used to clear any previous formatting attributes you may
have searched for. If the button can be clicked, click it to clear out those
attributes and start over afresh.
5. Click the Format button.
Figure 6-5:
Various
formatting
options to
search.
72
Part II: Word Processing Basics
11_036583 ch06.qxp 11/16/06 12:46 PM Page 72
6. Choose Font from the pop-up list.
The Find Font dialog box appears, which is where you set or control var-
ious text attributes. Say that the large goose egg you’re searching for is
24 points tall.
7. Choose 24 from the Size list.
Look in the upper-right corner of the Find Font dialog box.
8. Click OK.
The Font dialog box goes away, and you return to the Find and Replace
dialog box.
Notice the text just beneath the Find What box. It says
Format: Font:
24 pt
. That text is telling you that Word is now geared up to find only
text that is 24 points tall — about twice the normal size.
9. Click the Find Next button to find your formatted text.
If you want to search only for a format, leave the Find What text box blank
(refer to Step 2). That way, you can search for formatting attributes without
caring what the text reads.
To find specific text attributes (bold or underline, for example), use the
Find Font dialog box to choose those attributes.
You can use this technique to look for specific occurrences of a font,
such as Courier or Times New Roman, by selecting the font from
the selection list. Scroll through the font menu to see what you can
choose.
You can also search for paragraph formatting, such as an indented para-
graph, by choosing Paragraph rather than Font from the Format pop-up
list in the Find and Replace dialog box.
Yes, you can search for more than one formatting attribute at a time.
Just keep choosing format options from the Format button.
Word remembers your formatting options! The next time you want
to search for plain text, you need to click the No Formatting button.
Doing so removes the formatting options and allows you to search
for text in any format. After you forget to do this a few times, you
get really heated up that Word cannot find your text. Do not forget
to click the No Formatting button to return Word to normal text-
finding mode!
73
Chapter 6: Find and Replace
11_036583 ch06.qxp 11/16/06 12:46 PM Page 73
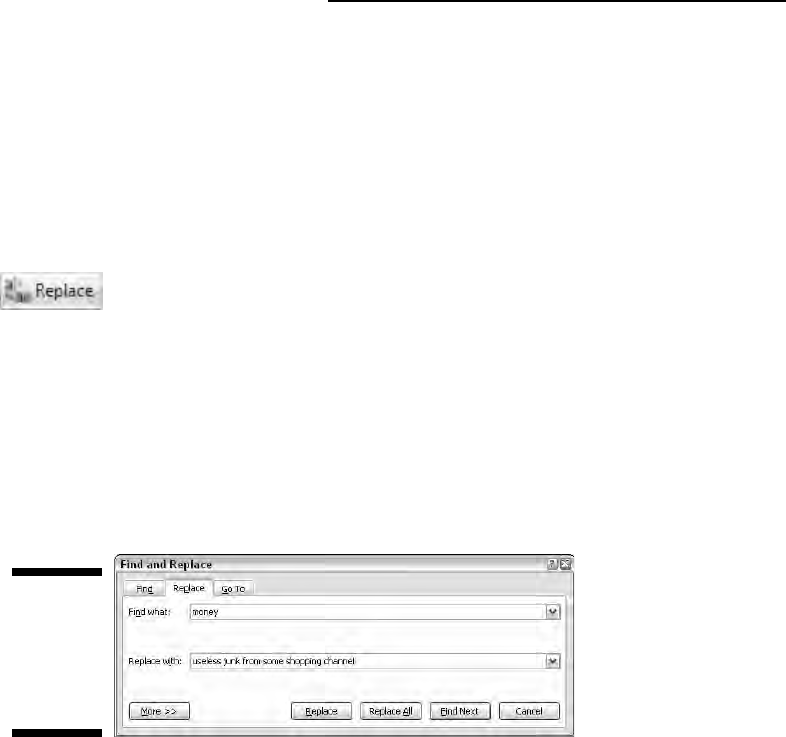
Replacing What’s Been Found
The true power behind the Find command is not only its ability to find text
but also to replace that text with something else. Call it alchemy, but it works!
The key is the Replace command. With it, you can turn lead into gold, change
Peoria into Pocatello, or Lance Beauchamp, the multimillionaire playboy and
international financier, into Paula Dowd, the renowned psychic and horticul-
turalist. Here’s how you do that, and more:
1. On the Home tab, click the Replace command button, found in the
Editing group on the far right side.
When the Replace command button isn’t visible in the Editing group
(refer to Figure 6-1), click the Editing button, and then choose the
Replace command button from the pop-up group of command buttons
that appears.
Choosing the Replace command button displays the Find and Replace
dialog box, as shown in Figure 6-6. This place should be familiar if you’ve
been using the Find command. After all, finding stuff is the first part of
using Find and Replace.
2. In the Find What box, type the text you want to find.
This is the text you want to replace with something else. So, if you’re
finding Lance and replacing him with Paula, type
Lance.
Press the Tab key when you’re done typing.
3. In the Replace With box, type the text you want to use to replace the
original text.
To continue from the example in Step 2, you type Paula here.
4. Click the Find Next button.
Figure 6-6:
The Replace
part of the
Find and
Replace
dialog box.
74
Part II: Word Processing Basics
11_036583 ch06.qxp 11/16/06 12:46 PM Page 74
At this point, the Replace command works just like the Find command:
Word scours your document for the text you typed in the Find What
dialog box. When that text is found, you move on to Step 5; otherwise,
the Replace command fails because there’s nothing to replace.
5. Click the Replace button.
Word replaces the found text, highlighted on-screen, with the text typed
in the Replace With box.
6. Keep replacing.
After you click the Replace button, Word immediately searches for the
next instance of the text, at which point you keep repeating Step 5 until
the entire document has been searched.
7. Read the summary that’s displayed.
After the last bit of text is replaced, a dialog box appears and lists a sum-
mary for you. For example, it might say “Word has completed its search of
the document and has made 9 replacements.” Of course, the number of
replacements depends on what you were searching for and yadda-yadda.
8. Click the Close button.
You’re done!
All the restrictions, options, and rules for the Find command also apply
to finding and replacing text. Refer to the section “Text Happily Found,”
at the start of this chapter.
The keyboard shortcut for the Replace command is Ctrl+H. Huh? Yeah,
Ctrl+H. There’s no way to remember it, other than if you look at the com-
puter keyboard, you see that the F, G and H keys appear next to each
other, and Ctrl+F, Ctrl+G, and Ctrl+H all summon the same dialog box.
Coincidence? Honestly!
The Replace command’s dialog box also sports a More button, which
can be used exactly as the More button for the Find command. See the
section “The Super Find command,” earlier in this chapter.
Word may find your text in the middle of another word, such as use in
causes. Oops! Click the More button and select the Find Whole Words
Only option to prevent such a thing from happening.
If you don’t type anything in the Replace With box, Word replaces your
text with
nothing! It’s wanton destruction!
Speaking of wanton destruction, the Undo command restores your docu-
ment to its preceding condition if you foul up the Replace operation. See
Chapter 5 for more information.
75
Chapter 6: Find and Replace
11_036583 ch06.qxp 11/16/06 12:46 PM Page 75

The miracle of the Replace All button
The steps in the previous section work well to find and replace tidbits of text
to and fro in your document. But it can often be tedious to keep pressing that
Replace button over and over. That’s why the Replace command’s dialog box
sports a handy Replace All button.
The Replace All button directs the Replace command to find all instances of
the Find What text and — without question — replace it with the Replace
With text. To use this button, simply click the Replace All button in Step 5 in
the previous section. Then skip to Step 8.
Finding and replacing formatting
Just as the Find command can search for text with specific formatting, you
can use the Replace command to replace text and apply formatting or to
replace one type of formatting with another. Needless to say, this process
can be very tricky: Not only do I recommend that you be familiar with Word’s
formatting commands, but you should also be well-practiced in using the
Replace command.
Suppose that you want to replace all instances of underlined text with italic.
Underlined text reeks so much of typewriter, and that’s just too 20th century
for these modern times. By replacing underline with italic, you’re searching
for one text format and replacing it with another; you’re not searching for
text at all. So, be careful. Do this:
1. Press Ctrl+H to summon the Find and Replace dialog box.
2. Click the More button, if necessary, to display the full dialog box.
3. Click to select any text in the Find What box, and then delete that text
by pressing the Backspace key.
4. Click the Format button and choose Font from the pop-up menu that
appears.
The Find Font dialog box appears.
5. In the Find Font dialog box, choose the single underline graphic from
the Underline style drop-down list.
6. Click OK.
Back in the Find and Replace dialog box, the text Format: Underline
should appear before the Find What box.
76
Part II: Word Processing Basics
11_036583 ch06.qxp 11/16/06 12:46 PM Page 76

7. Click to select any text in the Replace With box and press Backspace
to delete that text.
8. Choose Font from the Format button’s pop-up list.
9. In the Find Font dialog box, choose Italic from the Font Style list.
10. Click OK to close the Find Font dialog box.
Below the Replace With box, it should say Format: Font: Italic.
11. Click the Replace All button.
Word scours your document and replaces any underlined text with
italic.
12. Click OK when the find-and-replace is done.
As long as you set things up carefully, searching and replacing text formatting
is a quick and easy way to spiff up a boring document.
To replace one format with another, such as underline with italic, be
sure to leave the Find What and Replace With text boxes empty. That
way, only the text formatting is replaced.
An easier way to update formatting in a document is to use and apply
styles. Refer to Chapter 16 for details.
Don’t forget about the No Formatting button! You need to click it if you
want to change the formats or replace text without paying attention to
formats.
77
Chapter 6: Find and Replace
11_036583 ch06.qxp 11/16/06 12:46 PM Page 77

78
Part II: Word Processing Basics
11_036583 ch06.qxp 11/16/06 12:46 PM Page 78

Chapter 7
Text Blocks, Stumbling Blocks,
Writer’s Blocks
In This Chapter
Understanding text blocks
Marking a block with the keyboard
Selecting text with the mouse
Using the F8 key to mark text
Un-blocking text
Copying and moving blocks of text
Pasting text in various ways
Working with collect and paste and the Clipboard
W
riting involves blocks. This began with the ancient Egyptians, who
perfected writing on blocks, quite literally. Entire epochs were pre-
sented on a wall of stone. When the ancient Egyptian editor arrived, she
would point out problems in the wall, so the writer would have to replace
some blocks of text or move other blocks around. And if the writer hesitated,
the editor would hit him over the head with what would then become the
writer’s block. It was quite an ingenious system.
As writing moved to paper, working with blocks became obtuse. Thanks to
the invention of scissors and rubber cement, it was possible to cut and paste
blocks of text, but the result was sloppy. Often the writer would play with the
rubber cement, rolling it into tiny balls to flick at the back of the editor’s head
when she wasn’t looking. The system was quite awkward.
12_036583 ch07.qxp 11/16/06 12:46 PM Page 79
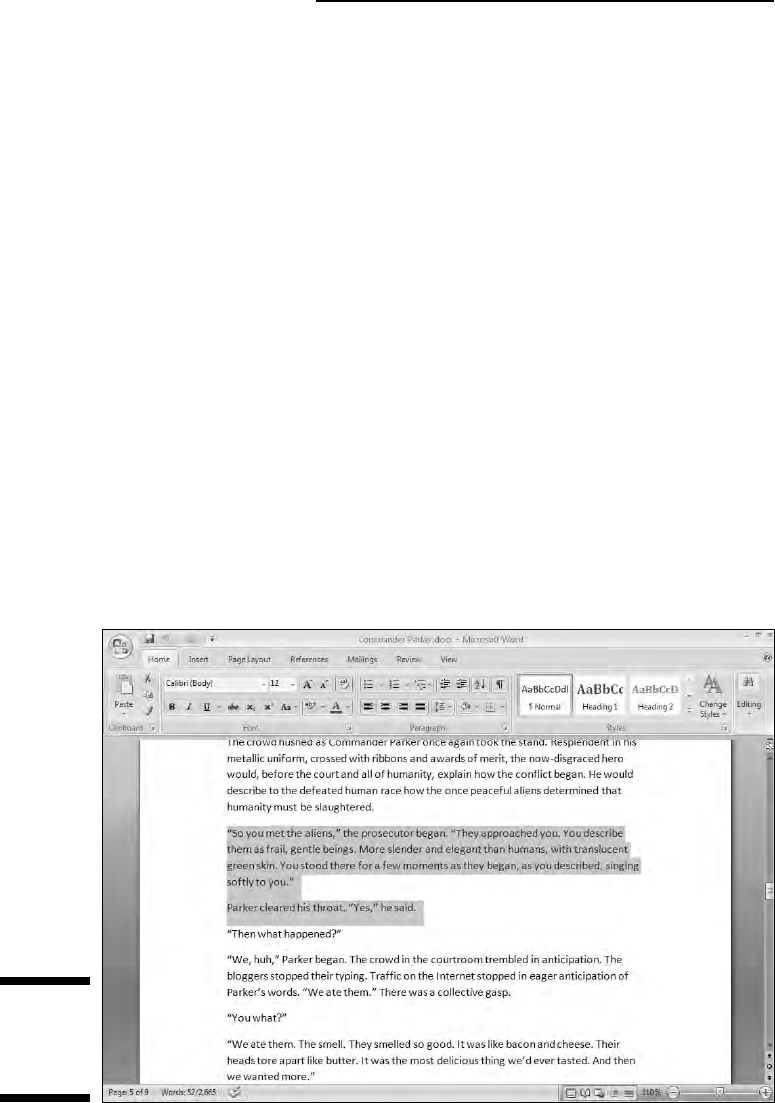
Only with the dawn of the word processor has working with blocks returned
to its Stone Age glory. Word lets you rope off any random chunk of text —
a word, sentence, paragraph, or more — and mark that chunk as a block.
You can then do amazing things with that block of text, things that are cov-
ered in this chapter. Yes, it’s time once again to play with blocks.
What Is a Block of Text?
A block of text is simply some portion of text in your document, from a single
character to the entire document. The block has a beginning and an end, and
the block itself consists of all the text between.
You create a block by selecting text.
Selecting is done by using the keyboard,
the mouse, or various other text-selection techniques covered in this chapter.
On the screen, the block appears highlighted, as shown in Figure 7-1.
By marking off text as a block, you can perform certain actions, or use vari-
ous Word commands, that affect only the text in that block. Or, you can copy
or move the block of text. It’s all covered later in this chapter as well as in
other places throughout this book. Indeed, blocks are handy things to use in
a word processor.
Figure 7-1:
A block of
text is
selected.
80
Part II: Word Processing Basics
12_036583 ch07.qxp 11/16/06 12:46 PM Page 80
A block of text in Word includes all the letters and characters and the
text formatting.
Graphics and other nontext elements can also be selected as a block. In
fact, you can select graphics along with text in the same block.
When the status bar is displaying a word count, the number of words
selected in the block of text is displayed, next to the total number of
words in the document. (Refer to Figure 7-1.)
When the Find command locates text, that text is selected as a block.
Refer to Chapter 6 for more information on the Find command.
Selecting text also means selecting characters such as tabs and the
Enter key press that marks the end of a paragraph. Fortunately, Word
shows the Enter “character” as an extra blank space at the end of a para-
graph. When you select that blank, you select the whole paragraph as a
paragraph. To avoid selecting the Enter character, don’t select the blank
space at the end of a paragraph.
Marking a Chunk of Text As a Block
Word offers you many ways to mark text as a block in your document.
This section mulls over the possibilities.
Using the keyboard to select text
The secret to using the keyboard to select text is the Shift key. By holding down
the Shift key, you can use the standard keyboard commands that move the inser-
tion pointer to select blocks of text. Table 7-1 has some suggestions for you.
Table 7-1 Shifty Selection Wizardry
To Do This Press This
Select a character at a time to the right of the insertion pointer Shift+→_
Select a character at a time to the left of the insertion pointer Shift+←
Select a block of text from the insertion pointer to the end of Shift+End
the line
Select a block of text from the insertion pointer to the beginning Shift+Home
of the line
Select a block of text from the insertion pointer to a line above Shift+↑
Select a block of text from the insertion pointer to a line below Shift+↓
81
Chapter 7: Text Blocks, Stumbling Blocks, Writer’s Blocks
12_036583 ch07.qxp 11/16/06 12:46 PM Page 81
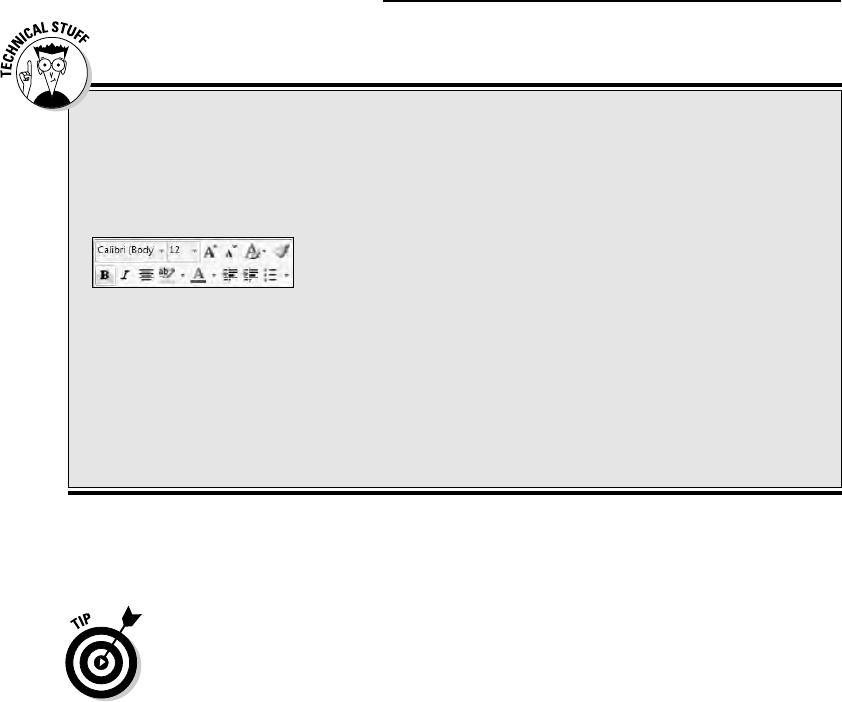
You can use any keyboard cursor-movement command (they’re listed in
Chapter 4), but I recommend using this Shift key method for selecting only
small chunks of text. Otherwise, you may end up tying your fingers into knots!
Either Shift key works, although I prefer to use the left Shift key and then
work the arrow keys on the right side of the keyboard.
Marking a block with the mouse
Forget cheese. The computer mouse was born to mark text, by selecting vast
swaths of words with a wide sweep of your hand, by clicking a number of
times, or by using the old point-and-stretch routine. Mickey may rule a king-
dom, but your computer mouse rules over selecting text in your computer.
Dragging over text to select it
The most common way to select text is by using the computer mouse thus:
1. Point the mouse at the start of the text block.
2. Drag the mouse over the text you want to select.
As you drag, text becomes highlighted, or selected. (Refer to Figure 7-1.)
3. Release the mouse — stop the dragging — to mark the end of the block.
You can use these steps to select any old size of block in your document.
82
Part II: Word Processing Basics
Out, damn Mini Toolbar!
When the mouse is used to select text, Word
displays the Mini Toolbar, looking like this:
The
Mini Toolbar
is a
palette
of common format-
ting commands that Word supposes you need for
a quick-format on that selected text. After initially
disliking the Mini Toolbar, I’ve grown to enjoy it.
But I recognize that you may find the Mini
Toolbar more annoying than useful. If so, you
can suppress its display. Follow these steps:
1. Choose the Word Options command from
the Office Button menu.
2. Choose Popular from the list on the left side
of the Word Options window.
3. Remove the check mark by the item Show
Mini Toolbar on Selection.
4. Click OK.
If you would rather not eternally banish the Mini
Toolbar, note that it hides itself whenever you
move the mouse beyond the selected chunk
of text.
12_036583 ch07.qxp 11/16/06 12:46 PM Page 82
This selection technique works best when you use the mouse to drag
over only the text you can actually see on the screen. When you try to
select text beyond what you see on the screen, you have to select and
scroll — which can be unwieldy; the mouse scrolls the text up and down
quickly, and, well, things get out of hand.
When you find yourself becoming frustrated over not selecting all or
part of a word, refer to the later sidebar “Would you rather select text by
letter or by word?”
Selecting text by clicking the mouse
A speedy way to select specific sizes of chunks of text is to match the power
of the mouse with the dexterity of your index finger. Table 7-2 explains some
clicking-and-selecting techniques worth noting.
Table 7-2 Mouse Selection Arcana
To Select This Click the Mouse Thus
Chunk of Text
A single word Point at the word with your mouse and double-click.
A line Move the mouse pointer into the left margin beside the line you
want to select. The mouse pointer changes to a northeastward-
pointing arrow. Click the mouse to select a line of text, or drag the
mouse up or down to select several lines.
A sentence Point the mouse at the sentence and Ctrl+click. (Press the Ctrl key
and click the mouse.)
A paragraph Point the mouse somewhere in the paragraph’s midst and triple-click.
The old poke-and-point method of selecting
Here’s the best way to select a chunk of text of any size, especially when that
chunk of text is larger than what you can see on the screen at once:
1. Click the mouse to set the insertion pointer where you want the block
to start — the anchor point.
2. Scroll through your document using the scroll bar.
You must use the scroll bar to scroll through your document. If you use
the cursor-movement keys, you reposition the insertion pointer, which
isn’t what you want.
3. To mark the end of the block, press and hold the Shift key and click
the mouse where you want the block to end.
The text from the insertion pointer to wherever you clicked the mouse is
selected as a block.
83
Chapter 7: Text Blocks, Stumbling Blocks, Writer’s Blocks
12_036583 ch07.qxp 11/16/06 12:46 PM Page 83
Using the F8 key to mark a block
If you can remember that the F8 key on the computer’s keyboard can be used
to mark text, you can exploit one of the seldom-used and most powerful text-
marking tools that Word has to offer.
Yes, wacky as it sounds, the F8 key is used to mark a block of text. Pressing
the F8 key once enters
extended selection mode. That’s where Word drops
anchor at the insertion pointer’s location and then lets you use either the
mouse or the cursor keys to select text. In fact, you cannot do anything but
select text in extended selection mode (unless you press the Esc key to exit
that mode).
Don’t let the F8 key weirdness boggle you. Instead, consider these steps the
next time you need to mark a block of text:
1. Position the insertion pointer at the start of the block of text.
2. Press the F8 key.
The F8 key drops anchor and marks one end of the block.
3. Use the keyboard’s cursor keys to select the block of text.
The cursor-navigation keys are discussed in Chapter 4.
You can also press a letter key to select text up to and including that
letter. If you press N, you select all text up to and including the next
N
in your document. Nice. Nifty. Neat-o.
Word highlights text from the point where you dropped anchor with F8
to wherever you move the insertion pointer.
4. Do something with the selected block of text.
Word remains in extended selection mode until you actually do some-
thing with the block.
Doing something with a block of text is covered in the second half of this
chapter.
To cancel the extended selection, press the Esc key. That ends extended
selection mode, but still keeps the block of text marked.
You can use the mouse and the F8 key to get really fancy. Position the
cursor at either end of the block you want to mark, and press the F8 key.
Then position the mouse cursor at the other end of the block and press
the left mouse button. Everything from there to there is marked.
84
Part II: Word Processing Basics
12_036583 ch07.qxp 11/16/06 12:46 PM Page 84
After pressing the F8 key, you can use the Find command to locate a spe-
cific bit of text. Word marks all text between the spot where F8 was
pressed (the anchor) and the text that the Find command locates.
Pressing the F8 key twice selects the current word (the one the insertion
pointer is blinking inside of).
Pressing the F8 key thrice (three times) selects the current sentence.
Pressing the F8 key four times selects the current paragraph as a block
of text.
Pressing the F8 key five times selects the entire document, from top to
bottom.
No matter how many times you press F8, be aware that it always drops
anchor. So, pressing F8 once or five times means that you’re still in
extended selection mode. Do something with the block or press Esc to
cancel that mode.
Blocking the whole dang-doodle document
The biggest block you can mark is the entire document. Word has a specific
command to do that, to select all the text in a document: From the Home tab,
locate the Editing area. (Click the Editing button when the entire Editing area
isn’t visible.) Then choose Select
➪Select All. Instantly, the entire document is
marked as a single block-o-text.
From the keyboard, you can use Ctrl+A to select all of a document, or just press
the F8 key five times. Or, you can even use the obscure Ctrl+5 (the 5 on the
numeric keypad) key combo.
85
Chapter 7: Text Blocks, Stumbling Blocks, Writer’s Blocks
Would you rather select text by letter or by word?
When you’re selecting more than a single word,
the mouse tends to grab text a full word at a time.
If you want Word to select text by characters
rather than by words (which is what I prefer),
follow these steps:
1. Choose Word Options from the Office
Button menu.
2. Choose Advanced from the list on the left
side of the Applications Settings window.
3. In the Editing Options section (on the right),
remove the check mark by the item labeled
When Selecting Automatically Select
Entire Word.
4. Click OK.
12_036583 ch07.qxp 11/16/06 12:46 PM Page 85

Deselecting a Block
Word treats all text marked in a block the same, by applying the same format-
ting commands to that text, moving the text, searching within the block, and
so on. But when you mark a block of text and change your mind, you must
unmark, or deselect, the text. Here are a few handy ways to do that:
Move the insertion pointer. It doesn’t matter how you move the insertion
pointer, with the keyboard or with the mouse — doing so unhighlights
the block. Note that this trick does not exit the F8 key’s extended selec-
tion mode.
Press the Esc key and then the ← key. This method works to end
extended selection mode.
Shift+F5. The Shift+F5 key is the Go Back command (see Chapter 4),
but it also deselects a block of text
and returns you to the text you
were editing before making the selection.
You’ve Marked the Block — Now What?
You can block punches, block hats, block and tackle, play with building
blocks and engine blocks, take nerve blocks, suffer from mental blocks, jog
for blocks and, naturally, block text. But what can be done with those marked
blocks of text?
The primary thing you can do with blocks of text is to copy or move them.
Like using search and replace, rearranging your text with blocks is one of the
true blessings of a word processor. Call it a typewriter-killing feature.
The subject of copying, moving, and duplicating blocks of text is covered in
this section. If you’re used to copying, cutting, and pasting in Windows, doing
the same with blocks in Word will be easy for you. Beyond that, you can do
the following things with a block of text in Word:
Delete the block with the Delete or Backspace keys. (See Chapter 5 for
more information on deleting text.)
Use the Search command, or Search and Replace, exclusively within the
block of text. See Chapter 6.
Proof the block, by reviewing your spelling and grammar goofs, as cov-
ered in Chapter 8.
Print the block. (See Chapter 10.)
Format the block. The various formatting commands are covered in
Part III of this book.
86
Part II: Word Processing Basics
12_036583 ch07.qxp 11/16/06 12:46 PM Page 86
The command you use affects only the text within that block.
Copying a block
After a block is marked, you can copy it into another part of your document,
to duplicate the text. The original block remains untouched by this opera-
tion. Follow these steps to copy a block of text from one place to another:
1. Mark the block.
Detailed instructions about doing this task are offered in the first part of
this chapter.
2. From the Home tab, choose the Copy tool from the Clipboard area.
There’s no visual clue that the text has been copied; it remains selected.
3. Move the insertion pointer to the position where you want to copy
the block.
Don’t worry if there’s no room there! Word inserts the block into your
text.
4. Choose the Paste tool from the Clipboard area.
The block appears. (See the later section “Options for pasting text” to
find out what to do about the wee li’l clipboard icon that appears by the
pasted text.)
The block of text you copy is inserted into your text just as though you had
typed it there by yourself.
The shortcut key for copying in Word (and Windows) is Ctrl+C.
The shortcut key for pasting is Ctrl+V.
After you copy a block, you can paste it into your document a second
time. That’s because whenever a block of text is cut or copied, Word
remembers it. You can yank that block into your document again at
any time — sort of like pasting text again after it has already been
pasted in. You use Ctrl+V, the Paste shortcut. Pasting text again simply
pastes down a second copy of the block, spit-spot (as Mary Poppins
would say).
You can paste the block into another document you’re working on, or
even into another application. (This is a Windows trick, which most
good books on Windows discuss.)
Refer to the section “The Miracle of Collect-and-Paste,” near the end of
this chapter, for more copy and paste choices.
87
Chapter 7: Text Blocks, Stumbling Blocks, Writer’s Blocks
12_036583 ch07.qxp 11/16/06 12:46 PM Page 87
Moving a block
To move a block of text, you select the text and then cut and paste. This is
almost exactly the same as copying a block, described in the previous sec-
tion, although in Step 2 you choose the Cut tool rather than the Copy tool.
Otherwise, all the steps are the same.
Don’t be alarmed when the block of text vanishes! That’s cutting in action;
the block of text is being
moved, not copied. You see the block of text again
when you paste.
The keyboard shortcut for the Cut command is Ctrl+X.
Don’t panic! If you screw up, remember that the Ctrl+Z Undo shortcut
undoes a block move.
Options for pasting text
When you paste text in Word, the Paste Options icon appears near the end
of the pasted block of text, as shown in the margin. Let it not annoy you!
That button allows you to select formatting for the pasted block because
occasionally the block may contain formatting that, well, looks very ugly
after it’s pasted in.
Using the Paste Options icon is utterly optional. In fact, you can continue
typing or working in Word, and the icon bows out, fading away like some neb-
bish who boldly asked a power blonde to go out with him and she utterly
failed to recognize his existence. Like that. Meanwhile, to use the Paste
Options icon to adjust pasted text formatting in Word, comply with these
steps:
1. Point the mouse at the Paste Options icon.
The icon turns into a “button,” with a downward-pointing triangle on one
end. If you’ve been using Windows for any length of time, you’ll recog-
nize this as a drop-down menu gizmo.
2. Click the downward-pointing triangle.
A menu appears, from which you can select various formatting options
(see Figure 7-2).
88
Part II: Word Processing Basics
12_036583 ch07.qxp 11/16/06 12:46 PM Page 88
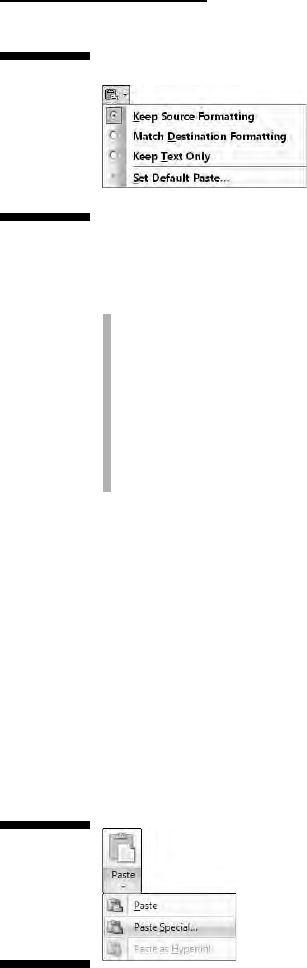
Here’s a quick summary of the options available:
Keep Source Formatting: The formatting is fine; don’t do a thing.
Match Destination Formatting: Reformat the pasted block so that it
looks like the text it’s being pasted into.
Keep Text Only: Just paste in the text — no formatting.
Set Default Paste: Opens the Word Options dialog box where you can, in
the Cut, Copy and Paste section, permanently set various pasting
options in Word.
Choose an option to match the formatting you want.
Special pasting
Pasting is simple, although trying to figure how the V in Ctrl+V means “paste”
can boggle the mind. Regardless, when you know the format of the thing
you’re pasting or you need to use a specific format, you can employ the Paste
Special command: Click the bottom of the Paste button to display a menu,
shown in Figure 7-3, and choose Paste Special from the list. The Paste Special
dialog box appears.
Figure 7-3:
Using the
Paste
Special
command.
Figure 7-2:
Various
Paste
command
formatting
options.
89
Chapter 7: Text Blocks, Stumbling Blocks, Writer’s Blocks
12_036583 ch07.qxp 11/16/06 12:46 PM Page 89
The Paste Special dialog box lists options for pasting text, graphics, or what-
ever was last copied or cut; the number of options depends on what’s waiting
to be pasted. For example, you can copy a chunk of an Excel spreadsheet and
paste it into your Word document as a spreadsheet, table, picture, text, or
what-have-you.
I often use Paste Special to paste in text from a Web page but without all the
HTML-blah-blah formatting. I choose the Unformatted Text option from the
Paste Special dialog box and click OK, and the text is pasted into Word as
plain text and not as some Web object doodad.
Copying or moving a block with the mouse
When you have to move a block only a short distance, you can use the
mouse to drag-move or drag-copy the block. This feature is handy, but usu-
ally works best if you’re moving or copying between two locations that you
can see right on the screen. Otherwise, you’re scrolling your document with
the mouse while you’re playing with blocks, which is like trying to grab an
angry snake.
To move any selected block of text with the mouse, just drag the block:
Point the mouse cursor anywhere in the blocked text, and then drag the
block to its new location. Notice how the mouse pointer changes, as shown
in the margin. That means you’re moving the text.
Copying a block with the mouse works just like moving the block, except that
you press the Ctrl key as you drag. When you do that, a plus sign appears in
the mouse pointer (see the margin). That’s your sign that the block is being
copied and not just moved.
The Paste Options icon appears after you’ve “dropped” the chunk of
text. Refer to the preceding section for more information on the Paste
Options icon.
When you drag a block of text with the mouse, you’re not copying it to
the Clipboard. You cannot use the Paste (Ctrl+V) command to paste
in the block again.
A linked copy is created by dragging a selected block of text with the
mouse and holding down
both the Shift and Ctrl keys. When you release
the mouse button, the copied block plops down into your document
with a dark highlight. That’s your clue that the copy is linked to the
original; changes in the original are reflected in the copy and vice versa.
90
Part II: Word Processing Basics
12_036583 ch07.qxp 11/16/06 12:46 PM Page 90

Copying and moving with the F2 key
Another way to move or copy a block is to press the F2 key after the block is
selected. As long as you can remember the F2 key, moving or copying a block
by using this technique can be very handy, as explained here:
1. Select a block of text.
2. Press the F2 key.
Notice how the status bar says “Move to where?”
3. Move the insertion pointer to where you want to paste.
Use the cursor keys or scroll with the mouse. Wherever you move the
insertion pointer is where the text is pasted.
4. Press Enter to paste the text.
And the block is moved.
To copy rather than move a block, press Shift+F2 in Step 2. The status bar
says “Copy to where?”
The Miracle of Collect-and-Paste
When you copy or paste a block of text, that block is placed into a storage
place called the
Clipboard. The block of text remains on the Clipboard until
it’s replaced by something else — another block of text or a graphic or any-
thing cut or copied in Windows. (The Clipboard is a Windows thing, which is
how you can copy and paste between Windows applications.)
In Word, however, the Clipboard can hold more than one thing at time. This
allows you to copy, copy, copy, and then use a special Clipboard view pane
to selectively paste text back into your document. They call it “collect and
paste,” and I firmly believe that this is a handy and welcome feature — but
one that also takes a bit of explaining.
Looking at the Clipboard
Word lets you see the contents of the Clipboard, to view the last several
items that have been cut or copied and, optionally, paste those items back
into your document.
91
Chapter 7: Text Blocks, Stumbling Blocks, Writer’s Blocks
12_036583 ch07.qxp 11/16/06 12:46 PM Page 91
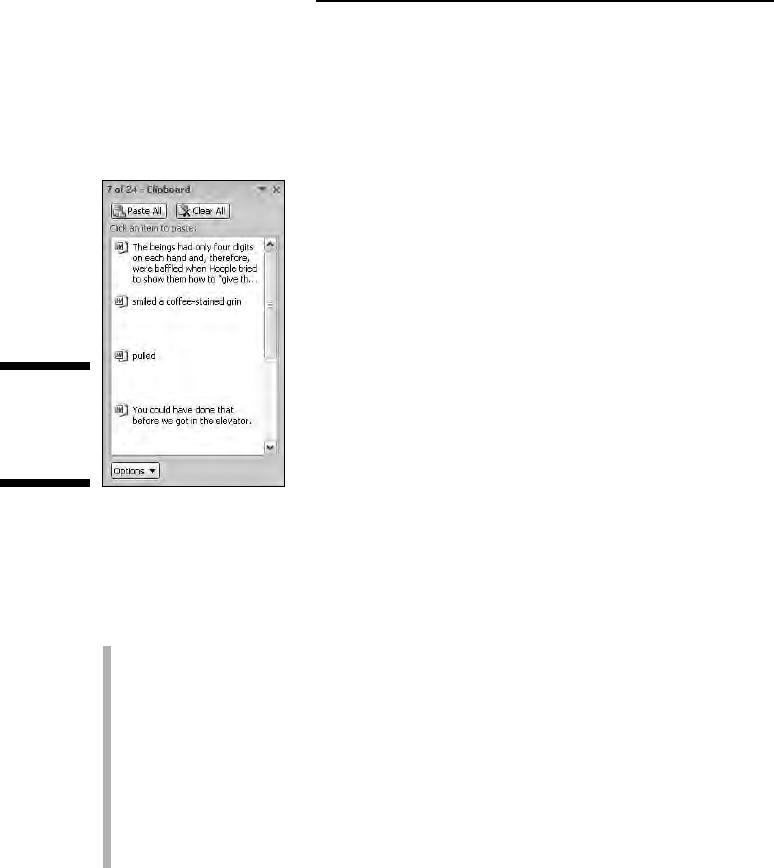
To view the Clipboard task pane (its official name), click the thing in the
lower-right corner of the Clipboard group on the Home tab, right next to the
word
Clipboard. The Clipboard task pane then appears in the writing part
of Word’s window, perhaps looking similar to what’s shown in Figure 7-4.
The scrolling list contains the last several items you’ve copied, not only from
Word but from other programs as well.
Pasting items from the Clipboard task pane is covered in the next section.
You can use the Copy command multiple times in a row to collect text
when the Clipboard task pane is visible.
The Clipboard can hold only 24 items. If any more than that is copied or
cut, the older items in the list are “pushed off” to make room for the new
ones. The current number of items is shown at the top of the task pane.
Other programs in Microsoft Office (Excel and PowerPoint, for example)
also share this collect-and-paste feature.
You can close the task pane when you’re done with collect and paste:
Click the X in the upper-right corner of the task pane window.
Pasting from the Clipboard task pane
To paste any collected text from the Clipboard view pane into your docu-
ment, simply click the mouse on that chunk of text. The text is copied from
the Clipboard and inserted into your document at the insertion pointer’s
location, just as though you typed it yourself.
Figure 7-4:
The
Clipboard
task pane.
92
Part II: Word Processing Basics
12_036583 ch07.qxp 11/16/06 12:46 PM Page 92

After pasting, the Paste Options icon appears next to the pasted text. Refer to
the section “Options for pasting text,” earlier in this chapter, to find out what
do to with that thing.
You can click the Paste All button to paste each and every item from the
Clipboard into your document.
Click only once! When you double-click, you insert two copies of
the text.
Cleansing the Clipboard task pane
You’re free to clean up Word’s Clipboard whenever the Clipboard task pane is
visible. To remove a single item, point the mouse at that item and click the
downward-pointing triangle to the right of the item. Choose Delete from the
shortcut menu, and that one item is zapped from the Clipboard.
To whack all the items on the Clipboard, click the Clear All button at the top
of the Clipboard task pane. I do this if I plan on collecting several items to be
pasted at once elsewhere. For example, I click Clear All and then go out and
copy, copy, copy. Then I move the insertion pointer to where I want every-
thing pasted and click the Paste All button — and I’m done.
Note that you cannot undo any clearing or deleting that’s done in the
Clipboard task pane. Be careful!
93
Chapter 7: Text Blocks, Stumbling Blocks, Writer’s Blocks
12_036583 ch07.qxp 11/16/06 12:46 PM Page 93

94
Part II: Word Processing Basics
12_036583 ch07.qxp 11/16/06 12:46 PM Page 94

Chapter 8
Proofing Your Document
(Spelling and Grammar)
In This Chapter
Understanding document proofing
Dealing with typos and spelling errors
Adding or ignoring unknown words
Correcting words automatically
Fixing grammatical boo-boos
Reviewing your document quickly
Finding synonyms with the thesaurus
Using the reference tools
Counting your words
I don’t give a damn for a man that can only spell a word one way.
— Mark Twain
I
turn to no greater source on the subject of spelling and grammar than
my favorite American author, Mark Twain. His thoughts on the topic are
abundant.
Twain once described spelling in the English language as “drunken.”
Specifically, Twain blamed the alphabet. Me? I peg the problem on vowels,
but I mostly blame all the foreign words in English. Come to think of it, about
60 percent of English is composed of foreign words. Just pluck them out and
the language would be perfect! But I digress.
13_036583 ch08.qxp 11/16/06 12:46 PM Page 95

This chapter covers Word’s amazing proofing tools. These include the spell
checker, the grammar-checking thing, plus other amazing tools and features
to help you get just the right word, use it, and spell it correctly.
Hun Dewing Yore Mist Aches
As the title of this section suggests, it may very well be true that Word’s
document proofing tools know an impressive number of words and have
mastered countless grammatical rules, and they may do their darndest to
recognize
context, but they still often fail. So, just because it appears that
your document contains no errors doesn’t mean that everything is perfect.
There’s no better way to proof a document than to read it with human eyes.
(My editor enthusiastically agrees!)
Check Your Spelling
Word’s built-in spell checker works the second you start typing. Like a
hungry leopard, the spell checker is ready to pounce on its unsuspecting
prey, the misspelled word or typo!
Spelling is corrected in two ways in Word. The most obvious way is that an
unrecognized word is underlined with a red zigzag. More subtly, the offending
word is corrected for you automatically. That feature, AutoCorrect, is covered
later in this chapter.
The red zigzag of shame
Word has an internal library consisting of tens of thousands of words, all
spelled correctly. When you type a word that doesn’t exist in the library
(yeah, looking up words is one thing the computer can do quickly), the word
that’s typed is marked as suspect. It appears underlined with a red zigzag, as
shown in Figure 8-1. What to do, what to do?
My advice: Keep typing. Don’t let the “red zigzag of a failed elementary educa-
tion” perturb you. It’s more important to get your thoughts up on the screen
than to stop and fuss over inevitable typos.
96
Part II: Word Processing Basics
13_036583 ch08.qxp 11/16/06 12:46 PM Page 96
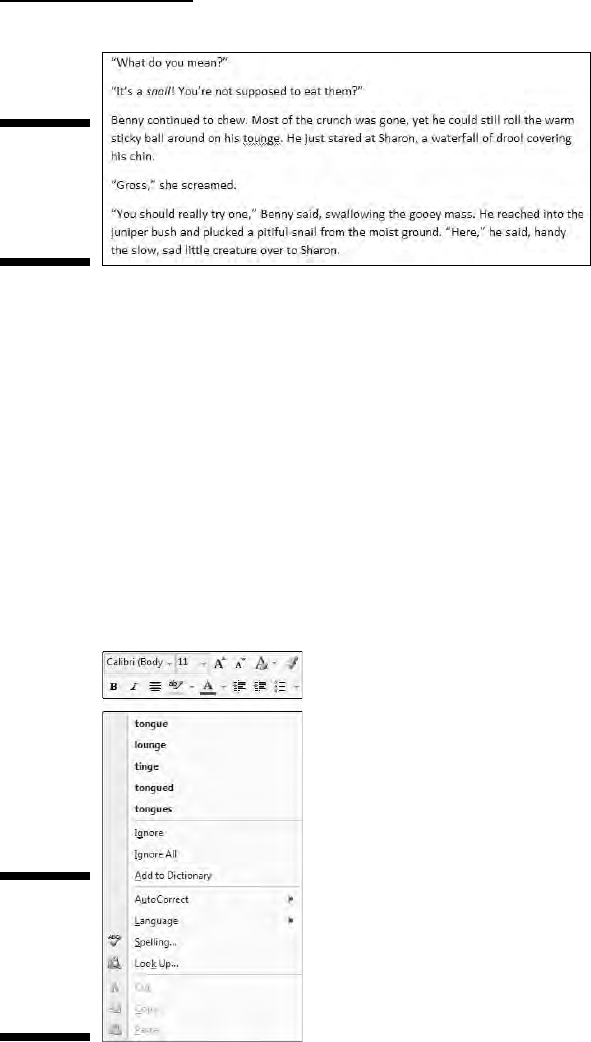
When you’re ready, say, during one of those inevitable pauses that takes
place as you write, go back and fix your spelling errors. Here’s what to do:
1. Locate the misspelled word.
Look for the red zigzag underline.
2. Right-click the misspelled word.
Up pops a shortcut menu and the Mini Toolbar, similar to what’s shown
in Figure 8-2.
3. Choose from the list the word you intended to type.
In Figure 8-2, the word tongue fits the bill. Click that word and it’s auto-
matically inserted into your document, to replace the spurious word.
Figure 8-2:
Choose the
properly
spelled
word from
the list.
Figure 8-1:
The word
tounge
is
flagged as
misspelled.
97
Chapter 8: Proofing Your Document (Spelling and Grammar)
13_036583 ch08.qxp 11/16/06 12:46 PM Page 97

If the word you intended to type isn’t on the list, don’t fret. Word isn’t that
smart. You may have to use a real dictionary or take another stab at spelling
the word phonetically and then correct it again.
The Mini Toolbar, shown at the top of the menu in Figure 8-2, is used for
quick formatting. It’s the same Mini Toolbar that appears when you
select text (see Chapter 7); it also appears whenever you right-click text,
as is done with a spell-check correction.
Word turns off automatic proofing when your document grows over a
specific size. For example, on my computer, when the document is more
than 100 pages long, automatic spell checking is disabled. A warning
appears to alert you when this happens. Note that you can still manually
spell-check, which is covered in the section “Proofing Your Entire
Document at Once,” later in this chapter.
What to do when the spell checker
stupidly assumes that a word is
misspelled but in fact it isn’t
Occasionally, Word’s spell checker bumps into a word it doesn’t recognize,
such as your last name or perhaps your city. Word dutifully casts doubt on
the word, by underlining it with the notorious red zigzag. Yes, this is one of
those cases where the computer is wrong.
When a word is flagged as incorrectly spelled or as a typo, you can use two
commands, both of which are found on the pop-up menu when you right-click
the word (refer to Figure 8-2). The commands are Ignore All and Add to
Dictionary.
Ignore All: Select this command when the word is properly spelled and you
don’t want Word to keep flagging it as misspelled.
For example, in your science fiction short story, there’s a character named
Zadlux. Word believes it to be a spelling error, but you (and all the people of
the soon-to-be-conquered planet Drebulon) know better. After you choose the
Ignore All command, all instances of the suspect word are cheerfully ignored,
but only in that one document.
Add to Dictionary: This command adds words to the list that Word refers to
so that the word becomes part of the internal Spelled Correctly library.
98
Part II: Word Processing Basics
13_036583 ch08.qxp 11/16/06 12:46 PM Page 98
For example, I once lived on Pilchuck Avenue, which Word thinks is a mis-
spelling of the word
Paycheck. If only. So, when I right-click the incorrectly
flagged word, I choose the Add to Dictionary command. Presto — the word
Pilchuck is added to Word’s internal dictionary. I’ll never have to spell-check
that work again.
If the word looks correct but is red-wiggly-underlined anyway, it could be
a repeated word. Those are flagged as misspelled by Word, so you can
either choose to delete the repeated word or just ignore it.
Word ignores certain types of words. For example, words with numbers
in them or words written in all capitals, which are usually abbreviations.
For example, Pic6 is ignored because it has a 6 in it. The word NYEP is
ignored because it’s in all caps.
You can adjust how spell-checking works, especially if you feel that it’s
being too picky. See the section “Customizing Proofing Options,” later in
this chapter.
Undoing an Ignore All command
Choosing the Ignore All command means that all instances of a given mis-
spelled word or typo are ignored in your document. This holds true even
when you save that document and open it again later. So, if you make a mis-
take and would rather have the ignored word regarded once more, do this:
1. Click the Word Options button on the Office Button menu.
The Word Options window appears.
2. Choose Proofing on the left side of the window.
3. Scroll down the right side of the window (if necessary) until you can
see the Recheck Document button; click that button.
A warning dialog box appears, reminding you of what you’re about
to do.
4. Click the Yes button.
Everything you’ve told Word to ignore while proofing your document is
now ignored. It’s the ignore-ignore command!
5. Click the OK button to return to your document.
99
Chapter 8: Proofing Your Document (Spelling and Grammar)
13_036583 ch08.qxp 11/16/06 12:46 PM Page 99
Note that following these steps causes all ignored words, as well as grammati-
cal errors you’ve chosen to ignore, to become visible once again. There’s no
way to undo this command.
These steps affect only the current document. The Ignore All command
affects only the current document.
Un-adding words to the dictionary
When you choose the Add to Dictionary command, the given word is placed
into something called the Custom dictionary. Recognizing that people may
change their minds, Word allows you to edit the Custom dictionary, to
remove words you may have added accidentally.
To remove unwanted words from the Custom dictionary, follow these steps:
1. Click the Word Options button in the Office Button menu.
The Word Options window shows up.
2. From the left side of the window, choose Proofing.
3. Click the button labeled Custom Dictionaries.
The Custom Dictionaries dialog box appears.
4. Select the CUSTOM.DIC dictionary file.
It’s probably the only item in the list.
100
Part II: Word Processing Basics
The 25 most frequently misspelled words
a lot atheist grammar maneuver ridiculous
accidentally collectible gauge no one separate
acquire consensus independent occurrence supersede
amateur definite kernel realize their
argument embarrass liaison receive weird
13_036583 ch08.qxp 11/16/06 12:46 PM Page 100

5. Click the button labeled Edit Word List.
You see a scrolling list of words you’ve added to the Custom dictionary.
6. Find and select the word you want to remove from the dictionary.
The word is selected by clicking it once.
7. Click the Delete button.
8. Repeat Steps 6 and 7 to, optionally, remove more words.
9. Click the OK button when you’re done editing the dictionary.
Close any other open windows.
Instant Text-Fixin’ with AutoCorrect
Some of your typos and spelling errors will never be graced with the red
zigzag. That’s because Word quickly fixes hundreds of common typos and
spelling errors on the fly. It’s done by the AutoCorrect feature, and you really
have to be quick to see it.
AutoCorrect in action
There’s nothing to using AutoCorrect; it happens automatically. In Word, try
to type the word
mispell. You cannot! Word uses AutoCorrect, and suddenly
you see
misspell.
Most of the commonly misspelled words can be found in AutoCorrect’s reper-
toire:
beleive, suposed, recieve, and so on. Try a few. See whether you can
baffle Word!
In addition to fixing spelling errors, AutoCorrect helps you enter special
characters. For example, type
(C) and AutoCorrect properly inserts the (c)
Copyright symbol. Ditto for
(TM) for Trademark. Typing --> is translated into
an arrow, and even
:) becomes a happy face.
Beyond spelling, AutoCorrect fixes some common punctuation. It automati-
cally capitalizes the first letter of a sentence. AutoCorrect capitalizes
I when
you forget to, it properly capitalizes the names of days, fixes the iNVERSE
cAPS lOCK pROBLEM, plus fixes other common typos.
101
Chapter 8: Proofing Your Document (Spelling and Grammar)
13_036583 ch08.qxp 11/16/06 12:46 PM Page 101
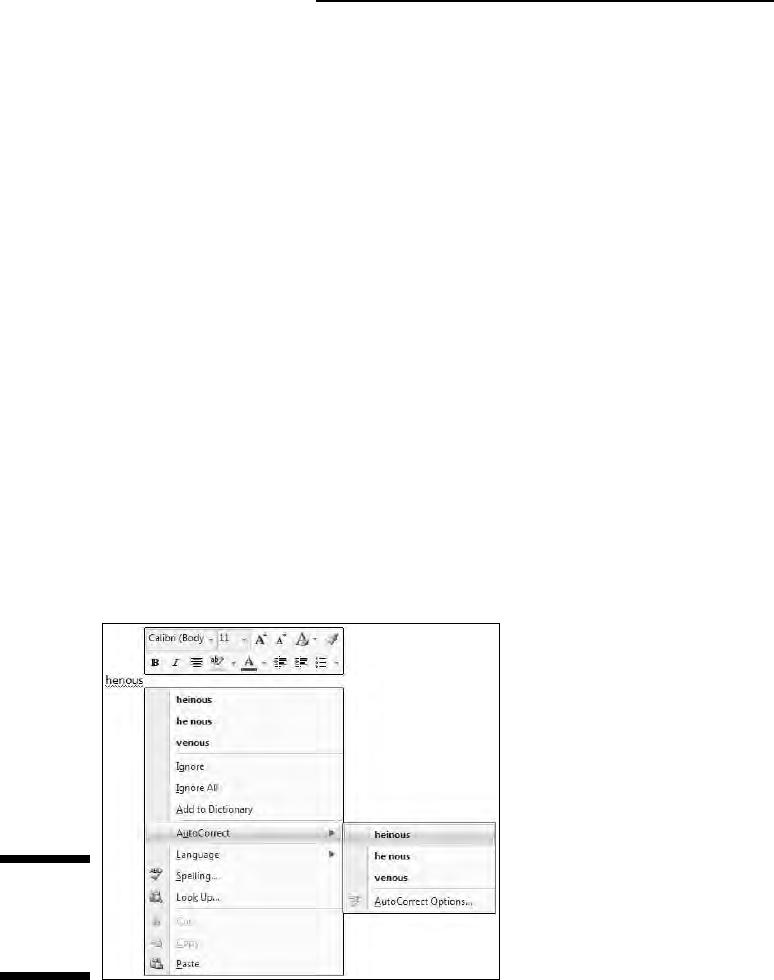
Do your own AutoCorrect entries
One of the joys of AutoCorrect is that you can add your own commonly mis-
spelled words to its list. For example, I’m always goofing up the word
brief.
I before E? E before I? Never mind! I need to fix the spelling error only once
by placing my typo and the proper spelling into AutoCorrect’s repertoire.
This is cinchy:
1. Right-click the misspelled word.
Normally, you choose the proper spelling from the list. But that fixes the
word only once. Instead:
2. Click the AutoCorrect item.
Up pops a submenu containing various corrections, as shown in Figure 8-3.
3. Choose the properly spelled word from the AutoCorrect submenu.
The word is added to the AutoCorrect list, and, as a special favor, Word
corrects the word in your text as well.
Whenever your typo is encountered, Word automatically corrects it for you.
But you must remember to use the AutoCorrect item from the spell-check-
thingy pop-up menu on your first sighting of the misspelled word rather than
just choose the corrected word from the list.
Figure 8-3:
Auto
Correcting a
werd.
102
Part II: Word Processing Basics
13_036583 ch08.qxp 11/16/06 12:46 PM Page 102
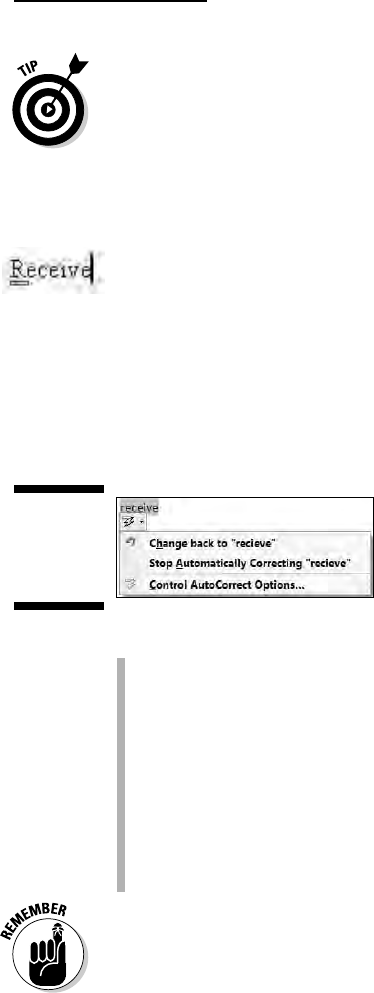
If possible, try to add only lowercase words with AutoCorrect. When you
add a word with an initial capital letter, such as
Werd, AutoCorrect
replaces only words with an initial capital letter. When you use AutoCorrect
on a word that’s all lowercase, it’s fixed every time.
Undoing an AutoCorrect correction
You can reverse AutoCorrect instant changes, but only when you’re quick.
The secret is to press Backspace or Ctrl+Z (the Undo command) immediately
after AutoCorrect makes its correction. When you do that, you see a blue
rectangle under the first letter of the still-corrected word, as shown in the
margin.
Point the mouse at the rectangle to see the AutoCorrect Options icon.
Clicking the downward-pointing arrow on the icon displays some choices,
as shown in Figure 8-4 and explained here:
Change Back to “whatever”: Choose this option to undo the
AutoCorrection.
Stop Automatically Correcting “whatever”: Choose this option to
remove the word from the AutoCorrect library so that it’s not corrected
automatically again. (But it may still be flagged as incorrect by the spell
checker.)
Control AutoCorrect Options: This item displays the AutoCorrect dialog
box, which is used to customize various AutoCorrect settings and edit
or create new entries in the AutoCorrect library. Refer to the section
“Customizing Proofing Options,” later in this chapter.
You don’t have to go with the AutoCorrection. If you don’t like the change,
press Ctrl+Z to undo or use Backspace to fix the AutoCorrect option. Clicking
the blue rectangle is optional.
Figure 8-4:
Adjusting
an Auto
Correction.
103
Chapter 8: Proofing Your Document (Spelling and Grammar)
13_036583 ch08.qxp 11/16/06 12:46 PM Page 103
Grammar Be Good
If spelling is drunken, grammar is a hallucination. Oh, I could rant on this for
hours. Suffice it to say, no matter what the grammarians think, English is not
Latin. It can’t be. Latin usually has one, very proper way to say something.
English has many ways and many words with which to express the same
thought. That’s why English is so poetic. That’s why so-called English gram-
mar has so many exceptions that it’s silly to make any rules.
Regardless of what I think, Word does come with a grammar checker, and it
does, at times, underline suspicious words or phrases with an angry green
zigzag. It’s your clue that you’ve somehow offended Word’s sense of gram-
matical justice.
As with a spelling error, right-click the green-underlined text. The pop-up
menu that appears either explains why the sentence is wrong or offers an
alternative sentence that you can choose. There’s also an option to ignore
the error, which I find myself using quite a bit.
When you select About This Sentence from the pop-up menu, the Office
Help system attempts to explain which part of the
English Language
Book of Rules
you offended.
Sometimes you may be puzzled about what the grammar checker finds
wrong. Don’t give up! Always check your entire sentence for a potential
error. For example, the grammar checker may suggest
had in place of
have. Chances are, have is correct but some other word in the sentence
has an unwanted
s attached.
It’s possible to customize or even turn off grammar checking. Refer to
the section “Customizing Proofing Options,” later in this document.
Proofing Your Entire Document at Once
Before the days of on-the-fly spell checking, you proofed your document by
entering a special spell-check mode. In spell-check mode, the computer
would read your document, from top to bottom, and alert you to any goofy
words it found. You can still use this type of proofing, which some folks find
easier to handle and less disruptive than automatic spell checking. Here’s
how it’s done:
104
Part II: Word Processing Basics
13_036583 ch08.qxp 11/16/06 12:46 PM Page 104
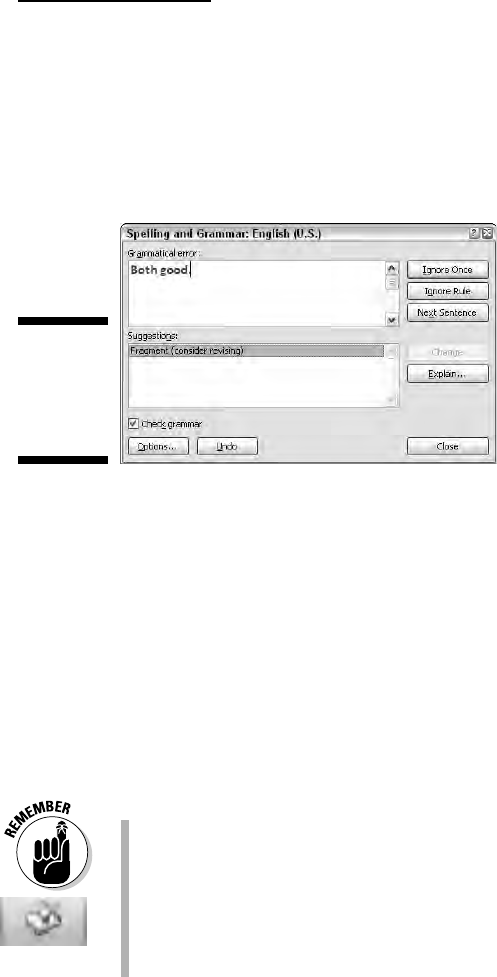
1. Click the Review tab.
2. In the Proofing group, click the Spelling & Grammar button.
The Spelling and Grammar dialog box appears, as shown in Figure 8-5. It
displays a chunk of your document at a time, with each chunk contain-
ing a spelling or grammar error.
Here’s what you can do:
• To fix the error, edit the text in the box.
• Use the Ignore button(s) to skip the error, or click the Next
Sentence button to keep moving through the document.
• Choose a proper spelling from the list and then click the Change
button.
3. Continue checking your document until Word says that you’re done.
You may find it even easier to do an all-at-once proof if you turn off automatic
spell- and grammar-checking. See the following section to find out how this
can be done.
Don’t forget that Undo button! Often times, you can enter a trance while
you’re document proofing. Undo helps you go back and change some-
thing you may not have paid attention to.
One of the easiest ways to breeze through a document and check your
spelling is to click the Spell icon on the status bar. As you click, you’re
taken to the next spelling (or grammatical) error, with a handy pop-up
window showing up to help you fix your boo-boos.
Figure 8-5:
Proofing a
document
one mistake
at a time.
105
Chapter 8: Proofing Your Document (Spelling and Grammar)
13_036583 ch08.qxp 11/16/06 12:46 PM Page 105

Customizing Proofing Options
All document proofing options and settings are kept in one place, in the
Application Settings window. Here’s how to get there:
1. Click the Word Options button on the Office Button menu.
The Word Options dialog box appears.
2. Choose Proofing on the left side of the window.
The right side of the window contains options and settings for document
proofing.
Various options are turned on or off by adding or removing check marks; for
example:
To direct Word not to spell-check a Web page address, put a check mark
by the item labeled Ignore Internet and File Addresses.
To turn off on-the-fly spell checking, remove the check mark by the item
Check Spelling As You Type.
To disable the grammar checking, remove the check mark by the item
Check Grammar As You Type.
Click the Settings button by the Writing Style drop-down list to customize
and hone the grammatical transgressions that Word marks. (I typically
disable the Fragments warning because Word is often wrong when flag-
ging fragments.)
Here are some other proofing things you can do:
You can click the AutoCorrect Options button to display the AutoCorrect
dialog box. Use that dialog box to modify AutoCorrect’s settings, add
new entries, delete bad AutoCorrect decisions, or edit existing entries.
Click OK to dismiss the Application Settings window.
Improving Your Word Power
Spelling and grammar are important, but beyond the basics, you want to
ensure that you use the best word. For example, is it
right, or is it correct?
Is something
hard, or is something difficult? It all depends on the context, of
course, as well as on your knowledge of the English language, your writing
experience, and your ability to cheat by using some handy tools: the
Thesaurus, the Translator, and the Research features in Word.
106
Part II: Word Processing Basics
13_036583 ch08.qxp 11/16/06 12:46 PM Page 106
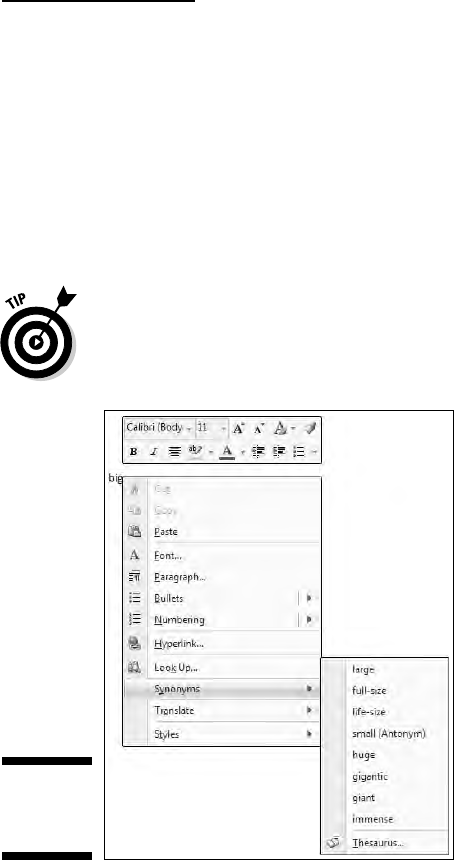
A thesaurus is not a colossal
prehistoric beast
When two words share the same meaning, they’re said to be synonyms; for
example,
big and large. Synonyms are helpful in that they allow you to find
better, more descriptive words and especially to avoid using the same tired
old words over and over. Obviously, knowing synonyms is a handy thing for
any writer. When you don’t know a lot of them, you can use a handy, nay,
practical tool called a thesaurus to help you.
To find the synonym of any word, right-click that word in your document.
From the pop-up menu, choose the Synonyms submenu to see a list of words
with a similar meaning (see Figure 8-6).
The Synonyms submenu displays a list of a dozen or so synonyms for
big,
plus one antonym (a word with the opposite meaning), as shown in Figure
8-6. To replace the word in the document with a synonym, just choose it from
the submenu.
Not all words have synonyms. If so, the Synonyms submenu displays
(No
Suggestions)
. Oh, well.
Figure 8-6:
Synonyms
for
big.
107
Chapter 8: Proofing Your Document (Spelling and Grammar)
13_036583 ch08.qxp 11/16/06 12:46 PM Page 107

At one time, there were synonyms for all words in the Word thesaurus.
Around half a dozen years ago, though, the censorship police took over and
hundreds of politically incorrect words were secreted away from Word’s
Thesaurus list. For example, try looking up the synonyms for
idiot. Some
synonyms list only one aspect of the word, such as the synonyms for
dummy
deal with only mannequins and not “dumb” things. And why are there syn-
onyms for every color except black? Silly Microsoft.
The Research task pane
A better way to play with words, as opposed to just right-clicking and looking
up a synonym, is to use the Research view pane in Word. Summon it with
these commands:
1. Click the Review tab.
2. In the Proofing group, click the Research button.
The Research task pane appears in the document part of the window, as
shown in Figure 8-7. The selected word appears at the top.
3. Click the green Start Searching button — the one with the rightward-
pointing arrow.
Word uses vast resources to look up oodles of factual tidbits about the
word in question. The results are displayed in the list, as shown in
Figure 8-7, where Microsoft’s online Encarta dictionary has some
definitions for the word
blue.
4. Narrow the search by selecting Thesaurus English (U.S.) from the
drop-down list.
The list of synonyms shown in the Research task pane is far more thor-
ough than what you see when you right-click a word and choose the
Synonym sub-menu.
5. To choose a replacement word, point the mouse at the word and
choose the Insert command from the menu that appears.
Or, if the word intrigues you, choose Look Up from the drop-down menu
to see more variations.
6. Close the Research task pane by clicking the X in its upper-right
corner.
Or, you can click the Research button again on the Ribbon.
108
Part II: Word Processing Basics
13_036583 ch08.qxp 11/16/06 12:46 PM Page 108
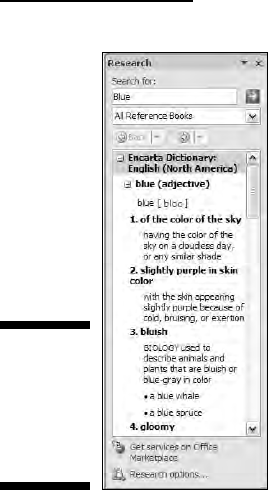
Be sure to check out other options in the drop-down list, such as foreign trans-
lations as well as other various and rich sources for finding that right word.
Sadly, this feature is made less handy because it really requires full-time,
broadband Internet access to work best. Also, don’t be too disappointed with
the translation features: My copy of Word came with only French and Spanish
translations. Funny, but I can’t seem to find the often-ridiculed but necessary
Klingon translator.
Making Every Word Count
You pay the butcher by the pound. The dairyman is paid by the gallon.
Salesmen are paid by a percentage of the sale. Writers? They’re paid by
the word.
If you’re lucky enough to be paid for your writing, you know the “word count”
quite well. Magazine editors demand articles based on word length. “I need
350 hilarious words on Grandma sending her first e-mail,” an editor once told
me. And, novel writers typically boast of how many words are in their latest
efforts. “My next book is 350,000 words,” they say in a stuffy, nasal voice.
How do they know how many words there are?
Figure 8-7:
Looking up
synonyms
in the
Research
task pane.
109
Chapter 8: Proofing Your Document (Spelling and Grammar)
13_036583 ch08.qxp 11/16/06 12:46 PM Page 109
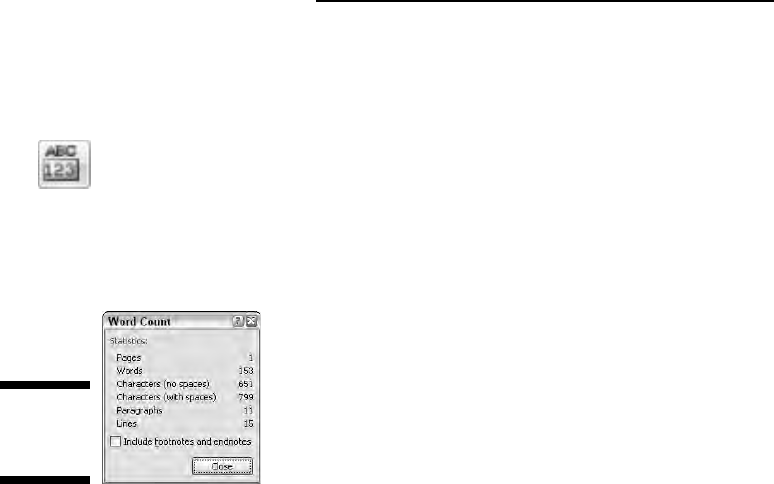
The best way to see how many words dwell in your document is to view the
status bar. The word count appears after the label Words, and it’s updated as
you type.
When the status bar word count isn’t enough for you or it isn’t visible, you
can click the Review tab and then, from the Proofing group, click the Word
Count button. A detailed Word Count dialog box, similar to the one shown in
Figure 8-8, appears.
Click the Close button to banish the Word Count dialog box.
Figure 8-8:
Pulling a
word count.
110
Part II: Word Processing Basics
13_036583 ch08.qxp 11/16/06 12:46 PM Page 110

Chapter 9
Documents and Files
In This Chapter
Understanding files
Creating a new document
Using templates
Saving your stuff to disk
Using the proper filename
Opening a document already saved to disk
Inserting one document inside another
D
ocuments created by a word processor are just like documents you
create with a typewriter or by scribbling on a piece of paper, although
with a word processor your text is better formatted and bolstered by all
the fancy things you can do with a computer. Still, the greatest difference
between a computer document and a real document is that a computer docu-
ment is stored inside the computer; it doesn’t exist in the real world until it’s
printed on paper.
This chapter covers how Word deals with documents and how those docu-
ments are stored in the computer. Knowing how documents are stored is
very important! You want to make Save the command you use most often.
Knowing how to save and when to save and how the Open command works
are your keys to becoming a happy, productive word processing human.
All About Files
To understand documents, you must first recognize the importance of files.
This concept is vital to grasp if you ever want your computer experience to
be a pleasant one and not a nightmare.
14_036583 ch09.qxp 11/16/06 12:47 PM Page 111

Your computer stores all sorts of information. In addition to word processing
documents, the computer can store graphical images, music, and video as
well as programs, games, and all sorts of other stuff. Those items are all
kept inside the PC and are digitally encoded on the computer’s hard drive.
The digital information is organized, so unlike you and that drawer in your
kitchen filled with all sorts of random items (scissors, candles, plastic spoons,
and playing cards), the computer can easily find stuff when you need it.
Information on a computer’s hard drive exists as
files. Each file contains infor-
mation, just as mason jars may contain fruits and jellies. The information the
file contains is electronic, so one file may be an image, another file may con-
tain music, another may be a video, and so on.
In Windows, a file appears as an icon. Each type of file has its own, unique
icon, which is used in Windows to help identify the file’s contents. The same
holds true with Word, which uses a specific icon to identify its documents, as
shown in the margin.
What’s important to remember is that after a Word document is saved to
disk, it exists as a file. Documents are their own thing, separate from Word,
the program that creates the documents.
Think of the relationship this way: A pianist uses sheet music to play a tune,
but the sheet music isn’t part of the piano. Just as you can store or mail sheet
music, you can store a Word document file (on a CD-R, for example) or send it
via e-mail. The Word document that exists on your computer’s hard drive as a
file is its own, unique thing.
For more information on understanding files as well as hard drives and
other basic computer concepts, I highly recommend reading my book
PCs
For Dummies
, published by Wiley. The more you know about your computer,
the happier you are as a computer user.
Making a New Document
Where did that document come from? I mean, you didn’t just pluck it from
thin air?
Well, actually, you probably did! The content of a document comes from your
brain, transmitted through your neck, shoulders, and arms, and then it
appears on the screen, thanks to your fingers fluttering over the computer
keyboard. That blank space you write upon? It did come from thin air — or,
rather, from thin electrons.
112
Part II: Word Processing Basics
14_036583 ch09.qxp 11/16/06 12:47 PM Page 112
The computer equivalent of a blank sheet of paper comes into being in sev-
eral ways. That blank sheet of, well,
electrons is the root of each document
you create in Word; all Word documents started out as described in this sec-
tion. Before pressing on, consider these general Word document tidbits:
Documents in Word aren’t limited to any size other than the largest file size
allowed by your computer operating system. I believe that’s something
like 4,096MB under Windows, which may be wrong, but, still, that’s a ter-
ribly huge file. Put into perspective, all the works of William Shakespeare
can fit into a Word document that’s only 5MB.
Size-wise, the typical word processing document is maybe 50K. Compare
that with 1,000K for the typical digital camera snapshot or 4,000K for
a typical MP3 (music) file, and you can see that word processing docu-
ments consume relatively little disk space.
K? MB? GB? Bytes? Read my book PCs For Dummies (Wiley) for instant
computer headache relief.
For speed’s sake, I recommend keeping your documents small. If you’re
writing a proposal, putting the whole thing in one document is fine.
If you’re writing a novel, make each chapter its own document. If you’re
writing the U.S. tax code,
please stop!
Writing long documents — say, over 100 pages — is fine, but when the
document size gets that large, Word begins to turn off features. For exam-
ple, automatic spell checking, image previews, and other “fun” features
may be suppressed in longer documents.
Quick! A blank sheet of paper!
Faster than newspaper reporter Clark Kent can whip out a sheet of paper and
roll it into his typewriter, you, mild-mannered reader, can summon a new,
blank document in Word. It’s cinchy, and no amount of kryptonite can
thwart you:
1. Choose the New command from the Office Button menu.
The New Document window appears, listing every dang-doodle option
known to Word (at least on this planet) for creating a new document.
2. Ensure that Blank Document is preselected for you in the Blank and
Recent area.
3. Click the Create button.
Instantly, the blank document appears, ready for typing!
113
Chapter 9: Documents and Files
14_036583 ch09.qxp 11/16/06 12:47 PM Page 113

Crack your knuckles and get to work!
A faster way to start a new document? Glad you asked: Press Ctrl+N on
the keyboard. That’s the shortcut key for New Document. Poof! Instantly,
you’re off and writing even faster than before.
You don’t have to quit Word when you just want to start working on a
new document.
Using a template
New, blank documents are fine for creating something from scratch. When you
want to save time, though, you can create a new document based on a tem-
plate rather than start afresh every time.
A
template is a special type of document that contains preset information and
formatting. For example, a template can define a set of styles for use in for-
matting the text. The template can include the company letterhead and logo.
I use a template whenever I write plays or movie scripts, send faxes, or send
invoices. A template can even contain
boilerplate text — a complete document
where you merely fill in the blanks.
Using a template is as easy as starting a new document. No matter which
template you use, start by choosing the New command from the Office
Button menu. The New Document window appears and provides you with
access to templates in a variety of ways:
To reuse any template you’ve recently used, click to select that template
from the Recently Used Templates part of the window. Click the Create
button to start a new document based on that template.
To see all templates you’ve created, choose the My Templates item. This
action closes the New Document window and opens the New window,
which lists all your own templates. Click to select one, and then click the
OK button to start a new document based on that template.
You can peruse the vast treasure trove of templates stored online
for Microsoft Office. To do so, choose a category from the list under
Microsoft Office Online in the New Document window. A list of templates
is then fetched from the Internet and displayed in the window. Choose a
template that pleases you, and then click the Download button to start a
new document based on that template.
114
Part II: Word Processing Basics
14_036583 ch09.qxp 11/16/06 12:47 PM Page 114
As you use Word, you’ll doubtless create your own set of templates, especially
when you find yourself re-creating the same type of document over and over.
Creating your own templates is easy; refer to Chapter 17.
Things to remember:
Opening a document with a template doesn’t change the template; your
new document is merely using the template’s styles and any text it
already has.
Refer to Chapter 17 for more information on templates.
Refer to Part III of this book for general information on styles in a
document.
One option in the New Document dialog box is named New from Existing.
Using this option is like using the Open command, although the docu-
ment you open remains unchanged on disk. The document’s contents
are placed into a new document for you to edit.
Some Word templates can also be used to create a Web page or e-mail
message. Honestly, Word makes a lousy Web page editor and an even
worse e-mail program. If you want to make Web pages, get a Web page
editor. For sending e-mail, use an e-mail program, not a word processor.
Saving a Document
The most important thing you can do to a document is save it. Create a per-
manent copy of what you see on-screen by saving that document as a file on
disk. That way, you can use the document again, keep a copy for business
reasons, copy the file to a CD-R, e-mail the document, or just keep the thing
for sentimental reasons. And all that requires saving!
Saving a new document
to disk the first time
Don’t think that you have to wait until you finish a document to save it to
disk. In fact, saving should be done almost immediately — as soon as you
have a few sentences or paragraphs. Save! Save! Save!
115
Chapter 9: Documents and Files
14_036583 ch09.qxp 11/16/06 12:47 PM Page 115
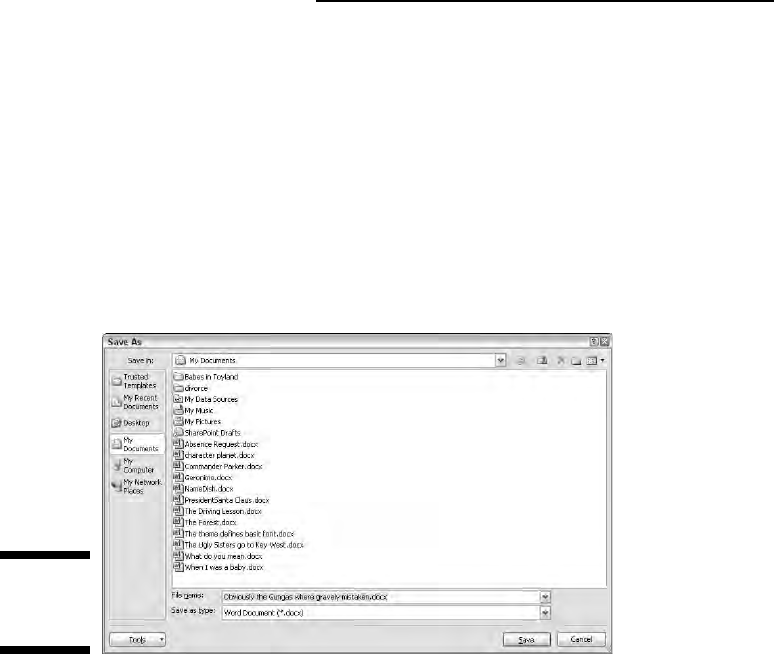
To save a document that hasn’t already been saved to disk, follow these
steps:
1. Choose the Save As command from the Office Button menu.
Just click the Save As item on the menu — not the right-pointing arrow,
which lists some interesting but confusing options. Choosing the Save
As button displays the Save As dialog box.
The Save As dialog box appears differently, depending on whether you’re
using Windows Vista or Windows XP. The Windows XP version is shown
in Figure 9-1.
2. Type a name for your document in the File Name box.
Word automatically selects the first line or first several words of your
document as a filename and puts it in the Save dialog box. If that’s okay,
you can move on to Step 3. Otherwise, type a name in the File name box.
Refer to the later sidebar “Complicated — but important — information
about filenames” for file-naming rules.
3. Optionally, choose a location for your file.
Word selects the Documents or My Documents folder as the location for
any document you save. This is fine for a while, but eventually you’ll
want to organize your documents by saving them in their own, unique
folders.
Figure 9-1:
The Save As
dialog box.
116
Part II: Word Processing Basics
14_036583 ch09.qxp 11/16/06 12:47 PM Page 116

You can use the various gizmos in the Save As dialog box to choose
another folder for your document. This is really a Windows thing; the
Save As dialog box is different between Windows Vista and Windows XP.
4. Click the Save button.
The file is now safely stored on disk.
At this point, you can keep working. As you work, continue to save; refer to
the section “Saving or updating a document,” later in this chapter.
There’s no need to quit after you save a document. Indeed, the idea is to
save as you go.
The only time you need to use the Save As dialog box is when you first
create a document. After that, you can use the Save command merely to
update your document, by storing the latest modifications to disk as you
write.
Your clue that the file has been successfully saved is that the filename
now appears on the document’s title bar, near the top of the screen.
Always save your document, even after you’ve typed only a few lines
of text.
The Save As command can also be used to save a document with a new
name or to a different location on disk. Refer to Chapter 25 for details.
Problems with saving a document to disk
Saving a document involves working with both Word and Windows. This
process doubles the chances for something going wrong, so it’s ripe time for
an error message. A potential message you may see is
The file whatever already exists
You have three choices:
Replace Existing File: Nope.
Save Change with a Different Name: Yep.
Merge Changes into Existing File: Nope.
After choosing the middle option, type a different file name in the Save As
dialog box.
117
Chapter 9: Documents and Files
14_036583 ch09.qxp 11/16/06 12:47 PM Page 117
Another common problem is when a message that’s displayed reads some-
thing like this:
The file name, location, or format ‘whatever’ is not
valid...
That’s Word’s less-than-cheerful way of telling you that the filename contains a
boo-boo character. To be safe, stick to letters, numbers, and spaces when you’re
naming a file. Check the nearby sidebar, “Complicated — but important —
information about filenames.” Then click OK and try again.
Saving or updating a document
Every so often as you continue to work on your document, you should save
again. That way, any changes you’ve made since the last time you saved are
remembered and recorded on disk permanently. I generally save my docu-
ments dozens of times a day, usually when the phone rings or when I get up
for a fresh cup of coffee or to use the potty or, often, when I’m just bored.
To resave a document that has already been saved to disk, choose the Save
command from the Office Button menu. There’s no feedback, and the Save As
dialog box doesn’t show up. That’s because you’ve already given the file a
name; the Save command merely updates the existing file on disk.
118
Part II: Word Processing Basics
Complicated — but important —
information about filenames
Filenames are a heck of a lot more flexible than
they were in the primitive days of computing.
Even so, you still have to follow rules about what
you can and cannot name a file. Here’s the list:
A filename can be longer than 200 ridicu-
lous-something characters; even so, keep
your filenames short and descriptive.
A filename can include letters, numbers, and
spaces and can start with a letter or number.
A filename can contain periods, commas,
hyphens, and even underlines.
A filename cannot contain any of these
characters: \ / : * ? “ < > |
Word automatically appends a three- or four-
character
filename extension
to all your docu-
ments — like a last name. You may or may not
see this extension, depending on how you’ve
configured Windows. No matter, you don’t need
to manually type the extension yourself; just
worry about giving the document a proper and
descriptive filename.
14_036583 ch09.qxp 11/16/06 12:47 PM Page 118
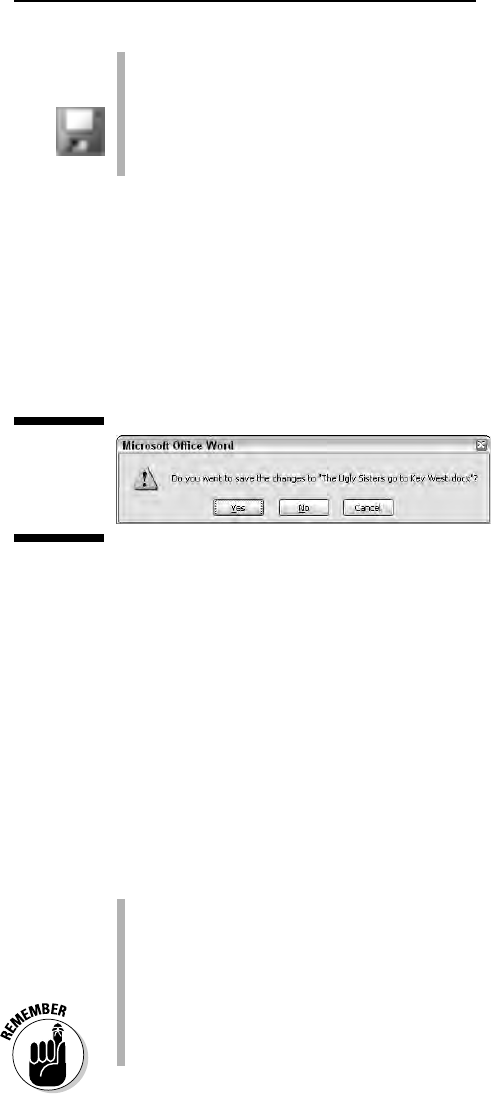
The fastest way to save a document is by using the Ctrl+S keyboard
shortcut.
You can also click the Save icon on the Quick Access toolbar to save a
document to disk.
The most bizarre command for saving a document: Shift+F12.
Saving when you’re done
Time to call it quits. The last save you do when you’re done with a document
happens as you either close the document or quit Word. Either way, when the
document hasn’t been saved, or was changed since the last save, you’re
asked to save again, as shown in Figure 9-2.
Here are your options:
Yes: The document is saved. If you’ve been really bad and haven’t saved the
document at all, the Save As dialog box appears when you choose Yes. See
the earlier section “Saving a new document to disk the first time.”
No: Don’t save the document. Any changes made since the document was
last saved are lost, or if the document was never saved, the entire thing is
lost forever.
Cancel: Word returns you to your document for more editing and stuff.
Choose, but choose wisely. I recommend the
Yes option.
To close a document without quitting Word, choose the Close command
from the Office Button menu. The keyboard shortcut for the Close com-
mand is Ctrl+W.
There’s no reason to quit Word and start it again to begin working with a
blank slate. Just use the New Document command again: Ctrl+N.
Always quit Word properly. Never turn off your PC or reset it when Word
or Windows is still on-screen.
Figure 9-2:
Your last
chance
to save.
119
Chapter 9: Documents and Files
14_036583 ch09.qxp 11/16/06 12:47 PM Page 119

Not saving a document
Yes, it’s possible not to save a document. I don’t see the reason why: Modern
computer hard drives are just brimming with room, and Word documents
don’t consume much disk space. It doesn’t hurt to always save! But, if you
want to not save, and remove any possibility of getting your stuff back, either
close the document or quit Word.
To close the document, choose the Close command from the Office Button
menu or press Ctrl+W.
To quit Word, choose the Exit command from the Office Button menu.
Either way, when you’re asked to save the document, choose No.
Opening a Document
Saving a document to disk means nothing unless you have a way of retrieving
it. You actually have several ways to
open a document previously saved as a
file on disk. This section mulls the possibilities.
Using the traditional Open command
Open is the standard computer command used to fetch a document from
disk. You use Open to hunt down documents that were previously saved and
open them like you’re unwrapping a present. The document is then displayed
in Word’s window like it has always been there.
To grab a file from disk — to open it — follow these steps:
1. Choose the Open command from the Office Button menu.
The Open dialog box materializes. It looks different between Windows
Vista and Windows XP, although it basically works the same. The
Windows XP version of the Open dialog box is shown in Figure 9-3.
2. Choose the document’s name with the mouse.
The Open dialog box — vast and wild as it is — contains a list of docu-
ments previously saved to disk, as you can see in Figure 9-3. Your job is
to find the one you want to open.
Using the Open dialog box, you can examine various folders on your
PC’s hard drive, and on any computer network your PC is connected to,
to scour for files to open. The way you use the Open dialog box differs
120
Part II: Word Processing Basics
14_036583 ch09.qxp 11/16/06 12:47 PM Page 120
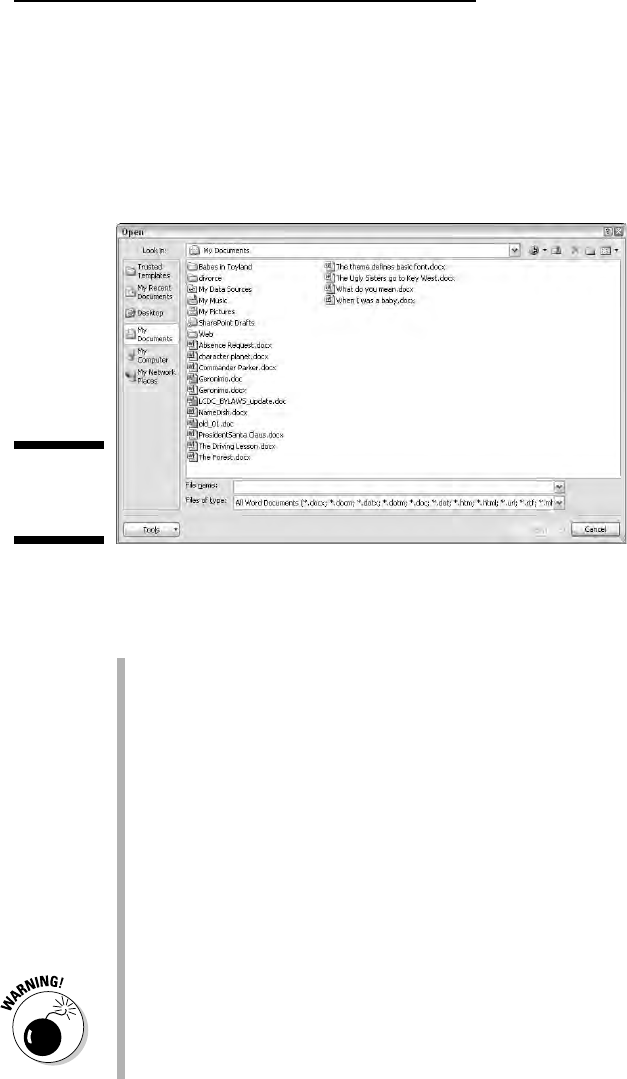
between Windows Vista and Windows XP; refer to a Windows reference
for specific information.
3. Click the Open button.
Word opens the highlighted file, carefully lifting it from your disk drive
and slapping it down on the screen.
After the document is open, you can edit it, just look at it, print it, or do what-
ever you want.
Opening a document doesn’t erase it from your disk drive. In fact, the
original copy of the file stays on the hard drive until you use the Save
command to save the document to disk again.
When you open a document, there’s no need to use the Save As com-
mand to save it again. Simply use the Save command (shortcut: Ctrl+S).
The shortcut key for the Open command is Ctrl+O.
You can also open a document from Windows itself. Merely locate a
Word document icon, double-click, and Word starts loading that docu-
ment for editing.
Open is a nifty name for the command, don’t you think? If not, consider
that the original version of Microsoft Word for the PC used the File
➪
Transfer➪Load command to open a file on disk.
Do not open a file on any removable disk. Although it’s possible, it can
lead to headaches later if you remove the disk before Word is done with
the file. Because of that, I recommend that you use Windows to copy the
document from the removable disk to the PC’s hard drive. Then open it
with Word.
Figure 9-3:
The Open
dialog box.
121
Chapter 9: Documents and Files
14_036583 ch09.qxp 11/16/06 12:47 PM Page 121
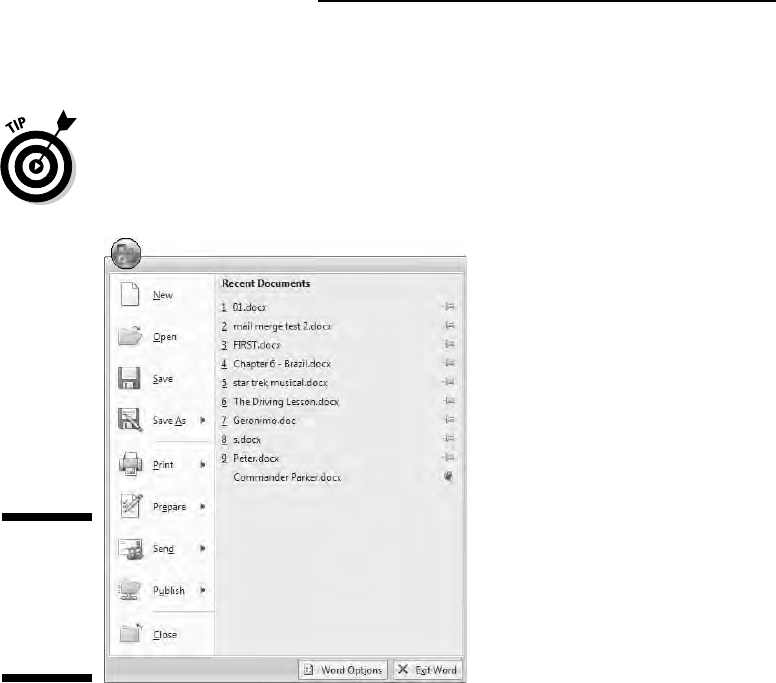
A handy way to open a recent file
Word remembers the last several files you’ve been working on. It keeps them
in a list on the Office Button menu, as shown in Figure 9-4. Chances are good
that you probably need to open one of them, so choosing one from the Office
Button menu is a handy way to open that document quickly.
Those green pushpins by the document’s name allow you to permanently
attach a document to the Office Button menu. Click a pushpin to “push it in.”
That makes the document stick around in the list. Clicking the pushpin again
allows the document to fade away after a time.
Opening one document inside another
Sticking one document into the thorax of another document is neither
strange, obtuse, nor unnecessary. And, it involves no surgery. For example,
you may have your biography, résumé, or curriculum vitae in a file on disk
and want to add that information to the end of a letter begging for a job. If so,
or in any other circumstances that I can’t think of right now, follow these
steps:
Figure 9-4:
Recently
opened files
on the Office
Button
menu.
122
Part II: Word Processing Basics
14_036583 ch09.qxp 11/16/06 12:47 PM Page 122
1. Position the insertion pointer where you want the other document’s
text to appear.
The text is inserted at that spot.
2. Click the Insert tab.
3. From the Text group, choose Object
➪Text from File.
A dialog box similar to the Open dialog box appears (refer to Figure 9-3).
4. Choose the icon representing the document you want to insert.
You can also use the gadgets and gizmos in the dialog box to locate a file
in another folder or on another disk drive or even on someone else’s
computer on the network. Such power!
5. Click the Insert button.
The document you insert becomes part of the original document, just as
though you had typed (and formatted) the whole thing right there with your
stubby little fingers.
The resulting combined document still has the same name as the first
document; the document you inserted remains unchanged on disk.
You can retrieve any number of documents on disk into your document,
one at a time. There’s no limit.
The preceding steps allow you to grab a chunk of text saved as a docu-
ment and stick the text into another document. This process is often
called
boilerplating, where a commonly used piece of text is slapped into
several documents. This process is also the way sleazy romance novels
are written.
Biography. Résumé. Curriculum vitae. The more important you think you
are, the more alien the language used to describe what you’ve done.
123
Chapter 9: Documents and Files
14_036583 ch09.qxp 11/16/06 12:47 PM Page 123

124
Part II: Word Processing Basics
14_036583 ch09.qxp 11/16/06 12:47 PM Page 124

Chapter 10
The Printer, the Paper,
the Document Maker
In This Chapter
Getting the printer ready to print
Previewing your document before printing
Using another printer
Printing a specific part of a document
Printing multiple copies of a document
Canceling the Print command
W
ord helps you create documents short and small, silly and brilliant.
Some documents remain in the digital domain and never hit paper.
For example, when I’m done writing this chapter, I’ll e-mail this document to
my editor. But most documents need to escape from their electronic realm
and must manifest themselves in the physical world. For this task, you must
employ your computer’s printer.
Printing is one of the final steps of your word processing labors, the nirvana
to which all documents aspire. Getting it down on paper is historically the
way ideas are shared. Indeed, lugging around the computer and showing folks
your first novel on the screen just doesn’t cut it. No, you need a printer, and
you need some paper if you desire to be a document maker.
Preparing the Printer
Printing involves using the computer printer, which really is its own little
computer. When you yearn to print a document, the immediate hassle
you’re presented with is how to use two computers at one time. Coaxing a
15_036583 ch10.qxp 11/16/06 12:47 PM Page 125

computer printer into behaving properly is an art form. Therefore, I recom-
mend following these steps to ensure that the printer is ready to actually
print something:
1. Make sure that your printer is plugged in and properly connected to
your computer.
Refer to my book PCs For Dummies (Wiley) for more information on
connecting and using a printer as well as various printer tips and stuff
like that.
2. Make sure that your laser printer has enough toner or that your ink
printer’s cartridges are brimming with ink.
Laser printers should have a good toner cartridge installed. If the laser
printer’s “toner low” indicator is on, replace the toner at once.
Most ink printers let you know when they’re out of ink, or you notice
that the image appears streaked or faded or is missing information.
Replace the ink cartridge at once.
3. Check the printer for paper.
The paper can feed from the back or top or enter from a paper tray, or
it can be manually fed one sheet at a time. However your printer eats
paper, make sure that you have it properly stocked before you print.
4. Your printer must be online or selected before you can print
anything.
This is weird: Some printers can be on but not ready to print. The power
is on, but unless the printer is online or selected, it ignores the computer.
To force those types of printers to listen to the computer, you must
press the Online or Select (or similar) button.
When you’re certain that the printer is up to the task, you can proceed with
the printing operation in Word.
Preview Before You Print
Despite the fact that Word displays your document on the screen so that the
document appears pretty much how it will look when printed, I still recom-
mend that you try the Print Preview feature before printing.
126
Part II: Word Processing Basics
15_036583 ch10.qxp 11/16/06 12:47 PM Page 126
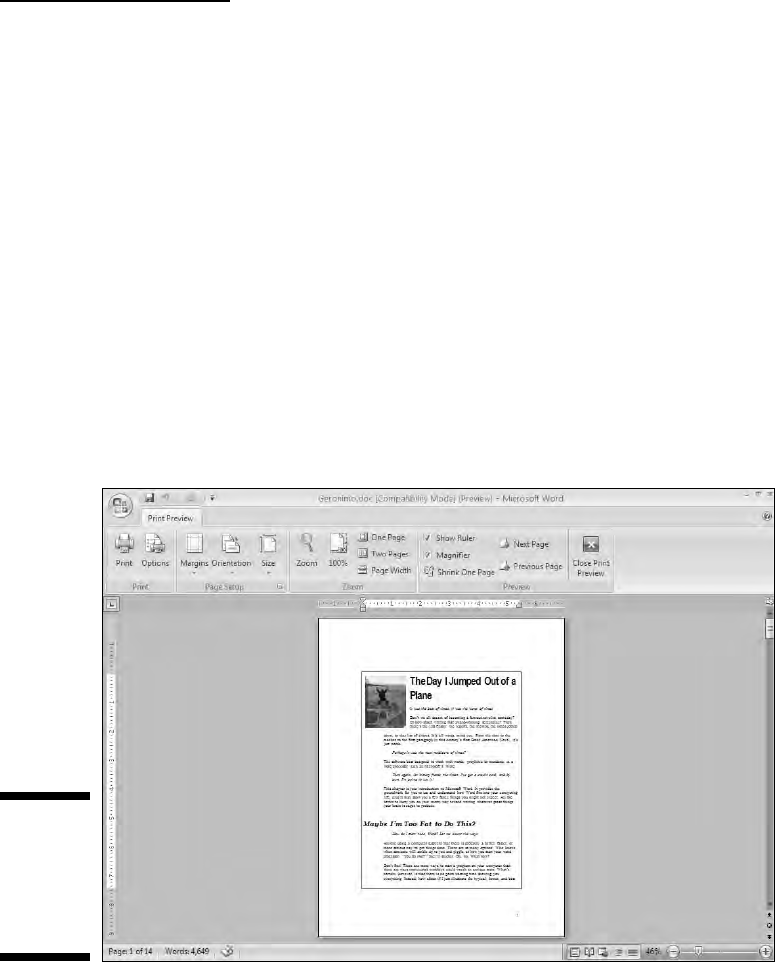
Print Preview is a word processing feature from the old days, back when text
on the screen looked nothing like what was printed. What Print Preview did
was to display an approximation of what a printed page of the document
would look like. That way, you could confirm things like margins, fonts, for-
mats, text sizes, headings, footers, and other parts of a document, stuff that
didn’t show up on the screen but would print on paper.
By taking a sneak peek at what your document looks like before printing, you
save yourself the time (and wasted paper) that you otherwise would spend
printing, proofing, and then printing again — or so the theory goes.
To sneak a preview of how your printed document will look, choose
Print
➪Print Preview from the Office Button menu. Your document then
appears in the special Print Preview mode, as shown in Figure 10-1.
Take note of how your text looks on the page. Look at the margins. If you’re
using footnotes, headers, or footers, look at how they lay out. The idea here
is to spot something dreadfully wrong
before you print.
Figure 10-1:
A document
is being
previewed
before
printing.
127
Chapter 10: The Printer, the Paper, the Document Maker
15_036583 ch10.qxp 11/16/06 12:47 PM Page 127
When you’re done gawking, click the Close Print Preview button to return to
your document.
Or, if everything looks hunky and dory, click the Print button to summon the
Print dialog box, and refer to the next section.
Note how the Page Setup group is visible in Print Preview mode. That
gives you fast access to some handy tools for fixing common problems
found in Print Preview: margins, paragraph spacing, document orienta-
tion, and so on. (Refer to Chapter 14 in this book.)
Use the scroll bars to see more of your document.
If you have a wheel mouse, like the Microsoft IntelliMouse, you can roll
the wheel up or down to scroll one page up or down in your document.
If your mouse is wheel-less, you can use the Page Up and Page Down but-
tons to peruse various pages of your document.
Click the mouse on your document to zoom in and get a closer look.
Click the mouse again to zoom back out. If this doesn’t work, click the
Magnifier check box in the Preview group.
The Zoom tool on the Status bar can also be used to zoom in or out.
In fact, you can zoom out to where you see the entire document dis-
played as tiny pages on the screen.
Sideways printing, paper sizes, and other document-related items are set
when you format your document’s pages. These are Word functions, not
ones you set when you print. Refer to Chapter 14.
Printing a Whole Document
All documents are printed the same, whether they’re absent notes to teachers,
heated screeds to editorial pages, company reports, or the next best-selling
novels to be turned into Tom Hanks movies. Generally speaking, here’s how
the printing operation goes:
1. Make sure that the printer is online and ready to print.
See the first section in this chapter, “Preparing the Printer.”
2. Save your document.
Ha! Surprised you. Saving before you print is always a good idea. Click
the little Save button for a quickie save, and if you need any extra help,
refer to Chapter 9, on saving your stuff to disk.
128
Part II: Word Processing Basics
15_036583 ch10.qxp 11/16/06 12:47 PM Page 128
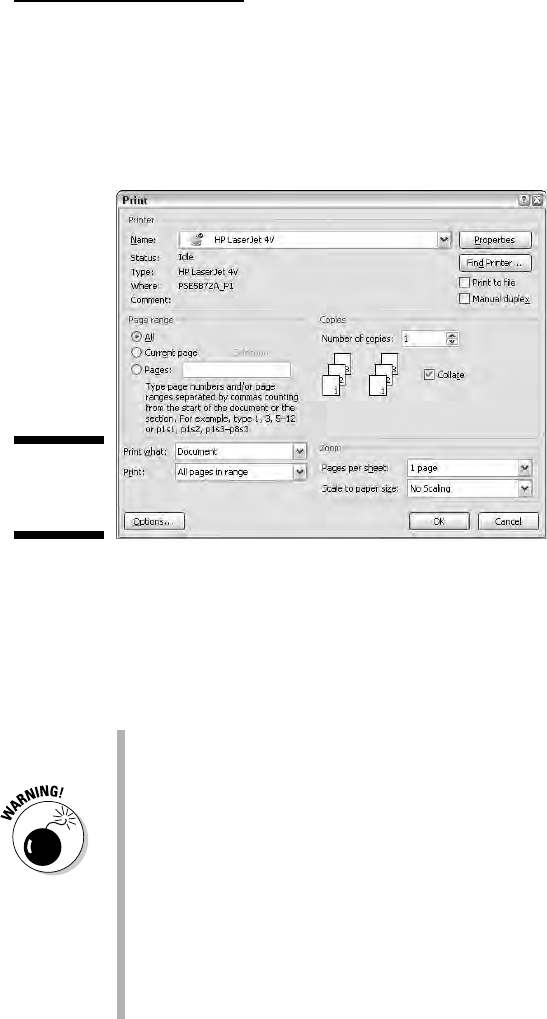
3. Choose the Print command from the Office Button menu to summon
the Print dialog box.
The Print dialog box (see Figure 10-2) provides a slew of printing
options, the most vital of which are covered elsewhere in this chapter.
4. Click the OK button.
The document begins to spew forth from your printer.
Printing may take some time; really, a
long time. Fortunately, you can continue
working while the document prints, falling a page at a time from the printer
.
The keyboard shortcut to display the Print dialog box is Ctrl+P. I’ve made
lots of puns about Ctrl+P, which appear in previous editions of this book.
If nothing prints, don’t hit the Print command again! There’s probably
nothing awry; the computer is still thinking or sending text to the
printer. If you don’t get an error message, everything will probably print,
eventually.
The computer prints one copy of your document for every Print com-
mand you incant. If the printer is just being slow and you impatiently
click the Print button ten times, you get ten copies of your document.
See the section “Canceling a Print Job (Omigosh!),” later in this chapter.
To print only a page, block, or other part of a document, refer to the
later section in this chapter “Printing Part of a Document.”
Figure 10-2:
The Print
dialog box.
129
Chapter 10: The Printer, the Paper, the Document Maker
15_036583 ch10.qxp 11/16/06 12:47 PM Page 129

When your document is formatted using a unique paper size, the printer
may prompt you to load that paper size. Printing on paper of different
sizes is a printer-specific function, not something that Word does. But
you set the paper size in Word as part of the page formatting. Refer to
Chapter 14.
Manual-feed printers beg for paper before they can print. The printer
may say something like “Feed me paper!” or the ever-popular “PC Load
Letter.” Like a dutiful mother, you must comply: Stand by the printer, line
up the paper, and shove it into the printer’s gaping maw until your docu-
ment is done printing. Fortunately, there’s no need to burp the printer
after manually feeding it paper.
Aside from saving your document, you may consider proofreading it
before you print. See Chapter 8.
Printing backward
.txet drawkcab htiw od ot gnihton sah siht ,oN
Do you have one of those printers where the sheets come out face up? In that
case, have you noticed how you must reshuffle your document after it prints
because the pages are in order from back to front? Why are you doing that?
Don’t you have a computer? Aren’t computers supposed to make life
easier?
Am I asking too many questions?
To prevent the face-up reshuffle, merely direct Word to print your document
backward. When you reverse the page order, your document finishes printing
face up, saving you time and making you look a lot smarter. Here’s how to
enact that blessing:
1. Summon the Print dialog box.
Do the Print-command-from-Office-Button jitterbug, the Ctrl+P thing, or
however you enjoy bringing forth the Print dialog box.
2. Click the Properties button in the Print dialog box.
The Properties dialog box for the selected printer appears.
3. On the Layout tab, Page Order area, select the option Back to Front.
4. Click OK.
5. Click OK to print your document.
The document comes out of the printer backward, but because it’s face
up, the document is in order when printing is complete.
130
Part II: Word Processing Basics
15_036583 ch10.qxp 11/16/06 12:47 PM Page 130
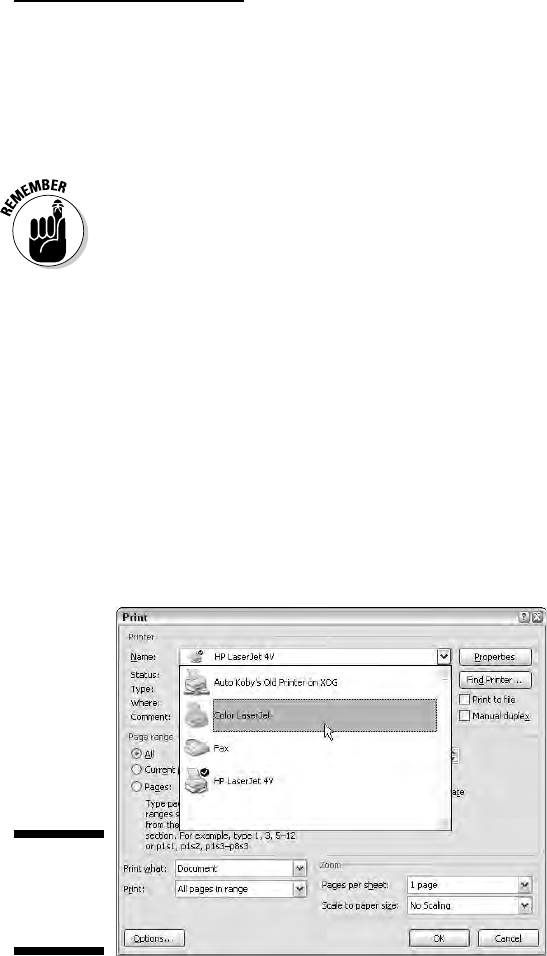
Printing a document quickly
To quickly print your document and avoid the Print dialog box, choose
Print
➪Quick Print from the Office Button menu. you get no visual feedback,
no chance to change settings; the whole document prints.
Quick, of course, is relative. Just because the command is Quick Print doesn’t
mean that your printer spews out the pages any faster than it regularly
would.
Choosing another printer
Your computer can have more than one printer attached. Even small offices
and home offices have computers networked and sharing printers. In any
case, you can use the Print dialog box to choose which printer to use to print
your document. It’s simple.
After bringing forth the Print dialog box, choose a different printer from
the Name drop-down list. Click the downward-pointing arrow on the right
end of the Name box. A list of available printers appears, as shown in
Figure 10-3.
Figure 10-3:
Choosing
another
printer.
131
Chapter 10: The Printer, the Paper, the Document Maker
15_036583 ch10.qxp 11/16/06 12:47 PM Page 131
Simply choose a printer from the list. Click the OK button and your document
prints on the printer you’ve chosen.
Yes, you also should check to ensure that the printer you’ve chosen is
on, selected, stocked with paper, and ready to print.
Setting up or adding printers is something you do in Windows, not in
Word.
Faxing works just like printing, although you’re printing to a fax machine
over a phone line. In Word, simply choose the fax printer from the list
of printers. (Installing a fax printer is something you do in Windows,
not in Word.)
For more information on printing and faxing, I recommend my book
PCs For Dummies (Wiley).
Printing Part of a Document
Unless you tell Word otherwise, the whole document prints each time you
click the OK button in the Print dialog box. For those times when you need
only a single page, a range of pages, or a selected block of text, Word lets you
print just that part of the document. This section provides the details.
Printing a specific page
Follow these steps to print only one page of your document:
132
Part II: Word Processing Basics
Deleting that extra, blank page
at the end of a document
Occasionally, you may be surprised when your
document prints and there’s one, extra page —
a blank page. And, it bothers you because you
cannot get rid of it! Until now:
To remove that ugly, blank page that often roots
at the end of your document, press Ctrl+End.
With the insertion pointer at the end of your doc-
ument, keep pressing the Backspace key until
the extra page is gone. How can you tell? Keep
an eye on the total page count on the status bar.
When that page count is decremented by one,
you know that the extra page is gone.
15_036583 ch10.qxp 11/16/06 12:47 PM Page 132
1. Move the insertion pointer so that it’s sitting somewhere on the page
you want to print.
Check the page number on the status bar to ensure that you’re on the
right page.
2. Choose the Print command from the Office Button menu or press
Ctrl+P.
3. Select the Current Page option in the Print Range part of the Print
dialog box.
4. Click OK.
The dialog box closes, and that one page prints. (It may take some time
to print as Word organizes its thoughts.)
The single page prints with all the formatting you applied, including foot-
notes and page numbers and everything, just as though you plucked that
page from a complete printing of the entire document.
Printing a single page in this manner is great for when you goof up (or
the printer goofs up) one page in a document and you need to reprint
only that page. Printing only a single page doesn’t waste paper.
Printing a range of pages
Word enables you to print a single page, a range of pages, or even some
hodgepodge combination of random pages from within your document.
To print a range or group of pages, follow these steps:
1. Conjure up the Print dialog box.
2. Click the Pages button in the Page Range area of the Print dialog box.
3. Type the page numbers or a range of page numbers.
To print pages 3 through 5, for example, type 3-5.
To print pages 1 through 7, type
1-7.
To print pages 2 and 6, type
2,6.
4. Click OK.
The pages you specify — and only those pages — print.
You can get very specific with the page ranges. For example, to print page 3,
pages 5 through 9, pages 15 through 17, and page 19 (boy, that coffee went
everywhere, didn’t it?), you type
3, 5-9, 15-17, 19.
133
Chapter 10: The Printer, the Paper, the Document Maker
15_036583 ch10.qxp 11/16/06 12:47 PM Page 133

To print all the odd pages, or all the even pages, use the Print drop-down list
in the lower-left corner of the Print dialog box. Choose either Odd Pages or
Even Pages from that list. I’ve used this option to print on both sides of a
sheet of paper: First print all the odd pages. Then flip over the stack of pages,
reinsert them into the printer, and print all the even pages.
Printing a block
After you mark a block of text on-screen, you can beg the Print command to
print that block. Here’s how:
1. Mark the block of text you want to print.
See Chapter 7 for all the block-marking instructions in the world.
2. Choose the Print command from the Office Button menu.
3. Tickle the button by the word
Selection.
The Selection item in the Print dialog box is available only when a block
is selected. Selecting it tells Word that you want to print only your high-
lighted block.
4. Click the OK button.
In a few moments, you see the hard copy sputtering out of your printer.
The page selection prints in the same position and with the same headers
and footers (if any) as it would if you had printed the entire document.
Printing More than One
Copy of Something
Imagine how silly it would be to send your résumé to a company but add that
you need your résumé back because you have only one copy. No, I’m not
trying to convince you that buying a photocopier is necessary. Why do that
when Word can easily print multiple copies of any document? Here’s how:
1. Choose the Print command from the Office Button menu.
2. Enter the number of copies in the Number of Copies box.
For three copies, for example, type 3 into the box.
3. Click OK to print your copies.
134
Part II: Word Processing Basics
15_036583 ch10.qxp 11/16/06 12:47 PM Page 134
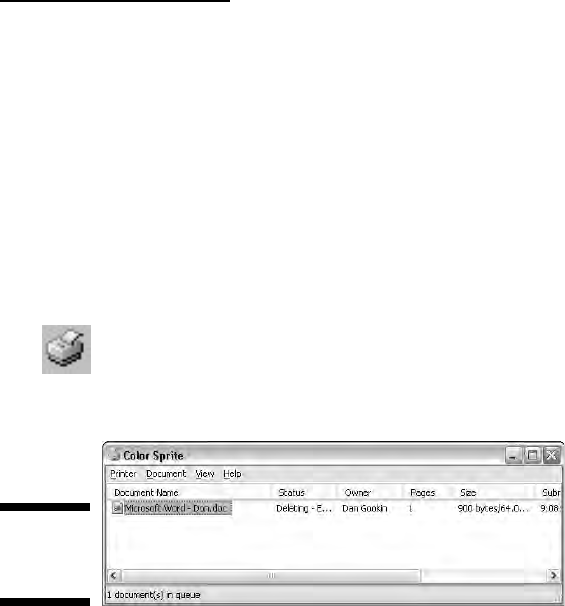
Under normal circumstances, Word prints each copy of the document one
after the other. This process is known as
collating. However, if you’re printing
seven copies of something and you want Word to print seven copies of page 1
and then seven copies of page 2 (and so on), click in the Collate check box to
remove the check mark. (Normally, you leave the check mark there.)
Canceling a Print Job (Omigosh!)
Because you probably need to quickly cancel your printing, here goes:
1. Double-click the li’l printer dude by the current time on the taskbar.
This step opens your printer’s window and displays any documents
waiting to be printed, as shown in Figure 10-4.
2. Click the name of your Word document job on the list.
3. Choose Document
➪Cancel.
The command may be Document➪Cancel Printing in some versions of
Windows.
4. Click Yes to terminate the job.
The command may be OK in some versions of Windows.
5. Close the printer’s window when you’re done.
Choose Printer➪Close to make the window run away from the desktop.
You’re zapped back to Word, ready for more editing action.
Note that it may take a while for the printer to stop printing. That’s because
the printer has its own memory (RAM), and a few pages of the document may
be stored there
and continue to print even after you’ve told the printer to
stop. (Stupid printer — stupid.)
Figure 10-4:
The printer
queue.
135
Chapter 10: The Printer, the Paper, the Document Maker
15_036583 ch10.qxp 11/16/06 12:47 PM Page 135

Stopping a print job is a Windows task, not really anything Word has
control over.
If you’re using a network printer, you may not be able to cancel printing.
Oh, well.
You can use your printer’s window (refer to Figure 10-4) to cancel more
jobs if you’re in an especially vicious mood: Just repeat Steps 2 through
4 for each job you want to sack.
To cancel all the documents (the printer jobs) waiting to print, choose
Printer
➪Cancel All Documents.
Obviously, canceling a print job is the act of a desperate person. In its
efforts to make life easy for computer users, Windows tries hard to help
us change our minds. Canceling something that’s printing may or may
not work as planned. My advice is just to be careful with the Print com-
mand in the first place.
136
Part II: Word Processing Basics
15_036583 ch10.qxp 11/16/06 12:47 PM Page 136
Part III
Formatting
16_036583 pt03.qxp 11/16/06 12:47 PM Page 137

In this part . . .
F
ormatting is the artist’s side of word processing. It’s
what gives your documents a professional, almost
typeset look. By properly formatting your text, sentences,
paragraphs, and pages, you kick up your document’s
appeal a notch, by adding to the value of what’s written.
In fact, forget what you’ve written — as long as it looks
good, who cares?
Seriously, formatting is the task of making your document
look less ugly. It’s something you do after you write, or if
you can handle the concept of
styles and templates, you
can format while you write. The chapters in this part of
the book demonstrate how all that nonsense is done. If
you can survive the formatting task, you can truly do any-
thing in Word.
16_036583 pt03.qxp 11/16/06 12:47 PM Page 138

Chapter 11
Formatting Text
In This Chapter
Understanding text formatting
Choosing a font
Applying basic text formats
Changing text size
Adding color to your words
Undoing text formatting
Exploring the Font dialog box
Changing text case
T
he most basic thing you can format in a document is text — the letters,
numbers, and characters you type. Just as your body is composed of mil-
lions of cells, documents are composed of thousands of characters. Like a
cell, a
character is the basic building block of the document. Characters
include letters, symbols, and Uncle Lloyd, who can play
The Blue Danube
waltz using only his cupped hand and his armpit.
You can format characters to be bold, underlined, italicized, little, or big or in
different fonts or colors — all sorts of pretty and distracting attributes. Word
gives you a magnificent amount of control over the appearance of your text.
This chapter contains the details.
How to Format Text
You can change the format of your text in two ways:
Choose a text-formatting command first, and then type the text. All the
text you type is formatted as chosen.
Type the text first, and then select the text as a block and apply the for-
matting. This technique works best when you’re busy with a thought
and need to return and format the text later.
17_036583 ch11.qxp 11/16/06 12:48 PM Page 139
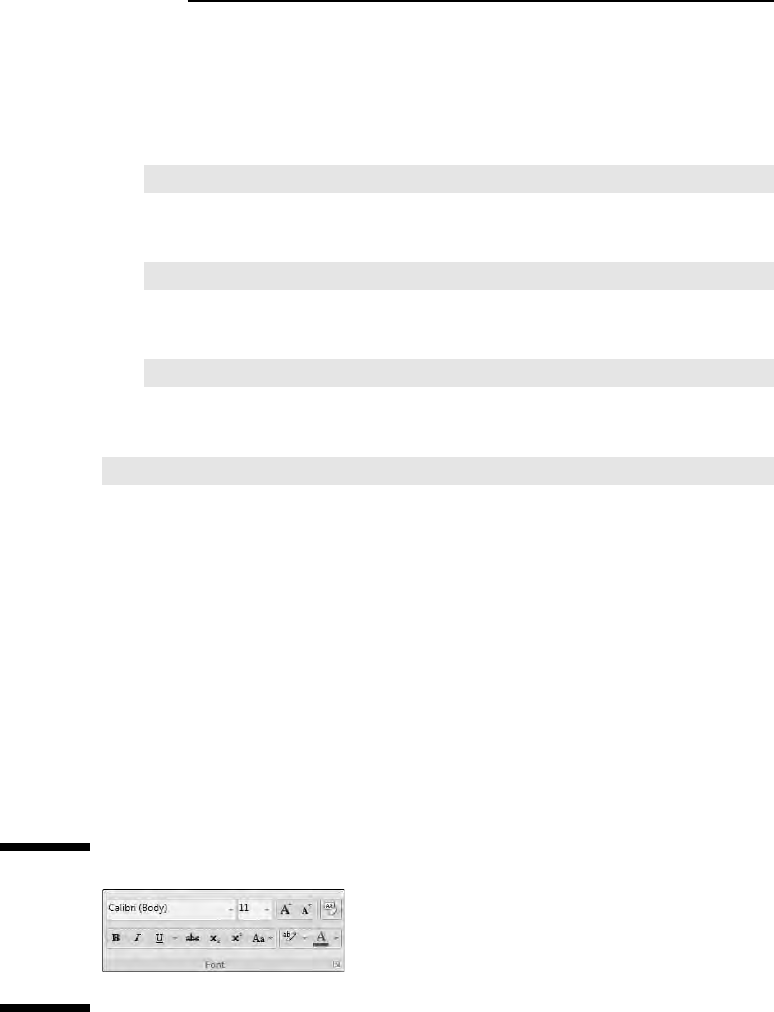
You use both methods as you compose text in your document. Sometimes,
it’s easier to use a formatting command and type the text in that format.
For example:
1. Type the following text:
And we all had a
2. Press Ctrl+I to activate italic text.
3. Type this word:
horribly
4. Press Ctrl+I again, which turns off italic.
5. Continue typing:
awful time.
The final sentence looks like this:
And we all had a horribly awful time.
For more complex formatting, it’s better to type the text first, go back, mark
the text as a block, and then apply the formatting. Even so, either way works.
See Chapter 7 for more information on marking blocks of text.
Basic Text Formatting
Word stores some of the most common text-formatting commands in one
group. On the Home tab, you find the Font group, shown in Figure 11-1.
The command buttons in that group carry out most of the basic text format-
ting you use in Word. This section mulls over the possibilities.
Figure 11-1:
Text-
formatting
attributes in
the Font
group.
140
Part III: Formatting
17_036583 ch11.qxp 11/16/06 12:48 PM Page 140
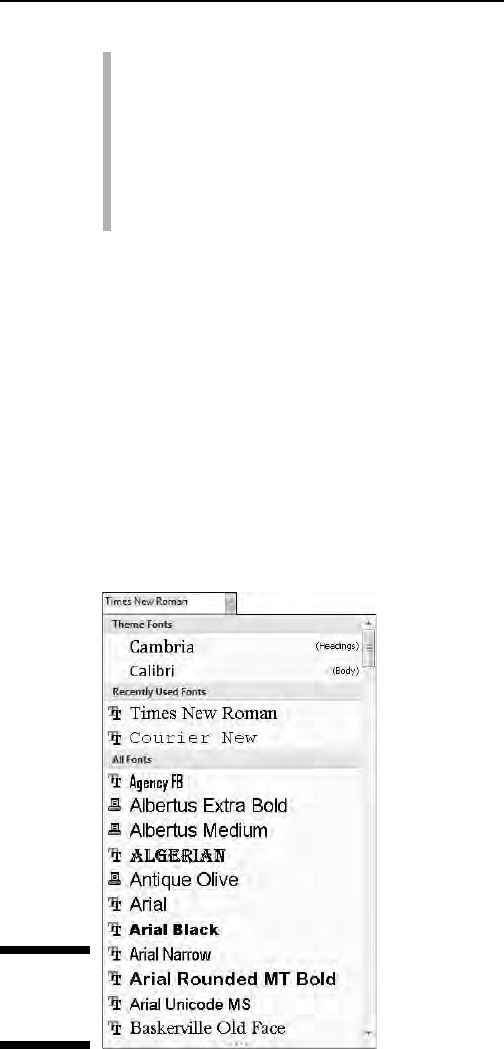
Text can also be formatted by using the Mini Toolbar that appears when-
ever you select text. Refer to Chapter 7.
The Font group can help you quickly determine which formatting is
applied to your text. For example, in Figure 11-1, the text where the
insertion pointer is blinking is formatted in the Calibri font. The number
12 tells you that the text is 12 points tall. If the B button were high-
lighted, you would also know that the text was formatted in bold.
(These text formats are discussed throughout this section.)
Changing the font
The most basic attribute of text is its typeface, often called the font. The font
sets up how your text looks — its overall text style. Although deciding on a
proper font may be agonizing, and indeed many graphic artists are paid well
to choose just the right font, the actual task of selecting a font in Word isn’t
that tough. It generally goes like this:
1. On the Write tab, in the Font group, click the down arrow to display
the Font face list.
A menu of font options appears, as shown in Figure 11-2.
Figure 11-2:
The Fonts
list.
141
Chapter 11: Formatting Text
17_036583 ch11.qxp 11/16/06 12:48 PM Page 141
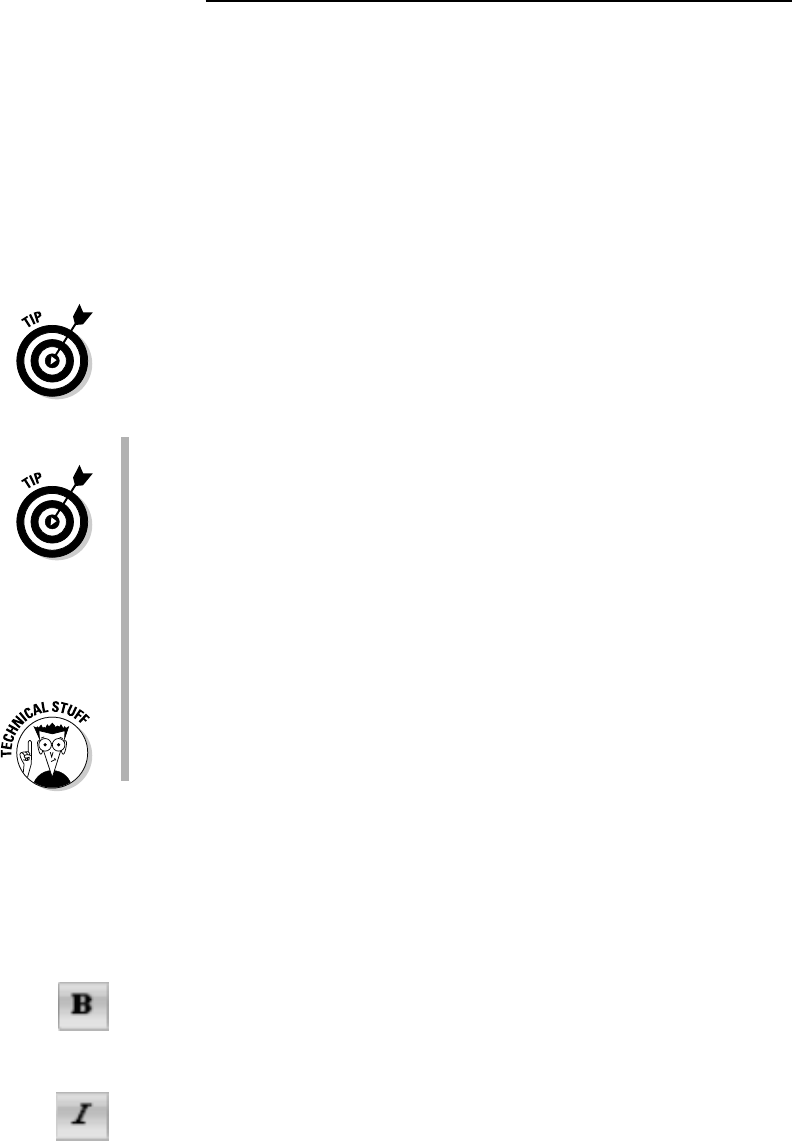
The top part of the menu shows fonts associated with the document
theme. The next section contains fonts you’ve chosen recently, which
is handy for reusing fonts. The rest of the list, which can be quite long,
shows all the fonts in Windows that are available to Word. It’s quite a
long list.
2. Scroll to the font you want.
The fonts in the All Fonts part of the list are displayed in context (as
they appear when printed) and in alphabetical order.
3. Click to select a font.
You can also use the Font menu to preview what fonts look like. Scroll
through the list to see which fonts are available and how they may look.
As you move the mouse over a font, any selected text in your document is
visually updated to show how that text would look in that font. (Note that no
changes are made until you select the new font.)
When no font is displayed in the Font group (the listing is blank), it means
that more than one font is being used in the selected block of text.
You can quickly scroll to a specific part of the menu by typing the first
letter of the font you need, such as T for Times New Roman.
Graphic designers prefer to use two fonts in a document — one for the
text and one for headings and titles. Word is configured this way as well.
The font you see with
Body after its name is the current text, or body,
font. The font marked as Heading is used for headings. These two fonts
are part of the document theme.
Refer to Chapter 17 for more information on document themes.
Fonts are the responsibility of Windows, not Word. New fonts are
installed in the Control Panel’s Fonts folder. (The procedure is really no
big deal.) Thousands of fonts are available for Windows, and they work
in all Windows applications.
Character formats (bold, italic, and so on)
The Font group lists some of the most common character formats. These are
applied in addition to the font. In fact, they enhance the font. Use them as
you see fit:
To make text bold, press Ctrl+B or click the Bold command button.
Use
bold to make text stand out on a page — for titles and captions or when
you’re uncontrollably angry.
To make text italic, press Ctrl+I or click the Italic command button.
142
Part III: Formatting
17_036583 ch11.qxp 11/16/06 12:48 PM Page 142

Italic is replacing underlining as the preferred text-emphasis format. Italicized
text looks so much better than shabby underlined text. It’s light and wispy,
poetic and free.
Underline text by pressing Ctrl+U or click the Underline command button.
When will this text attribute
die? I’m baffled. Honestly, I think we’re waiting
for the last typewriter-clutching librarian from the 1950s to pass on before
underlining is officially gone as a text attribute. And please don’t fall prey to
the old rule about underlining book titles. It’s
Crime and Punishment, not
Crime and Punishment
.
Strike through text by clicking the Strikethrough command button. (There’s
no keyboard shortcut for this one.)
I don’t know why strikethrough text made it up on the Font group. If I were
King of Microsoft, I would have put Small Caps up there instead. But, who am
I? Strikethrough is common in legal stuff, and when you mean to say some-
thing but then change your mind
, think of something better to say.
Make text subscript by pressing Ctrl+= (equal) or clicking the Subscript com-
mand button.
Subscript text appears below the line, such as the 2 in H
2
O. Again, it puzzles
me why this formatting command ranks up there with bold and italic. I sup-
pose that somewhere there’s a lot of subscripting going on.
Make text superscript by pressing Ctrl+Shift+= (equal sign) or clicking the
Superscript command button.
Superscript text appears above the line, such as the 10 in 2
10
. Note that the
command is written as Ctrl++ (plus), but it’s really Ctrl+Shift+=. If you can
remember that Ctrl+= is subscript, just press the Shift key to get Ctrl+Shift+=
for superscript — if you can remember, that is.
More text formats are available in Word, such as small caps, outline, and
shadow. These can be accessed through the Font dialog box. Refer to the
section “Fun and Formatting in the Font Dialog Box,” later in this chapter.
To turn off a text attribute, use the command again. For example, press
Ctrl+I to type something in
italic. Then press Ctrl+I again to return to
normal text.
You can use the down arrow by the Underline command button to dis-
play a variety of underline styles and options. When a specific underline
style is chosen from the menu, using Ctrl+U or the Underline command
button applies that style.
Basic character formatting affects only selected text or any new text
you type.
143
Chapter 11: Formatting Text
17_036583 ch11.qxp 11/16/06 12:48 PM Page 143

You can mix and match character formats. For example, press Ctrl+B
and then Ctrl+I to have bold and italic text. You need to use Ctrl+B and
Ctrl+I, or the command buttons, to turn those attributes off again.
Obviously, and logically, you cannot apply both superscript and sub-
script text attributes to the same chunk of text. That’s just silly.
The best way to use superscript or subscript is to write your text first.
After the text is written, go back, mark as a block the text you want to
superscript or subscript, and
then use these commands. So 42 becomes
4
2
, and CnH2n+1OH becomes C
n
H
2n+1
OH.The reason is that the text you
modify tends to be rather teensy and hard to edit. Better to write it first
and then format.
Text Transcending Teeny to Titanic
Big text. Little text. Text! Text! Text!
Text size is considered a text format in Word. You can choose the size of your
text, from indecipherably small to monstrously huge. Of course, more
common is the subtle text-size adjustment; rare is the student who hasn’t
fudged the length of a term paper by inching up the text size a notch or two.
To understand how Word (and Windows) deals with text size, you must
become one with an official typesetting term:
point. Text size is measured by
the point, where one point is equal to
1
⁄72 inch.
Here are some point pointers:
The bigger the point size, the larger the text.
Most text is either 10 or 12 points tall.
Headings are typically 14 to 24 points tall.
Most fonts can be sized from 1 point to 1,638 points. Point sizes smaller
than 6 are generally too small for a human to read.
Seventy-two points is equal to 1-inch-high letters (roughly).
The point size of text is a measure from the bottom of the descender to
the top of the ascender — from the bottom of the lowercase
p to the top
of the capital
E, for example. So, the typical letter in a font is smaller
than the given font size. In fact, depending on the font design, text for-
matted at the same size but with different fonts
(typefaces) may not
appear to be the same size. That’s just one of those typesetting oddities
that causes regular computer users to start binge drinking.
144
Part III: Formatting
17_036583 ch11.qxp 11/16/06 12:48 PM Page 144
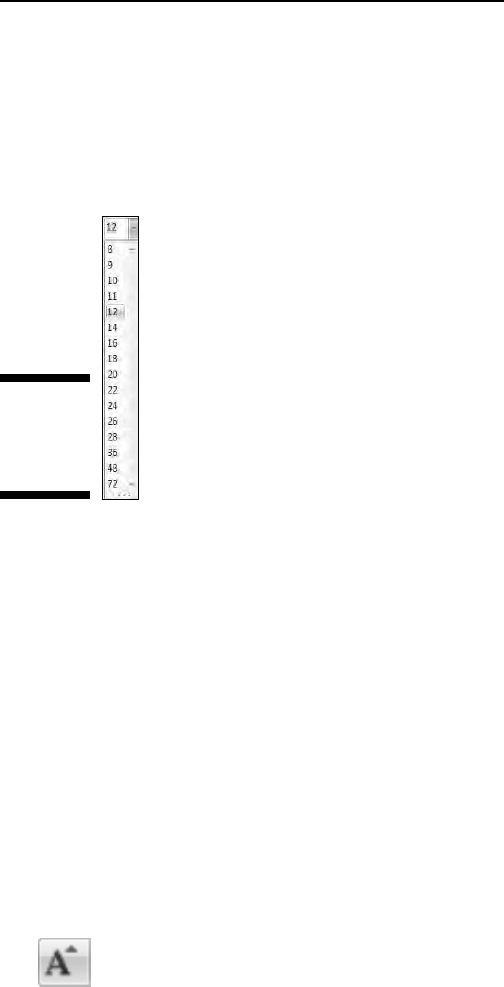
Setting the text size
Text size is set in the Font group on the Home tab. Just to the right of the
Font box is the Size box (refer to Figure 11-1). Clicking the down arrow dis-
plays a list of font sizes for your text, as shown in Figure 11-3.
You can preview the new text size by pointing the mouse at an item on the
Size menu. The word under the insertion pointer, or a selected block of text,
is updated on the screen to reflect the new size. Click to choose a size or
press Esc to cancel.
The Size menu lists only common text sizes. To set the text size to something
not listed or to something specific, type that value into the box. For example,
to set the font size to 11.5, click in the Size box and type
11.5.
Nudging text size
Sometimes, choosing text size is like hanging a picture. To get the picture
level, you have to nudge it just a little bit this way and that. Word has similar
tools for nudging text size larger or smaller, two of which are found on in the
Font group.
To increase the font size, press Ctrl+Shift+> or click the Grow Font command
button.
The Grow Font command nudges the font size up to the next value as listed
on the Size menu (refer to Figure 11-3). So, if the text is 12 points, the Grow
Font command increases its size to 14 points.
Figure 11-3:
Select a font
size from
this list.
145
Chapter 11: Formatting Text
17_036583 ch11.qxp 11/16/06 12:48 PM Page 145
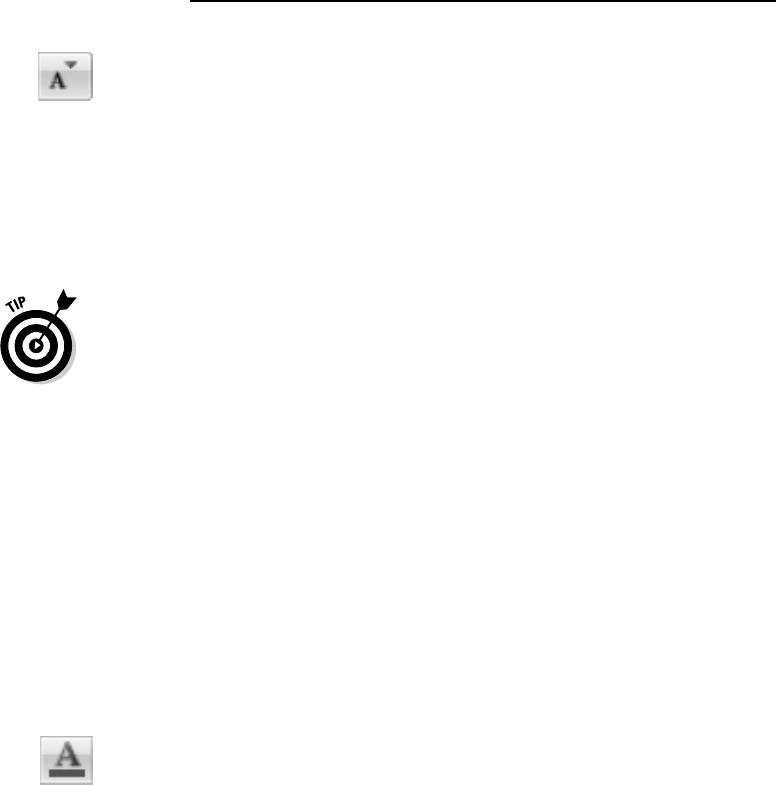
To decrease the font size, press Ctrl+Shift+< or click the Shrink Font com-
mand button.
The Shrink Font command works in the opposite direction of the Grow Font
command, by reducing the text size to the next-lower value as displayed on
the Size menu (refer to Figure 11-3).
I remember the Grow and Shrink keyboard commands easily because > is the
greater-than symbol and < is the less-than symbol. Just think, “I’m making my
text
greater than its current size” when you press Ctrl+Shift+> or “I’m making
my text
less than its current size” when you press Ctrl+Shift+<.
When you want to increase or decrease the font size by smaller increments,
use the following shortcut keys:
Ctrl+] Makes text one point size larger
Ctrl+[ Makes text one point size smaller
More Colorful Text Makes Not
for More Colorful Writing
Now that color printers are pretty much standard, you can take advantage of
those expensive ink pots by using colored text in Word. Color can add per-
sonality to your correspondence, provide punch in a business letter, or make
an important document extremely difficult to read. Choose your text color
wisely.
Text color is applied by clicking the Font Color command button. The bar
below the A on the Font Color command button indicates which color is
applied to text.
A new color can be chosen by clicking the menu arrow just to the right of the
Font Color command button. Choose a color from the menu, as shown in
Figure 11-4; as you move the mouse pointer over various colors, selected text
in your document is updated to reflect that color. When you find the color
you like, click it. That color then becomes the new text color associated with
the Font Color command button.
146
Part III: Formatting
17_036583 ch11.qxp 11/16/06 12:48 PM Page 146
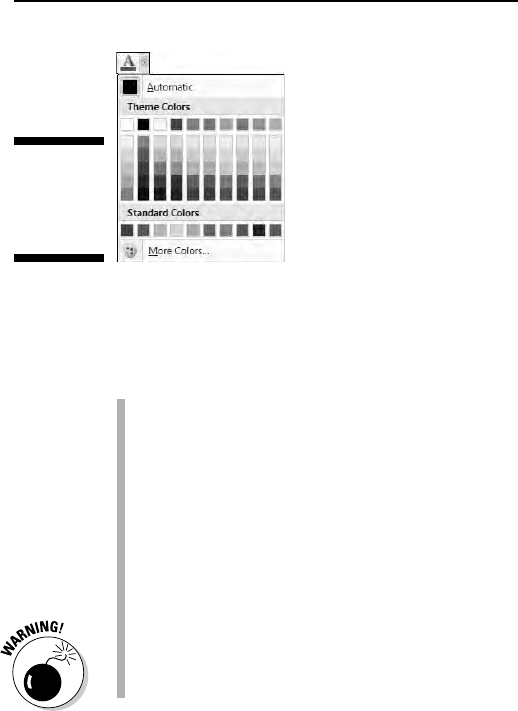
Of course, colored text prints only when a color printer is available and read-
ily stocked with ink. Refer to Chapter 10 for more information on printing
documents.
Theme colors are associated with the document theme. Refer to
Chapter 17.
Select the More Colors item to display a special Colors dialog box. Use
that dialog box to craft your own custom colors.
The color Automatic refers to the color defined for the text style you’re
using. Refer to Chapter 16 for more information on styles.
The Font Color command affects only the text color, not the background.
To color the background, you need to use the Shading command, which
is covered in Chapter 19.
Be careful not to confuse the Font Color command button with the Text
Highlight Color command button, to its left. Text highlighting is a text
attribute, but it’s best used for document markup. See Chapter 27.
Undoing All This Text-Formatting
Nonsense
There are so many formatting commands available that it’s possible for your
text to look more like a pile of formatting remnants than anything readable in
any human language. Word understands this problem, so it created the Clear
Formatting command to let you peel away all formats from your text, just like
you peel the skin from a banana:
Figure 11-4:
Selecting
a color for
the text.
147
Chapter 11: Formatting Text
17_036583 ch11.qxp 11/16/06 12:48 PM Page 147

To peel away formatting from a block of selected text, or the text the inser-
tion pointer is on, or future text you type, press Ctrl+spacebar or use the
Clear Formatting command button in the Font group.
The Clear Formatting command removes any formats you’ve applied to the
text: font, size, text attributes (bold or italic), and color.
Another key combination for Ctrl+spacebar is Ctrl+Shift+Z. Remember
that Ctrl+Z is the Undo command. To undo formatting, all you do is add
the Shift key, which may make sense — well, heck, if any of this makes
sense.
Technically, the Ctrl+spacebar command restores characters to the for-
matting defined by the
style you’re using. So, if the Body style is 12-point
Calibri, pressing Ctrl+spacebar restores that font and size. Don’t let
this information upset or confuse you! Instead, turn to Chapter 16 for
more information on Word’s styles.
Fun and Formatting in
the Font Dialog Box
There’s a place in Word where all your font-formatting delights are kept in a
neatly organized fashion. It’s the Font dialog box, shown in Figure 11-5.
To summon the Font dialog box, click the Dialog Box Launcher button in the
lower-right corner of the Font group or press Ctrl+D.
The Font dialog box contains
all the commands for formatting text, even
quite a few that didn’t find their way into the Font group.
Please note the lovely Preview window, at the bottom of the Font dialog box.
This window allows you to preview changes to your text. One of my pastimes
is to continuously select fonts in the Font dialog box to see what they look
like in the Preview window.
When you’re done setting up your font stuff, click the OK button. Or, click
Cancel if you’re just visiting.
The best benefit of the Font dialog box is the Preview window, at the
bottom. That window shows you exactly how your choices affect text in
your document.
You select the Underline attribute from the Underline Style drop-down
list. Word can do several types of underlining.
148
Part III: Formatting
17_036583 ch11.qxp 11/16/06 12:48 PM Page 148
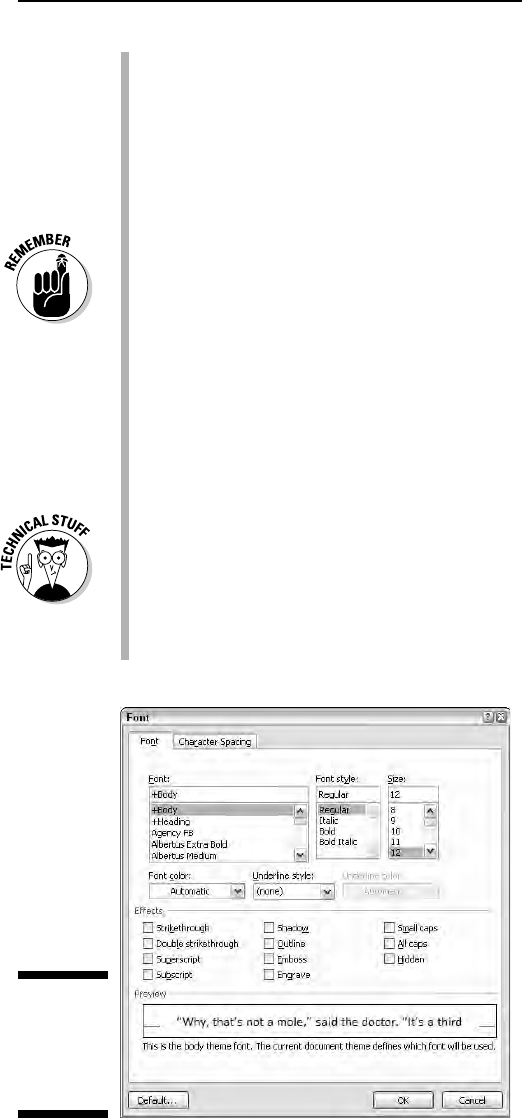
The Font names +Body and +Heading refer to the fonts selected by the
current document theme. This is done so that you can use Word’s theme
commands to quickly change body and heading fonts for an entire docu-
ment all at once.
Save the festive attributes — such as Shadow, Outline, Emboss, or
Engrave — for titles and headings.
The Character Spacing tab displays advanced options for changing the
size and position of text on a line.
Changes you make in the Font dialog box affect any marked block on the
screen or any new text you type after you close the Font dialog box.
The Font dialog box can also be accessed from the Find dialog box or
the Find and Replace dialog box. This helps you to search for, or search
and replace, specific text formatting in a document.
You can mark all similar text formatting in a document as a block by
right-clicking a bit of text and choosing Styles
➪Select Text with Similar
Formatting. That way, you can universally change similar text in a docu-
ment without doing a search-and-replace for text formats. Also see
Chapter 7 for more block-marking information.
The Default button in the Font dialog box is used to change the font that
Word uses when you’re starting up a new document. If you prefer to use
a specific font for all your documents, choose the font (plus other text
attributes) in the Font dialog box, and then click the Default button.
Click the Yes button to answer the question about changing the Normal
template. Afterward, all your documents start with the new default font
you’ve selected.
Figure 11-5:
The neatly
organized
Font dialog
box.
149
Chapter 11: Formatting Text
17_036583 ch11.qxp 11/16/06 12:48 PM Page 149
150
Part III: Formatting
Text-attribute effects roundup
Bold and italic are the most common ways to dress up a character. Beyond that, Word has a buck-
etful of character attributes you can apply to your text. This table shows the lot of them:
Format Key Combination Command Button
Clear all formats Ctrl+spacebar
ALL CAPS Ctrl+Shift+A
Bold Ctrl+B
Double underline Ctrl+Shift+D
Hidden text Ctrl+Shift+H
Italic
Ctrl+I
SMALL CAPS Ctrl+Shift+K
Continuous underline
* Ctrl+U
Word underline * Ctrl+Shift+W
Strikethrough
sub
script Ctrl+=
super
script Ctrl+Shift+=
* Note the difference between word underline and continuous underline.
Hidden text is good for what it says — hiding text in a document. Of course, you don’t see the text
on-screen, either. To show the hidden text, click the Show/Hide command button (in the Paragraph
Group on the Write tab) as described in Chapter 2, in the section about spots and clutter in your
text. The hidden text shows up in the document with a dotted underline.
17_036583 ch11.qxp 11/16/06 12:48 PM Page 150
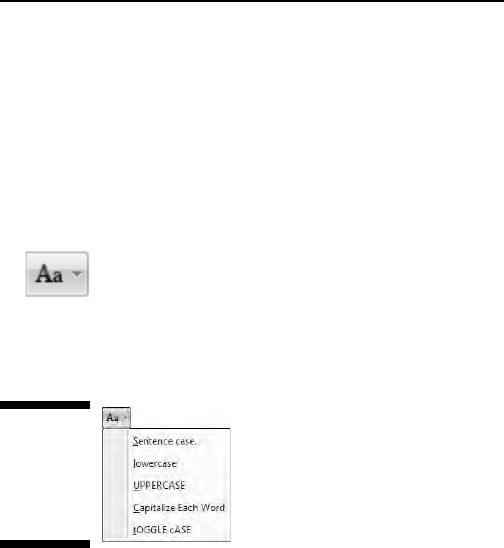
Changing the CASE of Text
Believe it or not, upper- and lowercase do have something to do with a font.
Back in the old mechanical-type days, fonts came in a case, like a briefcase.
The top part of the case, the upper case, held the capital letters. The bottom
part of the case held the lowercase letters. So, in a way, changing the case of
text is kind of a font-formatting trick.
To change the case of text in Word, use the Change Case command button in
the Font group. Choosing that button displays a menu of options, shown in
Figure 11-6. Select the text you want to change, and then choose the proper
item from the Change Case command button. Your text is modified to match
the menu item that’s selected.
You can also use the Shift+F3 command to change the case of selected text.
But that keyboard shortcut cycles between only three of the menu options
shown in Figure 11-6: ALL CAPS, lowercase, and Capitalize Each Word.
Figure 11-6:
The Change
Case com-
mand button
menu.
151
Chapter 11: Formatting Text
17_036583 ch11.qxp 11/16/06 12:48 PM Page 151

152
Part III: Formatting
17_036583 ch11.qxp 11/16/06 12:48 PM Page 152

Chapter 12
Formatting Paragraphs
In This Chapter
Understanding paragraph formatting
Finding paragraph-formatting commands
Aligning paragraphs left, center, right, and full
Changing line spacing
Adding room between paragraphs
Indenting a paragraph
Making a hanging indent
Double-indenting a paragraph
Using the Ruler
P
aragraphs are goodly sized chunks of text. In school, you were probably
taught that a paragraph must be one or more sentences expressing a
thought. Or something. Anyway, I view a paragraph, formatting-wise, as a ver-
itable text sandwich, bulky enough to qualify for its own round of formatting
commands: A paragraph has left and right margins, a top and a bottom, a
before and an after, plus space in the middle.
Word provides ample tools for formatting paragraphs of text. There’s a
simple way, for example, to automatically indent the first line of a paragraph.
Imagine! That and other amazing formatting tricks, all designed to impress
and inspire, are found in this handy chapter.
How to Format a Paragraph
You can format a paragraph in Word several ways:
18_036583 ch12.qxp 11/16/06 12:48 PM Page 153

Use a paragraph-formatting command, and then type a new paragraph in
that format.
Use the formatting command in a single paragraph to format that
paragraph. (Place the insertion pointer in a paragraph, and then use
a formatting command.)
Use the formatting command on a block of selected paragraphs to
format them all together.
Here’s an example for you to mess with:
1. Type the following paragraph:
It was a crushing blow. Francis had practiced her
lines all week. Her mother had finished the costume.
Even her brothers were impressed, commenting that she
really was Chicken Little. But all that meant nothing
now. While she sat in the bathtub, her father broke
the terrible news: “I’m sorry, Francis. But you have
the chicken pox.”
Did you remember to press Enter to end the paragraph? That’s important.
2. Move the insertion pointer so that it’s somewhere amid the para-
graph’s text.
3. Press Ctrl+E.
Ctrl+E is the keyboard shortcut for the Center command, which centers
the paragraph’s text from left to right on the page.
4. Press Ctrl+L.
The paragraph is left justified, undoing the centering.
5. Press Ctrl+T.
The paragraph is now formatted with a hanging indent.
6. Press Shift+Ctrl+T.
And the hanging indent is gone.
Hopefully, that little demo gets you in the mood for understanding how para-
graph formatting works. The commands used in these steps are explained
elsewhere in this chapter.
A paragraph is a chunk of text that ends when you press the Enter key.
Paragraph-formatting commands work only on paragraphs, not on sen-
tences or individual words. Of course, if your paragraph is only a single
word or sentence, that’s okay.
Refer to Chapter 7 for specific and entertaining block-marking
instructions.
154
Part III: Formatting
18_036583 ch12.qxp 11/16/06 12:48 PM Page 154
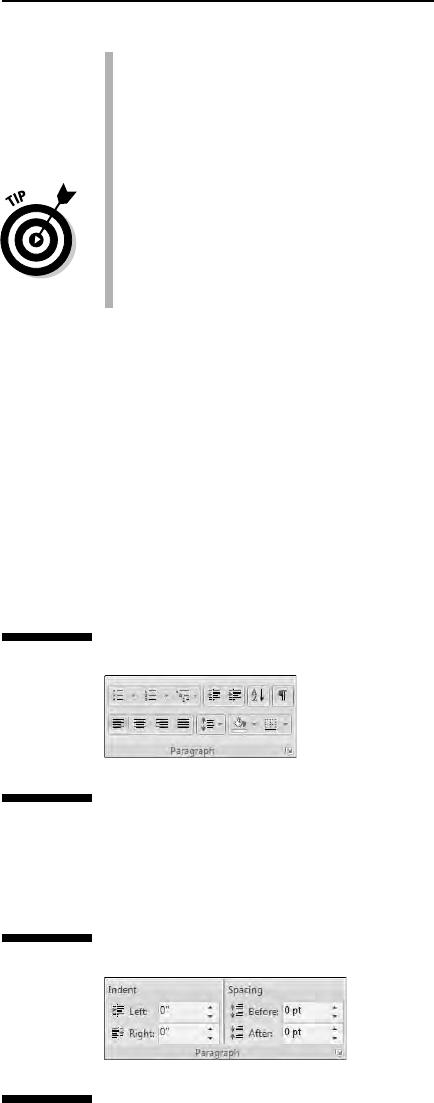
You can format all the paragraphs in a document by first selecting the
entire document. The quick way to do that is to press the Ctrl+A key
combination.
To format individual characters or the text inside a paragraph, refer to
Chapter 11.
Some folks like to see the Enter key symbol (¶) in their documents, visu-
ally marking the end of each paragraph. You can do this in Word by
clicking the Word Options button on the Office Button menu. Click
Display on the left side of the Word Options dialog box. On the right
side, put a check mark by Paragraph Marks. Click OK. Now, every time
you press the Enter key, a ¶ symbol appears at the end of the paragraph.
Where the Paragraph Formatting
Commands Lurk
Word smuggled some of the most popular paragraph-formatting commands
into the Paragraph group, found on the Home tab. Figure 12-1 illustrates the
Paragraph group, although you should note that Word may show a different
arrangement of the command buttons depending on your computer’s screen
width.
In an odd twist, indenting and paragraph spacing is found in another
Paragraph group, this one on the Page Layout tab, shown in Figure 12-2.
Figure 12-2:
Paragraph-
formatting
commands
on the Page
Layout tab.
Figure 12-1:
Paragraph-
formatting
commands
on the
Home tab.
155
Chapter 12: Formatting Paragraphs
18_036583 ch12.qxp 11/16/06 12:48 PM Page 155
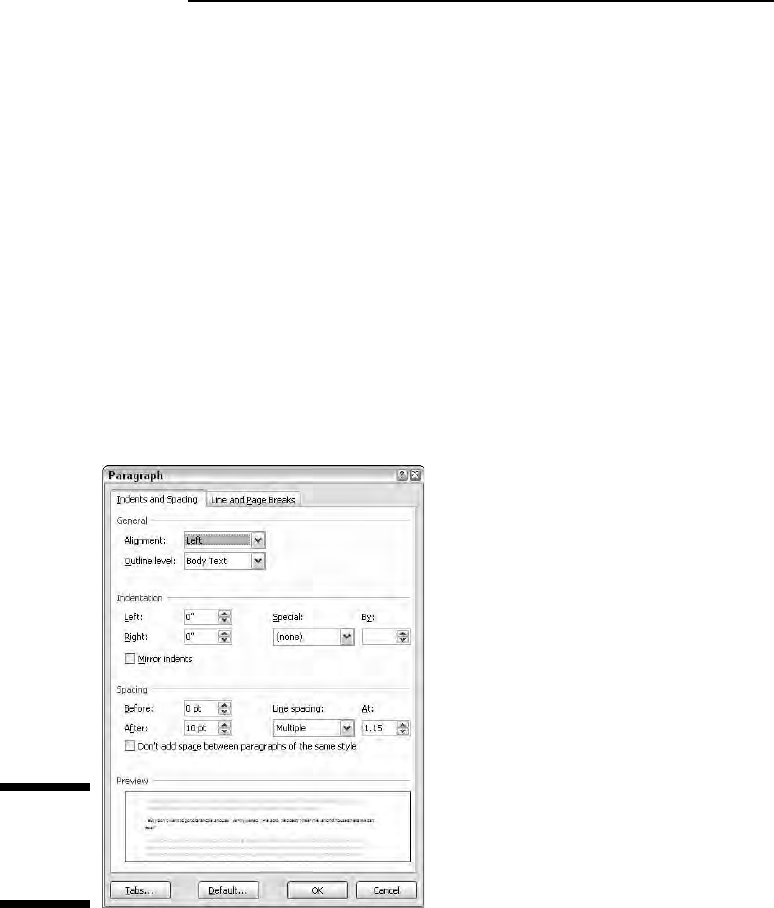
Because many of the paragraph-formatting commands require you to enter
values, there also exists a Paragraph dialog box, shown in Figure 12-3. There,
you find some finer controls that the command buttons just don’t offer.
To summon the Paragraph dialog box, click the Dialog Box Launcher button,
found in the lower-right corner of the Paragraph group. Or, you can use the
forgettable keyboard shortcut Alt+H, P, G.
The commands in the various paragraph-formatting locations are covered
throughout the rest of this chapter.
Click the Cancel button or press the Esc key to dismiss the Paragraph
dialog box.
The Mini Toolbar, which shows up after you select text, also contains a
smattering of paragraph-formatting buttons. Refer to Chapter 7 for more
information on the Mini Toolbar.
Paragraph Justification and Alignment
Paragraph alignment has nothing to do with politics, and justification has
nothing to do with the right or wrong of how paragraphs are formatted.
Instead, both terms refer to how the left and right edges of the paragraph
Figure 12-3:
The
Paragraph
dialog box.
156
Part III: Formatting
18_036583 ch12.qxp 11/16/06 12:48 PM Page 156
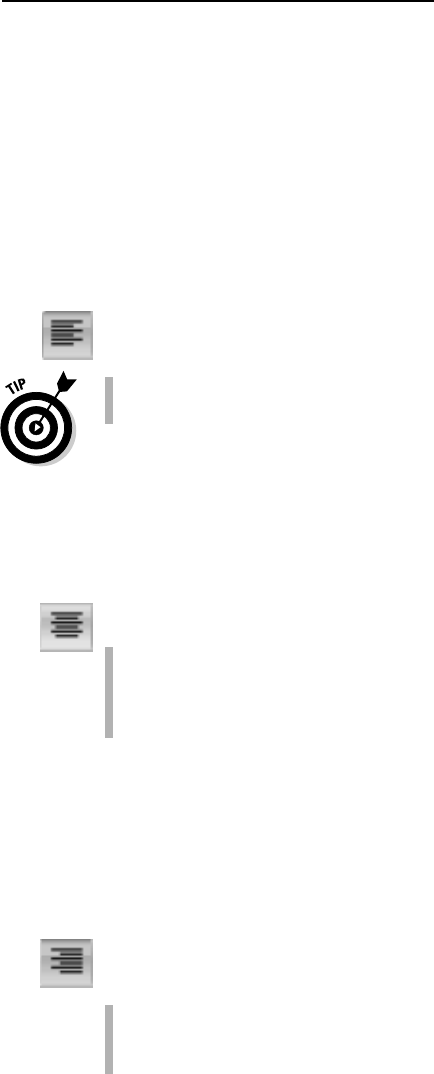
look on a page. There are four options: Left, Center, Right, and Fully Justified,
each covered in this section.
Line up on the left!
Much to the pleasure of southpaws the world over, left-aligning a paragraph
is considered normal. That’s the way the old typewriter used to do things:
The left side of the paragraph is all even and tidy, and the right side is jagged,
not lined up.
To left-align a paragraph, press Ctrl+L or click the Align Left command
button.
This type of alignment is also known as ragged right.
Left-aligning a paragraph is how you “undo” the other types of alignment.
Everyone center!
Centering a paragraph places each line in that paragraph in the middle of the
page, with an equal amount of space to the line’s right or left.
To center a paragraph, press Ctrl+E or use the Center command button.
Centering is ideal for titles and single lines of text. It’s ugly for para-
graphs and makes reading your text more difficult.
You can center a single word in the middle of a line by using the center
tab. Refer to Chapter 13 for the details.
Line up on the right!
A right-aligned paragraph has its right margin nice and even. The left margin,
however, is jagged. When do you use this type of formatting? I have no idea,
but it sure feels funky typing a right-aligned paragraph.
To flush your text along the right side of the page, press Ctrl+R or click the
Align Right command button.
This type of alignment is also known as ragged left or flush right.
You can right-justify text on a single line by using a right-align tab. Refer
to Chapter 13 for more info.
157
Chapter 12: Formatting Paragraphs
18_036583 ch12.qxp 11/16/06 12:48 PM Page 157
Full justification! (Full justification —
aye, sir!)
Full justification occurs when both the left and right sides of a paragraph are
lined up neat and tidy, flush with the margins.
To give your paragraph full justification, press Ctrl+J or click the Justify com-
mand button.
Fully justified paragraph formatting is often used in newspapers and
magazines, which makes the thin columns of text easier to read.
Word makes each side of the paragraph line up by inserting tiny slivers
of extra space between the words in a paragraph.
Making Room Before, After, or
Inside Your Paragraphs
Word lets you add air to the space before, after, and in the middle of your
paragraphs. Traditionally, the line spacing command lets you add room
between the lines of text within a paragraph. From the typesetting planet,
your word processor lets you add space before and after each paragraph.
Combine these two commands and you have a great deal of control over how
tall or tight your paragraph text can be.
Traditional line spacing
Changing the line spacing inserts extra space between all lines of text in a
paragraph. Word adds the space, or extra blank lines,
below each line of text
in the paragraph. That means that line spacing also affects the space between
paragraphs.
The Line Spacing command button displays a menu listing common line-
spacing commands, as shown in Figure 12-4. Choose a new line-spacing value
from that list to change the line spacing for the current paragraph or all the
paragraphs selected as a block.
158
Part III: Formatting
18_036583 ch12.qxp 11/16/06 12:48 PM Page 158
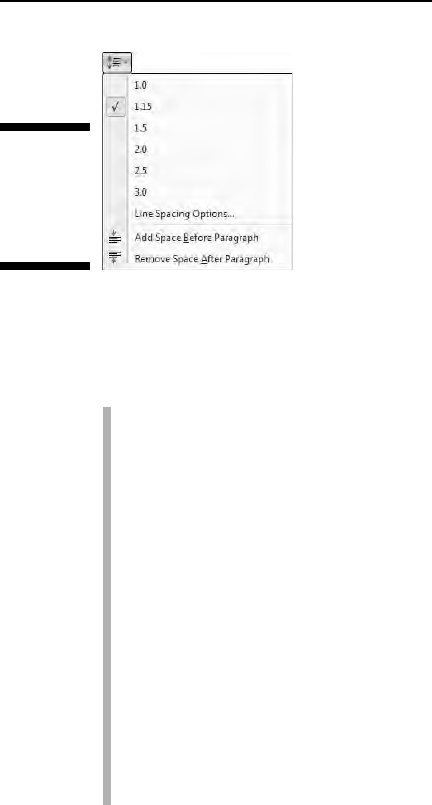
Before Word 2007, line spacing was preset to 1.0 in Word. Note in Figure 12-4,
as well as in your documents, that the setting is now 1.15, which is suppos-
edly more readable and also a blessing to term-paper writers all over.
Double spacing, or the line spacing value 2.0, means that one line of text
appears with one blank line below it. Triple spacing, 3.0, means that one
line of text appears with two blank lines below.
Ah! The keyboard shortcuts:
• To single-space, press Ctrl+1.
• To double-space, press Ctrl+2.
• To use 1
1
⁄2-spaced lines, press Ctrl+5.
Yes, Ctrl+5 means 1
1
⁄2-line spacing, not 5-line spacing. Use the 5 key on
the typewriter part of the computer keyboard. Using the 5 key on the
numeric keypad activates the Select All command.
I know some fussy editors, old-school types, who want everything triple-
spaced so that they can scribble comments between the lines.
As with justification, there’s no such thing as no line spacing. If you want
to “remove” fancy line spacing, select the text and press Ctrl+1 for single
spacing.
More line spacing options
To set the line spacing to something specific, you need to call on the Paragraph
dialog box, as described earlier in this chapter and shown in Figure 12-3.
In the Spacing part of the dialog box, the Line Spacing drop-down list is used
to set various line-spacing values: Single, 1.5, and Double, just like the Line
Spacing command button’s menu.
Figure 12-4:
Choose line
spacing
from this
menu.
159
Chapter 12: Formatting Paragraphs
18_036583 ch12.qxp 11/16/06 12:48 PM Page 159
Additional options in the Line Spacing drop-down list require you to also
use the At box. Values you set in the At box indicate line spacing as
described here:
At least: The line spacing is set to the specified value, which Word treats
as a minimum value. Word can disobey that value and add more space
whenever necessary to make room for larger type or different fonts on
the same line of text.
Exactly: Word uses the specified line spacing and doesn’t adjust the
spacing to accommodate for larger text.
Multiple: This option is used to enter line-spacing values other than
those specified in the drop-down list. For example, to set the line spac-
ing to 4, choose Multiple from the Line Spacing drop-down list and type
4 in the At box. Word’s 1.15 line spacing value is set with the Multiple
option.
You can specify values in the At box in increments of 0.1. So, when you want
to tighten up text on a page, select all the paragraphs on that page, choose
Multiple from the Line Spacing drop-down list, and then type
0.9 in the At box.
Or, to add more room subtly, type
1.2.
Click the OK button to confirm your settings and close the Paragraph
dialog box.
That space between paragraphs
It’s really a silly thing to do: Press Enter twice to end a paragraph. People say
that they need the extra space between the paragraphs, but what they don’t
realize is that Word can add that space for you, automatically. Here’s how:
1. Position the insertion pointer in the paragraph that you want more air
around, or mark a block of paragraphs to affect them all.
2. Check the point size of your text.
It’s listed on the Home tab, in the Font group.
3. Click the Page Layout tab.
4. Use the After button in the Paragraph group to add space after the
paragraph.
As you adjust the value, the paragraph (or paragraphs) grow extra
spacing.
For example, if your text size is 12, click the up arrow by After until the value
12 appears in the box. This adds 12 points, or one blank line, of space after
each paragraph you type.
160
Part III: Formatting
18_036583 ch12.qxp 11/16/06 12:48 PM Page 160

The space you add to the paragraph becomes part of its format, just like line
spacing would, although the space afterward appears only
after the para-
graph’s text. (You can see this space if you select the paragraph as a block.)
Most of the time, space is added following a paragraph, as just described.
Word also lets you add space before a paragraph. For example, you could
do this to further separate a paragraph from a heading or graphical image.
To add the space before, repeat the preceding steps and put a value into the
Before box in Step 4.
You can manually enter values in the After (or Before) box. But remem-
ber that the values are
points, not inches or potrzebies.
This trick is a great way to spread out a list of bullet points or numbered
steps without affecting the line spacing within the bullet points or steps.
Refer to Chapter 11 for more information points as they relate to
text size.
Adding space before or after a paragraph isn’t the same as double-spacing
the text inside the paragraph. In fact, adding space around a paragraph
doesn’t change the paragraph’s line spacing.
Paragraph Indentation
Do you suffer from the shame of manual paragraph indenting? It’s a hidden
secret. Yes, even though computers enjoy doing things automatically, too
many Word users still begin a paragraph of text by pressing the Tab key.
It’s ugly, but it’s something that must be discussed.
Word can indent your paragraphs for you just as easily as you can indent
your car door in a crowded mall parking lot. This section discusses various
paragraph-indenting options.
Indenting the first line of a paragraph
To have Word automatically indent the first line of every paragraph you type,
heed these steps:
1. Conjure up the Paragraph dialog box.
Refer to the section “Where the Paragraph Formatting Commands Lurk,”
earlier in this chapter, for proper conjuring incantations plus a bonus
picture of what the Paragraph dialog box looks like (refer to Figure 12-3).
2. In the Indentation area, locate the Special drop-down list.
3. Select First Line from the list.
161
Chapter 12: Formatting Paragraphs
18_036583 ch12.qxp 11/16/06 12:48 PM Page 161
4. Optionally, enter an amount in the By box.
Unless you’ve messed with things, the box should automatically say
0.5”, which means that Word automatically indents the first line of
every paragraph a half-inch — a tab stop. Type another value if you
want your indents to be more or less outrageous. (Things are measured
here in inches, not in points.)
5. Click OK.
The selected block, or the current paragraph (and the remaining para-
graphs you type), all automatically have an indented first line.
To remove the first-line indent from a paragraph, repeat these steps and
select
(none) from the drop-down list in Step 3. Then click the OK button.
Word’s AutoCorrect feature can perform these steps for you, but it’s tricky.
First you must type the paragraph. Then go back to the start of the para-
graph and press the Tab key. This instantly fixes the paragraph’s indentation
(if AutoCorrect is on), and you see the AutoCorrect icon on the screen. Here’s
the secret: Ignore the AutoCorrect icon and your paragraph indenting is
fixed.
Ta-da!
There are two ways to separate paragraphs from each other in a document.
The first is to add space between each paragraph, which is covered in the
earlier section “That space between paragraphs.” The second way is to
indent each paragraph’s first line, as covered in this section. Choose one or
the other; you don’t need to use both.
Making a hanging indent
A hanging indent isn’t in imminent peril, nor can it affect the outcome of an
election. Instead, it’s a paragraph in which the first line sticks out to the left
and the rest of the paragraph is indented. It’s a preferred way to present para-
graph lists — like this:
Door-proof. The answer to the question whether the cat
wants in or out is always
yes. The cat merely
wants to be on the other side of the door. We
at KittySmart have finally bred that annoyance
out of our cats.
To create such a beast, position the insertion pointer in the paragraph you
want to hang and indent. Press Ctrl+T, the Hanging Indent keyboard shortcut.
Because you probably won’t remember Ctrl+T all the time (who could?),
paragraphs can also be hanged and indented in the Paragraph dialog box.
Use the steps from the preceding section, but in Step 3 choose
Hanging from
the drop-down list.
162
Part III: Formatting
18_036583 ch12.qxp 11/16/06 12:48 PM Page 162
The hanging indent is really an indent-everything-but-the-first-line-of-the-
paragraph type of indent.
To undo a hanging indent, press Ctrl+Shift+T. That’s the un-hang key
combination, and it puts your paragraph’s neck back in shape.
Indenting a whole paragraph
Just as you can indent the first line of a paragraph, you can indent every line
of a paragraph, by moving the paragraph’s left margin over to the right a
notch, just like Mr. Bunny: Hop, hop, hop. This technique is popular for
typing block quotes or
nested paragraphs.
To indent a paragraph one tab stop from the left, press Ctrl+M or click the
Increase Indent command button in the Home tab’s Paragraph group.
To unindent an indented paragraph, press Ctrl+Shift+M or click the Decrease
Indent command button in the Home tab’s Paragraph group.
Each time you use the Increase Indent command, the paragraph’s left edge
hops over one tab stop (typically, one half-inch). To undo this and shuffle the
paragraph back to the left, use the Decrease Indent command.
You cannot decrease the indent beyond the left margin.
The indent isn’t affected by the paragraph’s alignment. These com-
mands affect only the paragraph’s left margin.
To indent both the left and right sides of a paragraph, use the Paragraph
dialog box and set both left and right indents to the same value.
Although the Ctrl+M and Ctrl+Shift+M shortcuts aren’t mnemonic,
their only difference is a Shift key. So, after you get used to using them
(hopefully, before the afterlife), they’re easy to remember.
Setting the paragraph margins
A paragraph of text in Word sits snugly between the page’s left and right mar-
gins. Those margins can be broken or extended, allowing you to indent the
left and right sides of one or more paragraphs however you want. The secret
is found in the Page Layout tab’s Paragraph group.
The Left item sets the indentation for the paragraph’s left edge.
The Right item sets the indentation for the paragraph’s right edge.
163
Chapter 12: Formatting Paragraphs
18_036583 ch12.qxp 11/16/06 12:48 PM Page 163
Setting positive values moves the edges inward. Setting negative values
moves the edges outward. When the values are set to zero, the paragraph’s
margins match the page’s margin.
For example, to double-indent a paragraph as a block quote, you could
move both the left and right margins in by
8
⁄10 of an inch. Here’s how that
happens:
1. Put the insertion pointer in the paragraph or just select multiple para-
graphs as a block.
2. Click the Page Layout tab.
3. In the Paragraph group, enter
.8 in the Left box.
You can type .8 in the box or use the spinner gizmo to enter .8. (The spin-
ner increments or decrements in
1
⁄10-inch values.)
4. Enter .8 in the Right box.
For a greater indent, enter a larger value in both the Left and Right boxes.
Or, to undo an indent, enter
0 in both boxes.
Refer to Chapter 14 for more information on the page margins.
When you’re formatting facing pages, with inside and outside margins,
it helps to use the Paragraph dialog box. (Refer to Figure 12-3.) Use the
Mirror Indents item to set the inside (toward the fold between the pages)
and outside (toward the edges) margins so that an indented paragraph
on one page mirrors the paragraph on the opposite page.
Do not try to mix left and right indenting with a first-line indent or hang-
ing indent while drowsy or while operating heavy equipment.
Who Died and Made This Thing Ruler?
The Paragraph dialog box can be a daunting place, what with all the
numbers and terminology and such. A more graphical, and therefore more
fun, way to manipulate a paragraph’s indentation and margins is to use the
Ruler.
The Ruler may be hidden in your copy of Word. To show it, click the View
Ruler button, found atop the vertical (right) scroll bar.
The Ruler appears on the top of the writing part of the Word window, shown
in Figure 12-5. In Print Layout view, a vertical ruler also shows up and runs
down the left side of the window. (That ruler is just for show.)
164
Part III: Formatting
18_036583 ch12.qxp 11/16/06 12:48 PM Page 164
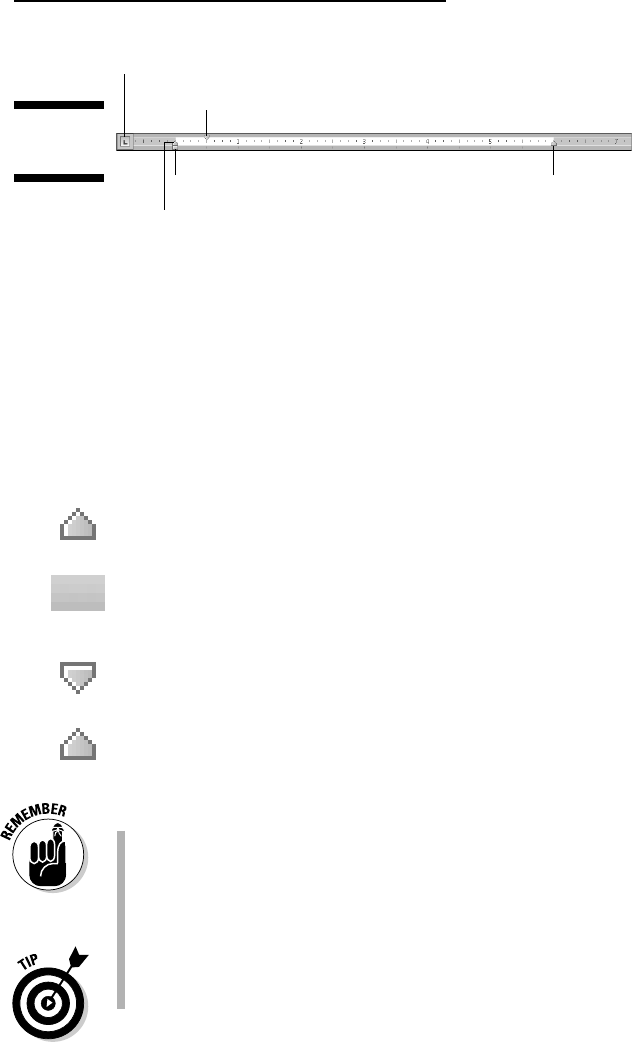
The dark gray part of the Ruler (outside ends) is beyond the margins that are
set for the page. The lighter gray is inside the page margins, and the Ruler
measures that space from the left, starting with zero inches.
On the ruler you find four gizmos that control paragraph indenting: one
downward-pointing triangle, two upward-pointing triangles, and one block.
Those gizmos reflect the current paragraph formatting, and they can be
manipulated with the mouse to change the formatting. Here’s what they
control:
To adjust a paragraph’s right edge, grab the Right Indent guy on the ruler and
drag him right or left.
To adjust the paragraph’s left edge, grab the Left Indent thing on the ruler
and slide it to the left or right. Note that this gizmo moves both the Hanging
Indent and First Line Indent guys together.
The paragraph’s first line can be set independently of the left edge by drag-
ging the First Line Indent doojobbie to the left or right.
The Hanging Indent thing controls all the paragraph’s lines except for the
first one. Normally, you don’t mess with this gizmo: Use the Left Indent guy to
set the paragraph’s left margin. The exception is for creating a hanging
indent, which is probably why this gizmo has such a clever name.
The Ruler measures from the left margin, not from the left edge of
the page.
The left margin is set when you format a page of text. See Chapter 14.
The Tab gizmo is used to set the various tab stops used in Word. This
confusing and frustrating subject is covered in Chapter 13.
The Ruler is fine for visually setting indents, but when you need to be
precise, use the Paragraph dialog box.
Tab gizmo
First Line indent
Left Indent
Hanging indent
Right Indent
Figure 12-5:
The Ruler.
165
Chapter 12: Formatting Paragraphs
18_036583 ch12.qxp 11/16/06 12:48 PM Page 165
166
Part III: Formatting
Paragraph-formatting survival guide
This table contains all the paragraph-formatting commands you can summon by holding down the
Ctrl key and pressing a letter or number. By no means should you memorize this list.
Format Key Combination Command Button
Center Ctrl+E
Fully justify Ctrl+J
Left-align (flush left) Ctrl+L
Right-align (flush right) Ctrl+R
Indent Ctrl+M
Unindent Ctrl+Shift+M
Hanging indent Ctrl+T
Unhanging indent Ctrl+Shift+T
Line spacing Alt+H, K
Single-space lines Ctrl+1
1.15 line spacing Ctrl+0
Double-space lines Ctrl+2
1
1
⁄2-space lines Ctrl+5
18_036583 ch12.qxp 11/16/06 12:48 PM Page 166

Chapter 13
Setting Tabs
In This Chapter
Understanding tabs
Setting left tab stops
Using right, center, and decimal tabs
Working in the Tabs dialog box
Setting leader tabs
Fixing the default tab stops
Removing tabs and tab stops
M
ost people have an issue with tabs in Word. I agree: The topic and the
method can be maddening, like seeing Aunt Eunice pour cheap ketchup
over her delicious homemade meatloaf. It’s really a philosophical thing:
When you deal with tabs, you’re dealing with the tab character and the tab
stop. They go hand in hand. Understand that and you’re well on your way to
becoming a tenth-level tab master in Word.
Tabs are really part of paragraph formatting, but the topic frustrates so many
Word users that I decided to dedicate this entire chapter to the subject of set-
ting tabs.
The Story of Tab
On my ancient Underwood typewriter, the Tab key is on the right side of the
keyboard and is named
Tabular Key. Elsewhere, I’ve seen it named Tabulator.
In each case, the root word is table. The Tab key is used to help build tables
or to organize information in a tabular way.
19_036583 ch13.qxp 11/16/06 12:48 PM Page 167
Pressing the Tab key inserts a tab character into your document. That tab
character works like a wide space character, but its size is determined by the
tab stop. The
tab stop is a predefined location marked across a page — say,
every half-inch — although in Word you can set tab stops at any interval.
It’s the tab stop that makes the Tab key work: Press the Tab key, and the
insertion pointer hops over to the next tab stop. That way, you can line up
text on multiple lines with tabs and tab stops, keeping things nice and even —
definitely much nicer than trying to fudge lining up text with the spacebar.
Pressing the Tab key doesn’t insert spaces. When you use Backspace or
Delete to remove a tab, you delete one character — the tab character.
It’s best to format tabs for a single line of text or for only the first line of
a paragraph. For anything more complex, use Word’s Table command.
See Chapter 20.
It helps to have the Ruler visible when you work with tabs. Refer to
Chapter 12.
Always use the Tab key when you mean to indent or align text in a docu-
ment. The worst thing you can do is press the spacebar. That is so
wrong! In fact, anytime you press the spacebar more than once, you
need a tab. Believe me, your documents will look prettier and you’ll be
happier after you understand and use tabs rather than spaces.
Tab characters can often confuse you because, like spaces, they don’t
show up on the screen. But you can see them, if you like. To direct Word
to display the tab character, which looks like a tiny arrow, as shown in
the margin, click the Word Options button on the Office Button menu.
Click Display from the left side of the Word Options dialog box. On the
right side of the window, put a check mark by Tab Characters. Click OK.
The diet beverage Tab was named for people who like to keep a tab on
what they consume.
The Tab Stops Here
The Tab key works because of tab stops. So, using the Tab key really means
setting a tab stop at a certain position in a line of text. That seems simple
enough, if it weren’t for two problems: Setting tab stops isn’t the most logical
thing in Word, and there are five different types of tab stops.
The handiest way to set tab stops in Word is to use the Ruler, shown in
Figure 13-1. The tab stops appear as tiny black symbols clinging to the
bottom of the Ruler, shown in the figure. As you may guess, these tab stops
are easily set and manipulated by moving the mouse.
168
Part III: Formatting
19_036583 ch13.qxp 11/16/06 12:48 PM Page 168
Here are the five types of tab stops available on the Ruler:
The left tab is the traditional type of tab stop.
The center tab centers text, mostly for titles or headers.
The right tab right-justifies text.
The decimal tab aligns numbers by their decimal parts.
The bar tab isn’t a tab stop at all, but, rather, a decorative ornament.
Setting a tab involves two steps. First, you select one of these tabs from the
Tab gizmo on the left end of the Ruler. Clicking the Tab gizmo displays a dif-
ferent tab type. (The Tab gizmo also displays some of the paragraph-indent
symbols, covered in Chapter 12.) The second step is to click the mouse on
the Ruler at the exact spot where you want the tab stop set. To set a left tab
stop, you choose the left tab from the Tab gizmo and then click the ruler
where you want that tab stop positioned. Click the 3-inch mark, and the
plump L of the left tab stop settles down at that position nicely.
Using and setting each of these tab stops listed in this section is covered
elsewhere in this chapter.
Tabs are paragraph-level things. Setting tabs affects only the paragraph
that the toothpick cursor is blinking in. To set the tabs for several para-
graphs, you must first select them as a block. Refer to Chapter 7 for
more blocky stuff.
Figure 13-1 shows three tab stops set: A left tab stop at the half-inch
mark, a center tab stop at the 3-inch mark, and a right tab stop at the
5
1
⁄2-inch mark.
When you’re selecting several paragraphs, you may spot a light gray or
phantom tab stop on the ruler. That indicates a tab stop set in one para-
graph, but not all. To apply the tab stop to all selected paragraphs, click
the phantom tab stop once. Otherwise, you can remove the tab stop
per the instructions found in this chapter’s later section “Unsetting a
Tab Stop.”
Tab gizmo
Left tab Center tab Right tab
Figure 13-1:
Important
tab things
on the Ruler.
169
Chapter 13: Setting Tabs
19_036583 ch13.qxp 11/16/06 12:48 PM Page 169
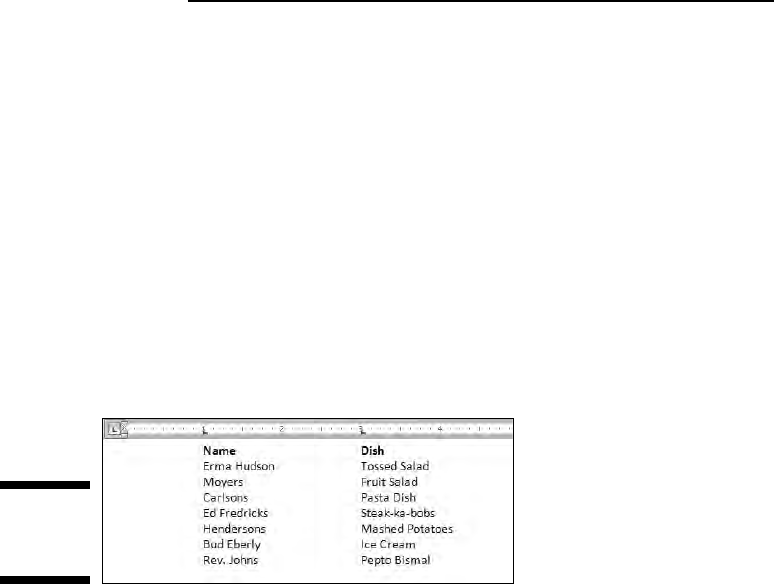
The Standard Left Tab Stop
The left tab stop is the traditional type of tab stop. When you press the Tab
key, the insertion pointer advances to the left tab stop, where you can con-
tinue to type text. This works best for typing lists, for organizing information
on a single line paragraph, or when you want to indent the first line of a multi-
line paragraph. This section provides some examples.
The tabbed list
A common use for the tab stop is to create a simple two-column list, as
shown in Figure 13-2.
The following steps describe how to easily set up such a list:
1. On a new line, press Tab.
2. Type the item for the first column.
It works best when this is a short item, two or three words max.
3. Press Tab.
4. Type the item for the second column.
Again, this should be something short.
5. Press Enter to end that line and start a new line.
Yes, your list looks horrible! Don’t worry. It’s more important to get the
data typed first and then format it second.
6. Repeat Steps 1 through 5 for each item in the list.
After the list is finished, setting the tab stops is done visually by using
the ruler.
Figure 13-2:
A two-
column list.
170
Part III: Formatting
19_036583 ch13.qxp 11/16/06 12:48 PM Page 170

7. Summon the ruler, if necessary.
Click the View Ruler button to display the ruler if it’s hidden.
8. Select all the lines of text that you want to organize into a two-column
tabbed list.
Refer to Chapter 7 for more information on marking blocks of text.
9. Click the Tab gizmo until the Left Tab icon appears.
If it already shows up in the Tab gizmo, you’re set to go.
You can see what a Left Tab icon looks like right here in the margin.
10. Click the mouse on the Ruler at the number 1, the 1-inch position.
This step sets a left tab stop at one inch. You see how the text you
selected immediately falls into place.
11. Click the mouse to set a second tab stop at the 3-inch mark.
The list looks nice and even, in two columns (refer to Figure 13-2).
12. Adjust the tab stops if necessary.
Slide the tab stops left or right on the ruler as needed to help clean
up your list. As you slide the tab stops, do you notice how a dashed
vertical line extends through your text? That shows you where text
lines up.
These steps can also be used to create a three- or even a four-column list.
The idea is to keep the text brief, on one line, and separated by single tabs.
Then use the tab stops on the ruler to line things up and make them pretty.
Here are the key points to remember here:
You need only one tab between items in a column list. That’s because:
It’s the
tab stop, not the tab character, that lines up your text. As with
using two spaces in a row, you never really need two tabs in a row.
You type the text first and then select the text and set the tab stops last.
The tab stops can be adjusted for the entire block of text by using the
mouse and the ruler.
For a tabbed list to work, each paragraph must be a line by itself,
and the items in each column should be only a word or two long. Any
longer, and you need to use Word’s Table command, as covered in
Chapter 20.
171
Chapter 13: Setting Tabs
19_036583 ch13.qxp 11/16/06 12:48 PM Page 171
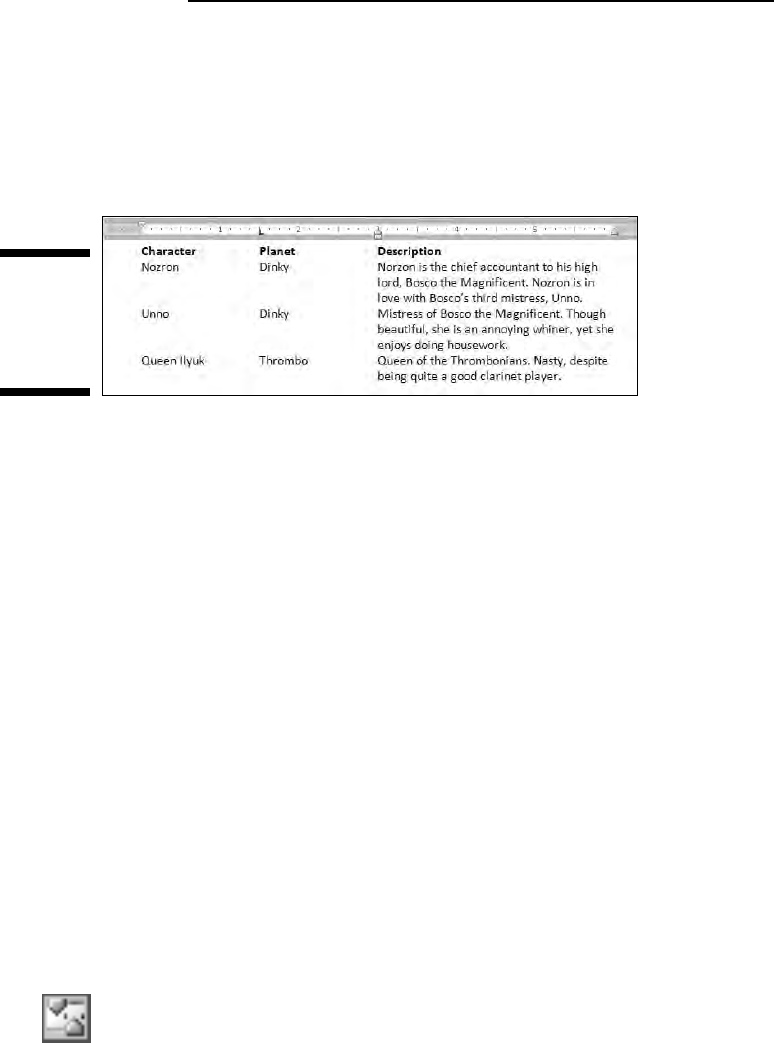
The tab-tab-paragraph thing
Tabs can also be used to form an item list where the paragraph text is kept in
the rightmost column. Figure 13-3 shows how the tab-tab-paragraph thing
works. It combines both paragraph- and tab-formatting skills.
Follow these steps to create something similar:
1. On a new line, type the item for the first column.
The shorter, the better.
2. Press Tab.
3. Type the second column’s text and press Tab.
This step is optional; it’s possible to create a simpler tab-paragraph
list, which looks just like Figure 13-3, but without the
Planet column
(and spaced accordingly).
4. Type the paragraph text.
Unlike with the first two items, you’re free to type more text here. That’s
because this final paragraph column will wrap, as shown in Figure 13-3.
5. Press Enter to end the line and start a new line.
Don’t let the ugly text format fool you at this point. The text beautifies
itself when you add the tab stops.
6. Repeat Steps 1 through 5 for all the items in the tab-paragraph list.
When you’re done, you can set the tab stops. You need the ruler for this
next step:
7. Bid the Ruler appear, if need be.
Click the View Ruler button to show a hidden ruler.
Figure 13-3:
A tab-tab-
paragraph
format
for text.
172
Part III: Formatting
19_036583 ch13.qxp 11/16/06 12:48 PM Page 172

8. Select all the lines of text you want to organize into a tab-tab-
paragraph list.
Chapter 7 discusses block-selection techniques.
9. Slide the Hanging Indent triangle to the 3-inch position on the ruler.
The paragraph appears.
10. Ensure that the left tab is chosen on the Tab gizmo.
The margin shows the Left Tab symbol.
11. Click the mouse to set a tab stop at 1.5 inches.
The second column snaps into place.
12. Adjust the tab stop and hanging indent triangle as necessary.
With the text still selected, you can slide the tab stop and the Hanging
Indent things on the Ruler to the left or right to adjust the look of your
tab-tab-paragraph. Whatever looks best works best.
You can vary these rules to have a tab-paragraph or even a tab-tab-tab-
paragraph. The more tabs you have, the tighter the paragraph gets, so be
careful. (The notes from the preceding section also apply to this technique.)
The Center Tab Stop
The center tab is a unique critter, and it has a special purpose: Text placed at
a center tab is centered on a line. Unlike centering a paragraph, only text
placed at the center tab stop is centered. This is ideal for centering some-
thing in a header or footer, which is about the only time you use this type of
tab stop.
Figure 13-4 shows an example of a center tab. The text on the left is at the
start of the paragraph, which is left-justified. But the text typed after the tab
is centered on the line.
Figure 13-4:
A center tab
in action.
173
Chapter 13: Setting Tabs
19_036583 ch13.qxp 11/16/06 12:48 PM Page 173
Here’s how to make that happen:
1. Start a new paragraph, one containing text that you want to center.
Center tabs are found in one-line paragraphs.
2. Set a center tab.
If necessary, show the ruler: Click the View Ruler button. Click the Tab
gizmo until a center tab appears, as shown in Figure 13-4. Click the
mouse on the light gray part of the Ruler to set the tab. In Figure 13-4,
the center tab is set at the center of the page, at the 3-inch position.
3. Optionally, type some text to start the line.
The text you type should be short; it appears only at the start of the line.
4. Press the Tab key.
The insertion pointer hops over to the center tab stop.
5. Type the text to center.
As you type, the text is centered on the line. Don’t type too much;
remember that the center tab is a single-line thing.
6. Press Enter to end the line of text.
Obviously, if you just want to center text on a line, centering the entire para-
graph is a better choice; see Chapter 12. Otherwise, this technique finds itself
used mostly in page headers and footers, which are covered in Chapter 15.
Look there for an additional example.
The center tab stop allows you to center text in a line without having to
center the entire line.
Center tabs are best used on a single line of text, usually by themselves.
There’s no reason to do them any other way.
The Right Tab Stop
Right tabs are possibly the most confusing tab stop, until you’ve seen one in
action. What they do is to allow you to right-justify text at a tab stop, allowing
a single line of text to contain both right- and left-justified text. You’ve proba-
bly seen examples of this all over, but not recognized what it was, so here are
Figures 13-5 and 13-6 for you to gawk at.
As with the other tabs, right tab stops work best on a single line of text.
The following two sections describe how to set up right tab stops as shown
in Figures 13-5 and 13-6. In both cases, note that it’s assumed that the Ruler is
visible on the screen. Click the View Ruler button to show the Ruler in Word.
174
Part III: Formatting
19_036583 ch13.qxp 11/16/06 12:48 PM Page 174
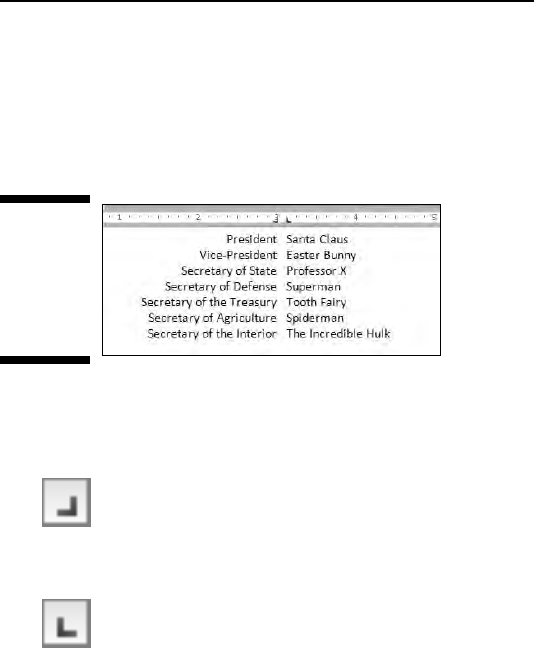
Right stop, left stop list
To create a centered, two-column list with a right tab stop and a left tab stop,
as shown in Figure 13-5, obey these steps:
1. Start out on a blank line, the line you want to format.
2. Choose the right tab stop from the Tab gizmo.
Keep clicking the Tab gizmo with the mouse until the right tab stop
appears.
3. Click the mouse at the 3-inch position on the Ruler.
4. Choose the left tab stop from the Tab gizmo.
Click, click, click until you see the left tab stop.
5. Click the mouse at the 3
1
⁄8-inch position on the Ruler.
Use Figure 13-5 as your guide. Don’t fret; you can change the tab stop
positions when you’re just about done.
6. Press the Tab key.
The insertion pointer hops over to the 3-inch stop, the right tab stop.
7. Type your text.
The text is right-justified at the right tab stop.
8. Press the Tab key.
9. Type your text.
The text is left-justified (normal).
10. Press Enter to end the line of text.
11. Repeat Steps 6 through 10 for each line in the list.
As long as you keep the text to one line, the list should look great, just like in
Figure 13-5.
Figure 13-5:
Right tab
stops are
used to
center-align
this list.
175
Chapter 13: Setting Tabs
19_036583 ch13.qxp 11/16/06 12:48 PM Page 175
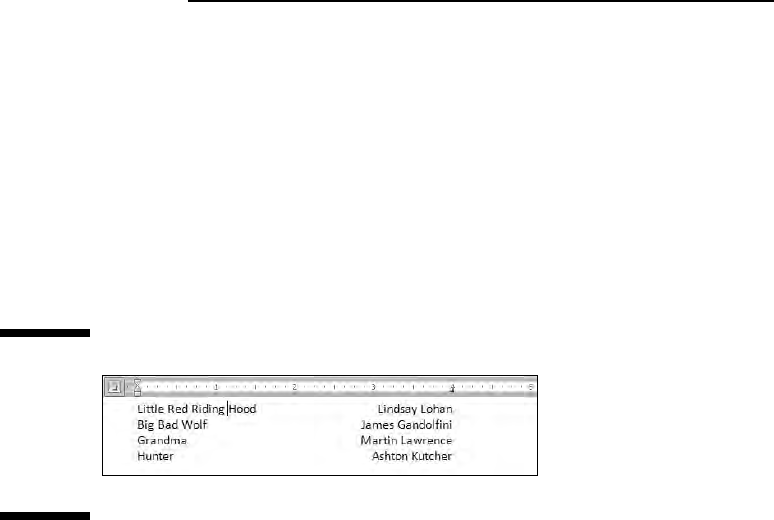
To make adjustments, select the list as a block (see Chapter 7) and use the
mouse to adjust the tab stops on the ruler. As you move the tab stops, a
dashed line extends down through your text, showing you where the text
lines up.
Tab, right stop list
The right tab stop can also be used in a list, as shown in Figure 13-6, commonly
found in dramatic programs but just as good for a variety of purposes.
Here’s how to concoct such a thing:
1. Start out with a blank line of text.
2. Ensure that the Tab gizmo on the Ruler shows the right tab stop.
Refer to Figure 13-6.
3. Click the mouse at the 4-inch position on the Ruler.
The position is just a guess at this point. Later, you can adjust the right
tab stop setting to whatever is more visually appealing.
4. Type the left column text.
The text is left-justified, like normal.
5. Press the Tab key.
The insertion pointer hops to the right tab stop.
6. Type the right column text.
The text you type is right-justified, pushing to the left as you type.
7. Press Enter to end the line of text.
8. Repeat Steps 4 through 7 for each line in the list.
Figure 13-6:
Right tab
stops right-
align the
second
column of
this list.
176
Part III: Formatting
19_036583 ch13.qxp 11/16/06 12:48 PM Page 176

Afterward, you can mark the text as a block and then use the mouse to drag
the right tab stop back and forth to whatever looks more visually appealing.
You can drag the left indent toward the center of the page to offset the
list from the left margin.
Also refer to the section “Setting leader tabs,” later in this chapter, for
adding a dotted leader to the right tab stop.
The Decimal Tab
The decimal tab lives to line up columns of numbers. Although you could use
a right tab to do this, the decimal tab is a better choice. Rather than right-
align text, as the right tab does (see the previous sections), the decimal tab
aligns numbers by their decimal portion — that period in the number, as
shown in Figure 13-7.
Here’s how to work with such a beast:
1. Start a blank line of text.
2. Choose the Decimal tab stop from the Tab gizmo on the Ruler.
Refer to Figure 13-7.
3. Set the tab stop on the ruler by clicking the mouse at the 3-inch position.
4. Type the left column text.
5. Press the Tab key.
6. Type the numerical amount.
The number is right-justified until you press the period key. After that,
the rest of the number is left-justified. The effect is that the amount is
lined up at the decimal tab stop by the period in the number.
7. End that line of text by pressing Enter.
8. Repeat Steps 4 through 7 for each line in the list.
Figure 13-7:
Lining up
numbers
with the
decimal tab.
177
Chapter 13: Setting Tabs
19_036583 ch13.qxp 11/16/06 12:48 PM Page 177
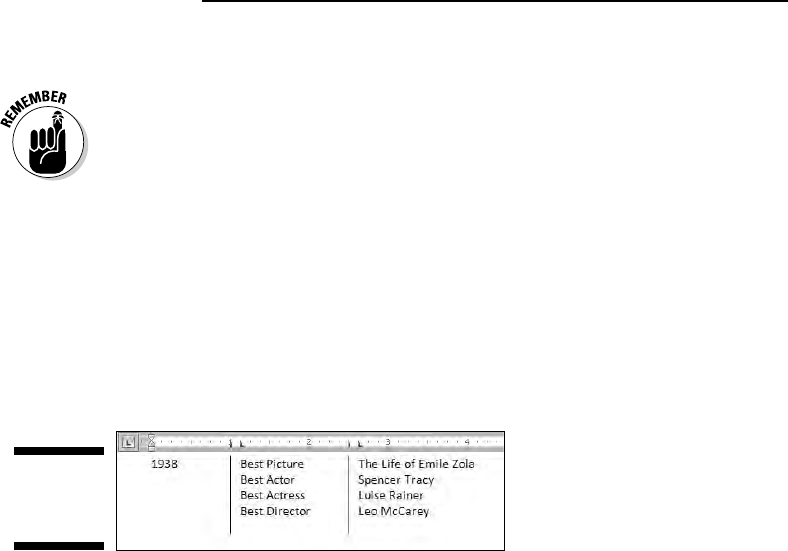
When you type something without a period in it (refer to Figure 13-7), it’s
shown right-justified.
You can adjust your text by selecting all the lines as a block and then moving
the decimal tab stop on the Ruler with the mouse.
The Bar Tab
Aside from being a most excellent pun, the bar tab isn’t a true tab stop in
Word. Instead, consider it as a text decoration. Setting a bar tab merely
inserts a vertical line into a line of text, as shown in Figure 13-8. It’s much
better than using the | (pipe) character on the keyboard for drawing a verti-
cal line in your document.
The setup to create the three-column text shown in Figure 13-8 is similar
to what’s presented earlier in this chapter for a two-column list (see the earlier
section “The tabbed list”), although Figure 13-8 shows a three-column list
with the first column at the start of a line.
A bar tab is set like any other tab. But, rather than insert a tab, it inserts a
black vertical line in the text. The line appears always, even when no text
or tabs are used on a line, as you can see in the last row of text (empty) in
Figure 13-8.
In Figure 13-8, observe that a left tab stop is set immediately after the bar
tab to help organize text on a line. This is normally how bar tabs are used,
although for all practical purposes it’s just easier in Word to surrender here
and use the Table function instead; see Chapter 20.
The Tabs Dialog Box
If setting tabs on the Ruler is the left-brain approach, using the Tabs dialog
box is the right-brain method of setting tab stops in Word. The Tabs dialog
box, shown in Figure 13-9, allows you more precision over using the Ruler by
itself.
Figure 13-8:
The mysteri-
ous bar tab.
178
Part III: Formatting
19_036583 ch13.qxp 11/16/06 12:48 PM Page 178
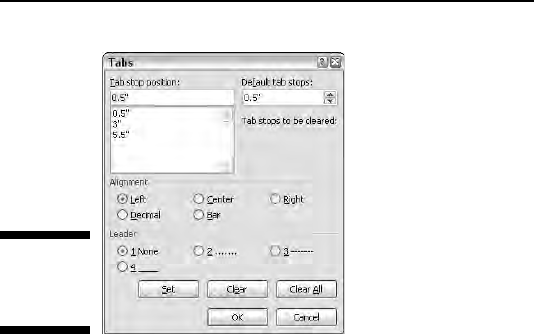
Getting to the Tabs dialog box is a journey, the type of journey that ends with
an “All I got was this stupid Tabs dialog box t-shirt.” The simplest way to
beckon forth the Tabs dialog box is to double-click the mouse in the middle
of the Ruler (on the light gray part). Of course, that also
sets a tab stop,
which can be frustrating.
The other way to get to the Tabs dialog box is to summon the Paragraph
dialog box: do so by clicking the Dialog Box Launcher button in the lower-
right corner of the Paragraph group, on the Home tab. When the Paragraph
dialog box is visible, click the Tabs button in the lower-left corner to bring
forth the Tabs dialog box.
Setting a tab in the Tabs dialog box
When you need to be precise with your tab stops and the Ruler is proving
unruly, follow these steps to set your tabs in the Tab dialog box:
1. Enter the exact tab stop position in the Tab Stop Position box.
For example, type 1.1875 to set a tab at exactly that spot.
2. Choose the type of tab stop from the Alignment area.
The standard tab stop is Left. Other tab stops are covered elsewhere in
this chapter.
3. Click the Set button.
The Set button — not the OK button — is what creates the tab stop.
After you click Set, your tab stop is placed on the list below the Tab Stop
Position dialog box. (You may notice that numbers are rounded to the
nearest tenth; Word interprets 1.1875 as 1.9, for example.)
Figure 13-9:
The Tabs
dialog box.
179
Chapter 13: Setting Tabs
19_036583 ch13.qxp 11/16/06 12:48 PM Page 179
4. Continue setting tabs.
Repeat Steps 1 through 3 for as many tabs as you need to set.
5. Click OK.
The tabs you set affect the current paragraph or a selected group of para-
graphs. If the Ruler is visible, you can see the tabs and adjust them by using
the mouse.
⻬ You must click the Set button to set a tab! I don’t know how many times
I click OK, thinking that the tab stop is set, and it’s not.
⻬ For most of your tab-setting exercises, I recommend using the Ruler.
The Tab dialog box is only necessary when you need to be precise,
when you’re setting multiple tabs close to each other, or when you’re
defining leader tabs, as described next.
Setting leader tabs
There’s only one task that must be done in the Tabs dialog box that you
cannot do with the Ruler: Set a leader tab.
What is a leader tab?
A leader tab produces a row of dots, underlining (in a fashion) the tab charac-
ter. Three styles are available:
Fearless dot leader tabs . . . . . . . . . . . . . . . . . . . . . . . . . . . . . . . . . . . . . . . . .180
Zipper line leader tabs _ _ _ _ _ _ _ _ _ _ _ _ _ _ _ _ _ _ _ _ _ _ _ _ _ _ _ _180
U-boat underline leader tabs 180
You can apply a leader tab to any tab stop in Word other than the bar tab.
To do so, refer to other sections in this chapter on how to set the various tab
stops — specifically, the right tab stops. To add the dot leader to the tabbed
list you’ve created, follow these steps:
1. Select the text as a block.
Refer to Chapter 7 for block-marking directions.
2. Bring forth the Tabs dialog box.
3. Select the tab stop from the Tab Stop Position list.
180
Part III: Formatting
19_036583 ch13.qxp 11/20/06 6:58 PM Page 180

For example, in Figure 13-6, the right tab stop shows up in the Tab Stop
Position list as 4". Click to select that item in the list.
4. In the Leader area, choose the leader style.
None means “no leader,” and it’s selected already. Choose one of the
three other options.
5. Click the Set button.
Don’t click OK before you set the tab stop to add the leader. This step is
the one you’ll screw up most often.
6. Click OK.
After clicking the Set button, you can click OK to close the Tabs dialog
box and gawk at your text.
Leader tabs with the underline character are also the best way to create fill-
in-the-blanks forms. Use the Tabs dialog box to set a left tab stop at the far
left margin (usually, 6.0 inches). Choose an underline leader for that tab.
Click Set and then OK. Back in your document, type the prompt for the
fill-in-the-blanks line, such as
Your name:
Rather than press a brazillian underlines, just press the Tab key. Instantly, a
line extends from the colon to the right margin.
Default tab stops
Word automatically sets tab stops for you in each new document you create.
These
default tab stops are set at half-inch intervals. That’s fine for most
people, but you can change those defaults, if you like.
New default tab stops are set in the upper-right corner of the Tab dialog box
(refer to Figure 13-9), where a new interval for the default tab stops is entered.
For example, to set the default tab stops three-quarters of an inch apart,
type
0.75” in the Default Tab Stops box. Click the OK button to confirm and
close the Tabs dialog box. The default tab stops appear as dark brown ticks
(they’re very hard to see) on the gray line below the ruler.
When you set your own tab stops, Word removes the default tab stops
between the left margin and wherever any tab stop is set. For example, in
Figure 13-8, you can see the default half-inch tab stops starting at the 3-inch
position.
181
Chapter 13: Setting Tabs
19_036583 ch13.qxp 11/16/06 12:48 PM Page 181

Unsetting a Tab Stop
Removing a tab stop is as easy as dragging the Tab Stop icon from the Ruler:
Point and click at the tab stop and drag the mouse downward, and the tab
stop is gone.
The Tabs dialog box can also be used to remove tab stops. It’s especially
good for those times when you may have several tab stops close together
and plucking one out with the mouse would be tiresome. In the Tabs dialog
box, choose the tab stop position in the Tab Stop Position list, and then click
the Clear button. Poof! It’s gone!
Clicking the Clear All button in the Tabs dialog box removes all tabs from the
ruler in one drastic sweep.
To delete a Tab character, of course, simply back up over it with the
Backspace key.
182
Part III: Formatting
19_036583 ch13.qxp 11/16/06 12:48 PM Page 182
Chapter 14
Formatting Pages
In This Chapter
Setting the page and paper size
Choosing landscape or portrait layout
Setting margins for your document
Automatically numbering your pages
Changing page numbers
Creating a new page
Coloring a page
Adding a watermark
N
ormally, Word doesn’t ask questions about the paper you’re using.
Nope. It’s not that Word doesn’t care. It cares! But rather than ask ques-
tions, Word just guesses that you’re using a typical, boring sheet of paper.
That’s fine, until you need something more interesting or set up a page differ-
ently than Word normally guesses. For that, you need to properly describe
the sheet of paper to Word. Thus, you have the dawn of
page formatting.
Page formatting starts with a piece of paper, the final destination of your
word processing journey. It covers the margins, or air around the text you
write. And, just to be different, in this chapter at least, page formatting also
covers page numbering.
Describe That Sheet o’ Paper
No matter what size paper you’re printing on, Word refers to it as a page.
As you can possibly guess, not all pages are alike; even within a single docu-
ment, page size or orientation can change, so pages must be flexible in order
for them to be useful.
20_036583 ch14.qxp 11/16/06 12:49 PM Page 183
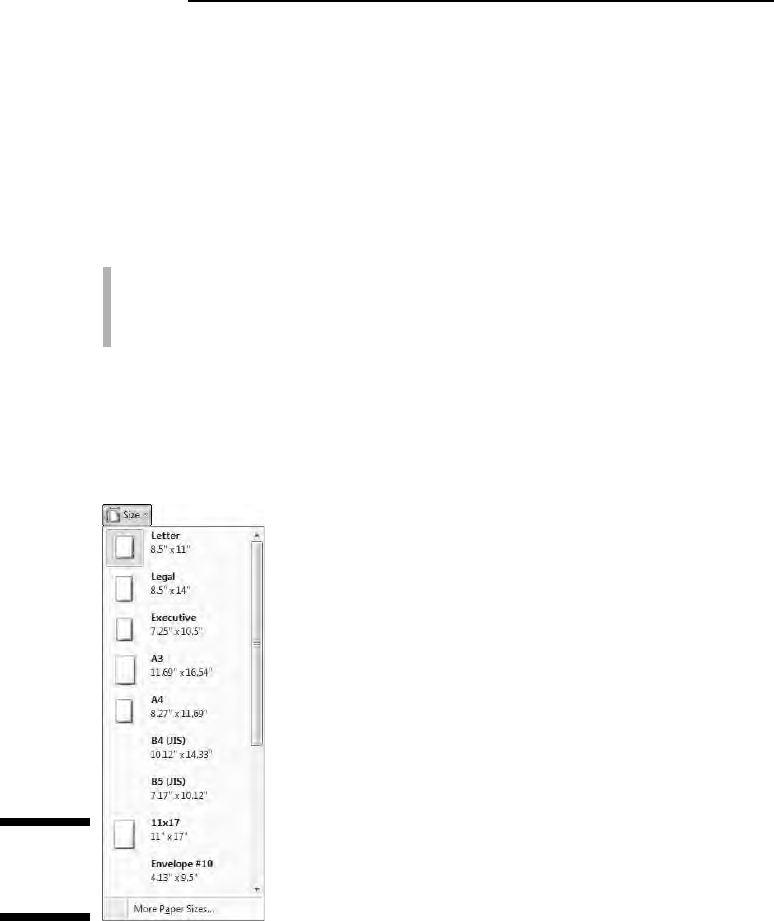
This section discusses the various ways Word deals with paper and pages.
A page is a sheet of paper about “this” big
Word can print on any size sheet of paper, from a wee postage stamp to the
same broadsheet a newspaper is printed on, or even larger. There are only
three things to keep in mind here:
You must find that specific paper size, possibly at an office supply store.
You must have a printer that can swallow that specific paper size.
You must tell Word that you’re using that specific paper size.
The paper-size-setting stuff is done in the Page Setup group on the Page
Layout tab. Choosing a specific size of paper is done by clicking the Size
button in that group, which displays a menu, as shown in Figure 14-1.
Choose your paper size from that list.
For example, if you want to print on that tall, legal-size paper, choose Legal
8.5" x 14" from the list. Your entire document is then updated to reflect the
new page size.
Figure 14-1:
The Size
menu.
184
Part III: Formatting
20_036583 ch14.qxp 11/16/06 12:49 PM Page 184
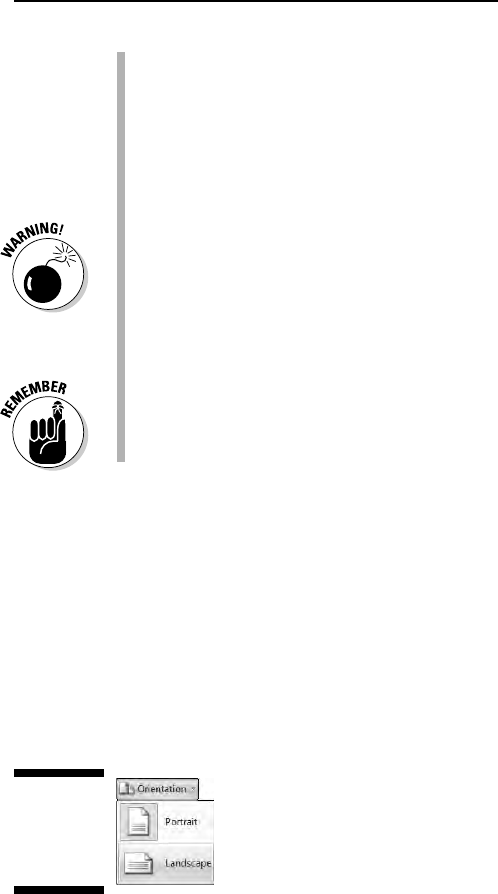
To select a size not shown on the menu, choose the More Paper Sizes
command to summon the Paper tab of the Page Setup dialog box. Refer
to the section “Behold the Page Setup dialog box,” elsewhere in this
chapter, for more information.
Page-size changes are reflected in the entire document, from first page to
last. That is, unless you divide your documents into sections. Then you
can use different page sizes within each section. Refer to Chapter 15 for
information on sections.
Most PC printers can print on several sizes of paper. Weird sizes,
although available on the list, may not be compatible with your printer.
A typical sheet of paper, at least in the United States, measures 8
1
⁄2
inches across by 11 inches tall. Most of the rest of the world uses the
A4 paper-size standard, which is slightly longer and a tad narrower.
If you’re printing on an odd-size piece of paper, remember to load that
special paper into your printer before you start printing. Some smarter
printers even tell you which paper size they want to print on. Mine nags
at me all the time for the proper paper size. It’s like a second mother.
Page orientation (landscape or portrait)
Word normally prints on a sheet of paper from top to bottom with the narrow
edge on top. This is called
portrait mode because its orientation is vertical,
like a portrait.
Word can also be told to print longways, or in
landscape mode. This trick is
done by choosing Landscape from the Orientation command in the Page
Layout tab’s Page Setup group, as shown in Figure 14-2.
Choosing Orientation
➪Landscape directs Word to shift the paper orientation
for every page in your document. This doesn’t mean that the text is sideways
more than it means that the text prints wide on a page (though I suppose that
it could be looked at as printing sideways).
Figure 14-2:
Setting
a page’s
orientation.
185
Chapter 14: Formatting Pages
20_036583 ch14.qxp 11/16/06 12:49 PM Page 185

To change the pages back, choose Orientation➪Portrait.
Changing between portrait and landscape modes may require you to
adjust the document’s margins; see the next section.
Make the decision to have your document in landscape mode before you
do any extensive formatting. That mode affects your paragraphs and
other “lower-level” formatting, so you should have it done first, before
you start composing your text.
Scientists and other people in white lab coats who study such things
have determined that human reading speed slows drastically when
people must scan a long line of text, which happens when you use land-
scape mode. Reserve landscape mode for printing lists, tables, and
items for which normal paper is too narrow.
Consider using multiple columns in landscape mode. See Chapter 21.
Also see the section “Behold the Page Setup dialog box,” later in this
chapter, for more page-orientation settings and options.
Marginal information
Every page has margins. They provide the air around your document — that
inch or so of breathing space that sets off the text from the rest of the page.
As with other things in Word, these margins can be adjusted, fooled, cajoled,
or otherwise obsessed with.
Word automatically sets your margins at 1 inch from the top and bottom of
the page and 1.25 inches from the left and right sides of the page. Most English
teachers and book editors want margins of this size because these people
love to scribble in margins. (They even write that way on blank paper.)
In Word, you can adjust the margins to suit any fussy professional.
To change the margins, use the Page Setup group on the Page Layout tab.
Clicking the Margins button in that group displays a menu full of common
margin options, as shown in Figure 14-3.
Specific margins can be set by clicking the Custom Margins button at the
bottom of the Margins menu. Doing so displays the Margins tab in the Page
Setup dialog box, where specific margin information can be entered, includ-
ing information on printing more than one page on a sheet of paper. Refer to
the next section for more information.
186
Part III: Formatting
20_036583 ch14.qxp 11/16/06 12:49 PM Page 186
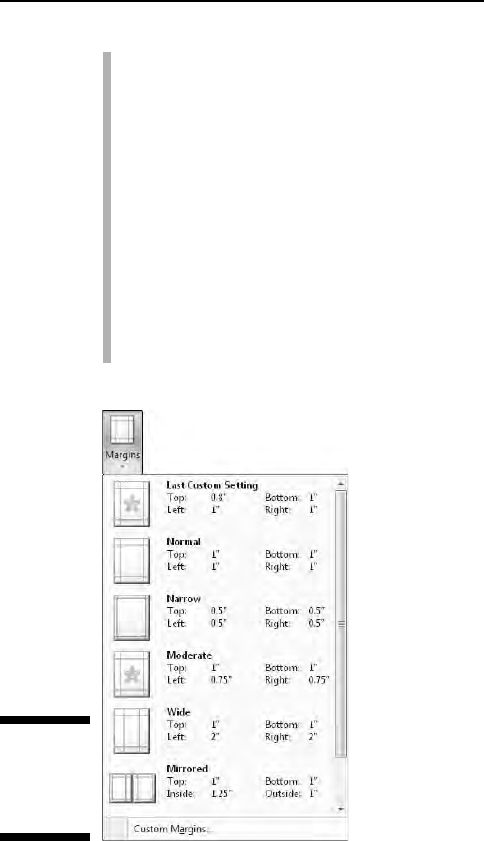
Margins on a page are covered in this chapter. To set the indents for a
single paragraph, you need to use a paragraph-formatting command.
See Chapter 12.
The stars on the Margin menu’s icons represent popular or recent
margin choices you’ve made.
Keep in mind that most laser printers cannot print on the outside half-
inch of a piece of paper — top, bottom, left, and right. This space is an
absolute margin; although you can tell Word to set a margin of 0 inches
right and 0 inches left, text still does not print there. Instead, choose a
minimum of 0.5 inches for the left and right margins.
Likewise, many ink printers have a taller top or bottom margin require-
ment. If you attempt to print outside that area, a dialog box appears,
informing you of your offense.
Behold the Page Setup dialog box
As with many things in Word, when you want more control over page format-
ting, you must surrender from the Ribbon interface and use an old-fashioned
dialog box. In this case, it’s the Page Setup dialog box, shown in Figure 14-4.
Figure 14-3:
Stuff on the
Margins
menu.
187
Chapter 14: Formatting Pages
20_036583 ch14.qxp 11/16/06 12:49 PM Page 187
To summon the Page Setup dialog box, click the Dialog Box Launcher in the
lower-right corner of the Page Setup group on the Page Layout tab. Or, you
can use the keyboard shortcut: Alt+P, P, S.
The Page Setup dialog box sports three tabs: Margins for setting margins,
Paper for selecting the paper size, and Layout for dealing with other page-
formatting issues.
Click the OK button to confirm your changes and close the Page Setup
dialog box.
To print on three-hole paper, use the Margins tab in the Page Setup
dialog box to set the gutter margin to about half an inch. That moves the
entire margin “frame” over one half-inch from where the three holes are
punched. You can set the Gutter Position to Left option, unless the holes
are punched on the top of the page, in which case you set the Gutter
Position to Top option.
188
Part III: Formatting
Dangerous treading in the Multiple Pages
area of the Page Setup dialog box
Nestled on the Margins tab of the Page Setup
dialog box is the Pages area (refer to Figure
14-4). The Multiple Pages drop-down list tells
Word how to use the paper on which your doc-
ument is printed. Surprisingly, there’s more than
one way to print a document on a page. The fol-
lowing definitions help, as does the little pre-
view page at the bottom of the Page Setup
dialog box:
Normal means one page per sheet of paper. You
can’t get more normal than that.
Mirror Margins is used when your printer is
smart enough to print on both sides of a sheet
of paper. That way, every other page is flip-
flopped so that your margins always line up. For
example, the “gutter” may be on the left of one
page, but on the right for the page’s back side.
2 Pages per Sheet splits the paper right down the
center and forces Word to print two “pages” per
sheet of paper. Note that this option works best
when used in landscape mode.
Book Fold is Word’s attempt to create a multi-
ple-page booklet by printing the proper pages
on both sides of a sheet of paper. This option
works best if you have a printer capable of print-
ing on both sides of a sheet of paper. The Sheets
Per Booklet option that appears helps tell Word
how long your booklet is.
Despite these options, Word is a poor book-
binding program. If you’re into any type of pub-
lishing, consider getting a desktop publishing
program, such as Adobe InDesign or Microsoft
Publisher, which are far better equipped to deal
with such things.
20_036583 ch14.qxp 11/16/06 12:49 PM Page 188
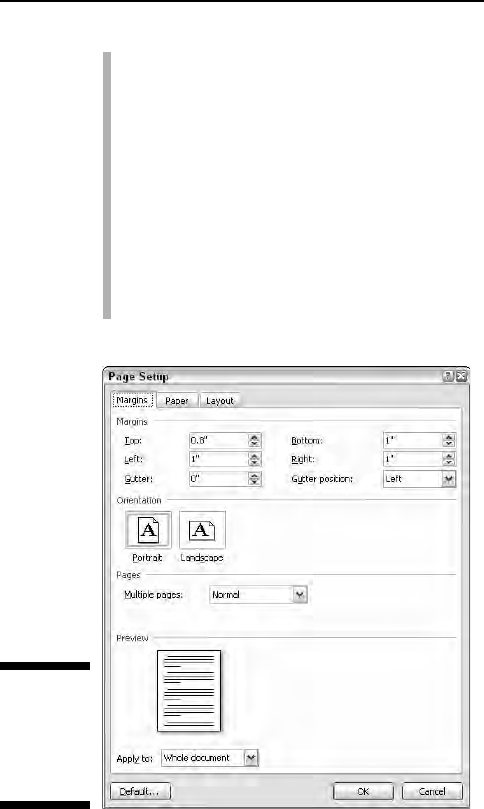
Changes made to a page’s format — paper size, orientation, and margins —
normally affect an entire document. By using the Apply To drop-down
list in the Page Setup dialog box, however, you can determine which
portion of a document will be affected by the margin change. You have
three options:
•
Whole Document changes the margins for your whole document,
from bonnet to boot.
•
This Point Forward means that the new margins take place from
the toothpick cursor’s position onward.
•
This Section means that the margins apply to only the current sec-
tion. (See Chapter 15 for more information on sections.)
Page Numbering
Woe to the human who manually numbers pages in a word processor! Yea, ye
shall be smote upon with fire, brimstone, and blistering typos!
Your word processor will number your pages for you!
Memorize it. Live it. Be it.
Figure 14-4:
The Page
Setup
dialog box;
Margins tab.
189
Chapter 14: Formatting Pages
20_036583 ch14.qxp 11/16/06 12:49 PM Page 189

Where to stick the page number?
Word not only can automatically number your pages, but it also lets you
place the page number just about anywhere on the page and in a variety of
fun and interesting formats.
Start your page numbering odyssey thus:
1. In the Insert tab’s Header & Footer area, click the Page Number com-
mand button.
A menu drops down, listing various page-numbering options. The first
three are locations: Top of Page, Bottom of Page, and Page Margins or
the sides of the page.
2. Choose where to place the page numbers.
I want my page numbers on the bottom of the page, so I regularly
choose the Bottom of Page option.
3. Pluck a page-numbering style from the scrolling list.
There are oodles of samples, so don’t cut yourself short by not scrolling
through the menu. You can even choose those famous
page X of Y
formats.
In Print Layout view, you can see the page numbers. In Draft view, they
remain hidden. (Use Print Layout or Print Preview to see them.) Dutifully,
Word numbers each page in your document, starting with 1 for the first page,
up to however many pages long the thing grows.
Delete a page? Word renumbers for you.
Insert a page? Word renumbers for you.
As long as you insert the page number per the preceding steps, Word handles
everything.
Headers and footers are parts of a page that you can format with all
sorts of interesting things, including your own page number style or
even page numbers on both the top
and bottom of the page. Refer to
Chapter 15 for details.
To change the page number format, simply choose a new one from the
Page Number menu.
190
Part III: Formatting
20_036583 ch14.qxp 11/16/06 12:49 PM Page 190
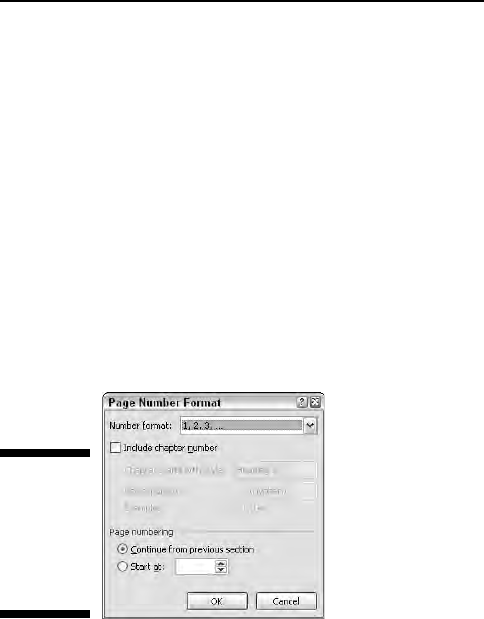
Starting off with a different page number
You and I know that the first page of a document is really page 1, but Word
doesn’t care. It lets you start numbering your document at whatever page
number you want. If you want to start numbering Chapter 2 at page 47, you
can do so, if you follow these instructions:
1. Click the Insert tab.
2. In the Header & Footer area, choose Page Number
➪Format Page
Numbers.
The Page Number Format dialog box materializes, as shown in
Figure 14-5.
3. Click the Start At radio button and type the beginning page number in
the box.
4. Click OK to close the Page Number Format dialog box.
Word starts numbering your document at the specified page number. So, if
you enter 47 in Step 3, the first page of your document is now page 47, the
next page is 48, and so on.
When you want the page number to jump in the middle of your document,
say, from page 5 to page 16 or (more likely) from page
iv to page 1, you need
to use sections to divide the document. You can start page numbering over
again, and at any number or in a new section. See Chapter 15 for more infor-
mation on sections.
Figure 14-5:
More
control
over page
numbers is
given here.
191
Chapter 14: Formatting Pages
20_036583 ch14.qxp 11/16/06 12:49 PM Page 191

Numbering with Roman numerals
When the urge hits you to regress a few centuries and use Roman numerals
to tally a document’s pages, Word is happy to oblige. Summon the Page
Number Format dialog box (refer to Figure 14-5) per Steps 1 and 2 in the pre-
ceding section. Simply choose the style you want from the Number Format
drop-down list.
Removing page numbers
To strip out page numbers you’ve inserted into your document, choose the
Remove Page Numbers command from the Page Number menu (in the Header
& Footer group on the Insert tab).
The Remove Page Numbers command rids your document of only those page
numbers you’ve inserted by using the Page Number menu. If you’ve manually
added a page number in a header or footer, you must manually delete it. See
Chapter 15.
New Pages from Nowhere
As you type your document, Word keeps adding new, blank pages for you to
write on. These pages are appended to the end of the document, so even if
you’re typing in the midst of some chapter, the extra pages keep appearing so
that no text is lost and nothing falls off the edge. That’s all normal and good.
For those times when you need to stick a blank page in the middle of a docu-
ment, Word provides two interesting commands. This section explains things.
Starting afresh on a new, blank page
To start typing on a new page in your document, you need to insert a manual
page break, also called a
hard page break. The simplest way to do this is to
press the Ctrl+Enter key combination. Word then begins a new page On That
Very Spot. All text before the insertion pointer is on the previous page, and
all text afterward is on a new page.
You can also insert a hard page break by choosing the Page Break command
from the Pages group on the Insert tab.
192
Part III: Formatting
20_036583 ch14.qxp 11/16/06 12:49 PM Page 192
In Print Layout view, a hard page break looks like any other page break.
The only way to know the difference is to switch to Draft view and use the
Show/Hide command. In Draft view, the words
Page Break appear before the
break in your document. That’s your clue that you have a hard page break.
Keep these points in mind when you’re dealing with hard page breaks:
Never, never, never start a new page by pressing the Enter key over and
over until a new page pops up. That’s just leads to trouble later as you
edit your document.
Pressing Ctrl+Enter inserts a hard page-break character in your document.
That character stays there, always creating a hard page break no matter
how much you edit the text on previous pages.
You can delete a hard page break by pressing the Backspace or Delete
key. If you do this accidentally, just press Ctrl+Enter again or press
Ctrl+Z to undelete.
If you set hard page breaks, remember to use Print Preview to look at
your document before you print it. Sometimes, the process of editing
moves text around, making the hard page breaks unnecessary and awk-
ward. Refer to Chapter 10 for more information on the Print Preview
command.
The keyboard shortcut for the Show/Hide command is Ctrl+Shift+8.
You can also use the Show/Hide command button in the Home tab’s
Paragraph group.
You can also insert a hard page break by choosing Breaks➪Page from
the Page Setup group. Remember that this command is on the Page
Layout tab, not on the Insert tab.
Don’t fall into the trap of using hard page breaks to adjust your page
numbering. You can use the power of the computer to alter your page
numbers without having to mess with page formatting. See the section
“Where to stick the page number?” earlier in this chapter.
Inserting a whole, blank page
To shove a fresh, blank sheet of paper into the middle of a document, you can
use the Blank Page command button, found in the Insert tab’s Pages group.
What that command does is to insert
two hard page breaks into a document,
which creates a blank sheet of paper.
193
Chapter 14: Formatting Pages
20_036583 ch14.qxp 11/16/06 12:49 PM Page 193
I don’t recommend using this command unless you really need a blank page
in the midst of a document. That is, you never plan on writing on that page.
Putting graphics on the page is fine. Adding a table, or any other one-page
element to the blank page is also fine. But because the blank page is inserted
by using two hard page breaks, writing on the page leads to formatting woes
down the line.
Remember that Word automatically adds new pages as you write. So don’t
use the Blank Page command unless you truly want a
blank page in your
document.
Page Froufrou
Page formatting happens above your text, below your text, to the sides of
your text, and even
behind your text. This section demonstrates the things
you can format on a page that appear behind your words.
Color your page
To color your document’s pages, use the Page Color command button from
the Page Layout tab’s Page Background group. Clicking that button displays
a menu full of colors, some based on the document theme and some based
on standard colors, or you can choose your own color by choosing the
More Colors menu command.
Gradients, or multiple colors, can be chosen
by using the Fill Effects menu command.
194
Part III: Formatting
Protecting the widows and orphans
Occasionally, a paragraph of text may be split
between two pages in an awkward way. A
single line from a paragraph on the bottom of
one page is an
orphan
. A single line from a para-
graph ending at the top of a page is a
widow
.
Word offers orphan and widow protection,
which you can apply to paragraphs of text to
prevent that lone line from appearing at the top
or bottom of a page. The feature is Widow/
Orphan control.
Normally, Widow/Orphan control is turned on.
But you can disable it and set other options for
keeping paragraphs of text on one page or
another. This magic is done in the Paragraph
dialog box, on the Line and Page Breaks tab:
Press Alt+H, P, G to summon the Paragraph
dialog box, and then click the Page Breaks tab.
The options you set there are applied to the cur-
rent paragraph, or to any selected paragraph.
Click OK when you finish making your settings.
20_036583 ch14.qxp 11/16/06 12:49 PM Page 194

* * * Free Preview End * * *
Purchase Required To Gain Total Access
Visit www.landlordleaseforms.com To Purchase Landlord Lease Forms Package